
SpamSieve Manual
This manual is also available in SpamSieve’s Help menu, as a PDF (20.7 MB), and as multi-page online help. For other languages, please see Google Translate.
Contents
- 1 Introduction
- 2 Installing and Updating
- 3 Using SpamSieve
- 3.1 Setting Up Apple Mail
- 3.2 Setting Up Apple Mail (Plug-In)
- 3.3 Setting Up Airmail
- 3.4 Setting Up GyazMail
- 3.5 Setting Up MailMate
- 3.6 Setting Up MailMaven
- 3.7 Setting Up Outlook
- 3.8 Setting Up Outlook (Large Inboxes)
- 3.9 Setting Up Gmail, iCloud, Yahoo, AOL, or Other Web Mail
- 3.10 Setting Up Other Mail Clients
- 3.11 Do an Initial Training
- 3.12 Correct All Mistakes
- 3.13 SpamSieve and Multiple Macs
- 3.14 iPhone Spam Filtering
- 4 Customization
- 4.1 Allowlisting Previous Recipients
- 4.2 Automatically Deleting Old Spam Messages
- 4.3 Drone Setup and Remote Training
- 4.4 Customizing Using AppleScript
- 4.5 Apple Mail Customization
- 4.5.1 Spam Message Colors in Apple Mail
- 4.5.2 Color Rules in Apple Mail
- 4.5.3 Processing Messages Before SpamSieve
- 4.5.4 Setting the Junk Mailbox in Apple Mail
- 4.5.5 Only Filtering Certain Accounts
- 4.5.6 Rescuing Good Messages Caught By a Server Filter
- 4.5.7 Filtering Spam During Power Nap
- 4.5.8 Keeping Spam Messages Out of Gmail’s Archive
- 4.6 Outlook Customization
- 4.7 Hiding Special Gmail Mailboxes From IMAP
- 5 Menus
- 6 Settings
- 6.1 Settings ‣ Filters
- 6.1.1 Use corpus messages
- 6.1.2 Use macOS Contacts
- 6.1.3 Catch spam sent from my own addresses
- 6.1.4 Use Outlook/Entourage contacts
- 6.1.5 Use SpamSieve allowlist
- 6.1.6 Use SpamSieve blocklist
- 6.1.7 Use Bayesian classifier
- 6.1.8 Train SpamSieve allowlist
- 6.1.9 Train SpamSieve blocklist
- 6.1.10 Train Bayesian classifier
- 6.1.11 Auto-train as needed
- 6.2 Settings ‣ Notification
- 6.3 Settings ‣ Apple Mail
- 6.4 Settings ‣ Outlook
- 6.5 Settings ‣ Other Clients
- 6.6 Settings ‣ Storage
- 6.7 Settings ‣ Advanced
- 6.8 Esoteric Preferences
- 6.1 Settings ‣ Filters
- 7 Frequently Asked Questions (FAQ)
- 7.1 Why is SpamSieve not catching my spam?
- 7.1.1 Checking the Apple Mail Setup
- 7.1.2 Checking the Apple Mail Setup (Plug-In)
- 7.1.3 Checking the Airmail Setup
- 7.1.4 Checking the Entourage Setup
- 7.1.5 Checking the GyazMail Setup
- 7.1.6 Checking the MailMate Setup
- 7.1.7 Checking the MailMaven Setup
- 7.1.8 Checking the Mailsmith Setup
- 7.1.9 Checking the Outlook 2011 Setup
- 7.1.10 Checking the Outlook Setup
- 7.1.11 Checking the Outlook Setup (Large Inboxes)
- 7.1.12 Checking the Postbox Setup
- 7.1.13 Checking the PowerMail Setup
- 7.1.14 Checking the Training
- 7.1.15 Fixing Uncorrected Mistakes
- 7.2 What information should I include when I report a problem?
- 7.3 Why is every message going to the Spam mailbox?
- 7.4 Why do good messages keep going to the Junk or Spam mailbox?
- 7.5 Can I delete spam messages that are in the Junk mailbox?
- 7.6 How should I configure the junk filter on my mail server?
- 7.6.1 Turning Off the AOL Spam Filter
- 7.6.2 Turning Off the DreamHost Spam Filter
- 7.6.3 Turning Off the Fastmail Spam Filter
- 7.6.4 Turning Off the Gmail Spam Filter
- 7.6.5 Turning Off the GoDaddy Spam Filter
- 7.6.6 Turning Off the HostGator Spam Filter
- 7.6.7 Turning Off the Hover Spam Filter
- 7.6.8 Turning Off the iCloud Spam Filter
- 7.6.9 Turning Off Microsoft Spam Filters
- 7.6.10 Turning Off the Proton Mail Spam Filter
- 7.6.11 Turning Off the Yahoo Mail Spam Filter
- 7.6.12 Turning Off Other Spam Filters
- 7.7 Why does a message disappear or go back to the Junk mailbox after I train it as good?
- 7.8 Does SpamSieve protect me from viruses?
- 7.9 Does SpamSieve stop Web bugs?
- 7.10 Does SpamSieve bounce spam messages back to the sender?
- 7.11 Does SpamSieve prevent me from receiving messages?
- 7.12 SpamSieve Application Questions
- 7.12.1 Where is SpamSieve’s menu bar icon?
- 7.12.2 Why doesn’t my serial number work?
- 7.12.3 Should I download SpamSieve from this free site?
- 7.12.4 How can I copy my training data to another machine?
- 7.12.5 Does SpamSieve launch automatically?
- 7.12.6 Can I use SpamSieve with more than one mail program at a time?
- 7.12.7 How can I open the Library folder?
- 7.13 Apple Mail–Specific Questions
- 7.13.1 If Apple Mail Is Running Slowly
- 7.13.2 If Apple Mail Doesn’t Check for New Messages Automatically
- 7.13.3 If Apple Mail Shows an Error When Moving Messages
- 7.13.4 Duplicate Apple Mail Accounts
- 7.13.5 Why are Apple Mail inbox messages not being processed?
- 7.13.6 Why are other Apple Mail mailboxes not being processed?
- 7.13.7 Why don’t I see the SpamSieve commands in Apple Mail’s Message menu?
- 7.13.8 Why do good messages move to the wrong inbox when trained in Apple Mail?
- 7.13.9 Why do I see spam messages in my “Unread” smart mailbox in Apple Mail?
- 7.13.10 Why does the Spam mailbox in Apple Mail appear empty even though there’s a number beside it?
- 7.13.11 What can I do if my Spam or Junk mailbox in Apple Mail disappeared?
- 7.13.12 Why are messages marked as spam in Apple Mail but not moved?
- 7.13.13 Why do Apple Mail messages bounce back to the inbox after I train them as spam?
- 7.13.14 How can I rebuild Apple Mail’s database?
- 7.13.15 How can I reset Apple Mail’s junk database?
- 7.13.16 Can other Apple Mail plug-ins cause problems with SpamSieve?
- 7.13.17 What can I do if Apple Mail is crashing?
- 7.1 Why is SpamSieve not catching my spam?
- 8 Legacy Mail Programs
- 9 Legal Stuff
- 10 Version History
1 Introduction
1.1 What Is SpamSieve?
SpamSieve is a Mac app that filters out unsolicited mass mailings, commonly known as “spam.” Previously, most people just ignored spam messages or created simple rules in their e-mail programs to filter them out. In recent years, the spam problem has gotten worse. Today’s spam is harder to detect, and there is more of it. Without the assistance of a good spam filter, you’ll waste valuable time sorting through your inbox manually.
SpamSieve gives you back your inbox by bringing powerful Bayesian spam filtering to Mac e-mail programs. It’s quick and easy to control SpamSieve from within your mail program, and you can customize how it interacts with the rest of your message sorting rules.
SpamSieve learns what your spam looks like, so it can block nearly all of it. It looks at your address book and learns what your good messages look like, so it won’t confuse them with spam. Other spam filters get worse over time as spammers adapt to their rules; SpamSieve actually gets better over time as it adapts its filtering to your mail.
SpamSieve doesn’t delete any messages—it only moves them to a different folder in your e-mail program—so you’ll never lose any mail. By learning from the very messages that you receive, SpamSieve is able to block nearly all of your junk mail, without putting your good messages in the spam mailbox. SpamSieve works with any number of mail accounts, of whatever types are supported by your e-mail software (e.g. POP, IMAP, Exchange, Hotmail, AOL). You can even use it with multiple e-mail programs at the same time, for instance if you use one for work mail and one for personal mail.
1.2 Identifying Spam
SpamSieve uses a variety of methods to identify spam messages, but by far the most important is a statistical technique known as Bayesian analysis. For a more in-depth treatment of this technique applied to spam, see this article by Paul Graham and the papers it references. Bayesian spam filtering is highly accurate and adapts to new types of spam messages “in the field.”
First, you train SpamSieve with examples of your good mail and your spam. When you receive a new message, SpamSieve looks at how often its words occur in spam messages vs. good messages. Lots of spammy words mean that the message is probably spam. However, the presence of words that are common in your normal e-mail but rare in spam messages can tip the scale the other way. This “fuzzy” approach allows SpamSieve to catch nearly every spam message yet produce very few false positives. (A false positive is a good message mistakenly identified as spam. Most users consider false positives to be much worse than false negatives—spam messages that the user has to see.)
Because you train SpamSieve with your own mail, you have full control. If SpamSieve makes a mistake, you can train it with the message in question so that in the future it will do better. Further, since spammers don’t have access to the messages you trained SpamSieve with, they have no way of knowing how to change their messages to get through. Whereas other spam filters become less effective as spammers figure out their rules, SpamSieve becomes more effective over time because it has a larger corpus of your messages to work from.
1.3 Integration
Separate from the issue of identifying spam messages is the issue of how to prevent you from having to deal with them. There are basically four kinds of anti-spam software for doing this:
- Challenge-Response Systems
- This software requires people who send you mail to prove that they are human, and not an automated spam-sending program. After sending you a message, they get a reply asking them to complete a task that is easy for humans but hard for computers. Only then is the message passed on to you. This system is a nuisance for senders, delays your reception of the mail, and becomes impractical when sending messages to a group of people. Also, challenge response systems cannot deal with spoofed senders or legitimate messages that are sent by programs.
- Server-Side Filters
- This software runs on mail servers and often filters out spam before you ever see it. This means that you do not have to download the spam messages that it catches. However, some spam messages may still get through, and, unless the filter is perfect, a few legitimate messages will not. These could be important messages, and you will never know that you lost them.
- Server-Side Taggers
- This variant of server-side filters does not delete possible spam messages before you download them. Instead, it moves them to a separate IMAP or Exchange mailbox. This eliminates the major disadvantage of server-side filters—lost messages—however this type of filter is generally not as accurate as the ones below, because it generally does not adapt to your own mail.
- Client-Side Integrated
- This category includes SpamSieve and Apple Mail’s built-in spam filter. Suspected spam messages are moved to a separate mailbox, which you can quickly scan at your leisure to make sure there are no false positives. The e-mail program downloads messages directly from the mail server, thus avoiding the problems of client-side filters and proxies. You can train the anti-spam software to improve its accuracy from inside your e-mail program, and accuracy is higher than with server-side filters because the anti-spam software can learn from the messages that you receive.
1.4 Main Features
- Powerful Bayesian spam filtering results in high accuracy and almost no false positives. It adapts to the mail that you receive to get even better with time. Some other e-mail programs include Bayesian filters, but SpamSieve is more accurate.
- Integrates with your e-mail program for a superior user experience. Plus, you get the same great filtering if you ever switch e-mail programs or use more than one at a time.
- SpamSieve works with any mail provider/host. It filters all your mail accounts. There is no extra charge for additional addresses or devices.
- SpamSieve running on your Mac can keep the spam off your iPhone/iPad, and you can even train SpamSieve from afar.
- Colors show how spammy each message is, so you can quickly focus on the borderline ones if you want to check SpamSieve’s work.
- Integrates with the macOS Contacts app so that messages from friends and colleagues are never marked as spam.
- Automatically maintains a blocklist so that it can instantly adapt to spam messages sent from particular addresses, and catch 100% of them.
- Automatically maintains an allowlist to guarantee that messages from particular senders or mailing lists are never marked as spam, without cluttering your address book with these addresses.
- You can customize the allowlist and blocklist, adding sophisticated rules that match various message headers, or the message body. The rules can match text in a variety of ways, including using regular expressions.
- Many spammers encode the contents of their messages so that filters cannot see the incriminating words they contain. SpamSieve can decode and look inside these messages. Optionally it can mark them all as spam, on the theory that legitimate senders do not try to obscure their messages.
- SpamSieve keeps track of how accurate it is, how many good and spam messages you receive, and how these numbers change over time.
- Turn off new-mail notification in your e-mail program, and let SpamSieve notify you only when you receive non-spam messages.
- The Corpus window and Log let you see how each spam message was caught.
- Unlike server-based spam filtering services, your mail data stays on your own Mac, so your privacy is preserved.
- SpamSieve supports AppleScript, so you can connect it to additional apps and fully integrate it into a custom workflow.
1.5 Why Choose SpamSieve?
Given that e-mail programs such as Apple Mail include their own integrated spam filters, you may be wondering why you should consider SpamSieve. The answer is simple: SpamSieve’s higher accuracy will save you time. You’ll spend less time deleting spam messages from your inbox; in fact, SpamSieve gets rid of spam so effortlessly that you may even forget that you have it installed. Secondly, SpamSieve will give you peace of mind because it is far less likely to accidentally put good messages into the spam mailbox. No more worrying about missing an important work e-mail, job lead, or message from a friend.
The same is true if your mail provider, such as Gmail, already offers a server-side junk filter. Lots of SpamSieve customers have Gmail, but they use SpamSieve in addition to or instead of Gmail’s spam filter because it is missing spam messages or incorrectly catching their good messages. Even if Gmail is catching 95% or 99.0% for you, that still leaves quite a bit of room to do better (unless you don’t receive much mail at all). And for good messages, SpamSieve can provide an assurance that certain addresses (e.g. from Contacts) will never go to the spam mailbox.
Read what the press and other SpamSieve users have to say about it. Still not convinced? That’s OK. You can try SpamSieve free for 30 days.
2 Installing and Updating
2.1 Requirements
SpamSieve works with macOS 10.13 and later, as well as pre-release versions of macOS. For older versions of macOS, previous versions of SpamSieve are available.
Supported Mac Mail Programs
SpamSieve is designed to work with the following e-mail programs that are currently under development:
- Apple Mail from macOS 10.13 and later.
- Airmail 1.3.1 (223) and later. Versions 3.6.3 through 3.6.41 are not compatible with SpamSieve on macOS 10.14, but version 3.6.42 and later are.
- GyazMail 1.2.0 (1.5.8 or later recommended).
- MailMate 1.1.2 and later from Freron Software.
- MailMaven 1.0 and later from SmallCubed.
- Outlook from Microsoft Office 2011 (14.x) and later, including Outlook 15.x and 16.x from Office 365. With recent versions of Outlook, Outlook needs to be running with the “New Outlook” mode turned off, as described in the Turning Off New Outlook section. This is only possible when using the paid version of Outlook. See also the End of Support for Legacy Outlook section. Outlook Live and other browser-based mail are not supported, except via the Mac clients listed here.
iOS Mail and Web Mail
SpamSieve does not run on iOS, but you can use it together with your Mac to filter mail on your iPhone, iPad, or iPod touch. This is described in the iPhone Spam Filtering section.
SpamSieve works with Web mail providers via Apple Mail. Please see the Setting up Gmail, iCloud, Yahoo, AOL, or Other Web Mail section.
Supported Legacy Mac Mail Programs
SpamSieve also works with these legacy e-mail programs:
- Entourage v.X (2001) and later (Entourage 2004 or 2008 recommended) from Microsoft.
- MailForge 2.0.4 and later from Macsimize Software (formerly from Infinity Data Systems).
- Mailsmith 2.3.1 and later from Stickshift Software. (By applying this workaround you can use SpamSieve with Mailsmith 2.1.5.)
- Postbox 2.0 through 5.x from Postbox, Inc. Postbox 6 and 7 are not currently compatible. Postbox Express and the (discontinued) Mac App Store version of Postbox are not compatible.
- PowerMail 5.0 and later (6.x recommended) from CTM Development. PowerMail only supports SpamSieve with POP accounts.
Multiple Accounts/Addresses
SpamSieve filters all of your mail accounts. There is no extra charge for additional addresses.
Multiple Mail Programs
You can freely switch between mail programs or even use multiple mail programs at once. SpamSieve will share its training data and statistics among them.
Unsupported Mac Mail Programs
SpamSieve does not have direct integration with the following mail programs. You can, however, still use them with SpamSieve as described in the Setting Up Other Mail Clients section.
- Canary Mail is not sufficiently extensible for us to connect it with SpamSieve. We have offered to help the developers add support for SpamSieve, and they have expressed interest. Sending them feedback (click the blue-and-white icon at the bottom-right) will help them prioritize this feature.
- MailPlane is not sufficiently extensible for us to connect it with SpamSieve. Please contact the developers and tell them that you would like to use SpamSieve with it.
- Mail Pilot is not sufficiently extensible for us to connect it with SpamSieve. We have offered to help the Mail Pilot developers add support for SpamSieve, and it’s on their to-do list. Sending them feedback will help them prioritize this feature.
- Newton is not sufficiently extensible for us to connect it with SpamSieve. Please contact the developers and tell them that you would like to use SpamSieve with it.
- Spark is not sufficiently extensible for us to connect it with SpamSieve. We have offered to help the Spark developers add support for SpamSieve, and they have expressed interest. Sending them feedback will help them prioritize this feature.
- Sparrow is not sufficiently extensible for us to connect it with SpamSieve. The Sparrow developers were interested in adding support for SpamSieve, but the product has since been acquired by Google and seems to no longer be under development.
- Thunderbird. Current versions of Thunderbird have removed support for compiled plug-ins. However, SpamSieve does work with Postbox, which is an enhanced version of Thunderbird.
- Unibox is not sufficiently extensible for us to connect it with SpamSieve. We have offered to help the Unibox developers add support for SpamSieve. Sending them feedback will help them prioritize this feature.
Mail Program Differences
SpamSieve works roughly the same way with each mail program. This section describes features that are only available in certain mail programs.
Auto-Deletion
These mail programs support automatically deleting old Spam messages: Apple Mail, Entourage, Outlook (not Outlook 365), Postbox.
Complete Message Access
These mail programs allow for more accurate filtering because they let SpamSieve access the entire raw source of each message, including the attachments: Apple Mail, Airmail, Entourage, GyazMail, MailMate, Mailsmith, Outlook.
Custom Rules
These mail programs let you control SpamSieve through a regular rule, so that you can determine how it interacts with your other rules: Apple Mail, Entourage, GyazMail, MailMate, Mailsmith, Outlook 2011, PowerMail.
Drone Support
These mail programs work with the setup described in Drone Setup and Remote Training: Apple Mail, MailMate, Outlook 2011 (not Outlook 365, 2016, or 2019).
Refiltering Messages
These mail programs let you manually re-apply SpamSieve to old messages: Apple Mail, Entourage, GyazMail, MailMate, Mailsmith, Outlook, Postbox, PowerMail.
Spam Levels
These mail programs can display spam messages in different colors or with a numeric score to indicate their level of spamminess: Apple Mail, Entourage, MailMate, Mailsmith, Outlook, PowerMail.
2.2 Installing SpamSieve
If you have not already done so, go to the SpamSieve Web site and click the Download (Free Trial) button. (The trial and full version of SpamSieve are the same file.) After it finishes downloading, double-click the SpamSieve-3.3.dmg file.
Drag the SpamSieve icon onto the Applications folder. (It is important that SpamSieve be installed directly in the Applications folder—not in another folder, or in a subfolder—because otherwise your mail program might not be able to find it.)
Double-click the Applications folder to open it.
Double-click the SpamSieve icon to launch it. (If macOS won’t launch the app because it says that it’s damaged, please see the Download Fixer page.)
Eject the SpamSieve-3.3 icon.
Next, you must follow the instructions in the Using SpamSieve section in order to set up your mail program to use SpamSieve.
2.3 Updating From a Previous Version
There are two ways to update to the latest version of SpamSieve:
Automatic Updating
- Launch your old version of SpamSieve.
- Normally, SpamSieve will automatically check for updates and detect
that a new version is available. If you have turned that feature off or
don’t want to wait for the automatic check:
- Choose Software Update… from the SpamSieve menu. If SpamSieve’s Dock icon is hidden, you can access the Software Update… command via the SpamSieve menu bar icon.
- Click the Check Now button.
- Click the Download & Install button and follow the on-screen instructions.
- You may be asked for an administrator password to ensure that incorrect file permissions on your Mac do not prevent the update from completing, leaving your Mac in an inconsistent state. The username and password for the automatic update are the ones for installers and logging into your Mac. They’re not related to SpamSieve. If you don’t know your password, you can reset it or update SpamSieve by following the “Manual Updating” instructions below.
Manual Updating
Go to the SpamSieve Web site and click the Download (Free Trial) button.
Quit SpamSieve and your mail program.
Replace the old SpamSieve application file with the new one. That is, if SpamSieve is installed in the Applications folder, drag the new SpamSieve application icon into the Applications folder and click Replace when the Finder asks if you want to overwrite the old version. (If macOS won’t launch the app because it says that it’s damaged, please see the Download Fixer page.)
Note: If you get an error saying that the file is locked or you do not have sufficient privileges, drag the old SpamSieve to the trash and empty it, and then drag the new one into the Applications folder.
Launch SpamSieve and your mail program.
Updating From SpamSieve 2 to SpamSieve 3
First, download and install the SpamSieve 3 app, as described above.

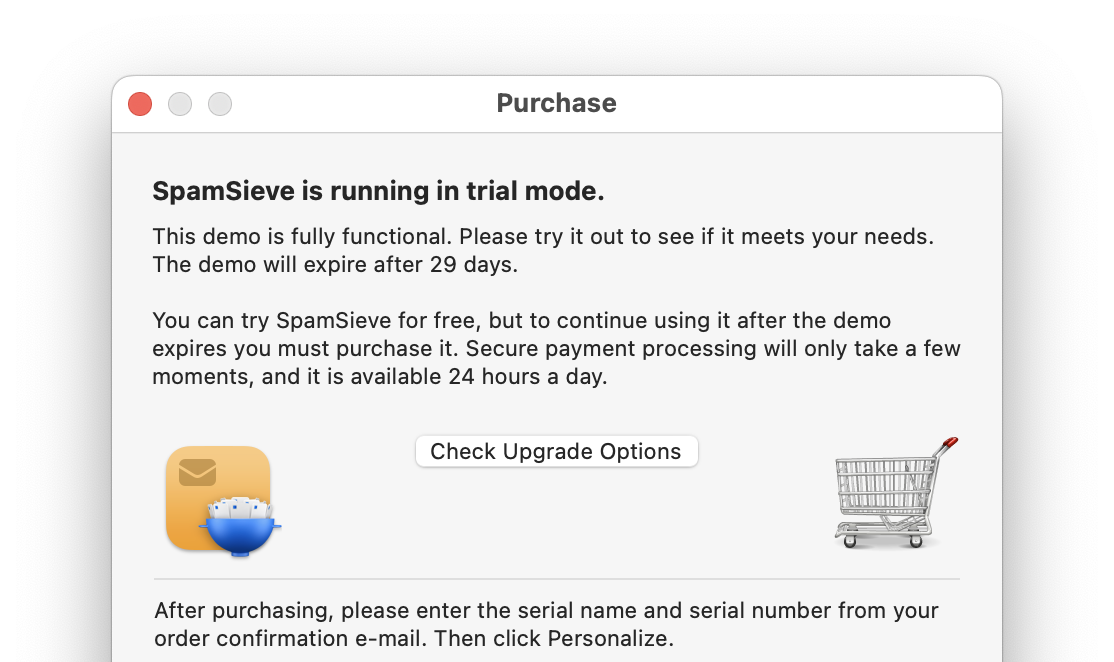
If you had purchased SpamSieve 2, SpamSieve 3 will start out in trial mode, and you can click the Check Upgrade Options button in the Purchase window to take you to the store and automatically apply the upgrade discount.
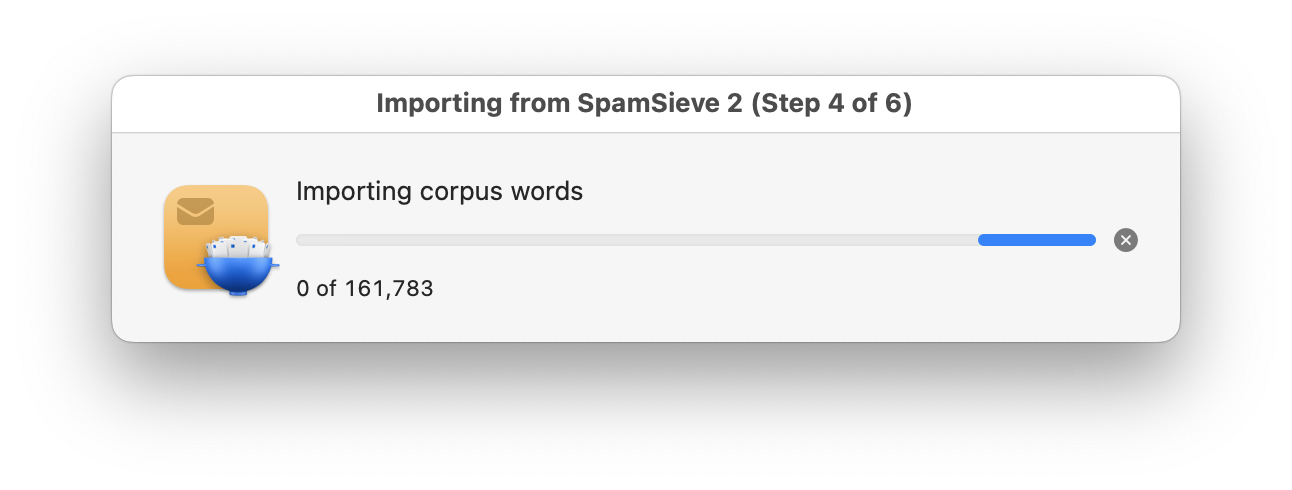
The first time you launch SpamSieve 3, it will offer to import all your SpamSieve 2 data:
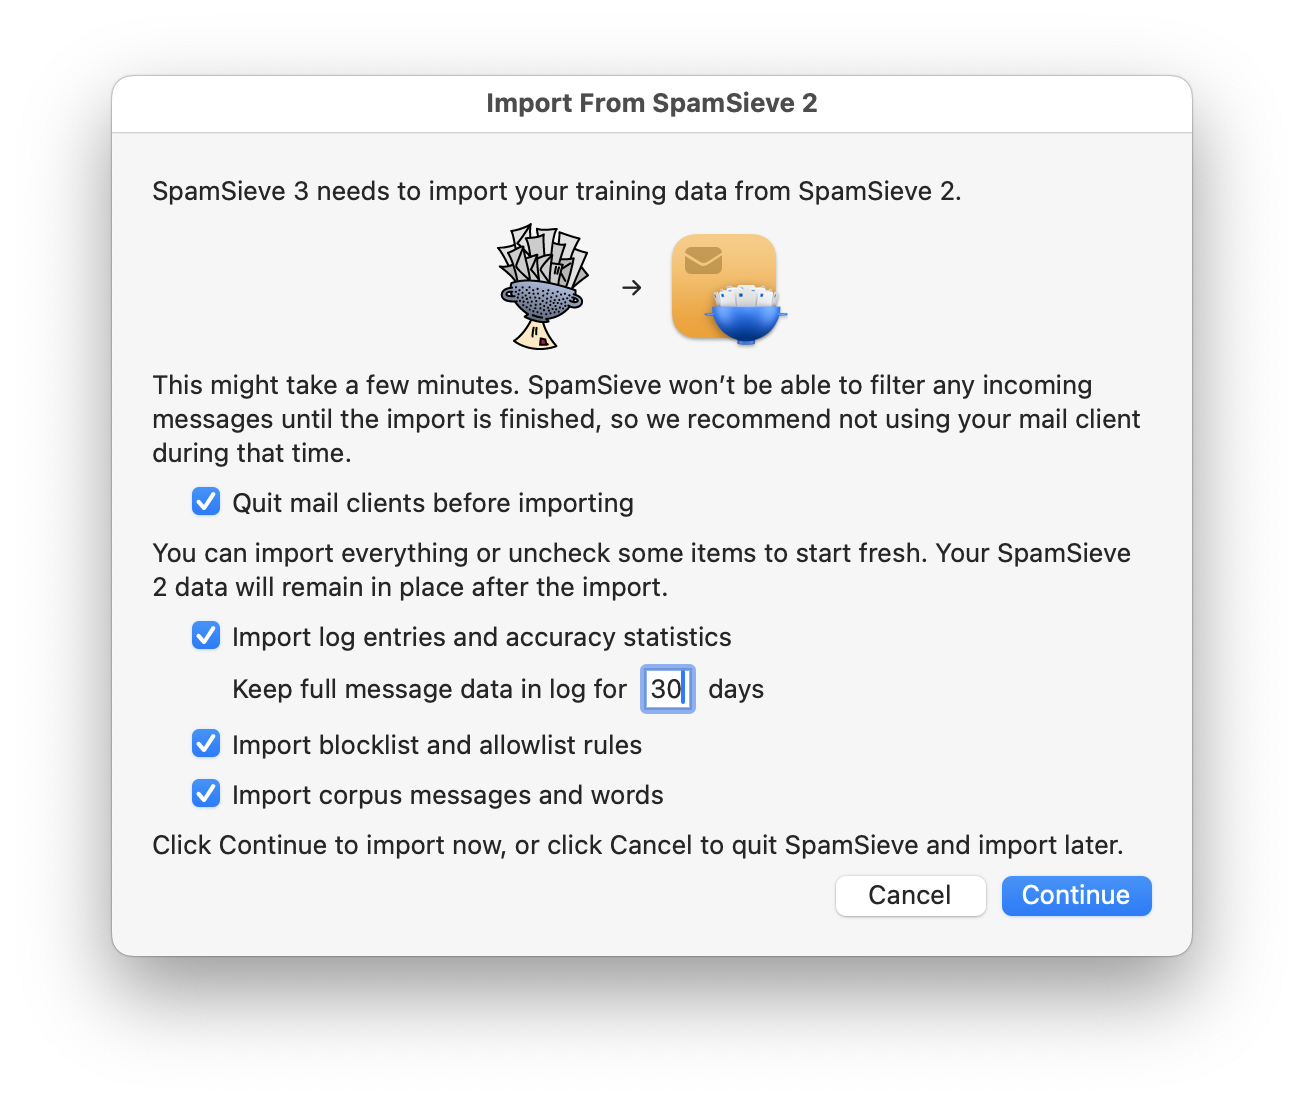
This may take a few minutes depending on how many messages you had trained and filtered:
Repeated Update Prompts
If SpamSieve keeps telling you that a new version is available, even after you’ve updated, you may still have the old version somewhere on your Mac. There should only be one copy of SpamSieve installed, and it should be stored directly in your Applications folder. If you see a window saying that you need to update SpamSieve, you can Command-click on the SpamSieve icon in the Dock. This will reveal the location of the SpamSieve.app file in the Finder so that you can see where the old version is and delete it (after quitting SpamSieve).
2.4 Reinstalling a Fresh Copy
If your copy of SpamSieve is damaged, you may need to download and install a fresh copy.
- If you are able to launch SpamSieve, you can ask it to reinstall itself. To do this, follow the Automatic Updating instructions (in the Updating From a Previous Version section) but hold down the Option key when you click the Check Now button.
- If SpamSieve won’t launch, follow the Manual Updating instructions in the Updating From a Previous Version section.
- If you’ve uninstalled SpamSieve, you can always get it back by going to the SpamSieve Web site and clicking the Download (Free Trial) button. After installing it, you can enter your Serial Name and Serial Number into the Purchase… window to take it out of trial mode. If you can’t find your serial number, you can look it up online.
2.5 Uninstalling SpamSieve
Please Contact Us
If you are considering uninstalling SpamSieve because you’re having trouble using it or it doesn’t seem to meet your needs, please see this page or contact us at spamsieve@c-command.com. We’re happy to help get you up and running and always looking for suggestions for how to improve SpamSieve.
Temporarily Disabling SpamSieve
You can easily turn off SpamSieve if you don’t want your mail to be filtered for a while. For example, it can be helpful to disable spam filtering while you are troubleshooting your other mail rules.
- In SpamSieve’s Settings ‣ Apple Mail ‣ Setup window, select Disable spam filtering in Apple Mail.
- In SpamSieve’s Settings ‣ Outlook ‣ Setup window, select Disable spam filtering in Outlook.
- For other mail clients, see the settings within the mail client.
Fully Uninstalling SpamSieve
Disabling spam filtering (as described above) will remove most of SpamSieve’s helper files.
If you are using the Apple Mail plug-in, you can additionally go to the Settings ‣ Apple Mail ‣ Setup window in SpamSieve and click the Uninstall Plug-In… button. This will offer to delete the SpamSieve rule(s) in Mail for you. (Note: If you are using multiple Macs and wish to continue using SpamSieve on one of the others, you wouldn’t want the deletion to propagate through iCloud, so you should instead uncheck the rule rather than deleting it.)
If you are using Outlook, any SpamSieve rules that you had created in Outlook’s Tools ‣ Rules window.
To completely uninstall SpamSieve, drag the SpamSieve application file in your Applications folder to the trash.
Other Mail Clients
Airmail
Uncheck the Use SpamSieve checkbox in the Advanced section of the settings (described in Setting Up Airmail).
Entourage
The scripts are located in the Entourage Script Menu Items folder inside Microsoft User Data (which is probably in your Documents folder). Go to Entourage’s Tools menu and choose Junk E-mail Protection… (or Junk Mail Filter in Entourage v.X) and re-enable Entourage’s junk mail filter.
GyazMail
Delete the SpamSieve rule (described in Setting Up GyazMail).
MailMate
Uncheck SpamSieve (described in Setting Up MailMate).
Mailsmith
Uncheck Use SpamSieve (described in Setting Up Mailsmith).
Outlook 2011
Delete the SpamSieve script files that are located in the Outlook Script Menu Items folder inside Microsoft User Data (which is probably in your Documents folder).
Additional scripts are located in the folder:
/Users/<username>/Library/Application Support/Microsoft/Office/Outlook Script Menu Items/
See the How can I open the Library folder? section for how to get to this folder.
Postbox
Choose Add-ons from Postbox’s Tools menu. Click the remove button next to SpamSieve Postbox Plug-in.
PowerMail
Go to the Spam filter assistant (described in Setting Up PowerMail).
Removing SpamSieve’s Data Files
You can optionally delete SpamSieve’s data files, which are stored at:
/Users/<username>/Library/Application Support/SpamSieve
/Users/<username>/Library/Preferences/com.c-command.SpamSieve.plist
/Users/<username>/Library/Logs/SpamSieve/
See the How can I open the Library folder? section. If you delete these files, you will have to re-train SpamSieve if you reinstall it.
2.6 Security & Privacy Access
On macOS 10.14 and later, you need to tell the system if you want applications to be able to control other applications via automation or to access their data. For example:
- In order to train messages in Apple Mail (and to filter messages in other mailboxes), SpamSieve needs to be able to control Mail.
- When using the Apple Mail extension, SpamSieve needs full disk access to filter messages quickly and to access messages in large mailboxes.
- When using the Apple Mail plug-in, SpamSieve needs full disk access to install the plug-in for Apple Mail and to communicate with Mail. It also needs to control Mail to activate, deactivate, and uninstall the Apple Mail rule. The SpamSieveHelper app needs to control Mail and SpamSieve to train messages.
- In order to filter and train messages in Outlook, SpamSieve needs to be able to control Outlook.
- Airmail and MailMate need to control SpamSieve to send it messages to analyze.
- In order to allowlist messages from your Outlook or Entourage address books, SpamSieve needs to control those applications to ask them about your addresses.
- In order to flash a PowerMate when new messages arrive, SpamSieve needs to be able to control the PowerMate app.
2.6.1 Granting Full Disk Access
As discussed in the Security & Privacy Access section, SpamSieve needs Full Disk Access in order to fully function.
To Grant Full Disk Access on macOS 13 Ventura Through macOS Tahoe 26
Go to System Settings ‣ Privacy & Security ‣ Full Disk Access. (You can also click here to go directly to Full Disk Access.)
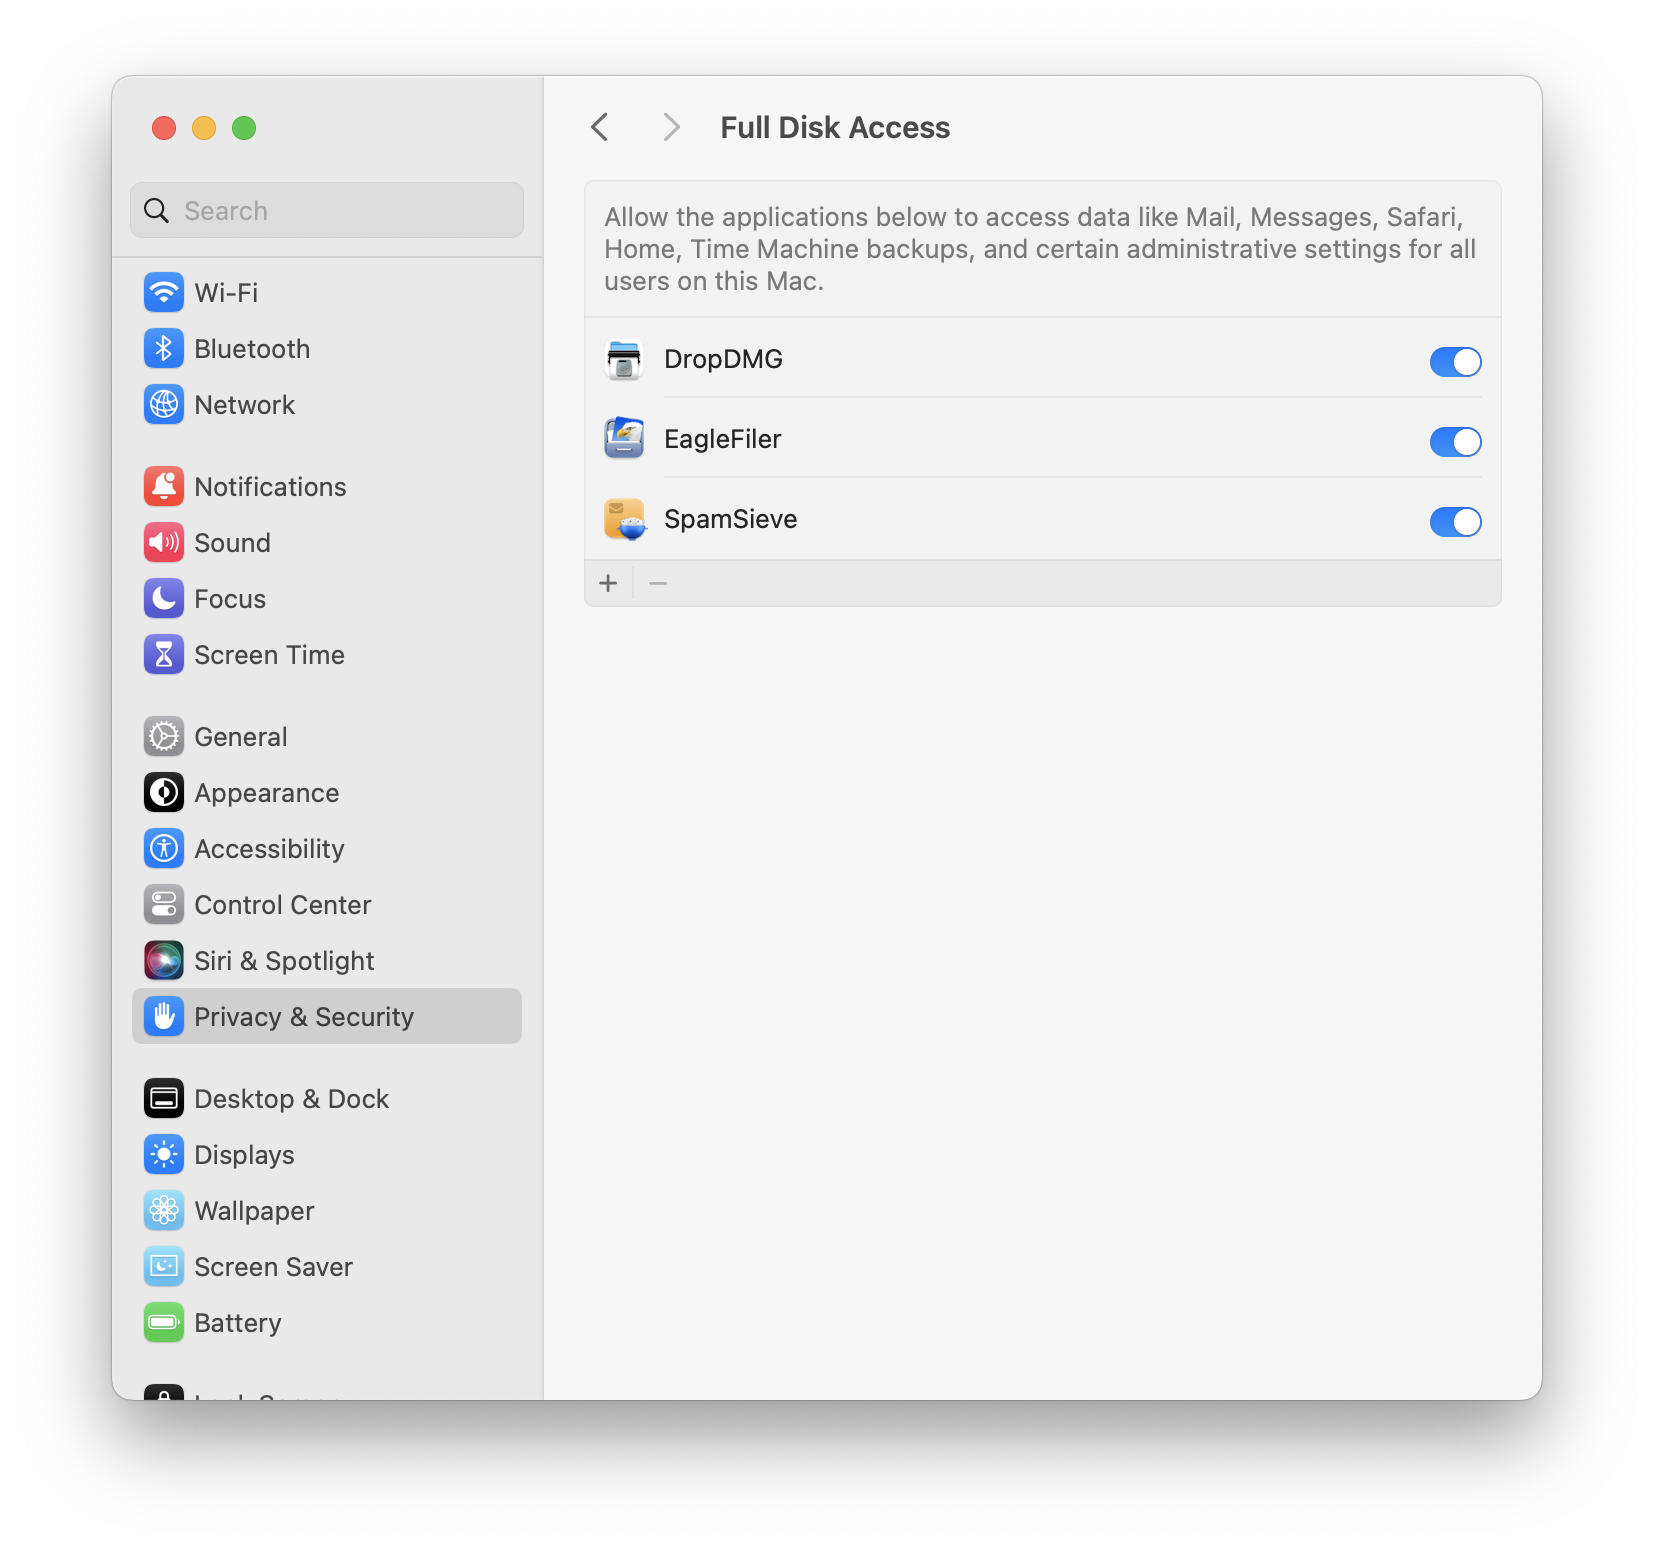
Click the + button indicated by the red arrow and choose SpamSieve from your Applications folder. Click Quit & Reopen if applicable. SpamSieve should now appear in the list as checked.
Double-click the SpamSieve icon to relaunch it if it is not already open.
To Grant Full Disk Access on macOS 10.14 Through macOS 12
Go to the Security & Privacy pane of System Preferences and click on the Privacy tab. Then scroll down and click on Full Disk Access. (You can also click here to go directly to Full Disk Access.)
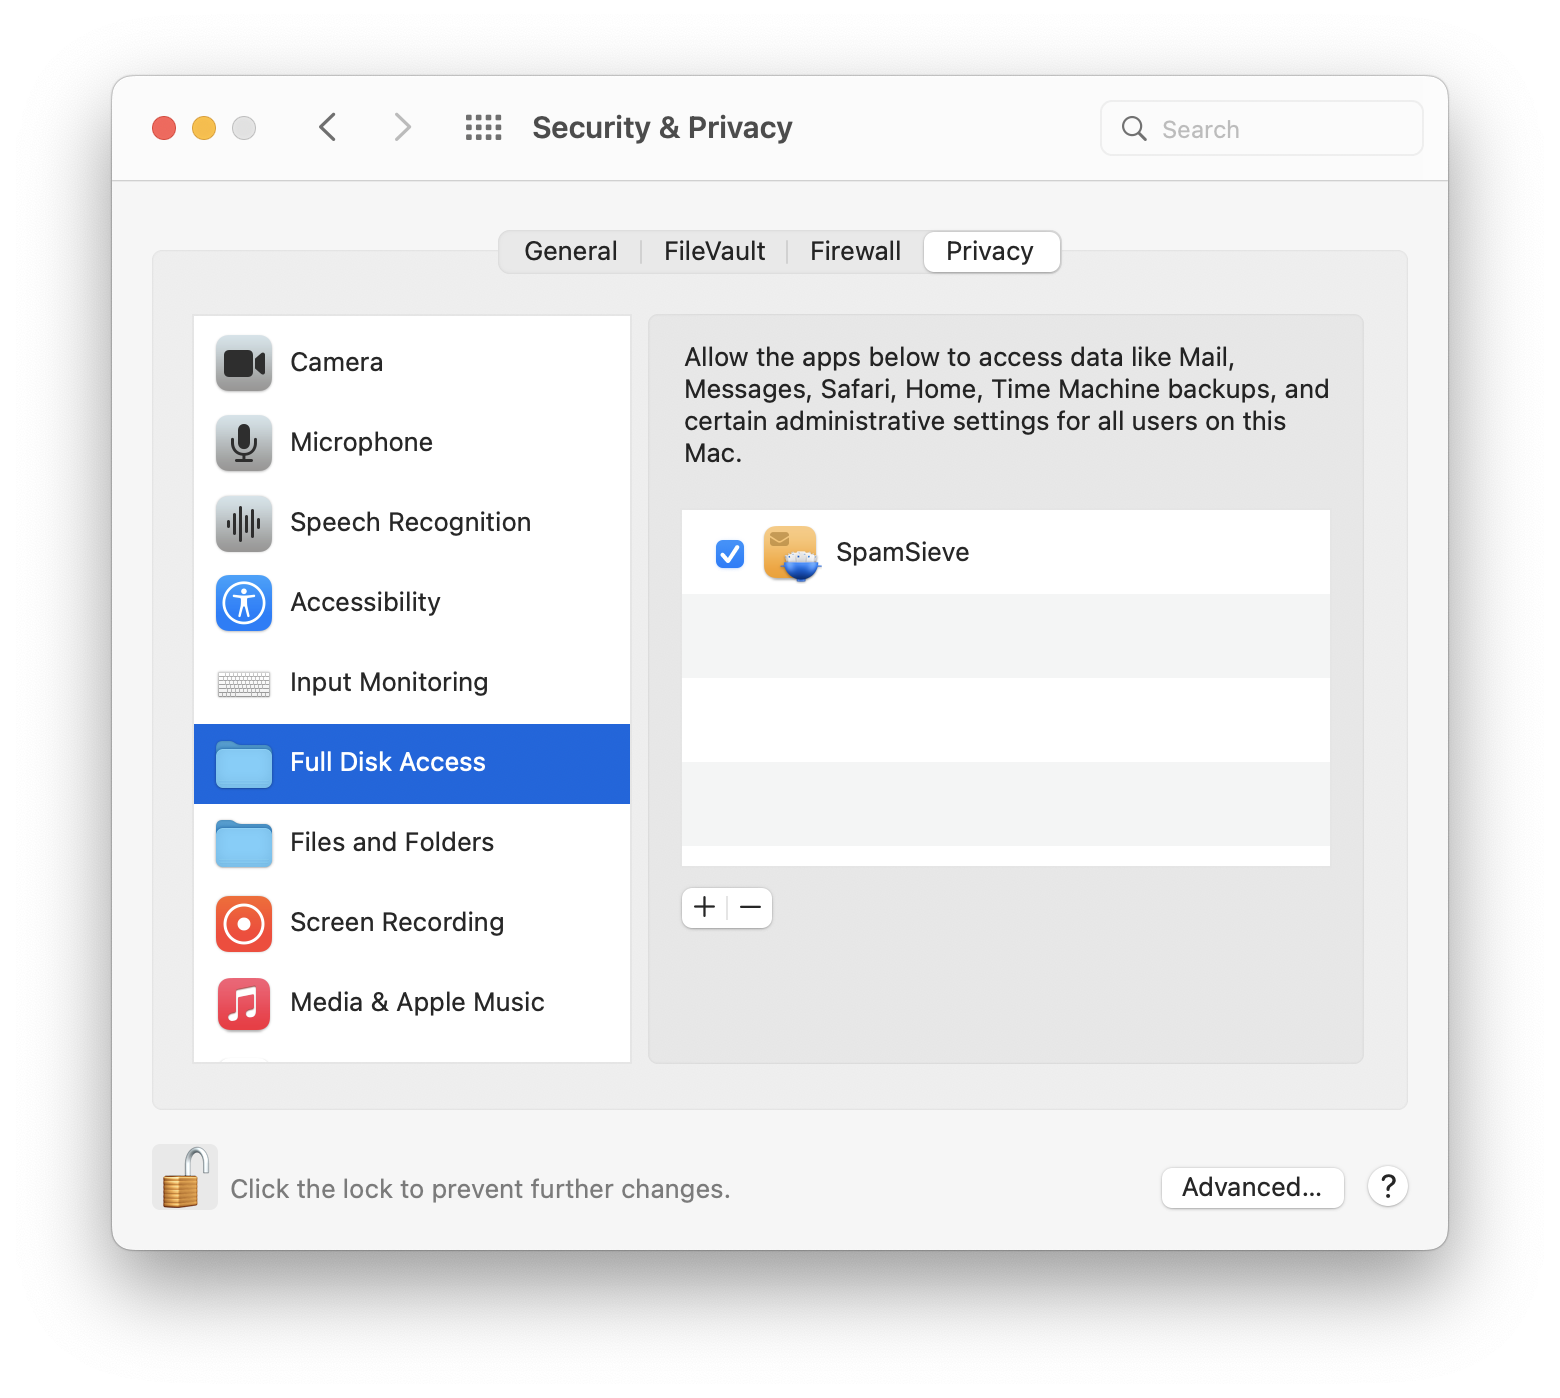
If the lock button in the lower left corner of the window is locked, click on it, enter your Mac’s login password, and click Unlock so that you are allowed to make changes.
Click the + button and choose SpamSieve from your Applications folder. Click Quit Now if applicable. SpamSieve should now appear in the list as checked.
Double-click the SpamSieve icon to relaunch it.
Troubleshooting Full Disk Access
In rare cases, SpamSieve may not appear in the Full Disk Access list after you add it. First, try restarting your Mac. You can also enter this command in Terminal:
tccutil reset SystemPolicyAllFiles
to reset the system’s database of Full Disk Access privileges and then try adding SpamSieve again.
If you still aren’t able to add SpamSieve, see the Troubleshooting Privacy Access section.
2.6.2 Granting Automation Access
As discussed in the Security & Privacy Access section, SpamSieve needs Automation access in order to fully function.
macOS will automatically ask you when SpamSieve needs to be able to control an application. It will show an alert, and you should click the OK button.
If you accidentally click Don’t Allow and deny SpamSieve access to control an application, macOS will remember this and may not ask you again. However, you can fix this by manually granting access.
To Grant Automation Access on macOS 13 Ventura Through macOS Tahoe 26
Go to System Settings ‣ Privacy & Security ‣ Automation. (You can also click here to go directly to Automation.)
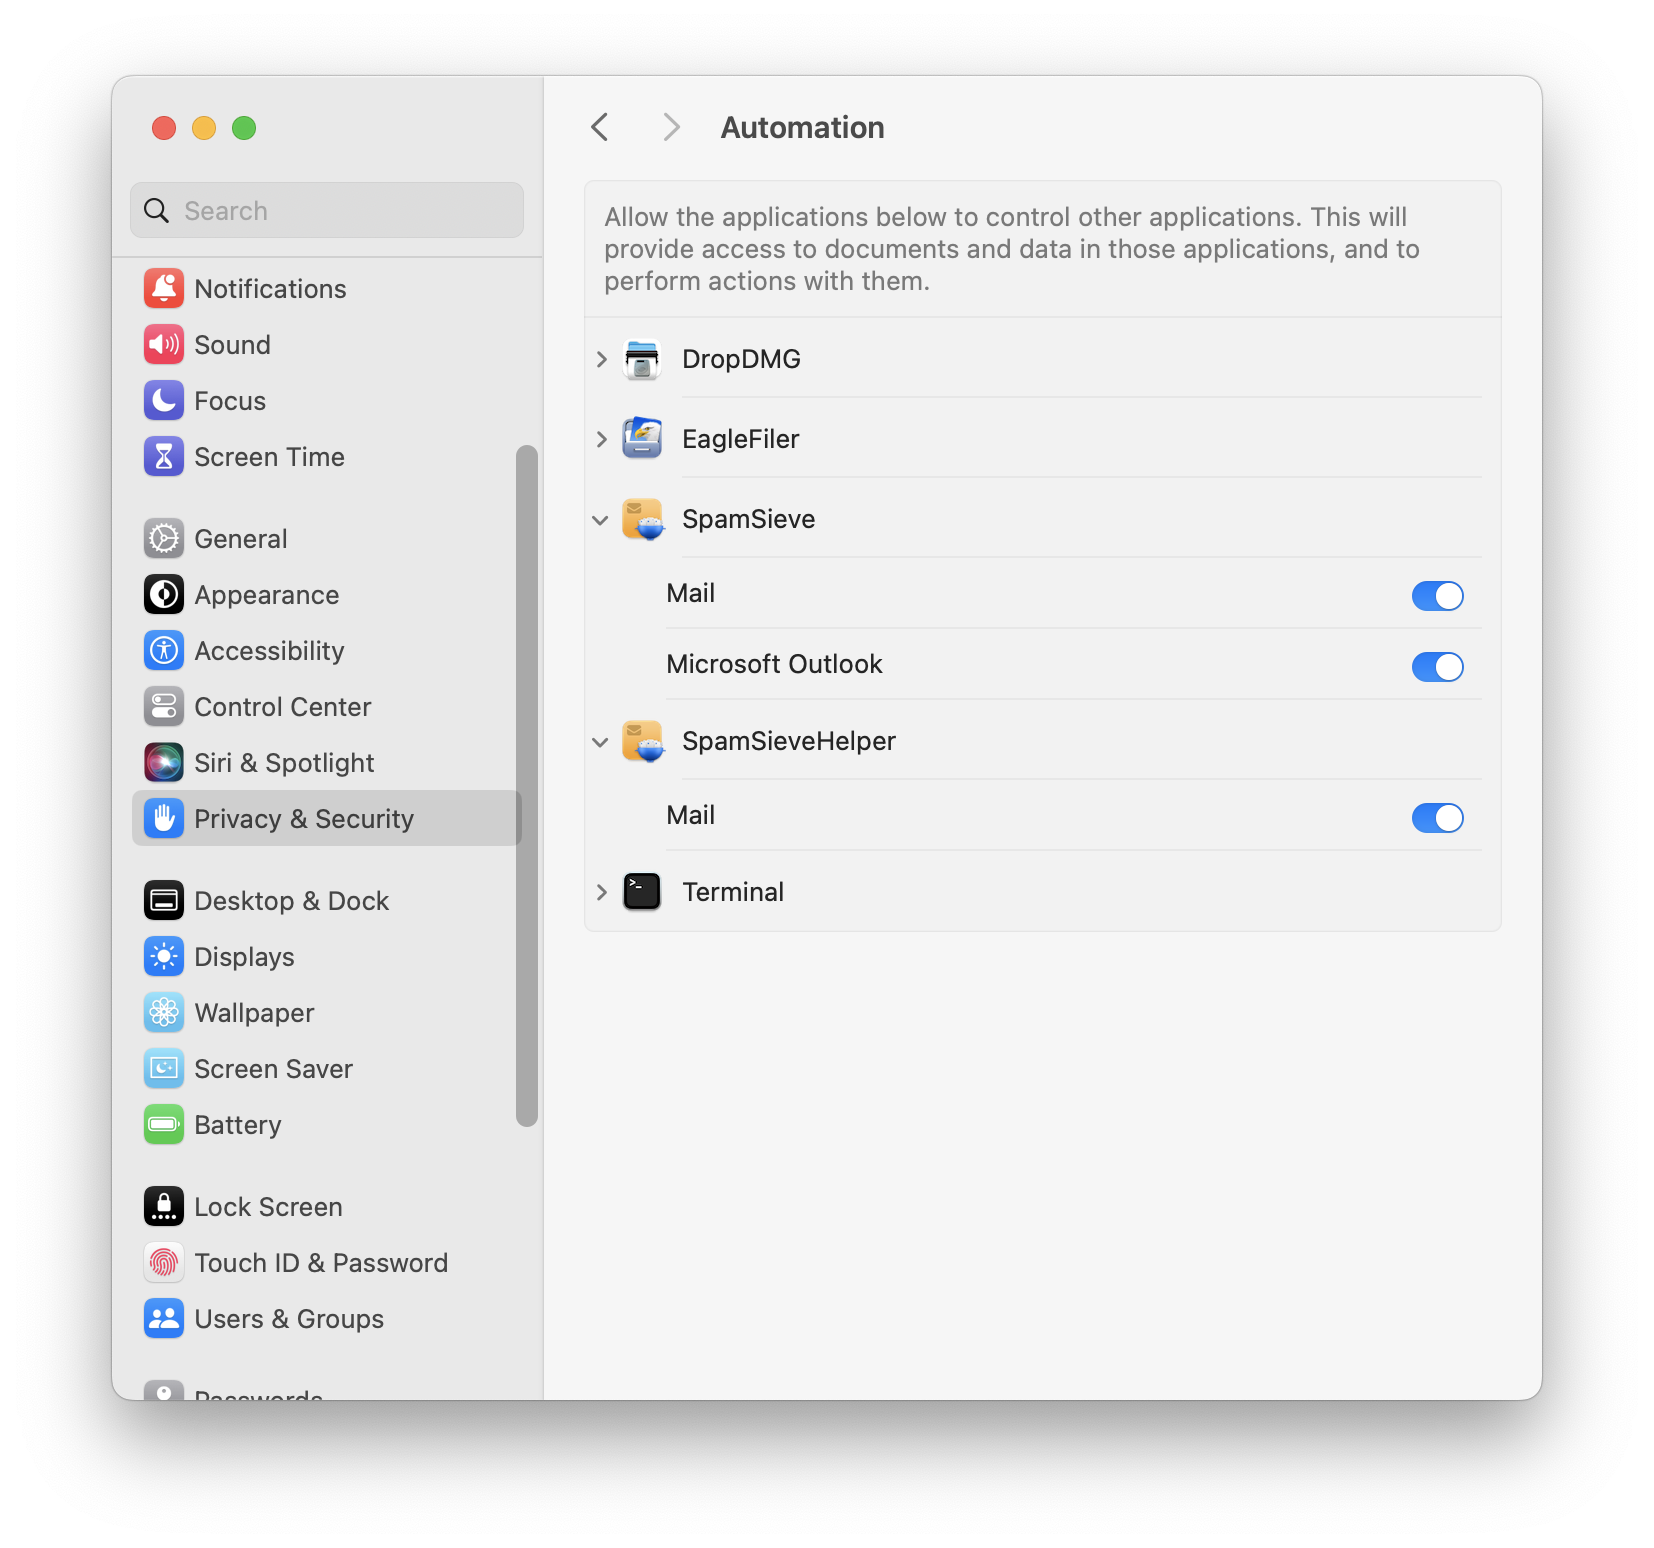
Click the switch(es) under SpamSieve.
To Grant Automation Access on macOS 10.14 Through macOS 12
Go to System Settings ‣ Security & Privacy ‣ Privacy ‣ Automation. (You can also click here to go directly to Automation.)
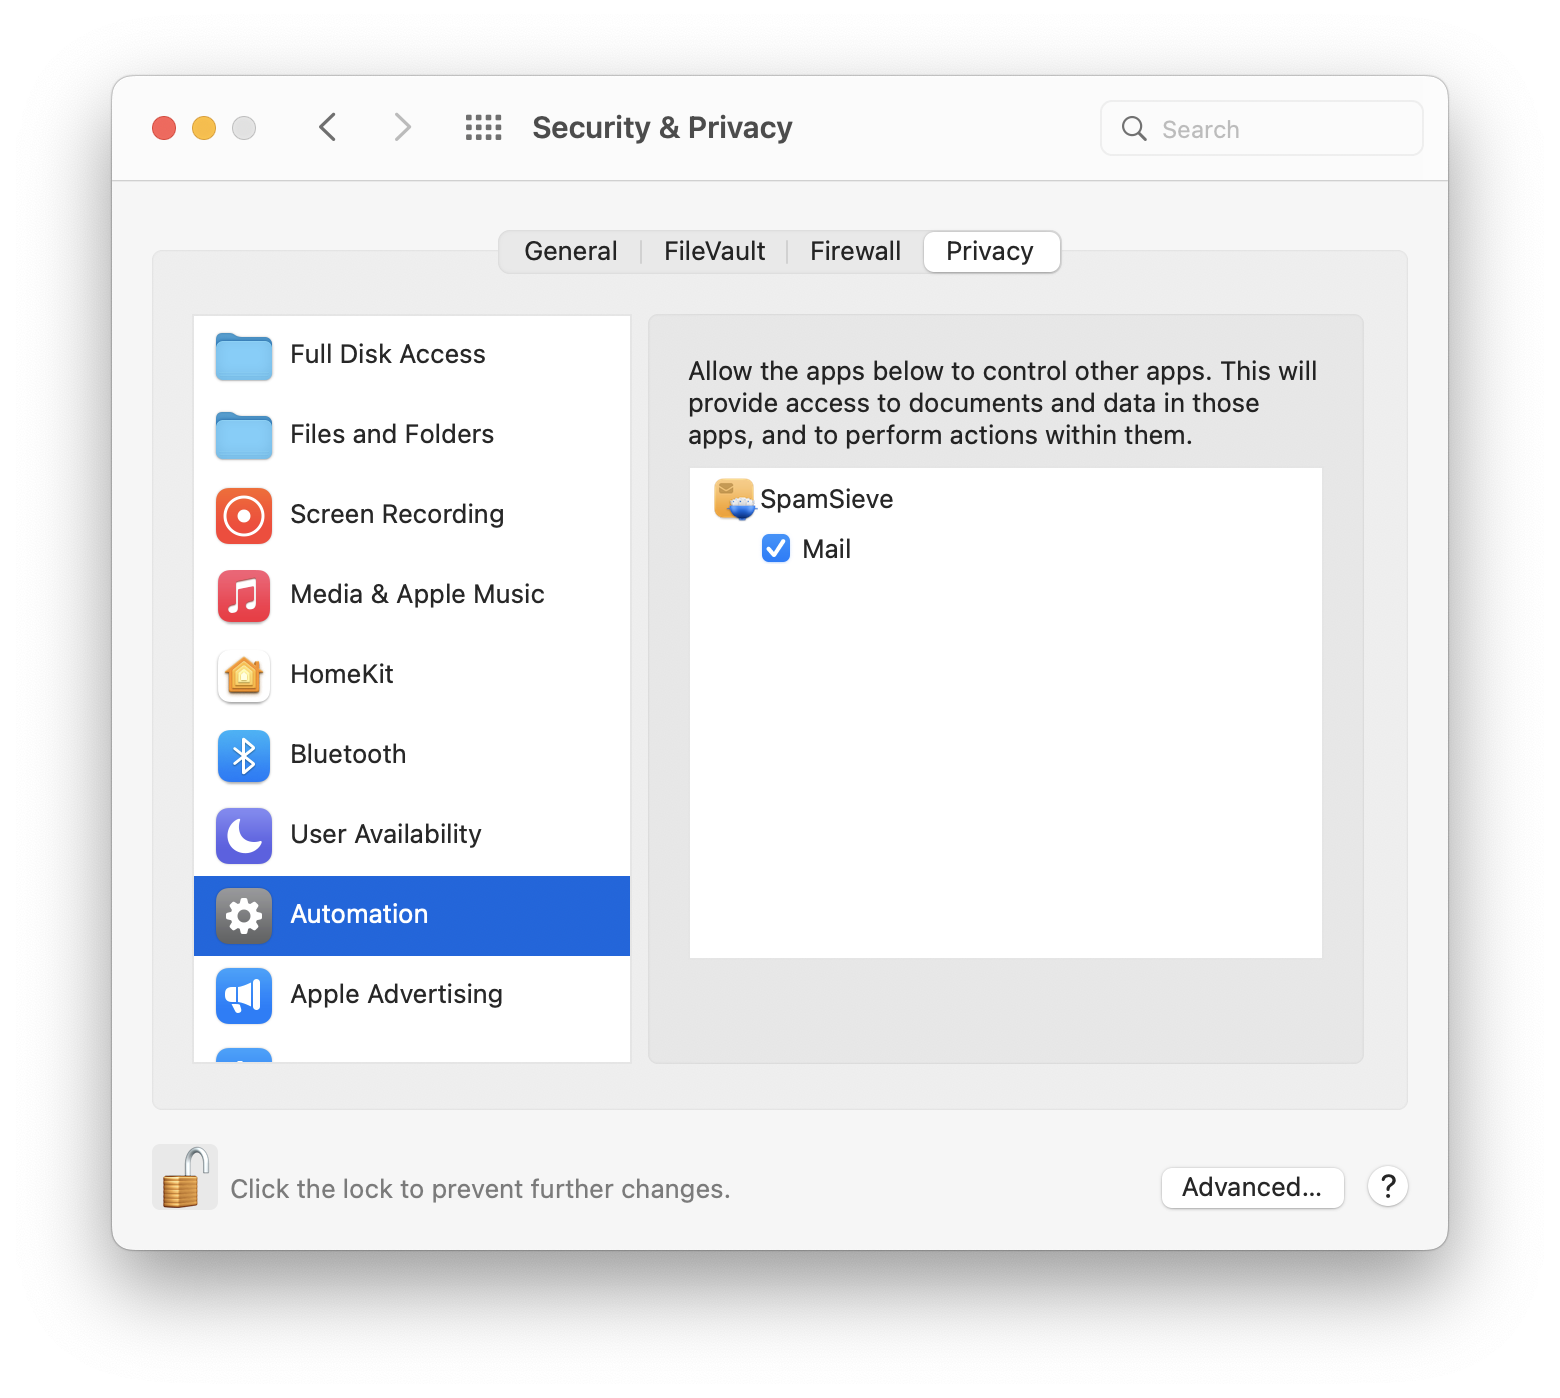
Checking the box(es) under SpamSieve.
Troubleshooting Automation Access
It may help just to restart your Mac.
You can enter this command in Terminal:
tccutil reset AppleEvents
to reset the system’s database of Automation privileges. Then macOS will ask you again the next time SpamSieve needs access, and you can click OK. If it still doesn’t ask you to grant access, it may help to restart your Mac again or use the maintenance feature of Onyx.
If it still doesn’t work, see the Troubleshooting Privacy Access section.
2.6.3 Granting Contacts Access
SpamSieve reads your macOS address book in order to prevent marking messages as spam if they were sent by one of your known contacts. This is controlled by the Use macOS Contacts preference.
It also reads which e-mail addresses are yours, in order to detect spam messages that may have been forged to come from your own address. This is controlled by the Catch spam sent from my own addresses preference.
Access to Your Contacts
The first time you use SpamSieve to filter messages, it will ask for permission to access your contacts. You can change the access setting by opening System Settings, going to the Privacy & Security pane, clicking on the Privacy tab, clicking on Contacts in the list, and checking or unchecking SpamSieve.app. (Please note that the applications in the list are not sorted alphabetically.)
Normally, macOS will remember when you’ve given SpamSieve permission to access the contacts. If it keeps prompting you each time SpamSieve is launched, this is probably because you have modified your copy of the SpamSieve application, breaking its code signature. It is no longer necessary to modify SpamSieve to hide its Dock icon; please see the Show Dock icon section.
Repeated Access Prompts
If the system keeps asking you for permission to access your contacts and does not remember this between launches:
You may need to reset the privacy database by entering this command in Terminal:
tccutil reset AddressBook
Your copy of SpamSieve may be damaged. Please see the Reinstalling a Fresh Copy section.
2.6.4 Troubleshooting Privacy Access
If macOS doesn’t remember the Security & Privacy Access that you granted:
Try Resetting the TCC Service
Try the tccutil reset commands as described in Granting Full Disk Access or Granting Automation Access.
Try Reinstalling the Application
Make sure that the application file is not damaged, e.g. by reinstalling a fresh copy. Also, make sure that you are not modifying the application package, e.g. editing its Info.plist file to try to hide the Dock icon.
Try Resetting the Privacy Database
If it still doesn’t work, you may need to reset the entire privacy database:
First, we will temporarily turn off System Integrity Protection so that we have access to delete the database. You may want to print these instructions or write them down so that you have access to them while rebooting your Mac.
Restart your Mac in Recovery Mode. The steps for doing this depend on which type of processor your Mac has:
- On an Intel-based Mac, click on the Apple menu and choose Restart…. Hold down the Command and R keys so that your Mac will reboot in Recovery Mode.
- On an Apple Silicon–based Mac, click on the Apple menu and choose Shut Down…. Press and hold the power button on your Mac until you see “Loading startup options.” Click Options, then click Continue, then click Continue again.
From the Utilities menu, choose Terminal.
Type csrutil disable and press Return.
Click on the Apple menu and choose Restart. This is necessary for the SIP change to take effect.
Drag the file:
/Users/<username>/Library/Application Support/com.apple.TCC/TCC.db
to the trash. (See How can I open the Library folder? if you have trouble finding it.)
You can then repeat Steps 2–5, typing csrutil enable instead, in order to turn SIP back on.
Try Reinstalling macOS
If it still doesn’t work, reinstalling macOS takes a while but always seems to fix the problem.
3 Using SpamSieve
There are four basic steps to installing and using SpamSieve:
Put the SpamSieve application in your applications folder. This is described in the Installing SpamSieve section.
Set up your mail program to use SpamSieve to filter your mail. This is described in the Setting Up Apple Mail section, in other sections below, and in the Legacy Mail Programs section.
Train SpamSieve with some examples of your spam and good messages, as described in the Do an Initial Training section. (This step is optional but highly recommended. You can skip it if you don’t have any saved spam messages.)
SpamSieve will launch automatically when new mail arrives. It will examine each incoming message and move the spam messages to a separate mailbox. In order to keep SpamSieve’s accuracy high, you’ll need to tell it about any spam messages that you find in your inbox or good messages that you find in your spam mailbox. This is described in the Correct All Mistakes section.
You can return to this page at any time by going to SpamSieve’s Help menu and choosing Setting Up and Using SpamSieve. The Help menu also contains a PDF version of this manual, which is easier to search and print.
The rest of this manual contains detailed information about how SpamSieve works and how it can be customized. If you have a question, it’s probably answered here. However, following the above four steps is all most users will need to do to effectively use SpamSieve.
3.1 Setting Up Apple Mail
This section describes how to set up SpamSieve and Apple Mail using the Mail extension on macOS 12 and later. If you have macOS 11 or earlier or want to use the more customizable Mail plug-in setup, see the Setting Up Apple Mail (Plug-In) section.
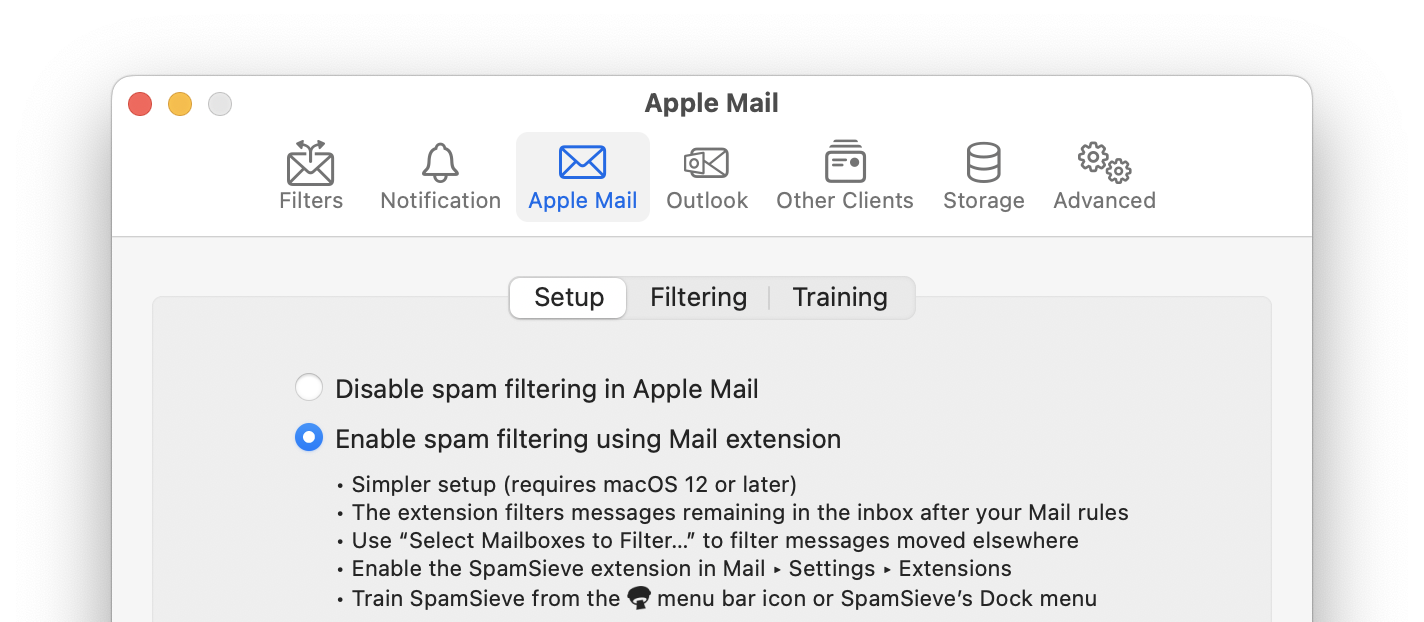
Choose Settings… from the SpamSieve menu at the top-left of the screen and click on the Apple Mail and Setup tabs. Select Enable spam filtering using Mail extension:
Make sure that SpamSieve has Full Disk Access by going to System Settings ‣ Security & Privacy. This is described in more detail in the Granting Full Disk Access section.
In Mail, open the Settings window and click on the Extensions tab. Check the box to enable SpamSieve:
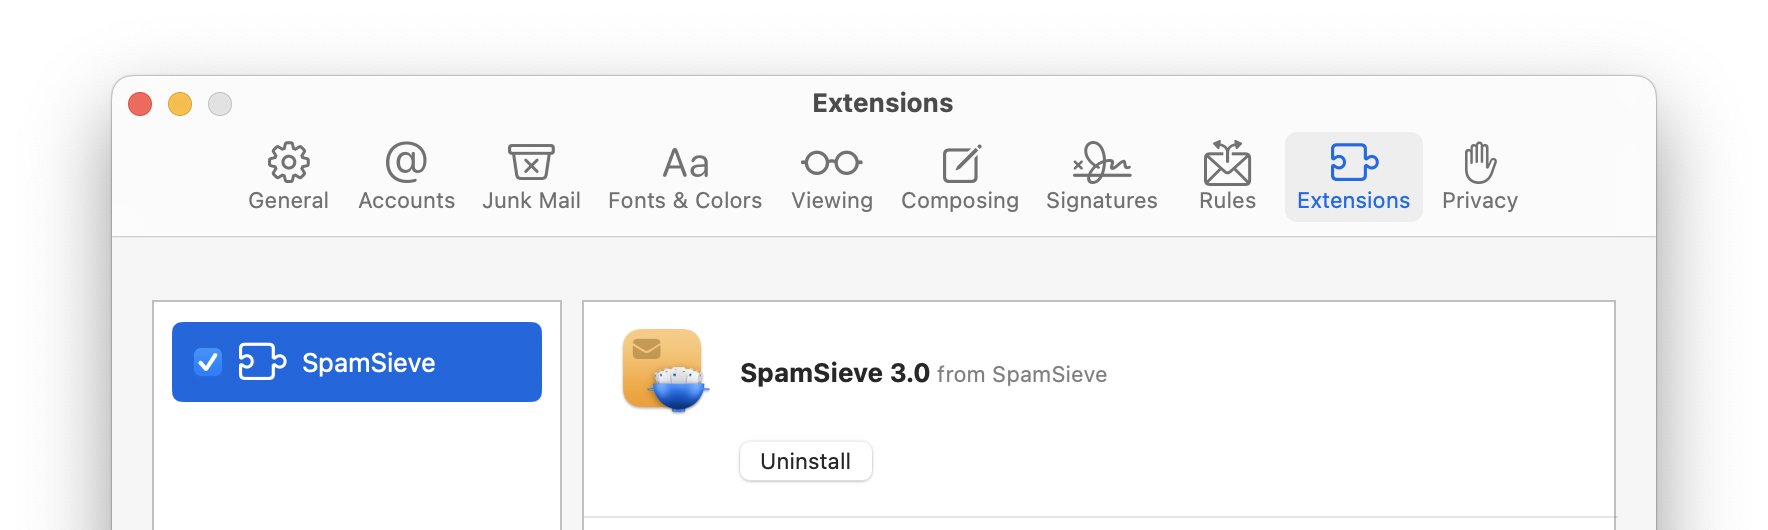
When prompted, click the Turn On button to confirm that you want to enable it. (SpamSieve should automatically appear in the Extensions list. If you don’t see it, make sure that SpamSieve is installed in your Applications folder. It may also help to quit and relaunch Mail or to restart your Mac.)
Click on the Rules tab of Mail’s Settings window.
- Make sure that there are no active rules whose names begin with SpamSieve, e.g. if you were using a previous version of SpamSieve. These rules should be deleted, unless you are still using the SpamSieve plug-in on another Mac that shares the same iCloud account; in that case, just uncheck them to make them inactive.
- If you had created rules to run SpamSieve AppleScripts, the names would not begin with SpamSieve, and you can keep them.
- If there are any other rules for processing spam/junk messages, we recommend that you disable them (by unchecking them) or delete them. Such rules are usually not needed when using SpamSieve and can cause confusion. If necessary, you can recreate them in SpamSieve’s Blocklist window.
- Other rules (not related to spam) can be left as-is.
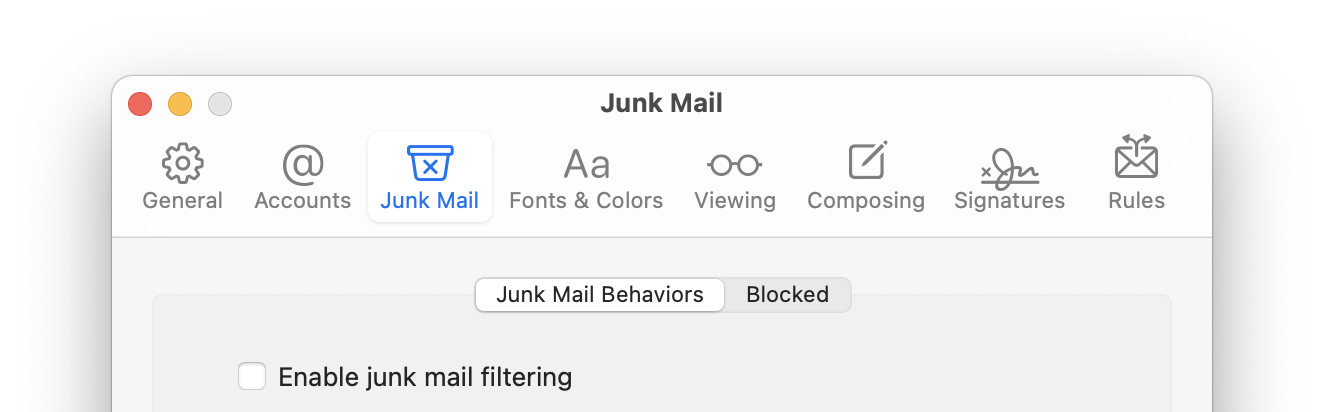
Click on the Junk Mail tab of Mail’s Settings window. On the Junk Mail Behaviors tab, uncheck Enable junk mail filtering. This will turn off Mail’s junk mail filter so that it doesn’t interfere with SpamSieve:
On the Blocked tab, uncheck Enable blocked mail filtering:
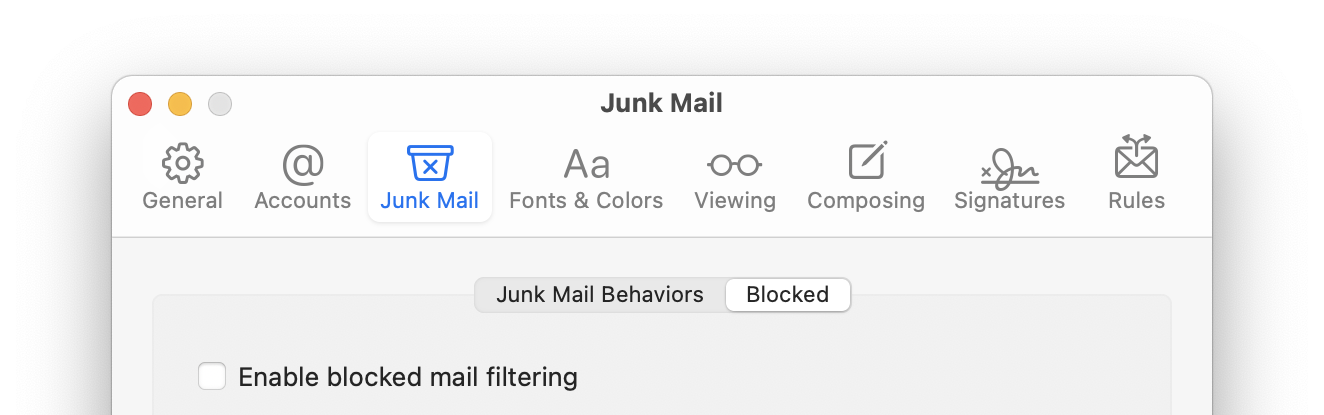
because this could move good messages to the trash even if SpamSieve thinks they’re good. It’s better to use SpamSieve’s own blocklist feature.
SpamSieve’s Mail extension filters new messages that end up in your inbox. Unlike the Mail plug-in (with SpamSieve on macOS versions before Sonoma) the Mail extension runs after the other Mail rules, so it does not have access to messages that were moved to a different mailbox by a Mail rule. Sometimes this is what you want, as you know that messages moved by a rule will never be spam. If you do want SpamSieve to remove the spam messages that were moved by Mail rules, go to the Settings ‣ Apple Mail ‣ Filtering tab and click Select Mailboxes to Filter… to choose which additional mailboxes you want SpamSieve to filter.
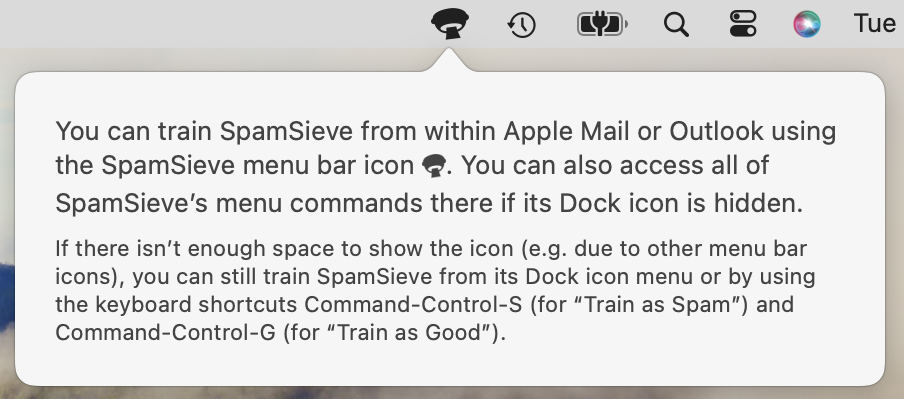
Now it’s time to train SpamSieve. You can do this either from the SpamSieve menu bar icon at the top of the screen or from SpamSieve’s Dock menu (when you click and hold on its Dock icon):
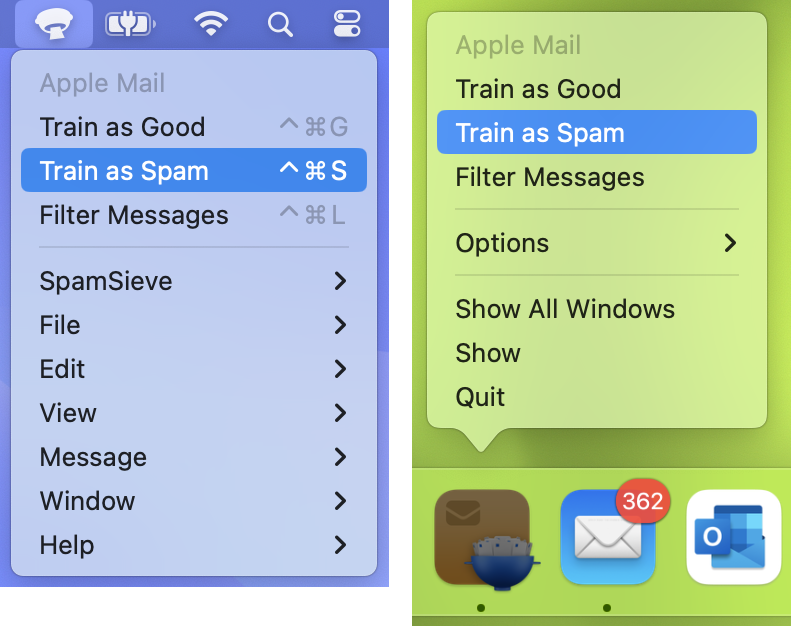
- To train SpamSieve with spam messages, select one or more of them in Mail and then choose Train as Spam from the menu. The messages will be colored in gray and moved to the Junk mailbox. The keyboard shortcut for this command is Command-Control-S. (Do not use the Move to Junk command in Mail.)
- To train SpamSieve with good messages, select one or more of them and then choose Train as Good from the menu. If a good message is in the Junk mailbox when you train it, it should move to the inbox—otherwise, see this section. (Even with Mail’s built-in junk mail filter disabled, Mail may show a Not Junk button at the top of spam messages; you should ignore this, i.e. always choose Train as Good rather than clicking the Not Junk button.)
The first time you try to train a message, macOS will ask for permission to control Mail, and you should click OK. When training multiple batches of messages, you should wait for Mail and SpamSieve to finish processing one batch before training the next.
The Do an Initial Training section explains which messages (and how many of them) you should train.
SpamSieve will process new mail automatically and move the spam messages to the Junk mailbox. In most cases, new messages in the inbox will be filtered immediately. In rare cases, the Check inboxes for new messages not sent to Mail extension feature will filter them after a slight delay. The Filter spam messages in other mailboxes feature also operates on a slight delay.
Spam messages caught by SpamSieve will have brown text and a colored background in the message list. You may also see messages with brown text on a white background (when your Mac is in Light Mode). These were likely caught by a server-side junk filter before they got to your Mac. These messages were not processed by SpamSieve, so they are not mistakes and should not be trained as spam.
If you ever need to manually ask SpamSieve to sift through a mix of spam and good messages, select the messages and choose Filter Messages from the SpamSieve menu bar icon or the SpamSieve Dock menu. SpamSieve will move the ones that it thinks are spam to the Junk mailbox.
The above is all you need to know about using SpamSieve with Mail. The Apple Mail Customization section explains some more advanced setup options, such as configuring the “new mail” notification sound.
If you need to troubleshoot SpamSieve and Apple Mail, see the Checking the Apple Mail Setup section and the Apple Mail–Specific Questions section.
3.2 Setting Up Apple Mail (Plug-In)
This section describes how to set up SpamSieve and Apple Mail using the Mail plug-in on macOS 10.13 through macOS 13. If you have macOS 14 or later or want to use the simpler Mail extension setup, see the Setting Up Apple Mail section.
Choose Settings… from the SpamSieve menu at the top-left of the screen (in earlier versions of macOS this is called Preferences…) and click on the Apple Mail and Setup tabs. Select Enable spam filtering using Mail plug-in:
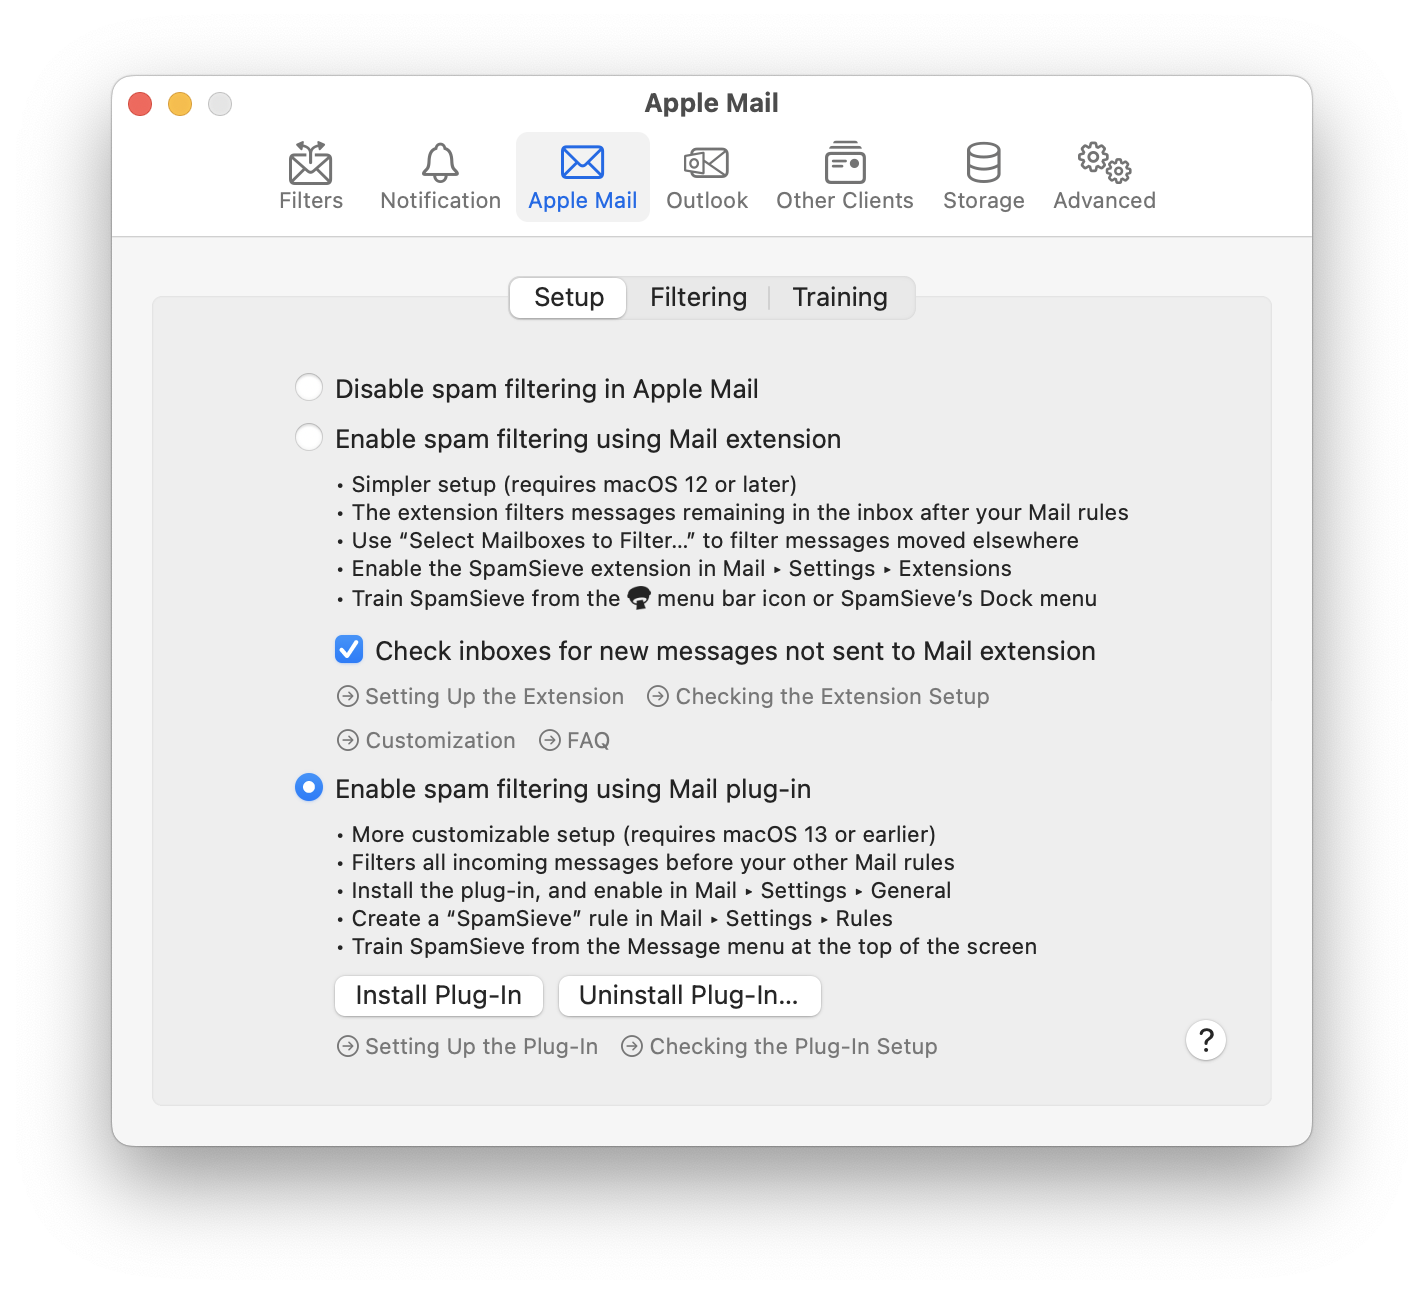
Make sure that SpamSieve has Full Disk Access by going to System Settings ‣ Security & Privacy. This is described in more detail in the Granting Full Disk Access section. (If you are using macOS 10.13 or earlier, you can skip this step.)
Quit Mail. Then double-click the SpamSieve application, go to Settings ‣ Apple Mail ‣ Setup, and click the Install Plug-In button. Now relaunch Mail.
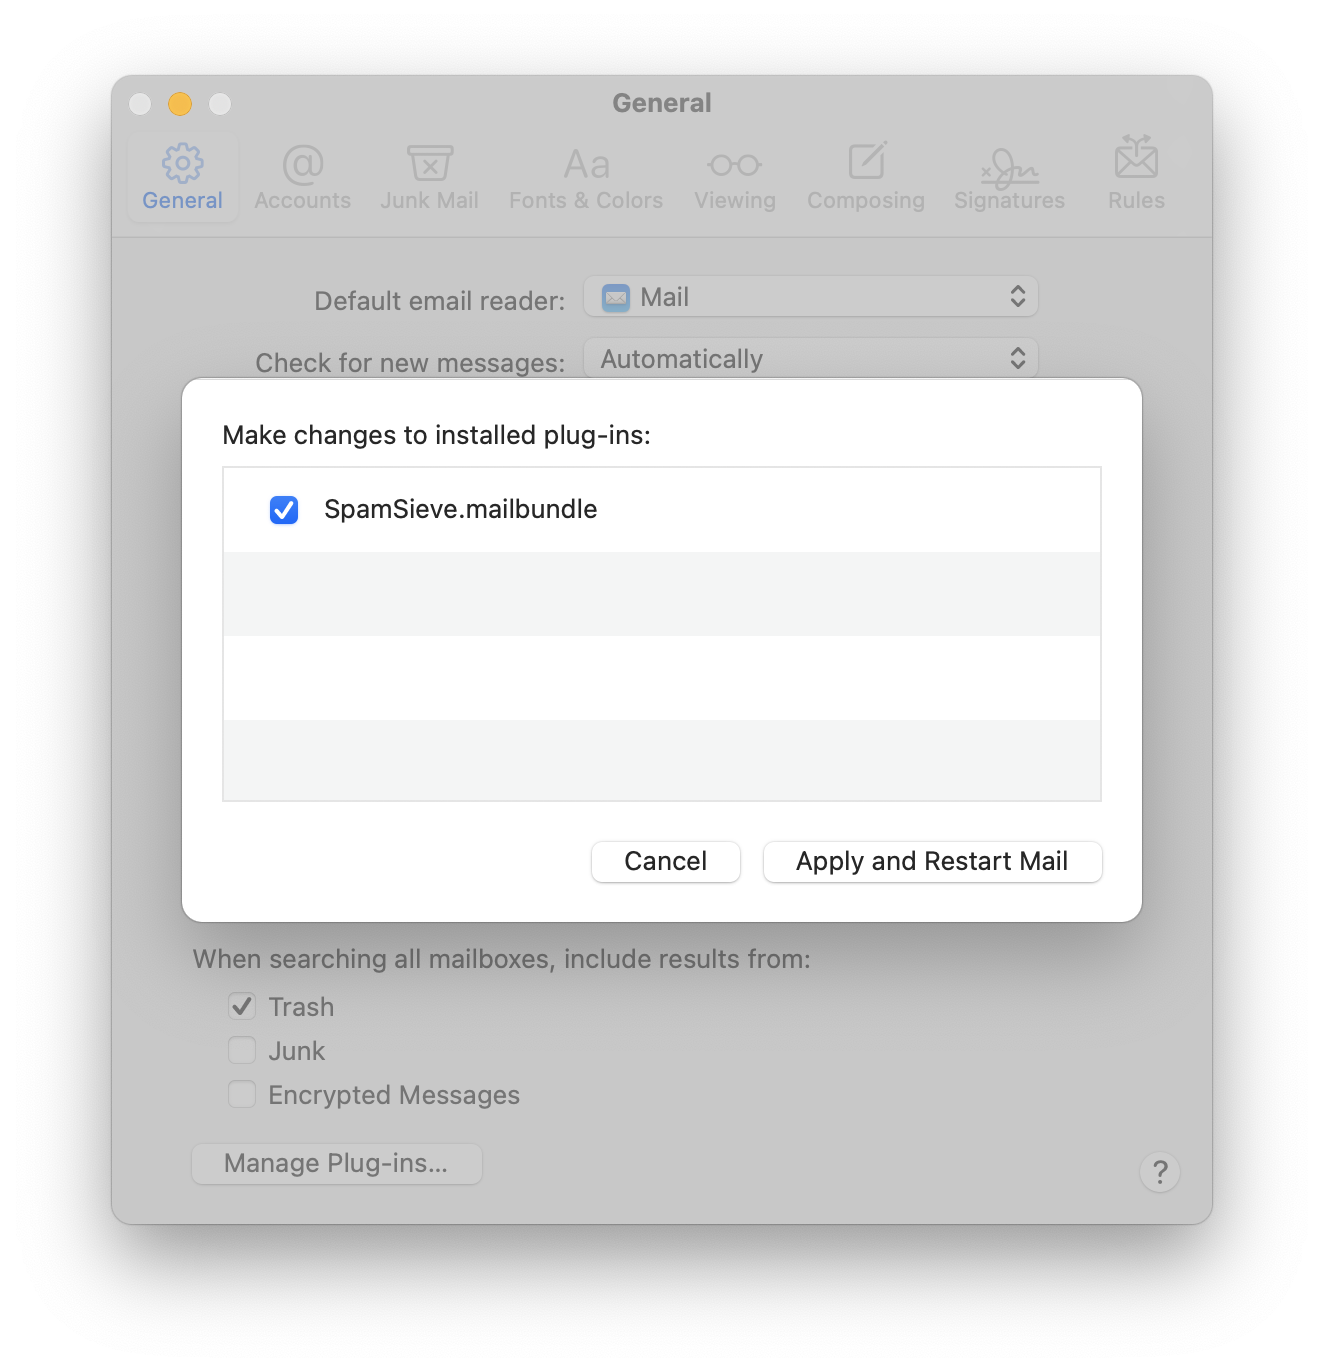
Click Manage Plug-ins… in Mail’s General settings and enable SpamSieve.mailbundle. This is described in more detail in the Enabling and Updating the Apple Mail Plug-In section. (If SpamSieve.mailbundle was already checked, Apply and Restart Mail will be disabled and you can just click Cancel. If you are using macOS 10.13 or earlier, you don’t have to enable the plug-in.)
You should now see the SpamSieve - Train as Good and SpamSieve - Train as Spam items in Mail’s Message menu:
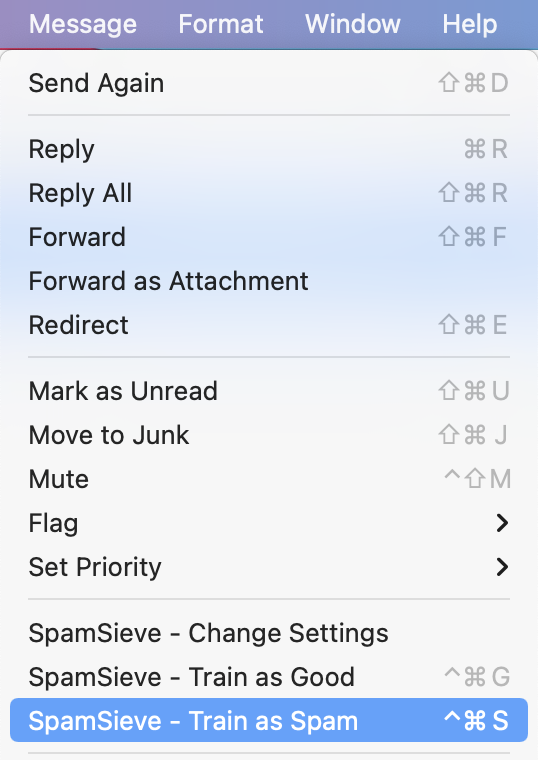
If you do not see these commands, please see the Why don’t I see the SpamSieve commands in Apple Mail’s Message menu? section.
Now you will set up a rule in Mail to move the incoming spam messages to the Junk mailbox:
Choose Settings… from the Mail menu and click the Rules button in the toolbar.
Click the Add Rule button.
Change the description to SpamSieve.
Note: The description of the rule must start with SpamSieve, but you can add additional text after that, if you want, so long as you don’t use square brackets, which SpamSieve uses for color rules.
Change the From pop-op menu to say Every Message, which is near the bottom of the menu.
Next to Move Message, select the top-level Junk mailbox with the special junk bin icon:

On macOS 11 and later, if you have multiple mail accounts, this will be called All Junk. This should always appear in the pop-up menu for selecting a mailbox. To show it in Mail’s sidebar, you can add it to the favorites.
On earlier versions of macOS or if you have a single mail account, it will be called Junk.
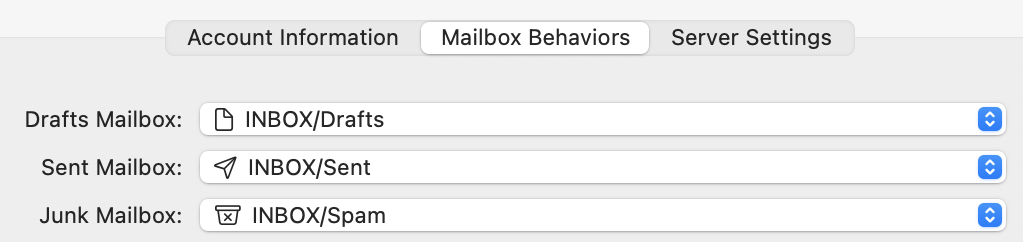
In rare cases, there may not already be a Junk mailbox. You can create one with the Mailbox ‣ New Mailbox… command. Make sure to create it within your account (rather than under On My Mac, unless you only have POP accounts) and then select it in your account’s Mailbox Behaviors.
Previous versions of SpamSieve had you select a Spam mailbox here. You can still do that, but we recommend switching to the Junk mailbox.
The rule should now look like (except that it may say Junk instead of All Junk, depending on your macOS version):
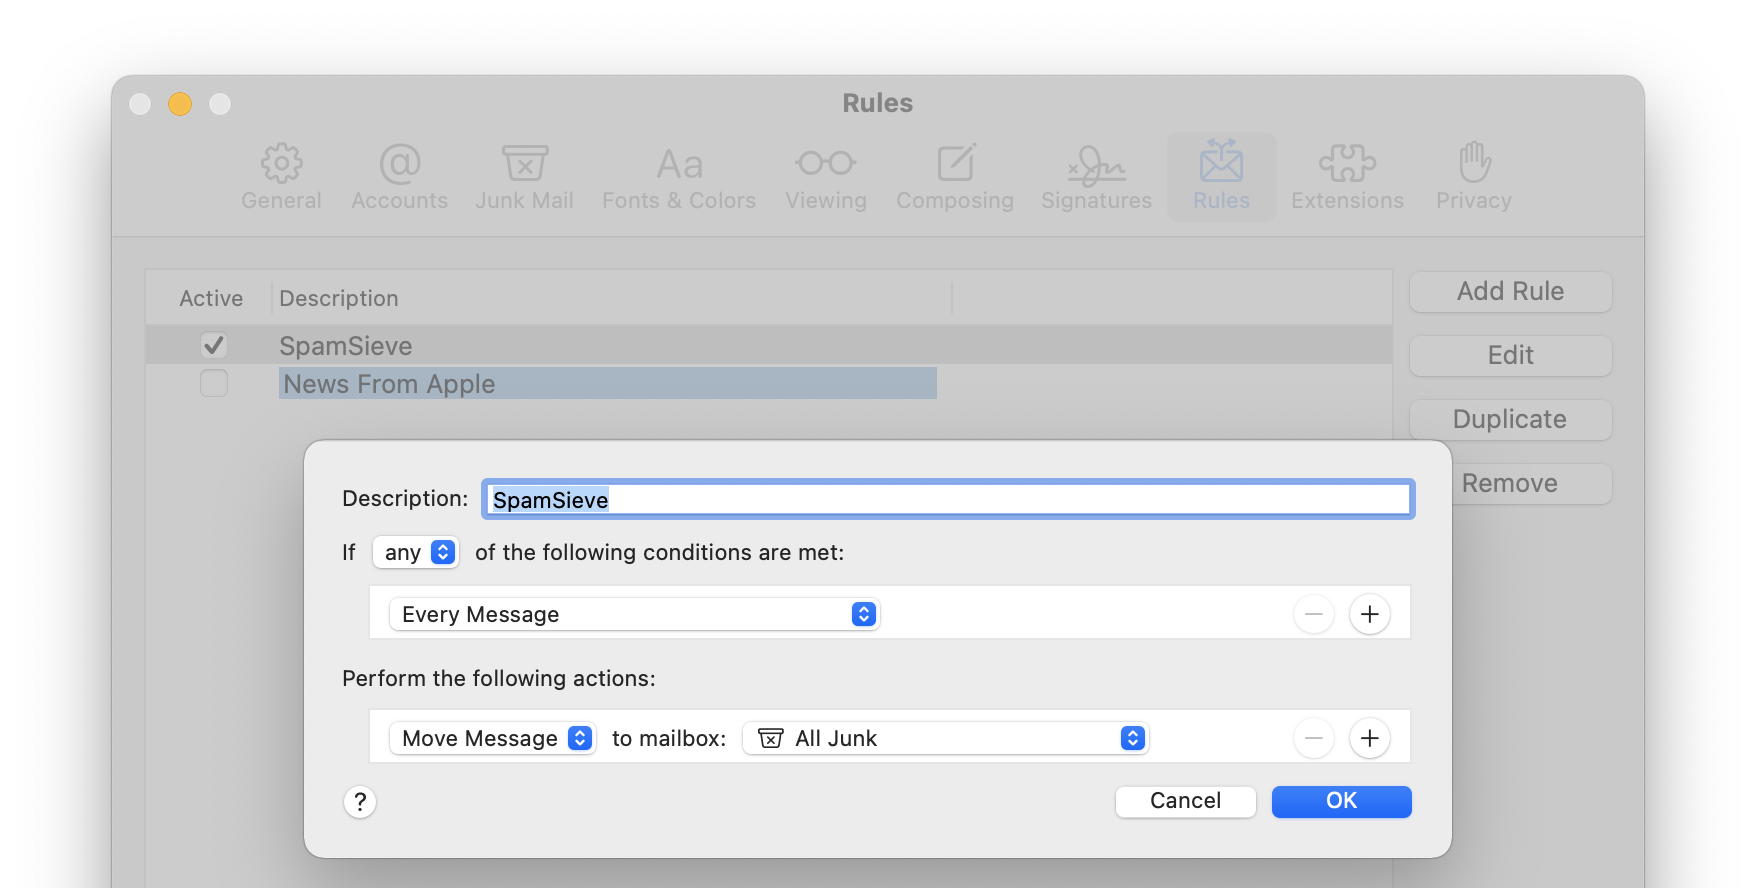
Note: Although the rule looks like it will move every message to the All Junk or Junk mailbox, because you have installed SpamSieve’s plug-in, it will only move the spam messages.
Now click OK to close the rule and save your changes. Mail may ask if you want to apply the rule; click Don’t Apply. (If you were to click Apply now, or in the future when editing a rule, that would filter all of the currently displayed old messages through SpamSieve, and you would be obliged to correct any mistakes.)
Drag the SpamSieve rule to the top of the list so that SpamSieve will be able to filter all of your mail. It’s fine to have additional rules in Mail for processing your good messages. Just make sure that they are below the SpamSieve rule. If you ever need to temporarily disable SpamSieve, e.g. for testing purposes, you can do so simply by unchecking the rule.
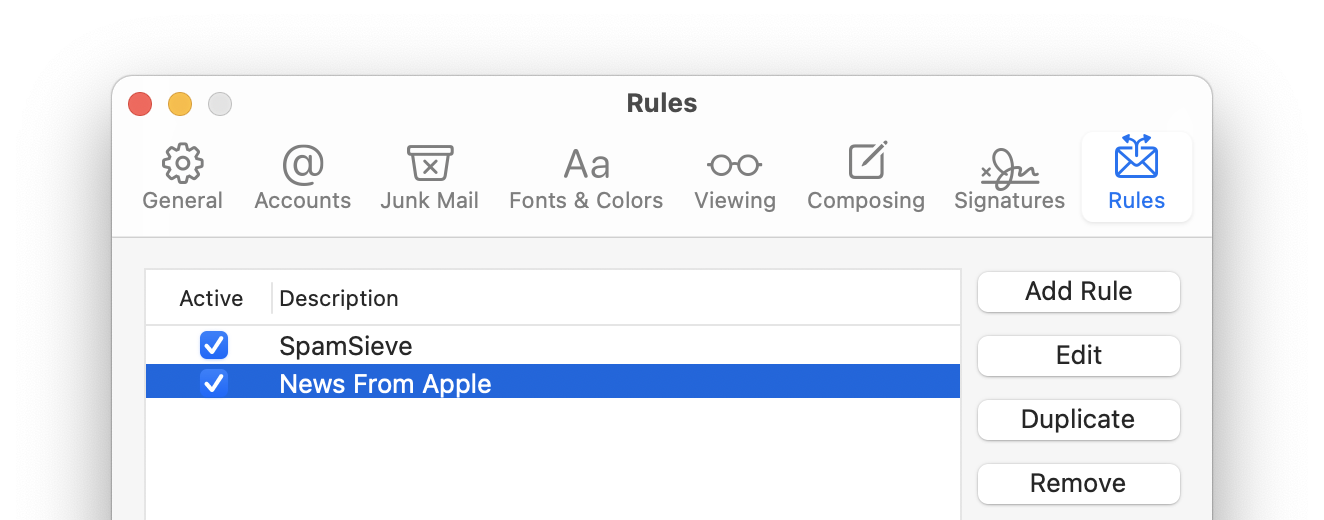
Make sure that the list shows no other rules for processing spam/junk messages. If you find any, disable them (by unchecking them) or delete them.
Go to the Junk Mail tab of Apple Mail’s Settings window. If there is a Trust junk mail headers in messages option, uncheck it. Uncheck Enable junk mail filtering on the Junk Mail Behaviors tab. This will disable its junk mail filter so that it doesn’t interfere with SpamSieve.
You may also want to uncheck Enable blocked mail filtering on the Blocked tab. This is because it can be hard to know when to train a SpamSieve mistake if Mail has already deleted the message. SpamSieve’s own blocklist automatically works with messages you’ve trained as spam, and you can set such messages to go directly to the trash if you want. To block unwanted messages that are not spam, we recommend creating a rule in Mail above the SpamSieve rule.
Note: Prior to macOS 10.15, there is no separate Junk Mail Behaviors tab—Enable junk mail filtering is on the Junk Mail tab—and there is no Enable blocked mail filtering option.
Now it is time to train SpamSieve:
To train SpamSieve with spam messages, select one or more of them in Mail and then choose SpamSieve - Train as Spam from the Message menu. The messages will be colored in gray and moved to the Junk mailbox. The keyboard shortcut for this command is Command-Control-S.
To train SpamSieve with good messages, select one or more of them and then choose SpamSieve - Train as Good from the Message menu. If a good message is in the Junk mailbox when you train it, it should move to the inbox—otherwise, see this section.
Even with Mail’s built-in junk mail filter disabled, Mail may show a Not Junk button at the top of spam messages; you should ignore this, i.e. always choose SpamSieve - Train as Good rather than clicking the Not Junk button.
The first time you try to train a message macOS will ask for permission to control Mail and SpamSieve, and you should click OK. When training multiple batches of messages, you should wait for Mail and SpamSieve to finish processing one batch before training the next.
The Do an Initial Training section explains which messages (and how many of them) you should train.
SpamSieve will process new mail automatically and move the spam messages to the Junk mailbox.
Mail may still color some messages brown and show them in the Junk mailbox, even though its own junk filter is off; this is normal. The Junk mailbox holds spam messages caught by server-side junk filters before they got to your Mac. These messages are not processed by SpamSieve, so they are not mistakes and should not be trained as spam. It’s also normal for messages in the Junk mailbox to say that you marked them as junk; this is because SpamSieve told Mail that they were junk on your behalf.
If you ever need to manually ask SpamSieve to sift through a mix of spam and good messages, select the messages and choose Apply Rules from the Message menu. SpamSieve will move the ones that it thinks are spam to the Junk mailbox.
The above is all you need to know about using SpamSieve with Mail. The Apple Mail Customization section explains some more advanced setup options, such as configuring the “new mail” notification sound.
If you need to troubleshoot SpamSieve and Apple Mail, see the Checking the Apple Mail Setup (Plug-In) section and the Apple Mail–Specific Questions section.
3.2.1 Enabling and Updating the Apple Mail Plug-In
After you install the plug-in for Apple Mail or SpamSieve auto-updates it to a newer version, Mail might not load the plug-in until you enable it. (Enabling the plug-in is not necessary on macOS 10.13 and earlier.)
To Enable the Plug-In
Quit Mail if it’s open.
Launch Mail and choose Settings… from the Mail menu.
Click on the General tab.
Click the Manage Plug-ins… button at the bottom of the window.
Make sure that SpamSieve.mailbundle is checked. Click the Allow Access button if Mail asks about that. (If SpamSieve.mailbundle isn’t in the list, please see the If the Apple Mail Plug-In Doesn’t Appear in the List or Doesn’t Stay Enabled section).
Click Apply and Restart Mail. (If SpamSieve.mailbundle was already checked, Apply and Restart Mail will be disabled and you can just click Cancel.)
If Mail Reports “Incompatible Plug-ins Disabled”
The newest version of SpamSieve is normally compatible with the newest version of macOS. Please make sure that you have updated. The latest information about this will be posted on the support page. Sometimes Mail erroneously reports that the SpamSieve plug-in is incompatible because other incompatible plug-ins were found (in that case, just restart Mail) or because of a problem with Mail’s own files (in that case, see Resetting Mail’s Private Plug-Ins Folder).
Why the Plug-In Needs to Be Enabled
When you first install the plug-in or when a new version of SpamSieve updates it, Mail will not load the plug-in until you have given your permission by enabling it.
If SpamSieve’s Mail plug-in is not loaded, Mail will not filter new messages through SpamSieve, and you will not be able to train SpamSieve. Additionally, if Mail receives new messages while the SpamSieve plug-in is disabled, the SpamSieve rule in Mail will move them to the Junk mailbox without consulting SpamSieve. SpamSieve will try to prevent this by temporarily deactivating the rule if it notices that the plug-in is disabled. You can also do this yourself by unchecking the SpamSieve rule in Mail’s settings before updating SpamSieve. Or you can just drag the messages back to the inbox if you happen to receive any before you’ve had a chance to re-enable the plug-in. (They do not need to be trained as good because SpamSieve did not think they were spam; they were moved by Mail.)
If You No Longer Want to Use Apple Mail With SpamSieve
If you’ve switched to another mail client and don’t want SpamSieve to remind you to enable its Mail plug-in, go to Settings ‣ Apple Mail ‣ Setup and click Uninstall Plug-In… to tell SpamSieve that you are no longer using Mail.
Troubleshooting
Please see:
3.3 Setting Up Airmail
These instructions apply to versions 4 and 5 of Airmail. For older versions of Airmail, please see the Setting Up Airmail 1–3 section.
From the Airmail menu, choose Settings….
Click on the Accounts icon at the top of the window. For each IMAP, Exchange, or Gmail account in the list:
- Click on the (…) or gear icon, then the More tab.
- Make sure Message Content is checked.
- Make sure that Attachment is set to either All Attachments or New Attachments. (With earlier versions of Airmail, you should instead make sure that the Attachments box is checked.)
POP accounts do not have the Download section, so you can skip this step for them.
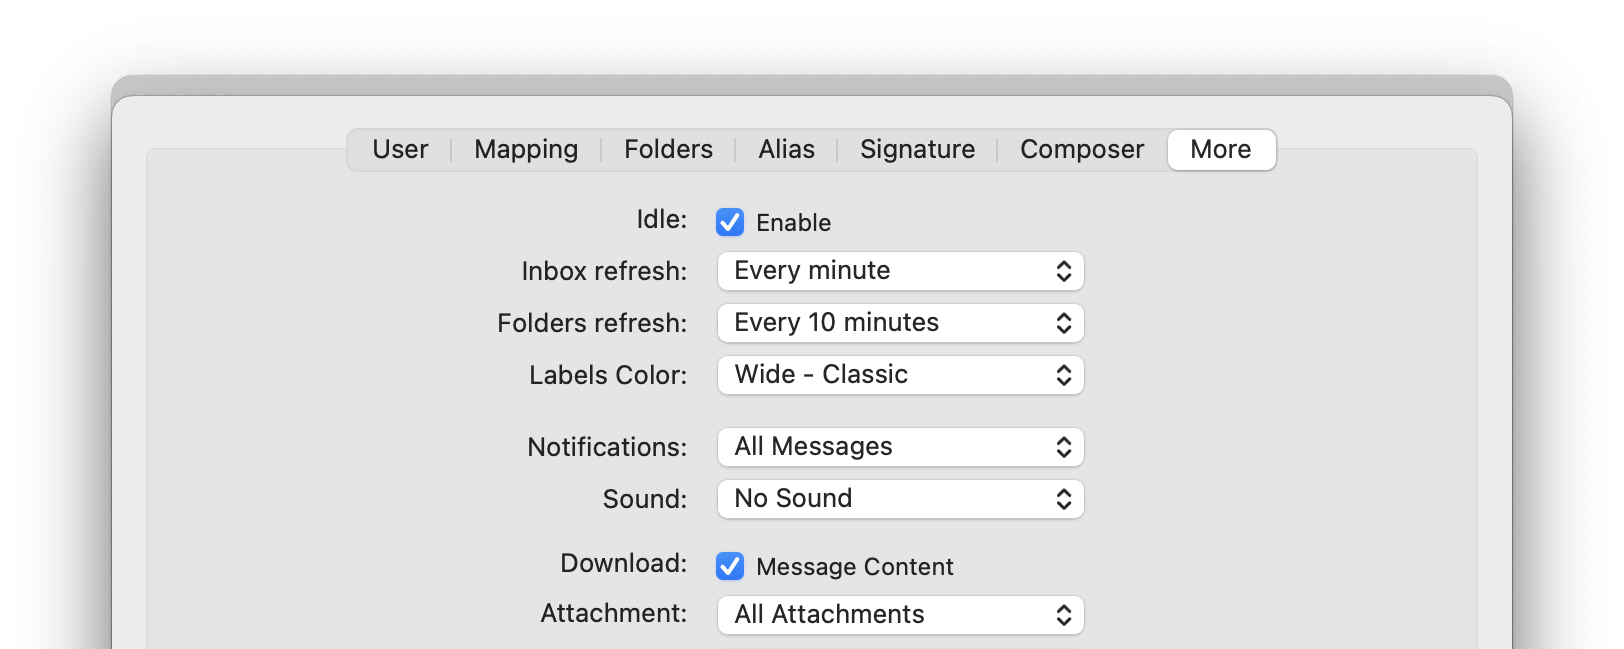
Click the Save button.
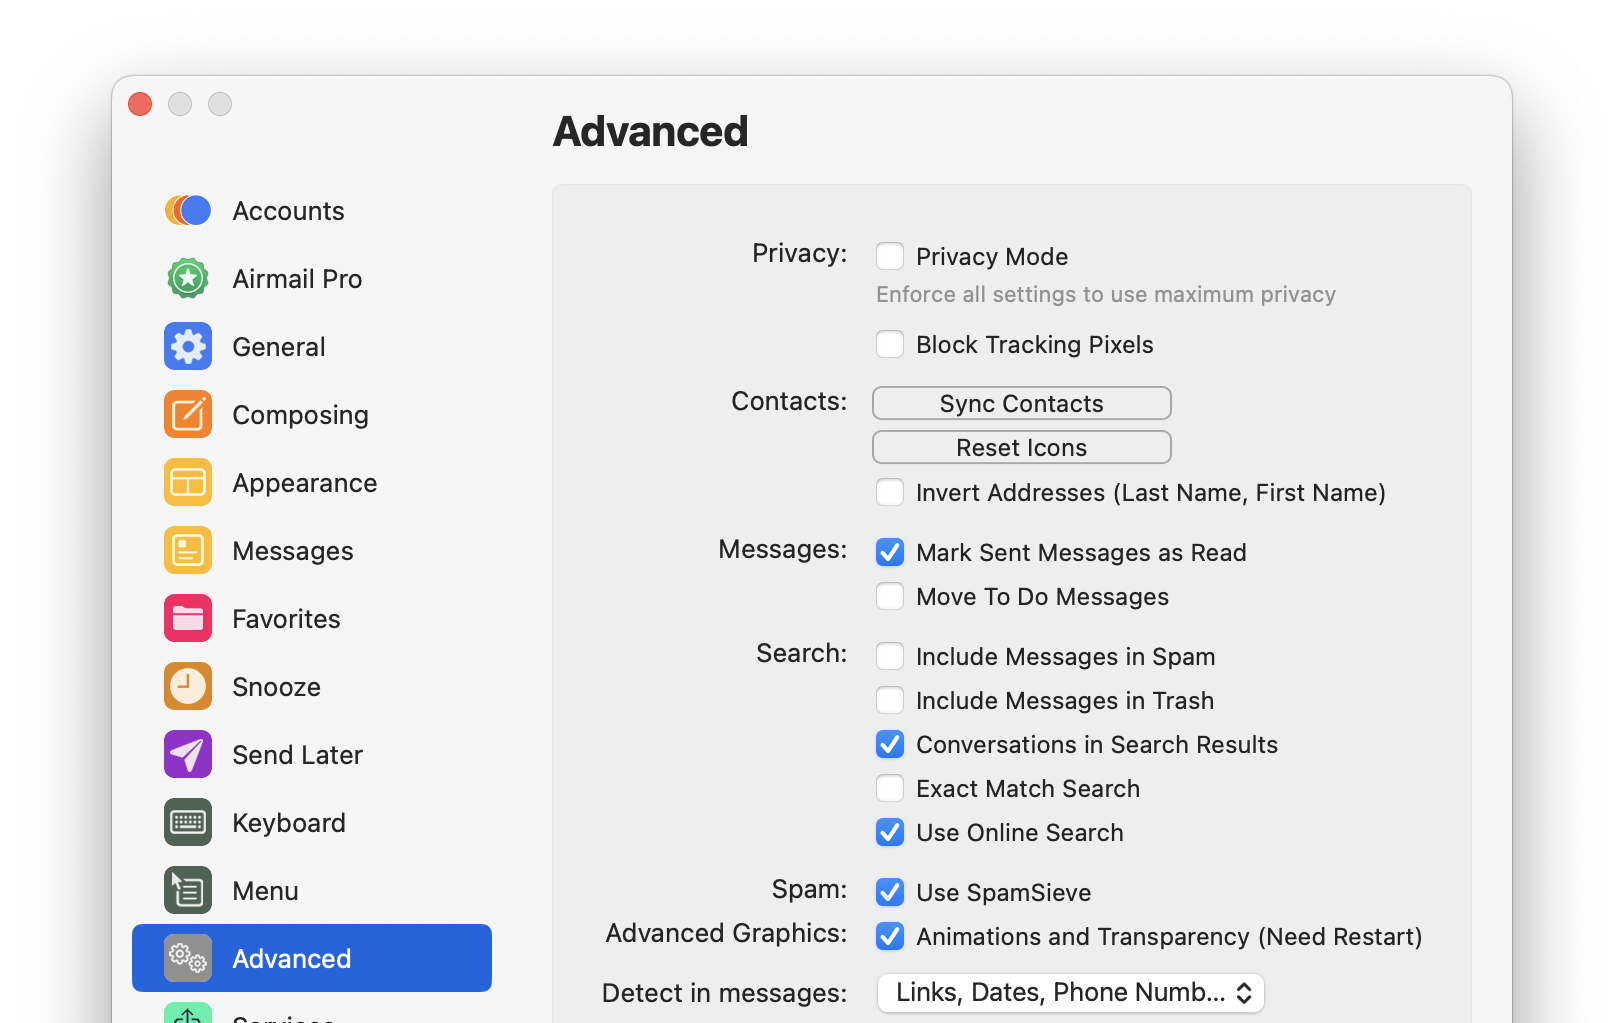
Click on the Advanced icon at the left of the window and make sure that Use SpamSieve is checked. (In older versions of Airmail, Advanced is at the top of the window.)
Make sure that you do not have any rules in Airmail’s Settings ‣ Rules window that process spam messages. Since Airmail applies these after SpamSieve, having other rules that catch spam messages can prevent proper training. If you want to customize SpamSieve’s filtering, it’s better to use the SpamSieve Blocklist window. (It’s OK to have Airmail rules that target the Spam mailbox rather than the inbox because then they would only apply to messages that SpamSieve either already saw or wasn’t going to see.)
Now it is time to train SpamSieve:
To train SpamSieve with spam messages, select the messages, Control-click, and choose SpamSieve - Train as Spam from the contextual menu. (Do not use the Mark as Spam command.)
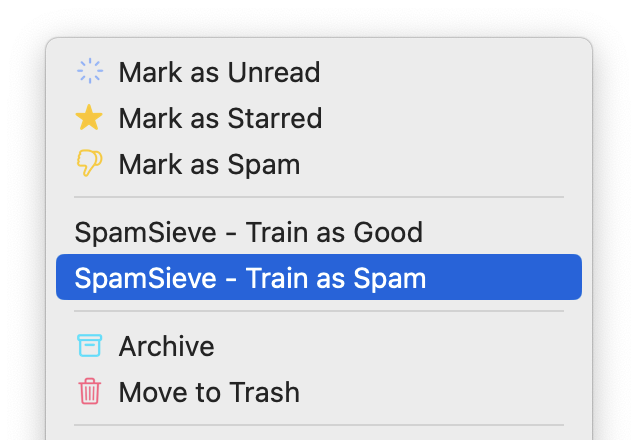
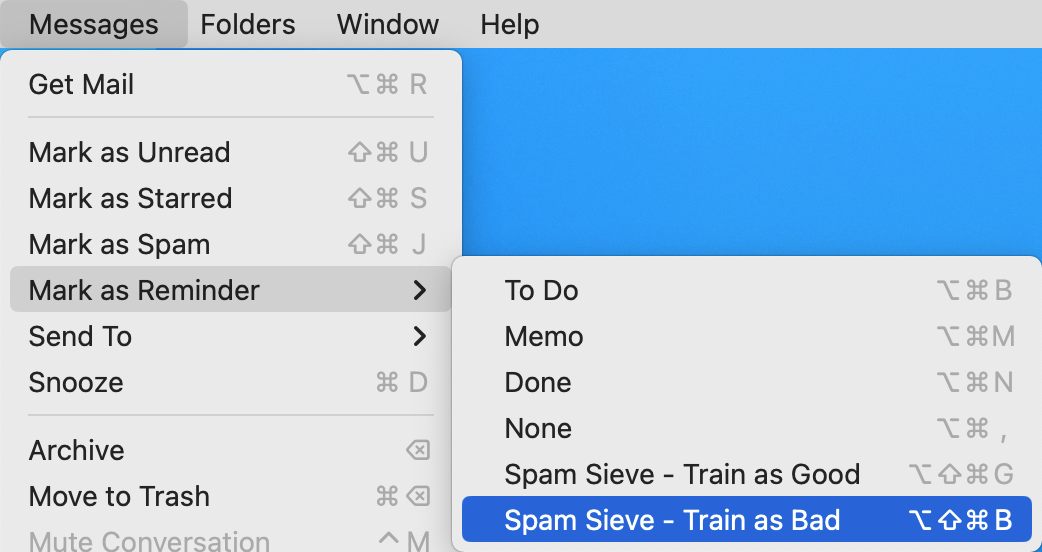
You can also choose Messages ‣ Mark as Reminder ‣ Spam Sieve - Train as Bad or press the Option-Shift-Command-B keyboard shortcut. (The keyboard shortcut can be customized in System Settings.)
To train SpamSieve with good messages, select the messages, Control-click, and choose SpamSieve - Train as Good from the contextual menu. (Do not use the Mark as Not Spam command.) You can also choose Messages ‣ Mark as Reminder ‣ Spam Sieve - Train as Good or press the Option-Shift-Command-G keyboard shortcut.
The Do an Initial Training section explains which messages (and how many of them) you should train.
On macOS 10.14 or later, the first time you try to train a message macOS will ask whether Airmail can control SpamSieve, and you should click OK.
SpamSieve will process new mail automatically. Messages that it thinks are spam will be moved to the Junk or Spam folder. Airmail will automatically launch SpamSieve when there are new messages that need to be filtered or when you train messages as spam or as good.
If you need to troubleshoot SpamSieve and Airmail, see the Checking the Airmail Setup section.
3.4 Setting Up GyazMail
Open GyazMail’s Preferences window and click Junk Filter. Make sure that Enable Junk filtering is checked and that the pop-up menu says SpamSieve.
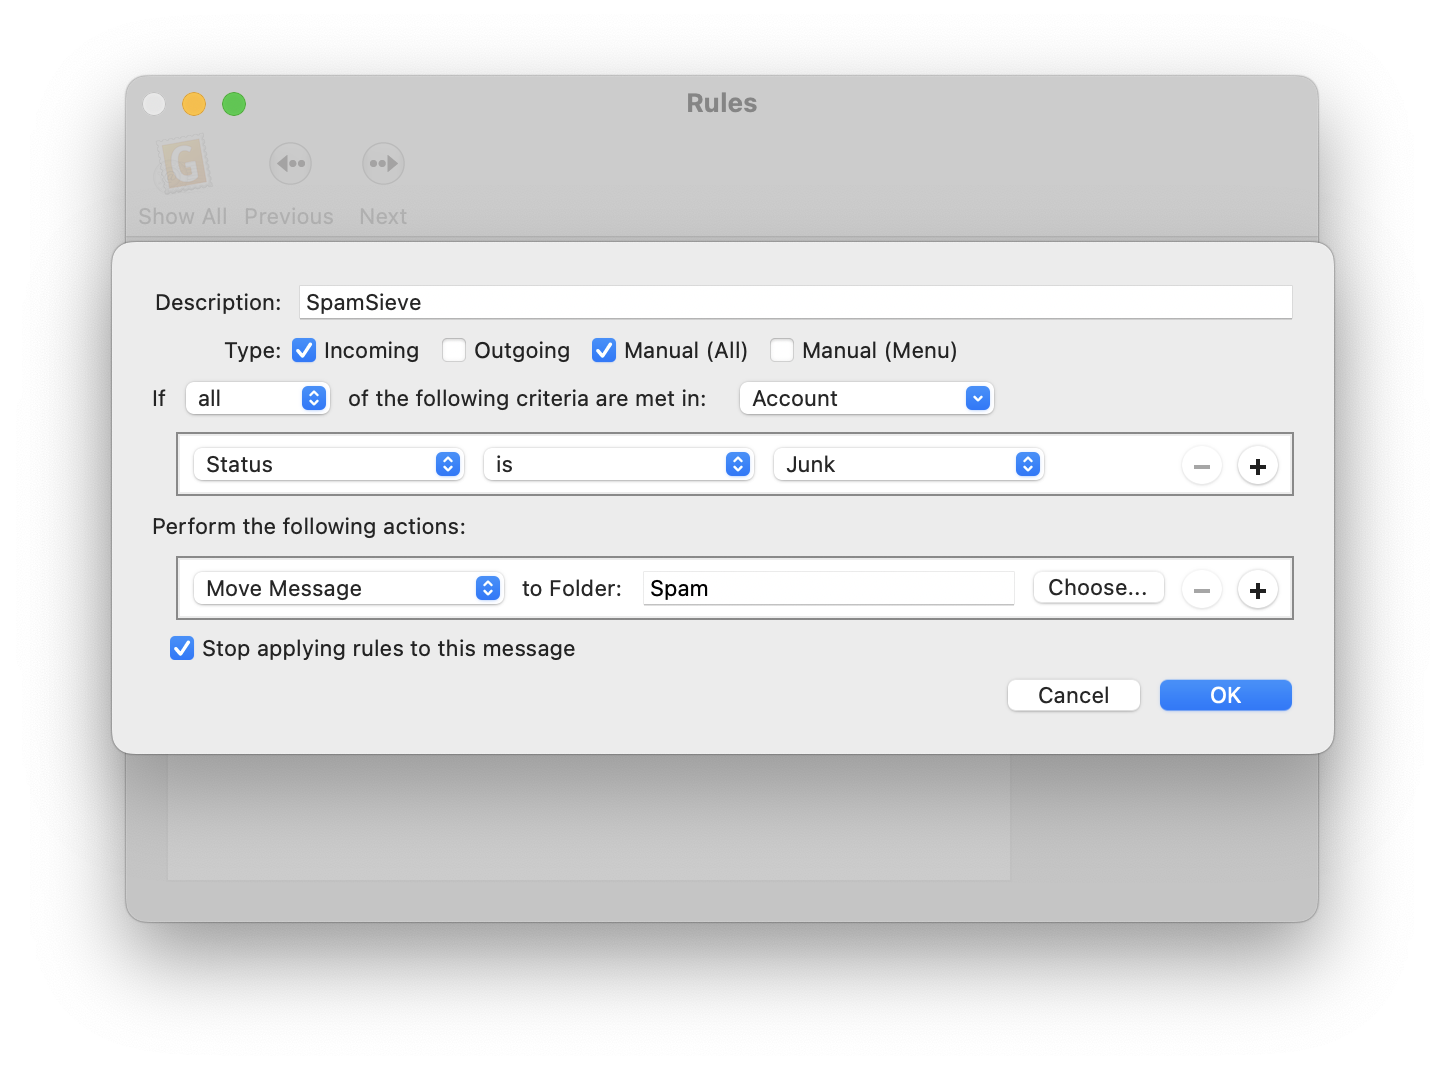
By default, GyazMail will color the incoming spam messages brown. If you want the spam messages to also be put in a separate folder, create a folder called Spam. Then click on Rules in the Preferences window and create a new rule as shown:
Now it is time to train SpamSieve:
- To train SpamSieve with spam messages, select the messages, go to GyazMail’s Message menu, and choose Junk ‣ Mark as Junk.
- To train SpamSieve with good messages, select the messages, go to GyazMail’s Message menu, and choose Junk ‣ Mark as Not Junk.
The Do an Initial Training section explains which messages (and how many of them) you should train.
You can also use the Junk button on the toolbar or the Message ‣ Status ‣ Junk menu command to toggle the junk status of the selected messages.
SpamSieve will process new mail automatically. If you ever need to manually ask it to sift through a mix of spam and good messages, select the messages and choose Junk ‣ Recheck Junk Status from the Message menu.
If you need to troubleshoot SpamSieve and GyazMail, see the Checking the GyazMail Setup section.
Moving Trained Messages
Normally, when you mark a message as junk or not junk in GyazMail, the message stays in the same mailbox. If you would like spam messages to move to the Spam mailbox and good messages to move to the inbox, you can set up two rules like this:
Then, instead of using the Junk and Not Junk buttons to train messages, you can use the Message ‣ Apply Rule ‣ Train as Spam and Message ‣ Apply Rule ‣ Train as Good menu commands to train and move them at the same time.
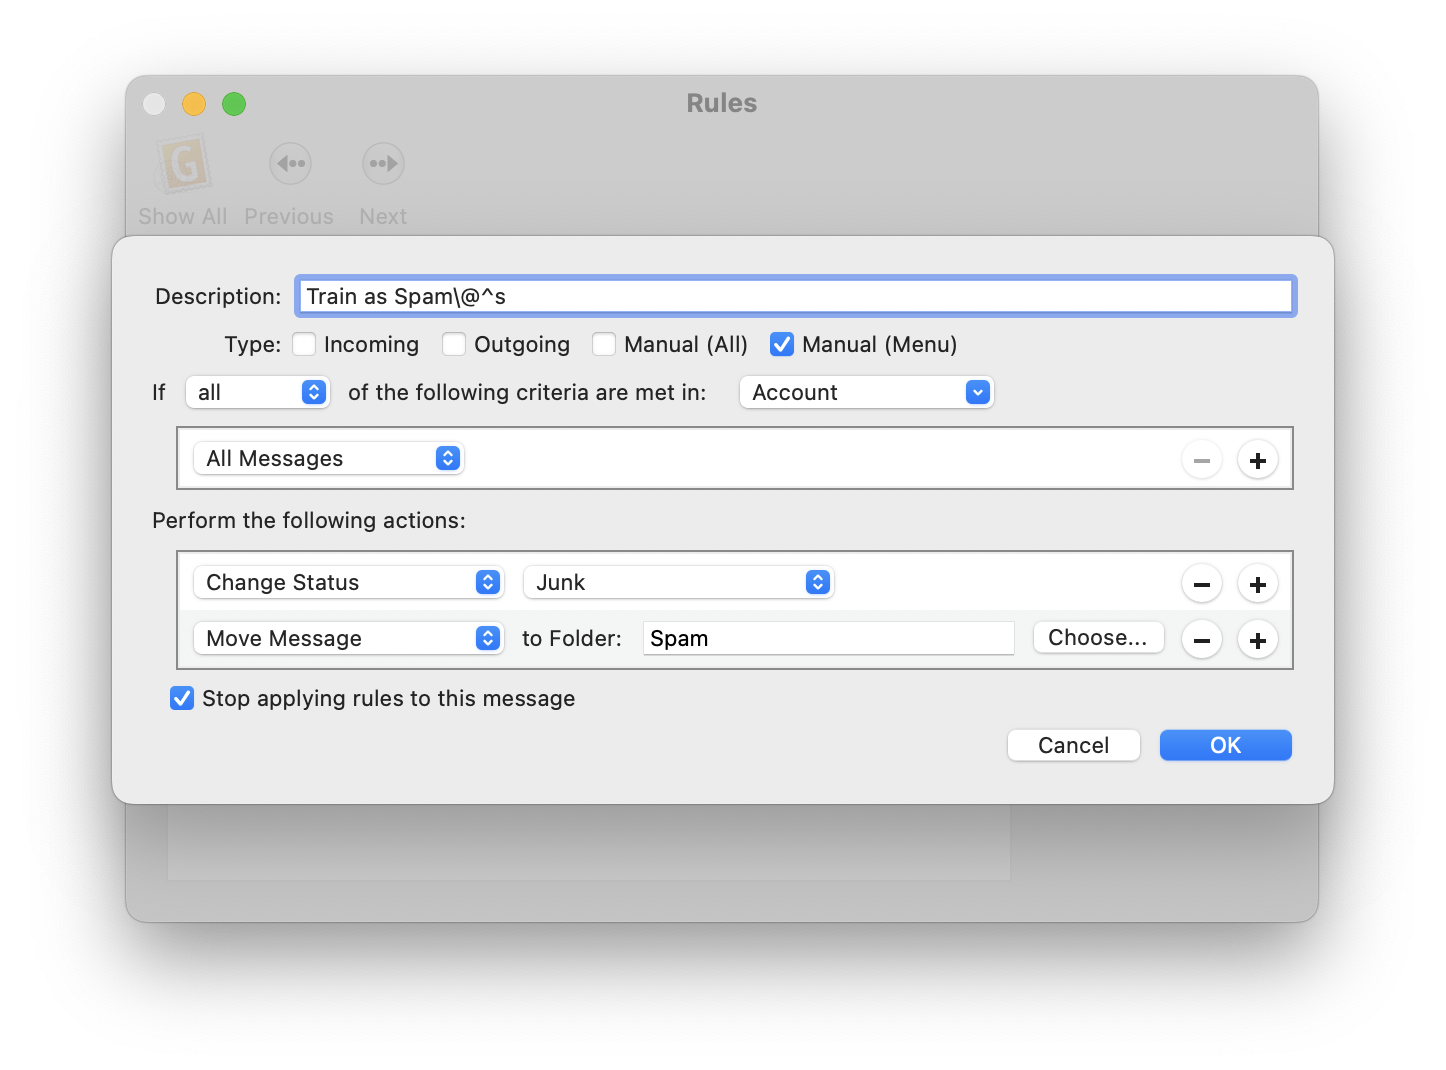
If desired, you can set up keyboard shortcuts for training. For example, give the Train as Spam rule a keyboard shortcut of Command-Control-S, change the Description of the rule to Train as Spam\@^s.
3.5 Setting Up MailMate
MailMate has built-in support for SpamSieve. Make sure that you are using MailMate 1.1.2 or later.
In MailMate’s Security settings, make sure that Enable is checked next to SpamSieve and that Enable for messages in is set to Inbox.
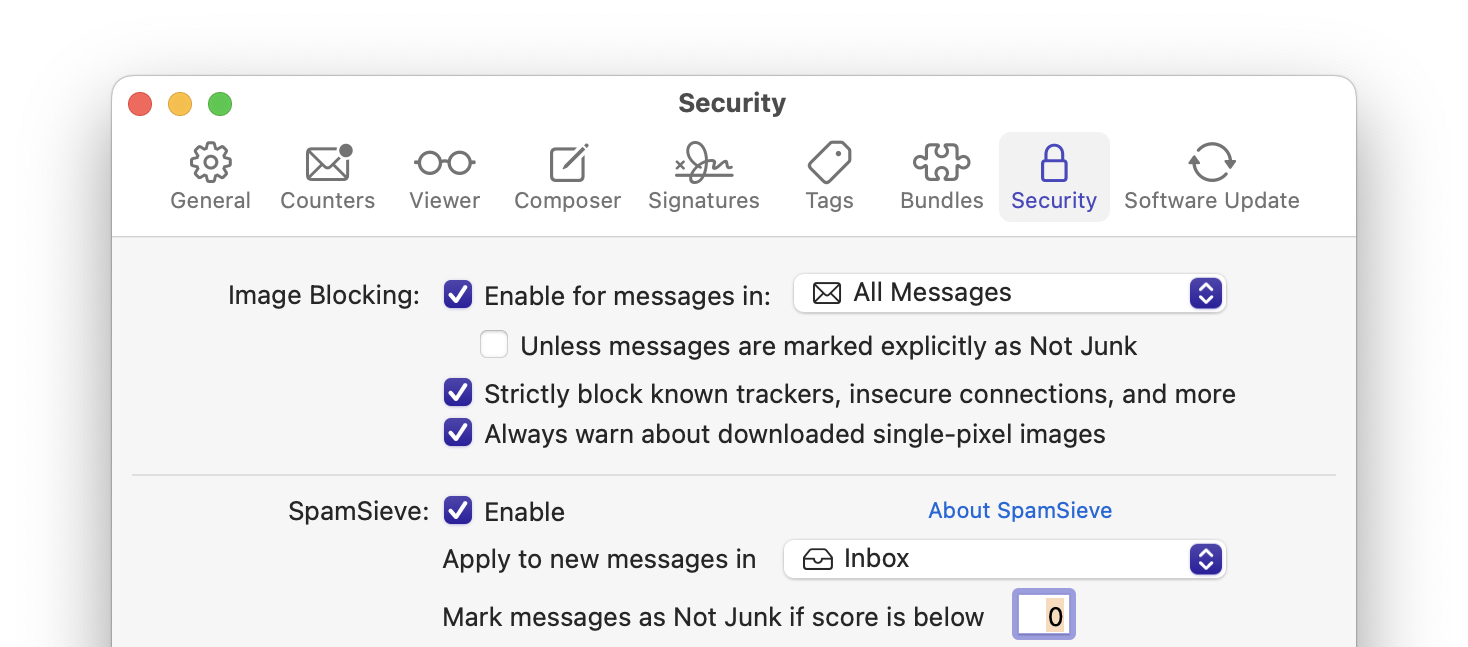
The Mark messages as Not Junk if score is below setting does not affect SpamSieve or its filtering. Rather, if SpamSieve thinks a message is less spammy than the score that you enter, MailMate will tell the mail server that it’s not junk, and it will also decide that it’s safe to display any remote images that the message references. If you would like to see remote images for all the messages that SpamSieve thinks are good, you should set this to 50.
Now it is time to train SpamSieve:
To train SpamSieve with spam messages, select the messages and click the Move to Junk button, or choose Message ‣ Junk State ‣ Junk from the menu bar, or move the message to the Junk mailbox.

To train SpamSieve with good messages, select the messages and click the Move Out of Junk button, or choose Message ‣ Junk State ‣ Not Junk from the menu bar, or move the message out of the Junk mailbox.

The Do an Initial Training section explains which messages (and how many of them) you should train.
SpamSieve will process new mail automatically. The SpamSieve Score column shows how spammy SpamSieve thought each message was, on a scale from 0 to 100 (with 50 and above meaning spam). (The Spam Score column shows the spam level reported by the server junk filter, if any.)
If you ever need to manually ask SpamSieve to sift through a mix of spam and good messages, choose Junk State ‣ SpamSieve ‣ Evaluate from the Message menu. (The Recompute Score command is similar except that it only updates the SpamSieve Score column in MailMate’s display. It does not move spam messages to the Junk mailbox.)
Note: On macOS 10.14 or later, the system will prompt you in order to let MailMate control SpamSieve, and you should allow this. For more information, see the Security & Privacy Access section.
If you need to troubleshoot SpamSieve and MailMate, see the Checking the MailMate Setup section.
Filtering Other Mailboxes
The above setup will automatically filter new messages that arrive in the inbox. If you have new messages in other mailboxes, e.g. due to server filtering rules or SaneBox, you can:
- Choose Mailbox ‣ New Smart Mailbox….
- Click the + button and add each additional mailbox that you would like to be filtered.
- In the Settings ‣ Security window, set Enable for messages in to the smart mailbox that you just created.
3.6 Setting Up MailMaven
MailMaven has built-in support for SpamSieve. We recommend using the latest versions of both apps.
In MailMaven’s Process ‣ Junk settings, make sure that Evaluate arriving messages using SpamSieve is selected.
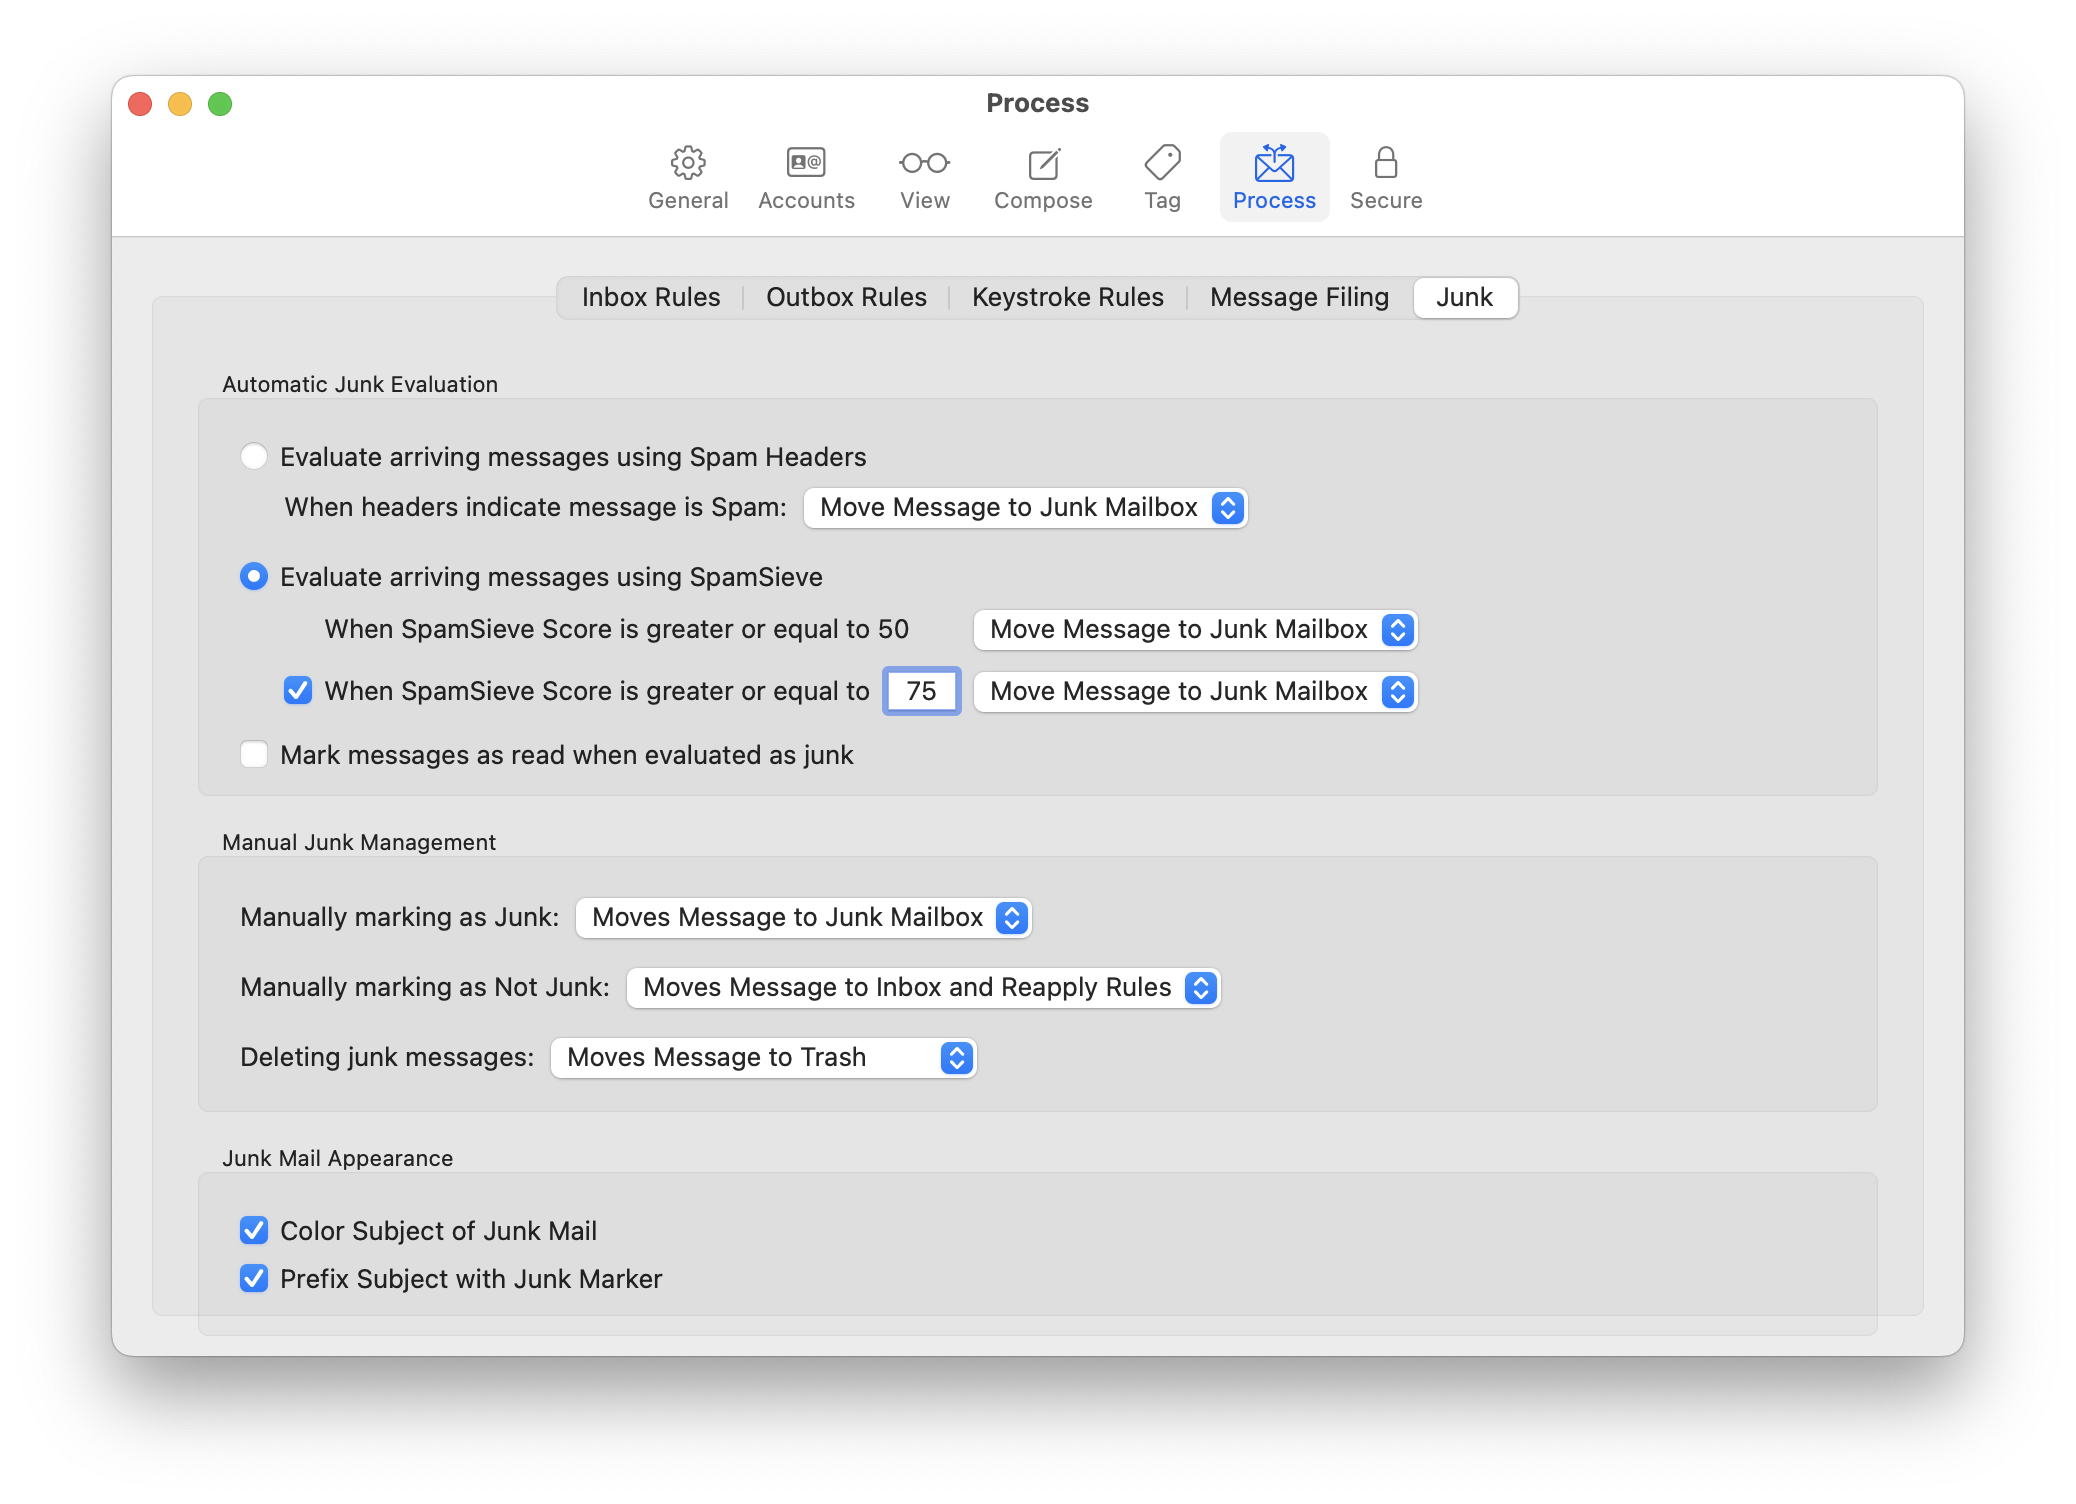
You can specify that all spam messages be moved to the Junk mailbox or set it to move the more spammy messages (with higher scores) to the Trash or even delete them immediately.
Note: If you choose to auto-delete the messages, they will still be stored in SpamSieve’s Log window for 30 days. It’s best to either correct any mistakes from the Log window or turn off auto-training so that uncorrected mistakes don’t mess up SpamSieve’s training.
There are additional options to customize whether incoming spam messages are marked as read, where MailMaven moves them after training, and whether it automatically re-applies the rules.
Now it is time to train SpamSieve:
To train SpamSieve with spam messages, select the messages in MailMaven and choose Message ‣ Mark as Junk from the menu bar or the contextual menu. You can also drag messages to the Junk mailbox in MailMaven.
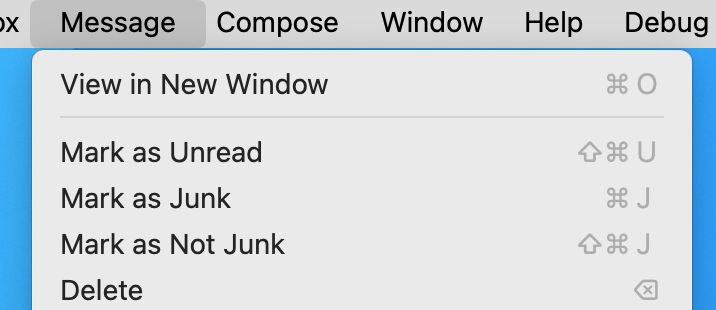
To train SpamSieve with good messages, select the messages and choose Message ‣ Mark as Not Junk from the menu bar or the contextual menu. You can also drag messages out of the Junk mailbox in MailMaven.
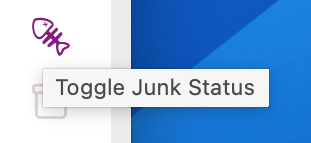
You can also click the Toggle Junk Status button when viewing a message:
The Do an Initial Training section explains which messages (and how many of them) you should train.
SpamSieve will process new mail automatically. There is currently no way in MailMaven to reprocess old messages.
Note: The system will prompt you in order to let MailMaven control SpamSieve, and you should allow this. For more information, see the Security & Privacy Access section.
If you need to troubleshoot SpamSieve and MailMaven, see the Checking the MailMaven Setup section.
3.7 Setting Up Outlook
These instructions apply to Microsoft Office 365 (also known as Outlook 2016 and Outlook 2019, versions 15.x and 16.x). If you have lots of messages in your inbox (such that this setup slows down Outlook), you should instead follow the Setting Up Outlook (Large Inboxes) instructions. For older versions of Outlook, please see the Setting Up Outlook 2011 section.
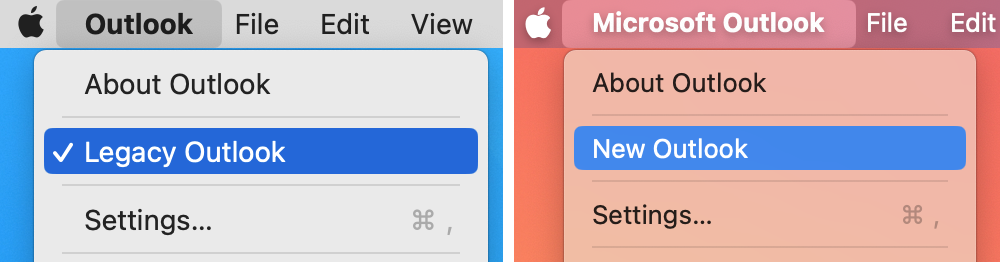
In Outlook, click on the Outlook menu at the top of the screen and make sure that Legacy Outlook is checked or that New Outlook is unchecked. There’s more information about this in the Turning Off New Outlook section of the manual.
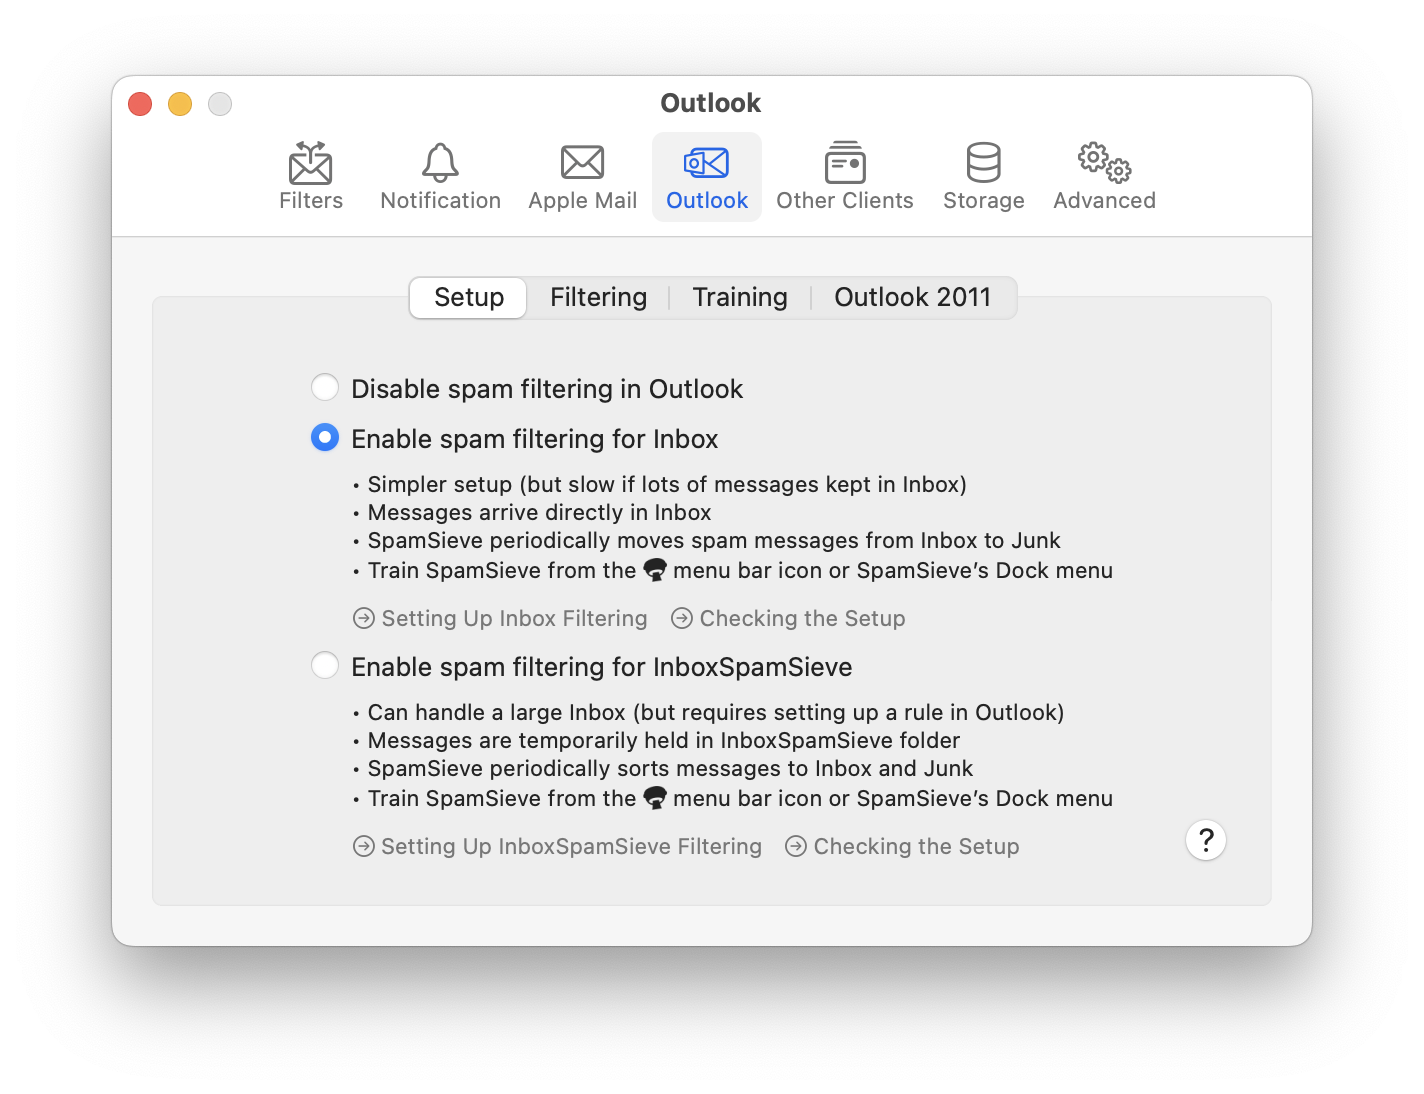
In SpamSieve, choose Settings… from the SpamSieve menu at the top-left of the screen and click on the Outlook and Setup tabs. Select Enable spam filtering for Inbox:
Click on the Filters tab of SpamSieve’s Settings. Make sure that Use Outlook/Entourage contacts is checked and click the Load Contacts button. You will want to do this again if you add more contacts to Outlook.
Now it is time to train SpamSieve. You can do this either from the SpamSieve menu bar icon at the top of the screen or from SpamSieve’s Dock menu:
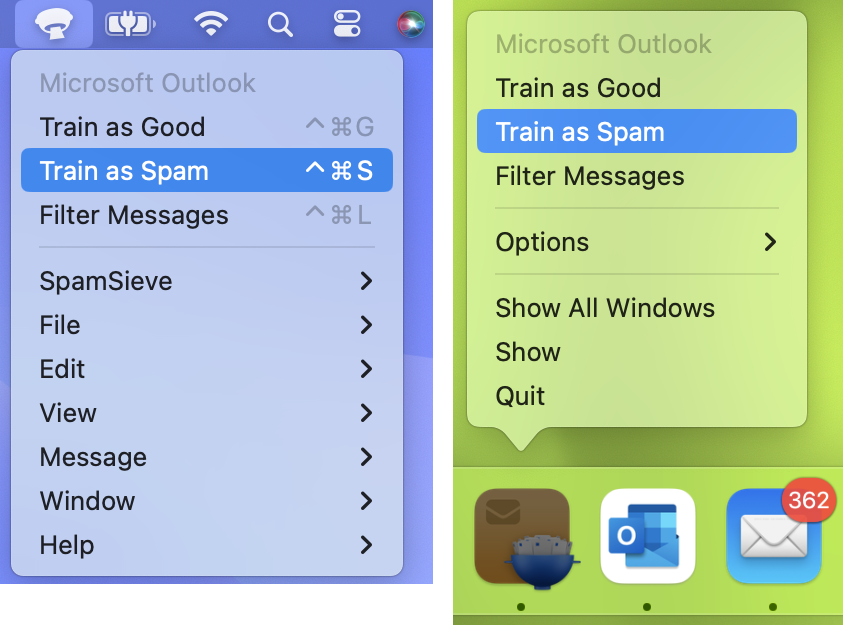
- To train SpamSieve with spam messages, select one or more of them in Outlook and then choose Train as Spam from the menu. The messages will be moved to the Junk Email folder. The keyboard shortcut for this command is Command-Control-S.
- To train SpamSieve with good messages, select one or more of them and then choose Train as Good from the menu. If a good message is in the Junk Email folder when you train it, it will be moved to the inbox.
The Do an Initial Training section explains which messages (and how many of them) you should train.
Note: On macOS 10.14 or later, the first time you try to train a message macOS will ask for permission to control Outlook, and you should click OK.
SpamSieve will process new mail automatically every minute, moving spam messages from Inbox to Junk Email.
If you ever need to manually ask SpamSieve to sift through a mix of spam and good messages, select the messages and choose Filter Messages from the SpamSieve menu bar icon or the SpamSieve Dock menu. SpamSieve will move the ones that it thinks are spam to the Junk Email folder.
The above is all you need to know about using SpamSieve with Outlook. The Outlook Customization section explains some more advanced setup options. If the filtering doesn’t seem to be working properly, you can check the setup as described in the Checking the Outlook Setup section.
3.7.1 Turning Off New Outlook
The Microsoft Outlook app can run in two modes: Legacy Outlook and New Outlook. SpamSieve uses AppleScript to communicate with Outlook, which is currently only supported in the legacy mode. Microsoft is ending support for Legacy Outlook on November 1, 2026. There’s more information about this, and how it affects SpamSieve, in the End of Support for Legacy Outlook section of the manual.
To switch to legacy mode, in Outlook, click on the Outlook menu at the top of the screen and make sure that Legacy Outlook is checked or that New Outlook is unchecked:
In some versions of Outlook, there is no switch to turn off “New Outlook” once it is enabled. You can enter this command in the Terminal app:
defaults write com.microsoft.Outlook EnableNewOutlook 1
and press Return to show the switch. You can also enter this command:
defaults write com.microsoft.Outlook IsRunningNewOutlook NO
to directly turn off New Outlook.
Note that the old and new versions of Outlook have separate mail storage. Messages stored in On My Computer folders will not automatically sync between the two versions.
3.7.2 End of Support for Legacy Outlook
Summary
Before November 1, 2026, to keep filtering your mail with SpamSieve, you will need to either switch from Legacy Outlook to New Outlook or switch to another mail client (such as Apple Mail). As of this writing, November 2025, New Outlook does not have support for AppleScript, and thus it cannot work directly with SpamSieve.
- Microsoft plans to restore AppleScript support in December 2025. You can wait until after that to switch to New Outlook and then keep using Outlook with SpamSieve as you have been doing.
- Or you can switch now and continue to use SpamSieve by also setting up your mail accounts and SpamSieve in Apple Mail. This will also keep the spam out of your inbox in Outlook, and if you enable the Train messages in TrainSpam and TrainGood setting, you can still train SpamSieve from within Outlook.
You can choose Give Feedback from the Help menu in Outlook to ask Microsoft to prioritize support for AppleScript so that New Outlook will work directly with SpamSieve as soon as possible.
Legacy Outlook vs. New Outlook
SpamSieve has worked with Microsoft Outlook and its predecessors since its inception. This was possible because of their strong support for AppleScript. This macOS technology let SpamSieve access the contents of your e-mail messages, so it could determine whether they were spam, and it also let SpamSieve tell Outlook to move the spam ones to the Junk Email folder.
In October 2020, Microsoft introduced a new version of Outlook built on Web technologies. Many popular features were missing, including AppleScript and rules. Microsoft said that it would continue to support both the current and new versions of Outlook, as separate modes within the same app, while it worked on bringing the new version up to feature parity. Initially, there was a switch to let you opt in to preview the “New Look” version. In recent years, the new version was the default and there was a switch to go back to “Legacy Outlook.” Running in legacy mode has been required for compatibility with SpamSieve since the new mode has not yet restored AppleScript support (nor added another mechanism to provide equivalent functionality).
Ending Support for Legacy Outlook
Microsoft has announced that, as of November 1, 2026, it is ending support for Legacy Outlook. This was originally scheduled for November 1, 2025, but on October 6 Microsoft extended the date by a year, in keeping with its previous statemens that Legacy Outlook support would continue until AppleScript support had been restored to New Outlook. After November 1 2026, when you launch Outlook on your Mac, it will force you to migrate to New Outlook. We expect that, by the time this happens, New Outlook will support AppleScript and the current version of SpamSieve at that time will seamlessly keep working with it.
Which Outlook Versions Are Affected?
Microsoft’s support page says that Legacy Outlook will no longer be supported for Microsoft 365 subscriptions (personal, family, business, and enterprise) or for standalone version of Outlook 2024. If you purchased Outlook LTSC (Office Long Term Service Channel), support will continue until October 2029. We believe, but cannot guarantee, that older versions of Outlook such as 14.x and possibly early versions of 15.x from before Outlook was subscription-based may continue to work. As of this writing, the current version of Outlook is 16.102.1, which includes the switch for changing between Legacy Outlook and New Outlook. However, Microsoft has said that, even if you keep this version installed and don’t update it, and even if you have an active Microsoft 365 subscription, the legacy mode will stop working on November 1, 2026.
How Can I Use SpamSieve With New Outlook Now?
If you’d like to use New Outlook before it supports AppleScript, you can still use SpamSieve to filter your Outlook e-mail even though SpamSieve will no longer be able to directly communicate with Outlook. All Macs include Apple’s Mail app, and it works great with SpamSieve. If you add your mail accounts to Apple Mail and set up SpamSieve for Apple Mail, SpamSieve and Mail will filter your inbox, and the spam messages will automatically be removed from your Outlook inbox, too. (This works for IMAP and Exchange accounts, but not for POP accounts.) You can hide Mail or run it without any windows open so that the filtering happens invisibly in the background (though you’ll need to remember to launch Mail when you restart your Mac). You do not have retrain SpamSieve from scratch; it will keep using the same training data from when you were using it with Outlook. Going forward, if you need to correct any filtering mistakes you can train SpamSieve directly from Outlook by moving messages into the special TrainSpam or TrainGood mailbox. To do this, first make sure that Train messages in TrainSpam and TrainGood is selected in the Settings ‣ Apple Mail ‣ Training window. There’s more information about how this works in the Drone Setup and Remote Training section of the manual.
When Will SpamSieve Work Directly With New Outlook?
Microsoft’s roadmap currently has AppleScript support expected to roll out in December 2025. At that time, the current version of SpamSieve may automatically start working with Outlook again. We will test with beta versions of Outlook as they become available and update SpamSieve as necessary.
Support for rules is also not implemented yet, and it is not currently on Microsoft’s roadmap, but this is not required for SpamSieve support. Legacy Outlook had a performance bug that required a different SpamSieve setup if you had a large number of messages in your inbox, and in some cases this required using Outlook’s rules feature. It’s unclear what the performance characteristics of New Outlook’s AppleScript support will be and, thus, whether rules support will be required for large inboxes. Many mail providers support server-side rules, which is good enough for SpamSieve’s purposes.
You can choose Give Feedback from the Help menu in Outlook to ask Microsoft to prioritize support for AppleScript, rules, or any other features that you miss.
3.8 Setting Up Outlook (Large Inboxes)
These instructions apply to Microsoft Office 365 (also known as Outlook 2016 and Outlook 2019, versions 15.x and 16.x). If you don’t keep large numbers of messages in your inbox, you can use the simpler setup described in the Setting Up Outlook section. For older versions of Outlook, please see the Setting Up Outlook 2011 section.
In Outlook, click on the Outlook menu at the top of the screen and make sure that Legacy Outlook is checked or that New Outlook is unchecked. There’s more information about this in the Turning Off New Outlook section of the manual.
You will now create an InboxSpamSieve folder in each account and set up a rule to move new messages to that folder. SpamSieve will periodically scan the messages in this folder, moving the good ones to Inbox and the spam ones to Junk.
- For each IMAP or Exchange account that you have, follow the Outlook IMAP/Exchange Account Rules instructions.
- For each Gmail account that you have, follow the Outlook Gmail Account Rules instructions.
- For each POP account that you have, follow the Outlook POP Account Rules instructions.
In SpamSieve, choose Settings… from the SpamSieve menu at the top-left of the screen and click on the Outlook and Setup tabs. Select Enable spam filtering for InboxSpamSieve:

Click on the Filters tab of SpamSieve’s Settings. Make sure that Use Outlook/Entourage contacts is checked and click the Load Contacts button. You will want to do this again if you add more contacts to Outlook.
Now it is time to train SpamSieve. You can do this either from the SpamSieve menu bar icon at the top of the screen or from SpamSieve’s Dock menu:
- To train SpamSieve with spam messages, select one or more of them in Outlook and then choose Train as Spam from the menu. The messages will be moved to the Junk Email folder. The keyboard shortcut for this command is Command-Control-S.
- To train SpamSieve with good messages, select one or more of them and then choose Train as Good from the menu. If a good message is in the Junk Email folder when you train it, it will be moved to the inbox.
The Do an Initial Training section explains which messages (and how many of them) you should train.
Note: On macOS 10.14 or later, the first time you try to train a message macOS will ask for permission to control Outlook, and you should click OK.
SpamSieve will process new mail automatically every minute. Messages yet to be processed will be held in the InboxSpamSieve folders (and should not be touched while there). SpamSieve will then move the good messages to Inbox and the spam messages to the Junk Email folder.
If you ever need to manually ask SpamSieve to sift through a mix of spam and good messages, select the messages and choose Filter Messages from the SpamSieve menu bar icon or the SpamSieve Dock menu. SpamSieve will move the ones that it thinks are spam to the Junk Email folder.
The above is all you need to know about using SpamSieve with Outlook. The Outlook Customization section explains some more advanced setup options. If the filtering doesn’t seem to be working properly, you can check the setup as described in the Checking the Outlook Setup (Large Inboxes) section.
3.8.1 Outlook IMAP/Exchange Account Rules
When Setting Up Outlook (Large Inboxes), repeat these instructions for each IMAP and Exchange account that you have:
Create a new folder called InboxSpamSieve in the account. You can do this by Control-clicking on the name of the account in Outlook’s main window and choosing New Folder.
Go to Outlook’s Tools menu and choose Rules to open the Rules list.
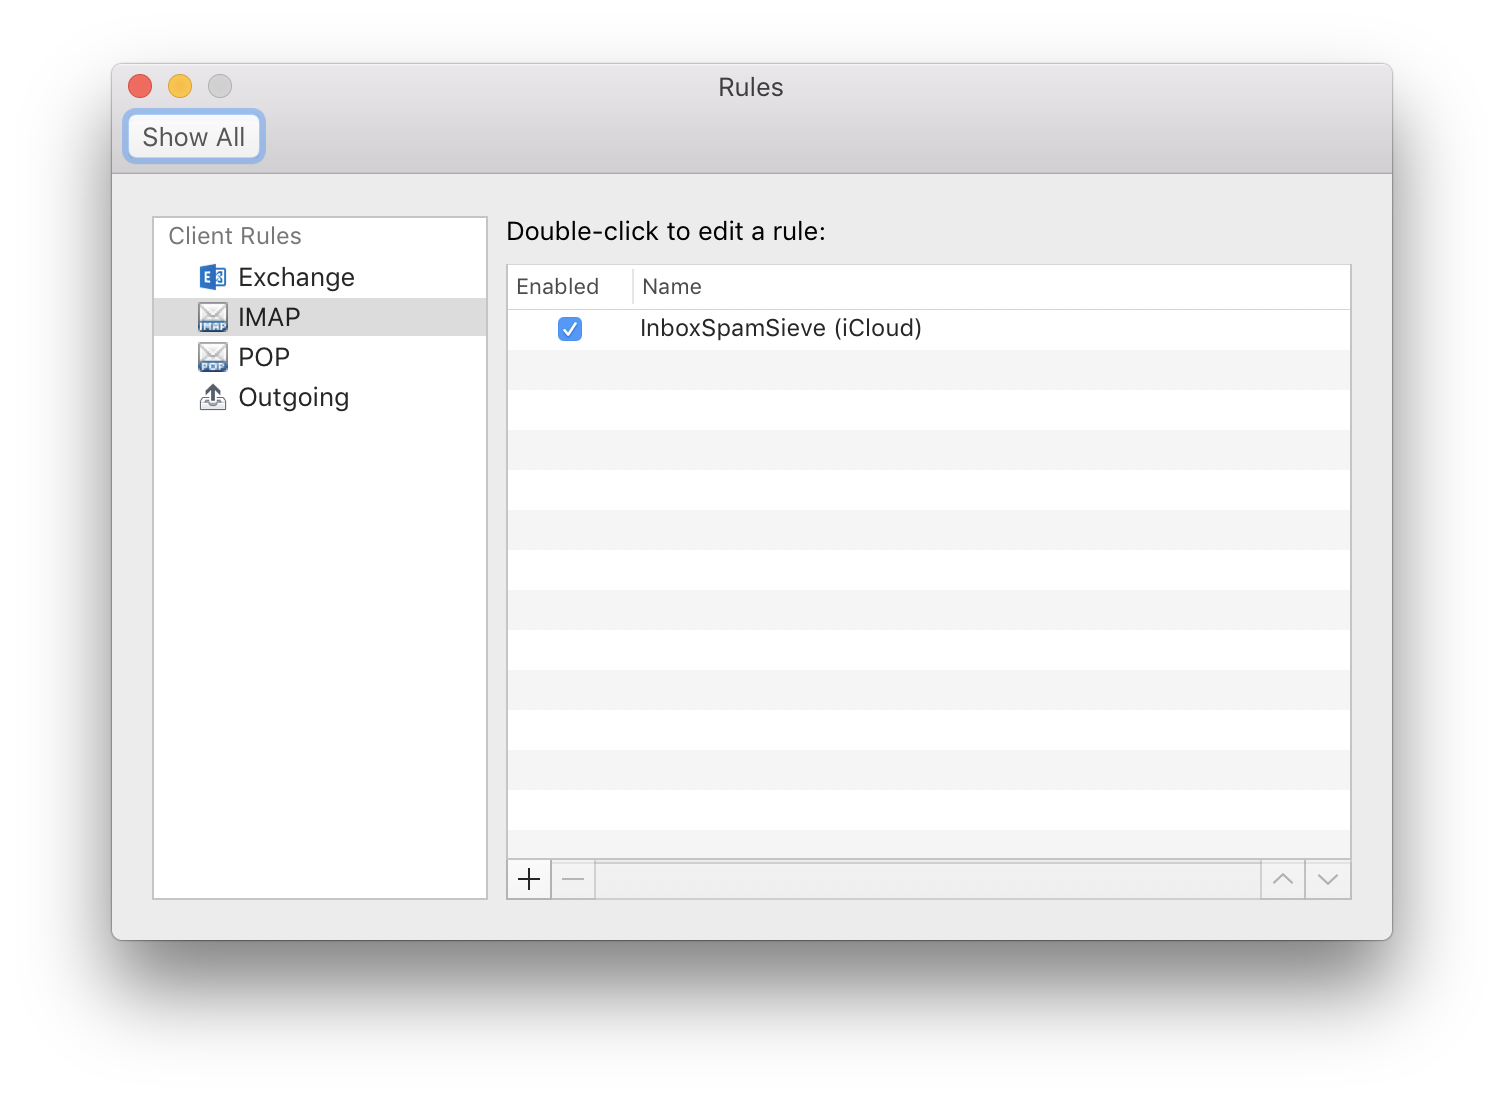
Click on the source list item under Client Rules corresponding to the type of account you that have (e.g. IMAP or Exchange). Ignore the Server Rules section of the window, if any.
Uncheck or delete any (non-SpamSieve) rules for filtering out junk/spam e-mails.
Click the + button at the bottom of the window to create a new rule.
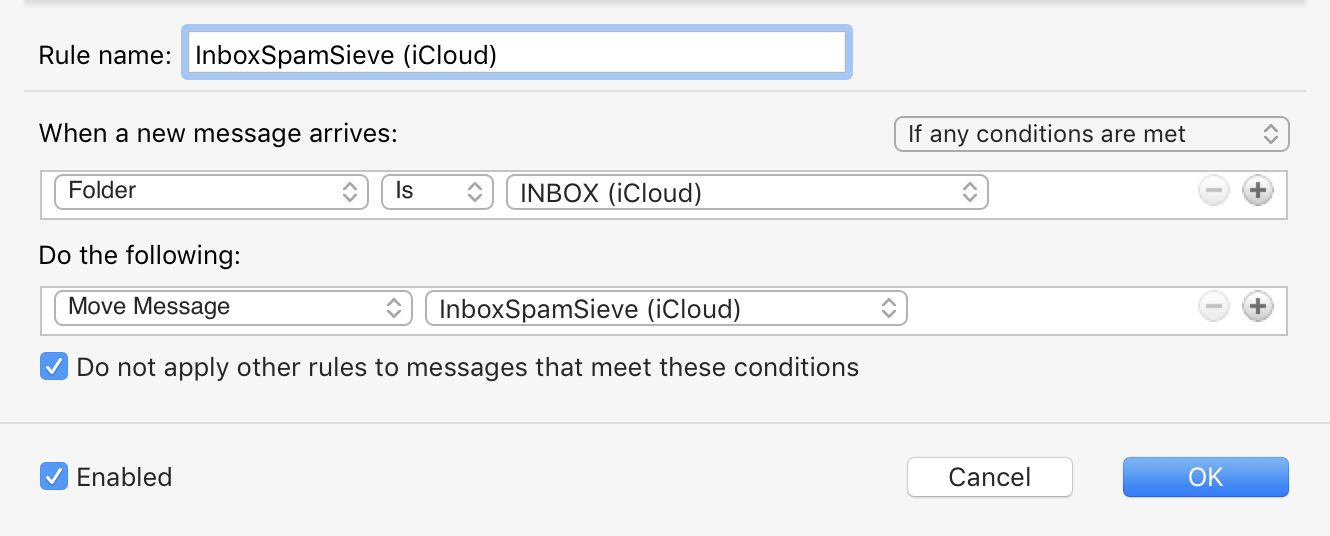
Change the name of the rule to InboxSpamSieve (AccountName) where AccountName is the name of your account (e.g. iCloud in this example).
Under When a new message arrives, choose Folder, Is, and INBOX (AccountName):
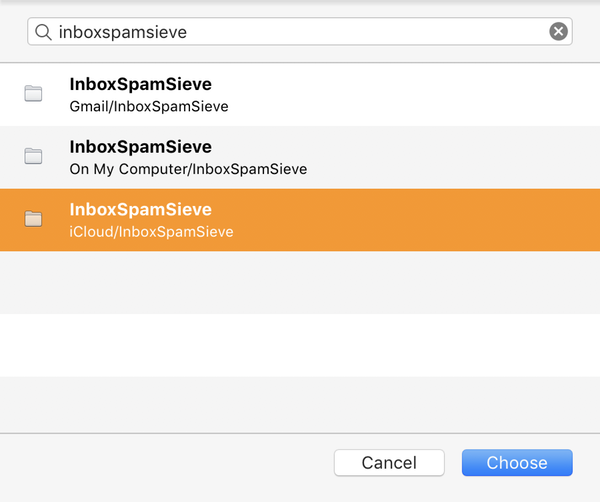
If INBOX (AccountName) is not in the third pop-up menu, you can select Choose Folder… from the pop-up menu and then search for it by typing Inbox:

Under Do the following, choose Move Message and InboxSpamSieve (AccountName). If InboxSpamSieve (AccountName) is not in the second pop-up menu, you can choose Choose Folder… from the pop-up menu and then search for it by typing InboxSpamSieve:
The rule should now look like:
Click OK to save the rule.
In Outlook’s Preferences ‣ Accounts window, select the account in the list and click Advanced…. In the Server tab, make sure that Sync all IMAP folders every _ minutes is checked. We recommend setting it to a small number, such as 2. (You can skip this step if you’re using an Exchange account rather than an IMAP one.)
You can now repeat this section for any additional IMAP or Exchange accounts, or return to Setting Up Outlook at Step 5.
3.8.2 Outlook Gmail Account Rules
When Setting Up Outlook (Large Inboxes), repeat these instructions for each Gmail account that you have.
Gmail Account Types in Outlook
A Gmail account in Outlook can be set up in two different ways:
It can be treated as a generic IMAP account. Such accounts look like this in Outlook’s Accounts preferences:

Prior to Outlook version 16.17, this was the only option, so it’s likely what you have if you originally set up your account using an older version of Outlook.
It can be set up as a special Google account. Such accounts look like this in Outlook’s Accounts preferences:

This option is only possible with newer versions of Outlook. Using the Google account type enables some Gmail-specific calendar and contacts features in Outlook. However, we generally recommend using an IMAP account instead, due to various limitations and bugs with Google accounts in the current version of Outlook. For example, messages may be moved to the wrong account’s inbox.
Setting Up SpamSieve With a Gmail IMAP Account
SpamSieve works best when a Gmail account is set up as a generic IMAP account. To set up an account to use IMAP:
- From the Outlook menu, choose Preferences and then click on Accounts.
- If your account does not already appear in the list, skip to Step 3. If your Gmail account was already set up as a Google account, you can remove it by selecting it and clicking the - button.
- Click the + button and choose New Account….
- Enter your Gmail e-mail address and click Continue.
- Click the Not Google? button at the top of the window.
- Click IMAP/POP, the fill in the rest of the information, and click Add Account.
- Now follow the the regular Outlook IMAP/Exchange Account Rules instructions to set up Outlook to filter the account with SpamSieve.
Setting Up SpamSieve With a Gmail Google Account
We recommend using the IMAP setup (above) where possible because, if you have multiple accounts, Outlook may move Google messages to the Inbox or Junk Email mailbox of the wrong account.
However, if you need to set up your Gmail account as a Google account in Outlook, it is still possible to use SpamSieve:
Log into the Gmail Web site.
Create a new label (folder) called InboxSpamSieve. The + Create new label command is located at the left of the window. You may need to click More in order to see it.
Click the gear at the top right, choose Settings, then click on Filters and Blocked Addresses.
Click Create a new filter. Enter {(to:me) (deliveredto:USERNAME@gmail.com)} in the Has the words field (replacing USERNAME with your actual Gmail username).
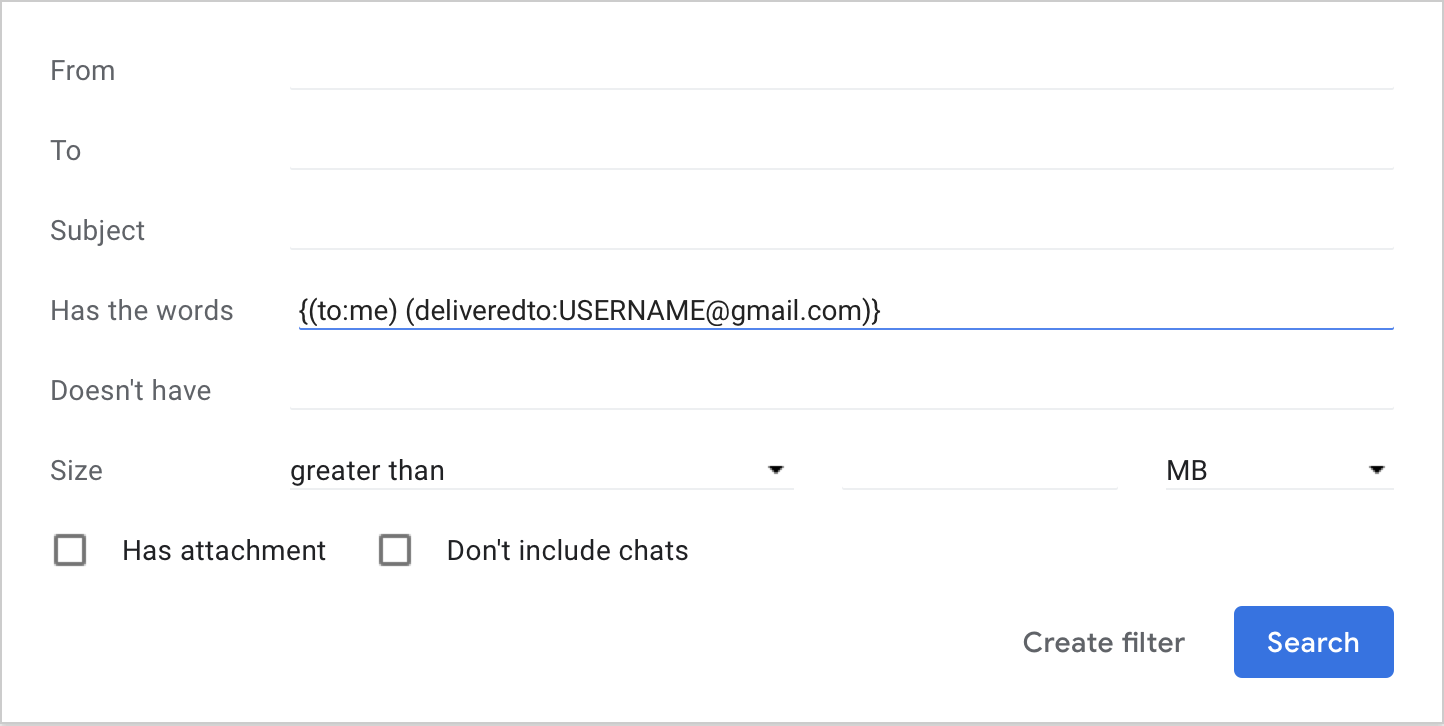
Then click Create filter.
Check the Skip the Inbox (Archive it) and Apply the label boxes and select InboxSpamSieve as the label.

Note: This will cause spam messages to be temporarily moved to Gmail’s archive, however they should be automatically removed from the archive when you delete them from Outlook. For more information, see Keeping Spam Messages Out of Gmail’s Archive, which shows how to have Gmail not archive messages that are deleted via IMAP.
Click Create filter.
You can now repeat this section for any additional Gmail accounts, or return to Setting Up Outlook (Large Inboxes) at Step 3.
3.8.3 Outlook POP Account Rules
When Setting Up Outlook (Large Inboxes), repeat these instructions for each POP account that you have.
Create a new folder called InboxSpamSieve. You can do this by Control-clicking on On My Computer in Outlook’s main window and choosing New Folder. (You only need one folder for all your POP accounts.)
Go to Outlook’s Tools menu and choose Rules to open the Rules list.

Click on POP under Client Rules.
Uncheck or delete any (non-SpamSieve) rules for filtering out junk/spam e-mails.
Click the + button at the bottom of the window to create a new rule.
Change the name of the rule to InboxSpamSieve (AccountName) where AccountName is the name of your account (e.g. POPAccount in this example).
Under When a new message arrives, choose Account, Is, and AccountName (iCloud in this example):
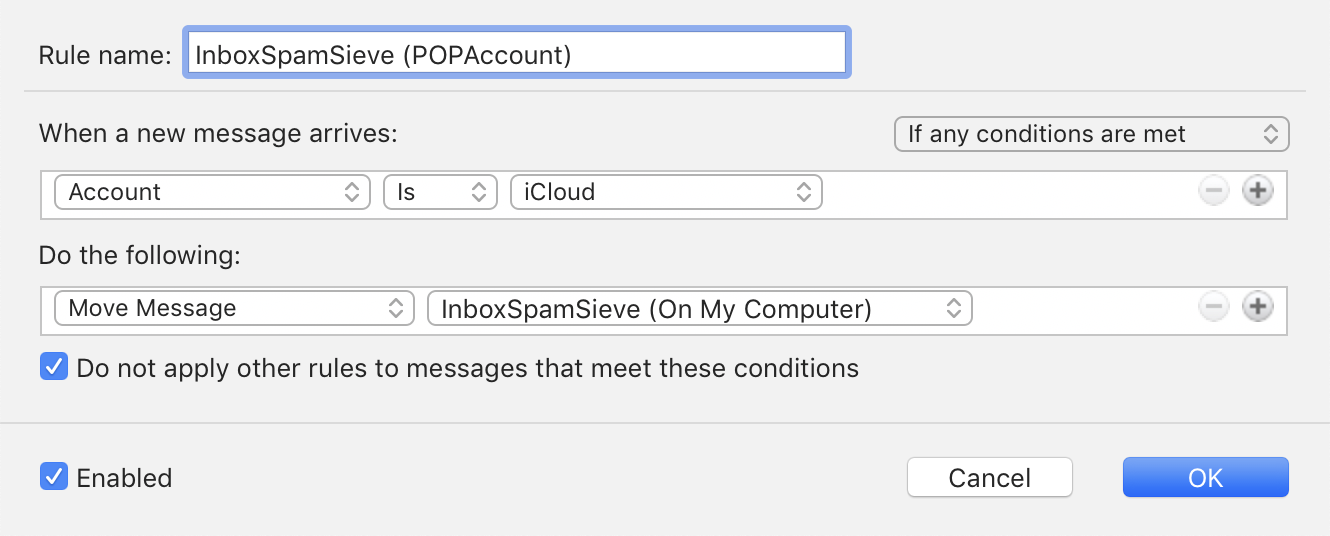
Under Do the following, choose Move Message and InboxSpamSieve (On My Computer). If InboxSpamSieve (On My Computer) is not in the second pop-up menu, you can choose Choose Folder… from the pop-up menu and then search for it.
Click OK to save the rule. You can now repeat this section for any additional POP accounts, or return to Setting Up Outlook at Step 5.
3.9 Setting Up Gmail, iCloud, Yahoo, AOL, or Other Web Mail
SpamSieve works with Web mail accounts, provided that they allow access via POP, IMAP, or Exchange. This includes Gmail, iCloud, Yahoo, AOL, Outlook.com, and most other Web mail providers. Just configure Apple Mail to access your account and then follow the normal SpamSieve setup instructions in the Setting Up Apple Mail section. SpamSieve will then filter your Web mail when Apple Mail is running.
You can train SpamSieve from within Apple Mail. If you use the drone setup, you can also train SpamSieve from your Web browser by moving messages into the special training mailboxes.
If you’re using Proton Mail, we recommend using the Move it to the Trash if the spam score is at least setting to have SpamSieve move all spam messages to the Trash instead of to the Junk mailbox, as Proton Mail does not remove spam messages from All Mail when they are moved to Junk.
See also:
3.10 Setting Up Other Mail Clients
You can still use SpamSieve with mail programs that are not directly supported. To do this, configure Apple Mail to access your mail account and then follow the normal SpamSieve setup instructions in the Setting Up Apple Mail section. SpamSieve will then filter your Web mail when Apple Mail is running. It can run in the background—and you can hide its windows if desired—while you use your preferred mail client to perform your normal e-mail tasks. (To do this automatically, you can set up Apple Mail in System Settings ‣ General ‣ Login Items.)
You can train SpamSieve from within Apple Mail or from SpamSieve’s Log window, or use the drone setup to train SpamSieve from your primary mail client by moving messages into the special training mailboxes.
3.11 Do an Initial Training
SpamSieve does not have distinct “training” and “working” modes. As soon as you install it, it is always learning from the messages it sees and always filtering out the spam that it finds.
Although you can start using SpamSieve immediately and just correct any mistakes that it makes, it will do a better job of filtering if you use some of your old mail to do an initial training. This simply means that you give it some examples of messages you consider to be spam, and ones which you do not. You do this by selecting some messages in your mail program and choosing a training command from the menu. For Apple Mail and Outlook, choose Train as Good or Train as Spam from the SpamSieve menu bar icon. For other clients, see the “Setting Up” section for your mail program. There’s more information about this in the Train as Good/Spam section of the manual.
SpamSieve collects information from the messages it’s trained with into its corpus, which it uses to predict whether subsequent messages are spam. Don’t worry; it learns quickly!
How many messages you should train SpamSieve with depends on how many old messages you have and on how much time you want to put into the process. 195 spam messages and 105 representative good ones are enough for most people to get very good accuracy, but it’s OK if you don’t have that many. The important points are:
- Do not use more than 1,000 messages.
- Using up to 1,000 recent messages in the initial training lets SpamSieve start out with a high level of accuracy. In general, the more messages you train SpamSieve with, the better its accuracy will be. However, using more than 1,000 messages initially, would “fill up” SpamSieve’s corpus with older messages, making it slower and less effective at adapting to new kinds of spam that you’ll receive in the future.
- The messages should be approximately 65% spam.
- For example, use 650 spams and 350 good messages or 65 spams and 35 good messages. It is better to use fewer messages in the initial training (i.e. not use all your saved mail) than to deviate from the recommended percentage. For example, if you have 500 good messages but only 195 saved spam messages, don’t train SpamSieve with all 695 messages. Instead, train it with the 195 spams and about 105 representative good messages.
In order to monitor your progress, you can go to SpamSieve’s Window menu and choose Statistics. The Corpus section in the middle of the Statistics window shows how many good and spam messages SpamSieve has been trained with, and what percentage of them are spam. After the initial training, SpamSieve will automatically train itself, and you’ll only need to train it to correct mistakes.
After the initial training, you don’t have to worry about the number or percentage of messages in the corpus. SpamSieve will automatically learn from new messages as they arrive and keep its corpus properly balanced.
Accuracy will improve with time, but if you’ve used at least 100 or so messages in the initial training, SpamSieve should immediately start moving some of the incoming spam messages to your junk mailbox. If you don’t see results right away, check the setup in your mail program. After a few hundred messages of each type are in the corpus, SpamSieve should be catching most of your spam.
Now you’re done setting up SpamSieve. The Correct All Mistakes section explains how you can keep SpamSieve’s accuracy high by telling it if it puts any messages in the wrong mailbox.
3.12 Correct All Mistakes
SpamSieve examines each incoming message and moves the spam messages into a separate spam mailbox. It leaves the good messages alone, so they will stay in the inbox or be processed by your other mail rules. In order to keep SpamSieve’s accuracy high, you’ll need to correct any mistakes that it makes:
- If you find a spam message that’s not in the spam mailbox, train it as spam.
- If you find a good message in the spam mailbox, train it as good.
Normally, the Train SpamSieve allowlist and Train SpamSieve blocklist settings are enabled. This means that training a single message as good will make SpamSieve classify all future messages from that message’s sender as good. Likewise, training a message as spam will make SpamSieve classify all future messages from that message’s sender as spam. Normally, the Train Bayesian classifier preference is also enabled, which will let SpamSieve learn from the message’s contents so that it can recognize future messages that are similar even if the sender is different.
How to Correct Mistakes
To correct a mistake, select the message in your mail program and choose a training command from the menu. For Apple Mail and Outlook, choose Train as Good or Train as Spam from the SpamSieve menu bar icon. For other clients, see the “Setting Up” section for your mail program. Always train SpamSieve using the specified menu commands (or keyboard shortcuts); do not move the messages into or out of the junk mailbox yourself, as this will bypass SpamSieve.
Correcting All the Mistakes
You must correct all of SpamSieve’s mistakes or its accuracy will deteriorate over time. The reason for this is that SpamSieve assumes that it classified a message correctly unless you tell it otherwise, and it will learn based on that assumption (unless you turn off the Auto-train as needed preference). Also, the sooner you correct SpamSieve, the better. By promptly correcting SpamSieve, you ensure that it’s always acting based on accurate information.
If you lose track of some messages in your mail client, you can also correct mistakes from SpamSieve’s Log and Corpus windows. This is described in the Fixing Uncorrected Mistakes section.
Which Messages to Train
After the initial training, it is not necessary (or recommended) to train SpamSieve with messages that are not mistakes.
Do train all the spam messages that get through to your inbox. Do this even for phishing messages, image spams, and messages from forged senders that you might think would confuse SpamSieve. It’s best to tell SpamSieve the truth.
Do not delete spam messages from your iPhone’s inbox because then SpamSieve won’t know that it made a mistake. Train them when you get back to your Mac or use the remote training setup to train them from your iPhone.
Do train any good messages in the Junk mailbox that SpamSieve had incorrectly classified as spam. In Apple Mail, these messages would normally have a colored background in the message list. If you are at your iPhone when you find a good message in Junk, remember to train it when you get back to your Mac or use the remote training setup to train it from your iPhone.
Do not train spam messages that SpamSieve automatically put in the Junk mailbox. Regardless of which color of spamminess it assigned them, SpamSieve already thinks that they are spam.
Do not train messages that a server filter automatically caught in the Junk mailbox or Bulk Mail mailbox. In Apple Mail, these messages would have brown/gold/black text on a white background in the message list, as described in Spam Message Colors in Apple Mail.
Do not train spam messages in the Apple Mail inbox that don’t have a green flag if you are using the Add green flag to unread good messages option. The lack of flag means that SpamSieve hasn’t processed the message yet, so it’s not actually a mistake.
Do not train as spam messages that are merely unwanted, e.g. messages from:
- Legitimate mailing lists that you no longer wish to read.
- Companies that you have done business with.
- People that you know who send or forward annoying messages.
These messages are not spam, so training them as such could confuse SpamSieve. For mailing lists, there should be instructions at the bottom of the e-mail to unsubscribe. Social media sites have ways that you can configure which types of messages they send you. For other types of unwanted messages, see you can optionally create a rule in your mail program above the SpamSieve rule to move or delete them before SpamSieve sees them.
Do not train quarantine digests from a server spam filter. These messages are not spam, but they contain lots of spammy words. It’s best to either turn off the server spam filter or to create a rule in your mail program above the SpamSieve rule to move these messages to another mailbox before SpamSieve sees them.
Do not train messages in Gmail’s All Mail, Important, or Starred mailboxes as spam, as these messages are duplicates not filtered by SpamSieve. For more information, see the Setting Up Gmail, iCloud, Yahoo, AOL, or Other Web Mail section of the manual.
Do not delete unwanted allowlist or blocklist rules that SpamSieve auto-created. Instead, let SpamSieve automatically disable the matching rules when you train messages as spam or as good.
Undoing a Training
If you make a mistake and tell SpamSieve that a message is spam when it is actually good (or vice-versa), simply correct yourself as you would correct SpamSieve. That is, if the message is good, train it as good; if it is spam, train it as spam. SpamSieve will “undo” the previous, incorrect, training.
Disable Other Spam Filters and Rules
When using SpamSieve, turn off any other spam filters that you’ve installed on your Mac. Disable any manual rules that you’ve created that move messages to the Junk mailbox, Spam mailbox, or trash. This will make it clear which messages SpamSieve did and didn’t catch, which is necessary for you to be able to properly correct it. If you really need those manual rules, you can recreate them using SpamSieve’s blocklist or put the rules above SpamSieve’s rule(s) so that the messages are moved or deleted before SpamSieve sees them.
Using SpamSieve With Multiple Macs
Please see the SpamSieve and Multiple Macs section for information about how to ensure that you are properly correcting mistakes when multiple copies of SpamSieve are filtering the same mail account.
3.13 SpamSieve and Multiple Macs
If you are accessing the same IMAP or Exchange mail account from multiple Macs running SpamSieve, it can be difficult to know which copy of SpamSieve needs to be trained to correct a mistake. There are several ways to deal with this (in order of preference):
- Run SpamSieve on a single Mac and let it clean your inbox for all the Macs. All the training is done from that Mac. This is the simplest solution. It works well when the Mac with SpamSieve will be running most of the time, and when you can easily access that Mac to do the training.
- Run SpamSieve on a single Mac using the drone setup. This setup works well when the Mac with SpamSieve will be running most of the time. When you’re away from that Mac, you can remotely train SpamSieve from any Mac, iOS device, or even via Web mail.
- Run SpamSieve on all the Macs and uncheck the Auto-train as needed preference (on all the Macs). You can train whichever Mac you happen to be using at the moment. This will have lower filtering accuracy than (1) or (2) but is useful in situations when you do not have a single Mac that is always available for mail filtering. With auto-training off, you may find it especially helpful to enable allowlisting of previous recipients.
- Run SpamSieve on all the Macs, being careful to only let one copy of SpamSieve run at a time, and to always correct all the mistakes before switching to another Mac. This will give better filtering accuracy than (3) but is a lot more work.
Server Spam Mailbox
If you have selected a local mailbox for storing spam messages, they they will only be accessible on the Mac that caught them. If you are using multiple Macs, we especially recommend that you store the spam on the server so that the same spam is visible on all the Macs.
Training Data
When upgrading to a new Mac or using setup (3) or (4) above, you can copy SpamSieve’s training data from one Mac to another. This is only recommended if the two Macs will be filtering the same mail account. Macs filtering different people’s mail should be trained separately for the best filtering accuracy.
Do not copy SpamSieve’s files using a file synchronization program or cloud syncing utility such as Dropbox while the SpamSieve application is running. Doing so can corrupt the files.
License Info
An individual user running SpamSieve on multiple personal Macs generally only needs to purchase one SpamSieve license. The Purchase… section of the manual has more information about the license policy.
iCloud Rule Syncing
Multiple Macs using the same iCloud account will automatically have the same rules in Apple Mail. If you want to use the SpamSieve rule on one Mac but not the other, you should uncheck it on the Mac where you want it to be disabled. Do not delete the rule because that would (through syncing) delete it from the other Mac as well.
POP Accounts
If you are accessing the same POP mail account from multiple Macs, you can safely run SpamSieve on all of the Macs simultaneously. Each Mac is entirely separate from the others, so you don’t have to worry about any of the training issues that IMAP and Exchange accounts have. The downside is that it’s more work to train each copy of SpamSieve separately.
3.14 iPhone Spam Filtering
Your Mac as the Spam Filter
Due to limitations of the iOS platform, there is not currently an iPhone version of SpamSieve. However, you can use SpamSieve on your Mac to keep the spam off your iPhone, iPad, or iPod touch. The Mac has more bandwidth and processing power, so it makes sense to do the spam filtering there, anyway. When you check for mail on your iPhone, you won’t waste time, battery power, or cellular data downloading or processing spam messages.
Cleaning the iPhone’s Inbox
In most cases, you don’t have to do anything extra for SpamSieve to filter the spam on your iPhone. SpamSieve is already removing the spam from your Mac’s inbox, so the normal IMAP/Exchange synchronization will automatically remove the spam messages from the iPhone’s inbox as well. (If you are not already using IMAP or Exchange, please see the Converting Your Apple Mail Setup to IMAP section.) New messages will arrive in the inbox, and SpamSieve will move the spam messages to the Junk mailbox. When the iPhone checks for new mail, the spam messages will generally already have been moved out of the inbox.
When Filtering Occurs
In order for messages to be filtered, your mail program needs to be running on your Mac. The Mac either needs to be on or set up for Filtering Spam During Power Nap. If your Mac is not on and connected to the Internet all the time, you will want to at least make sure that it is running shortly before you check mail on your phone so that there’s time for the messages to be filtered.
You can set your Mac to automatically wake up at a certain time so that it can filter messages:
On macOS 13 through macOS 26, you can use the “pmset” command in Terminal. For example, you can enter the command:
sudo pmset repeat wake MTWRFSU 7:00:00
to wake the Mac at 7 AM every morning. More complicated schedules are also possible.
On earlier versions of macOS, you can configure a sleep/wake schedule using the Battery or Energy Saver pane of System Preferences.
Training SpamSieve to Correct Mistakes
SpamSieve puts the spam that it catches into the special Junk, which syncs between all your devices. Thus, you will always have access to the suspected spam messages, in case a good message is accidentally moved there.
With the standard setup, you train SpamSieve directly from your Mac. If a spam message gets through to your inbox, you should not delete it from the iPhone because that would prevent you from correcting the mistake. Likewise, a good message in the Junk mailbox should be trained when you get back to your Mac.
The Drone Setup and Remote Training section describes how to set up remote training. If you’ll be away from your Mac for long periods of time, you can then train SpamSieve directly from the iPhone. Correcting mistakes promptly will keep SpamSieve running at peak accuracy.
To move a message to the special TrainGood or TrainSpam mailbox, tap the arrow button at the bottom of the screen:

Then tap the Move Message button:

Timing Issues
If the iPhone happens to see a new spam message before the Mac does:
- The message will appear in the inbox for a short while. When the Mac sees it, it will move it to the Junk mailbox and it will disappear from the inbox on the iPhone.
- The iPhone supports push e-mail, which lets it see new messages instantly. If you receive a lot of spam, you may prefer to turn off the push feature. That will give the Mac a chance to filter the messages before you see them on the iPhone. You may also want to adjust your iPhone’s notifications settings so that it doesn’t show banners or play sounds when new e-mails arrive.
- If you mark a message as read on the iPhone before the Mac sees it, the Mac will not see it as new and so will not apply its rules (such as SpamSieve) to the message.
Troubleshooting iPhone Spam Filtering
If there are spam messages in the inbox on your iPhone:
- If the Mac hasn’t yet downloaded the spam messages at all, you may need to adjust the Check for new messages preference in Mail. Make sure that the IDLE command is enabled in Mail’s settings for your account. With some servers, it may help to check for new messages every minute rather than Automatically.
- If the spam messages are in the inbox on your Mac, this is not an iPhone-specific problem. You should follow the regular Why is SpamSieve not catching my spam? instructions.
- If the spam messages are in the iPhone’s inbox but in the Mac’s Junk mailbox, try using “pull-to-refresh” to get the iPhone to resynchronize with the server. It should then update its inbox and remove the spam messages from the inbox.
- If the spam messages are still in the iPhone’s inbox, try logging into
your mail account via Web mail.
- If everything looks good in Web mail, there is likely a problem with your iPhone’s connection to the mail server.
- If the spam is in the Web mail inbox but not the Mac’s, there is likely a problem with the mail program on your Mac.
3.14.1 Converting Your Apple Mail Setup to IMAP
IMAP and Exchange
To use SpamSieve with your iPhone, you’ll need to set both the Mac and the iPhone to connect to your mail server using either the IMAP or Exchange mail protocol:
- Many popular mail hosts—such as Apple’s iCloud, Gmail, and Yahoo automatically use IMAP.
- Most other modern mail hosts also offer IMAP support.
- Some hosts, such as Comcast, can enable IMAP support if you request it.
- Some mail hosts only offer support for the older POP protocol. This makes it impossible for your Mac to clean the spam off your iPhone. We recommend switching to another provider.
Synchronization
When using IMAP or Exchange, all computers and mobile devices that connect to the same mail account will share the same mailboxes. The contents of the mailboxes will be synchronized automatically. The syncing happens when you open the Mail application.
Switching to IMAP
If your mail host supports IMAP but you are not using it, you can change the settings on your Mac to connect via IMAP instead of POP. Macworld has an article about this, or you can follow the instructions below.
- Choose Settings… from the Mail menu and click on Accounts. Your account(s) will be listed at the left of the window. If it already says IMAP or iCloud under your account, there’s nothing more that you need to do.
- If it says POP, you will need to disable the POP account and create a new IMAP one. Click on the POP account and make note of the contents of the Server Settings (if present) and Account Information tabs. Then click the Remove now button to remove from the server any messages that you’ve already downloaded.
- Click the + button at the bottom of the window and follow the steps to create a new account. Choose IMAP for the account type. For the server and login, enter the information that you noted for the POP account. (Note: Some providers use a different incoming mail server name for IMAP.) Put “IMAP” at the end of the account’s description so that you can tell this account apart from the old one.
- You should now be able to check for mail, and Mail will be using IMAP instead of POP. There will be two sets of mailboxes (Inbox, Sent, etc.) in the main window. If desired, you can go to each of these mailboxes and Option-drag the messages from the old mailboxes to the IMAP ones. Holding down the Option key when dragging the messages will cause Mail to copy the messages to the IMAP server. Your original messages will remain in the POP mailboxes on your Mac in case something goes wrong.
- Go back to Mail’s Settings window, click on the POP account, and uncheck Enable this account (in the Account Information tab). You will be using the new IMAP account instead, although the old POP settings, and any messages that you didn’t transfer to the IMAP mailboxes, will still be available should you want to go back to the old setup.
- On your iOS device, tap on Settings ‣ Mail. For each of your accounts, tap on the account name. At the top of the account settings it should say IMAP or Exchange. If it says POP, you will need to deactivate that account on the iPhone (by sliding the switch next to the Mail setting) and then choose Add Account to re-add your account as IMAP or Exchange.
3.14.2 Recommended Mail Hosts
For best results with SpamSieve—and for e-mail in general—we recommend a mail host that:
- Supports IMAP or Exchange (Not Just POP)
- This will keep your mailboxes and messages synchronized across multiple devices and let you use SpamSieve on your Mac for iPhone Spam Filtering. IMAP is preferred, as it is supported by more mail clients.
- Lets You Control Its Junk Filter
- You don’t want the server’s filter to accidentally delete good messages before you even see them. For more information, see the How should I configure the junk filter on my mail server? section.
- Is Not Your Internet Service Provider (ISP)
- This way you won’t be forced to change your address if you change ISPs, e.g. due to switching cable to fiber or moving to a different city.
- Can Use Your Domain Name
- If your e-mail address is at a domain name that you control (rather than at the provider’s domain), you won’t be locked into your current host should you ever become dissatisfied with it. You’ll be able to easily switch to a different host without having to change your e-mail address.
E-mail is important. If your mail provider does not offer the features that you want, we recommend switching to one that does. Fastmail, DreamHost, Pair, and Hover are some inexpensive hosts that we’ve used and recommend. Other ones that’ve heard good things about are 1&1, Cotse.Net, and LuxSci.
4 Customization
4.1 Allowlisting Previous Recipients
For added safety, you can specify that addresses that you’ve sent mail to will never send you spam. To do this in:
- Apple Mail
Open the Rules section of Mail’s Settings window and create a new rule called Previous Recipients. Change the condition that says Every Message to Sender is in my Previous Recipients.
- If you set the rule’s action to Stop evaluating rules, that will prevent the SpamSieve Mail extension from seeing the messages. However, SpamSieve could still process it via the Check inboxes for new messages not sent to Mail extension or Filter spam messages in other mailboxes features.
- If you set the rule’s action to Move Message and choose a destination mailbox that is not chosen in the Select Mailboxes to Filter… sheet, that will completely prevent SpamSieve from seeing the message.
- Apple Mail (Plug-In)
- Open the Rules section of Mail’s Settings window and edit the SpamSieve rule. Change the condition that says Every Message to Sender is not in my Previous Recipients. Mail will then assume that such messages are good, without showing them to SpamSieve.
- Entourage
- Create an outgoing rule that uses this AppleScript to add your messages’ recipients to SpamSieve’s whitelist.
- Mailsmith
- Create a rule that uses this AppleScript to add your sent messages’ recipients to SpamSieve’s whitelist.
- Outlook 2011
- Create an outgoing rule that uses this AppleScript to add your messages’ recipients to SpamSieve’s whitelist.
- Postbox
- Select Do not mark mail as junk if the sender is in Collected Addresses in Postbox’s Accounts preferences.
- PowerMail
- Create an outgoing filter that uses this AppleScript to add your messages’ recipients to SpamSieve’s allowlist.
For Apple Mail and Postbox the above settings will completely hide these messages from SpamSieve. Thus:
- You might not want to do this if you regularly receive spam messages that are forged so as to appear as though they were sent from one of your previous correspondents. SpamSieve won’t see the messages, so it will have no chance of catching them.
- SpamSieve will not be able to auto-train itself with these messages. You should be sure to manually train it with some examples of these messages, so that it has seen some examples of good messages with this type of content.
4.2 Automatically Deleting Old Spam Messages
You can set your mail program to automatically delete old spam messages. However, if you do this, you should still review your spam messages to make sure that no good messages are deleted. Not only would you lose such messages if you don’t correct all the mistakes, but (with auto-training enabled) SpamSieve would also incorrectly learn that they are spam, leading to more mistakes in the future.
Apple Mail
We recommend Setting the Junk Mailbox in Apple Mail. Then:
- You can quickly delete all the messages in all the Junk mailboxes by using the Mailbox ‣ Erase Junk Mail menu command.
- You can set Mail to automatically delete old spam messages. Go to the Mailbox Behaviors (or Special Mailboxes) tab of the Mail’s Accounts settings and select a time interval for Erase junk messages (or Delete junk messages when). You’ll need to repeat this for each account.
Entourage
You can set Entourage so that when it quits it will delete all the spam messages that are older than 7 days (or whichever interval you choose):
- Choose Tools ‣ Run Schedule ‣ Edit Schedules.
- Click the New button to create a schedule.
- Set the name of the schedule to Delete Old Spam, the When to On Quit, and the Action to Delete Junk Mail from Junk E-mail (On My Computer).
- Click OK to close the dialog.
MailMate
See this forum post.
Outlook
Outlook 365 does not support schedules.
Outlook 2011
You can set Outlook so that when it quits it will delete all the spam messages that are older than 7 days (or whichever interval you choose):
- Choose Tools ‣ Run Schedule ‣ Edit Schedules….
- Click the + button to create a schedule.
- Set the name of the schedule to Delete Old Spam, the When to On Quit, and the Action to Delete Junk Mail from Junk E-mail (On My Computer).
- Click OK to close the dialog.
Postbox
See the Automatically delete junk mail older than setting in the Accounts preferences.
4.3 Drone Setup and Remote Training
The drone setup refers to running SpamSieve on your Mac when you’re not actively using the Mac mail client that SpamSieve is configured to work with. This provides two benefits:
- SpamSieve can clean the spam out of your inbox even when you’re away from your Mac. Open up your your mail on your iPhone, iPad, or Windows PC, and—even though it isn’t running SpamSieve—the spam will be gone. This also works with Mac mail clients that don’t directly support SpamSieve. For example, if you configure SpamSieve to use Apple Mail, it can also clean the spam out of your inbox in New Outlook or Spark.
- You can train SpamSieve while away from your Mac. As described in the Correct All Mistakes section, you need to tell SpamSieve about messages that it misclassified so that it can learn from them. Also, the sooner you correct SpamSieve the better. With the drone setup, you can promptly train messages from anywhere (a mobile device, Webmail, another Mac not running SpamSieve, or another mail client on your SpamSieve Mac) by moving messages to the special TrainSpam or TrainGood mailbox.
Here’s an outline of how it works:
- All the computers and devices check the same IMAP, Gmail, iCloud, or Exchange account. (POP accounts are not supported.)
- One Mac (the drone) downloads the messages and filters them with SpamSieve. Because the messages sync between your devices, when SpamSieve moves spam messages out of the inbox on your Mac they’ll move out of the inbox on the other devices, too. You can still use SpamSieve on this Mac as you normally would and train it using the Train as Good/Spam menu commands.
- You can train SpamSieve remotely from another computer, an
iPhone, or another device accessing the same mail account:
- If a spam message gets through, don’t delete it. Instead, move it to the special TrainSpam mailbox. Periodically, the drone will train the messages in this mailbox as spam and then move them to the spam mailbox.
- If a good message ends up in the spam mailbox, move it to the special TrainGood mailbox. Periodically, the drone will train the messages in this mailbox as good and then move them to the inbox.
- The drone Mac will only filter and train messages when it’s logged into your macOS user account. (If you want, the screen can be locked or the account can be in the background via Fast User Switching.)
The set up a drone using Apple Mail, follow the normal Setting Up Apple Mail instructions and then enable remote training by selecting the Train messages in TrainSpam and TrainGood checkbox in the Settings ‣ Apple Mail ‣ Training window. To set up a drone using MailMate or Outlook, please see the Setting Up a MailMate Drone or Setting Up an Outlook Drone instructions.
4.3.1 Setting Up a MailMate Drone
This section is a continuation of the Drone Setup and Remote Training instructions for people using MailMate 1.14 or later.
In MailMate’s Settings window, click on the Security tab and make sure that the Enable box is checked next to SpamSieve.
Create two additional mailboxes in each mail account: TrainGood and TrainSpam. (There should not be spaces in the names.)
For each TrainGood mailbox, select the mailbox:
- Go to the Mailbox menu, and choose Edit Mailbox….
- Click on the Rules tab of the TrainGood window.
- Click the + button at the bottom of the window.
- In the Description, enter Remote Good Training.
- At the bottom of the window, create three actions:
- Set Tag/Keyword: Not junk
- Move to Mailbox: Inbox
- Remove Tag/Keyword: Seen (Read)
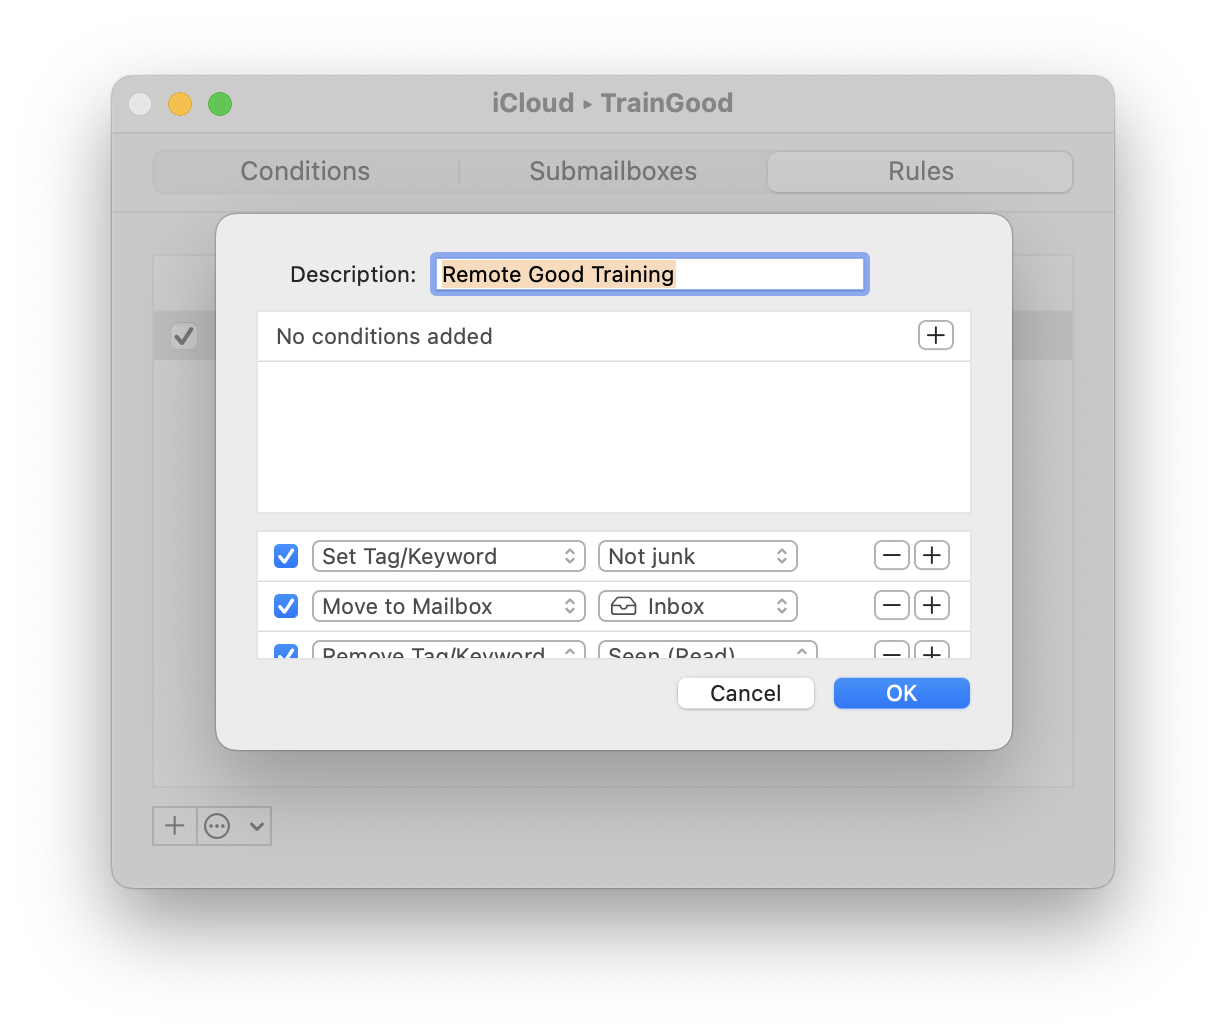
For each TrainSpam mailbox, select the mailbox:
- Go to the Mailbox menu, and choose Edit Mailbox….
- Click on the Rules tab of the TrainSpam window.
- Click the + button at the bottom of the window.
- In the Description, enter Remote Spam Training.
- At the bottom of the window, create two actions:
- Set Tag/Keyword: Junk
- Move to Mailbox: Junk
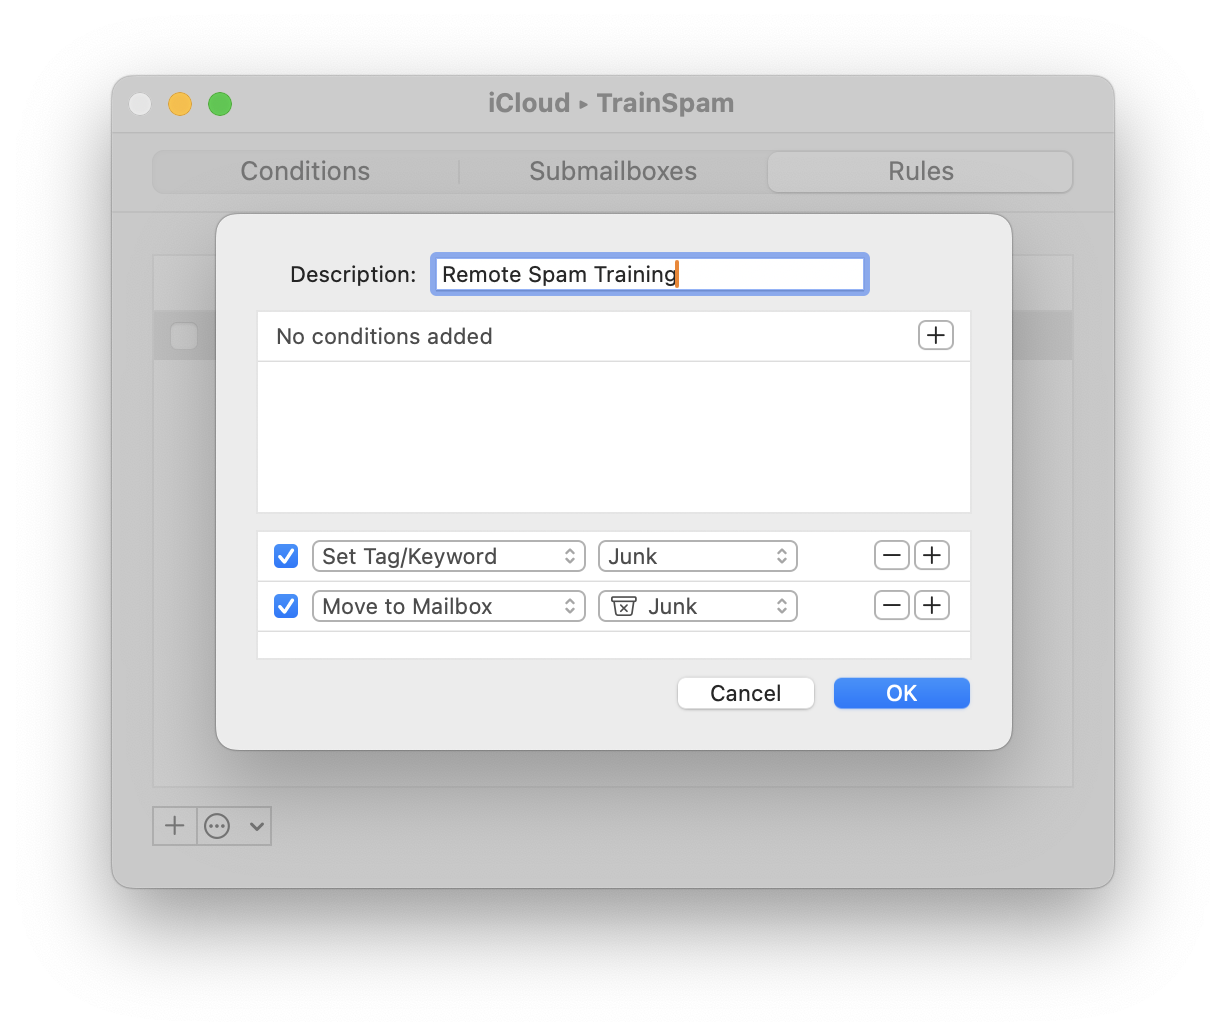
MailMate will check the Train mailboxes according to the Synchronization Schedule in the Mailbox menu. Only new messages (moved into these mailboxes after you set up the rules) will be processed.
Experimental Versions of MailMate
The rules interface with upcoming experimental versions of MailMate looks a bit different:
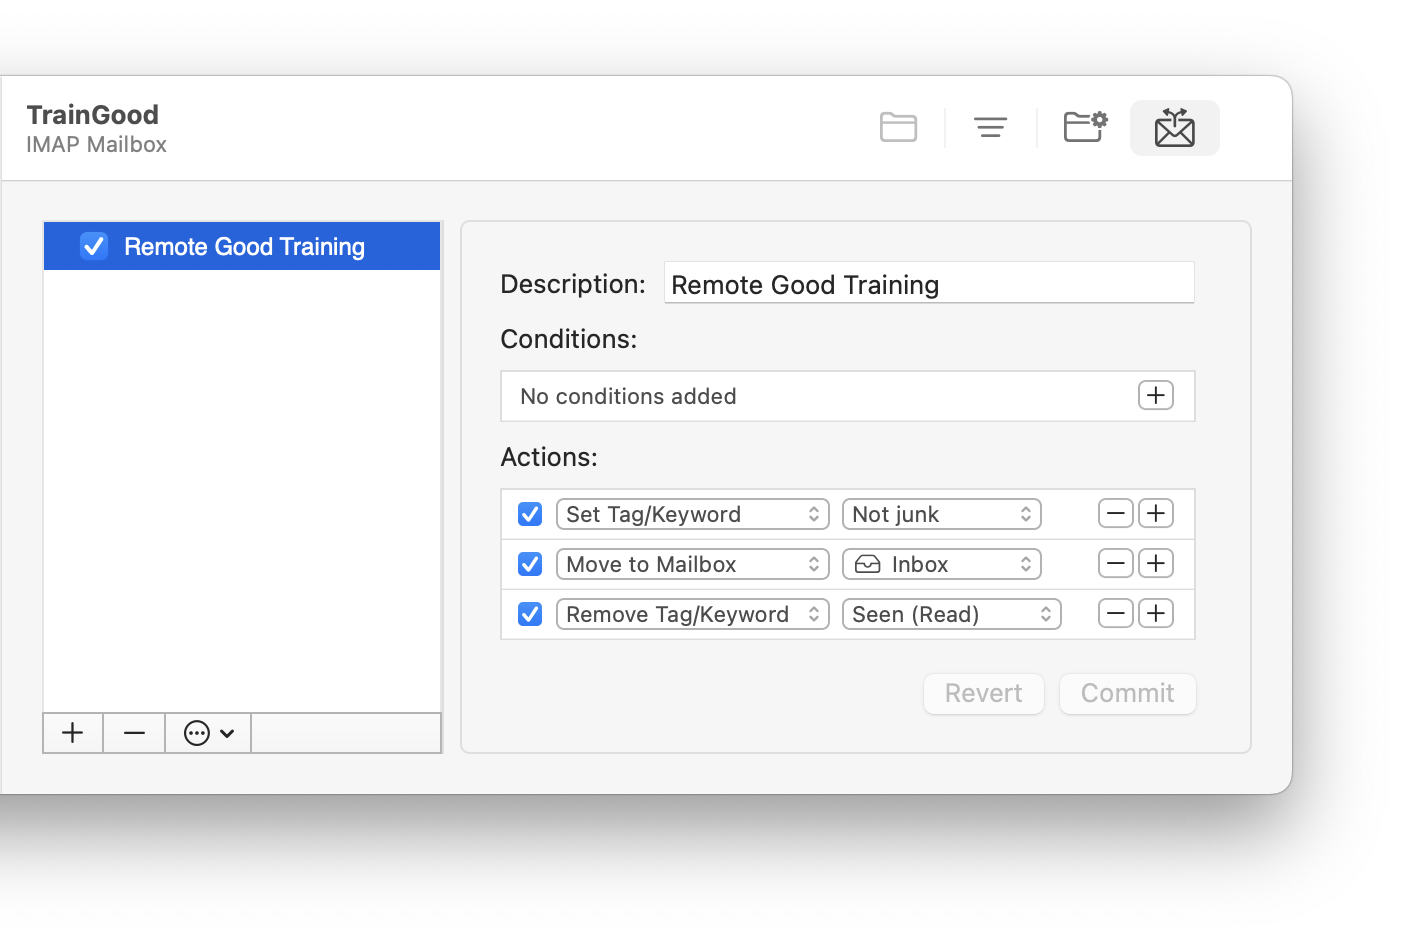
With MailMate 2.0, you should not have the Set Tag/Keyword: Not junk action for the TrainGood mailbox. (But you do want the Set Tag/Keyword: Junk action for the TrainSpam mailbox.)
Older Versions of MailMate
The remote training setup can also work with older versions of MailMate back to version 1.7.1. First, go to MailMate’s Settings window, click on the General tab and make sure that the Enable box is checked next to Experimental 2.0 Features.
4.3.2 Setting Up an Outlook Drone
This section is a continuation of the Drone Setup and Remote Training instructions for people using Microsoft Outlook 2011. Outlook 365 currently does not work with the drone setup because it does not support schedules.
Make sure that each of your accounts has its own Junk E-mail mailbox. This can be configured by going to the Accounts section of Outlook’s preferences and clicking on Advanced… and then Folders.
Create two additional mailboxes in each mail account: TrainGood and TrainSpam. (There should not be spaces in the names.)
If you have a single mail account, follow the normal SpamSieve setup procedure in the Setting Up Outlook 2011 section. When choosing the folder in the SpamSieve - Move Messages rule, be sure to choose the Junk E-mail folder on the server (not On My Computer). You’re now done with this step.
If you have multiple accounts, create two SpamSieve - Move Messages rules per account. The name of the first rule should be SpamSieve - Move Junk Messages - Account 1 (where Account 1 is the name of your account. It should say:
If all conditions are met:
Folder Is INBOX (Account 1)
Category Is Junk
Do the following:
Move Message Junk E-mail (Account 1)
The name of the second rule should be SpamSieve - Move Uncertain Junk Messages - Account 1. It should say:
If all conditions are met:
Folder Is INBOX (Account 1)
Category Is Uncertain Junk
Do the following:
Move Message Junk E-mail (Account 1)
Download the Outlook - Remote Training script file. Open it in Script Editor and add your account name(s) at the top.
In Outlook, choose Tools ‣ Run Schedule ‣ Edit Schedules…. Click the + button and create a schedule called Remote Training. The When should be Repeating Schedule with a duration of your choice. The Action should be Rule AppleScript. Click the Script… button and choose the Outlook - Remote Training.scpt file from Step 4.
4.4 Customizing Using AppleScript
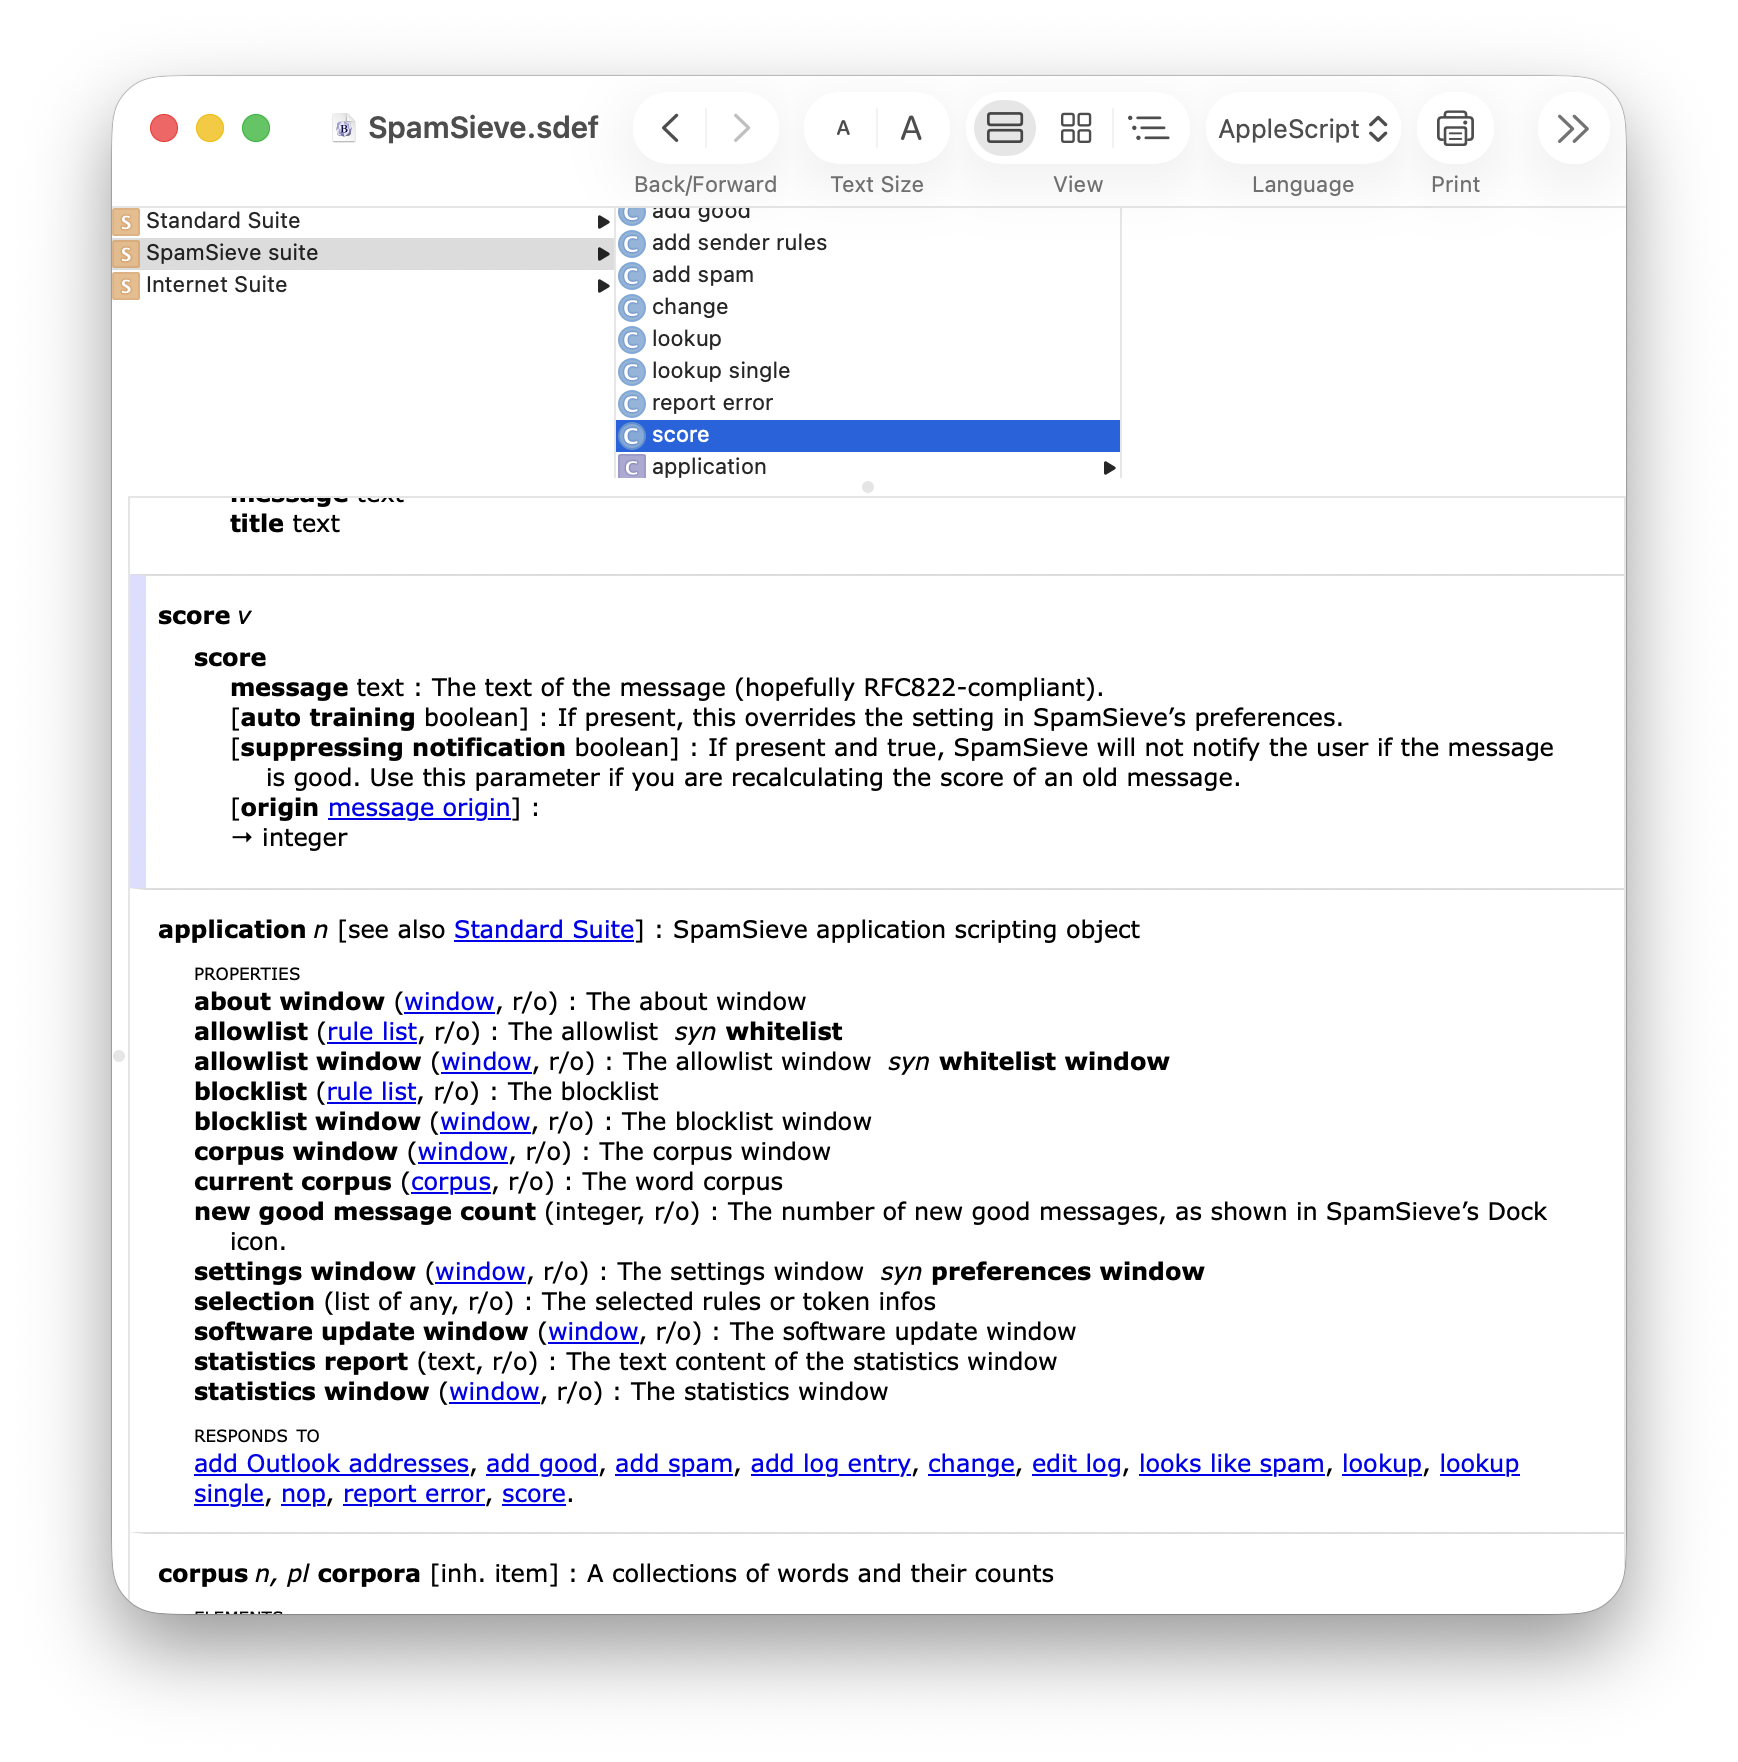
Many aspects of SpamSieve are scriptable, and it is possible to customize SpamSieve and extend its features using AppleScript. A collection of commonly requested example scripts is available.
SpamSieve’s interface for integrating with third-party mail and news programs is completely open. It is possible to add support for additional programs simply by writing some AppleScripts or Apple event code. SpamSieve’s AppleScript dictionary contains some basic information about the supported commands. However, there are some subtle, but important, points that are not discussed in the dictionary’s documentation. If you would like to connect an application to SpamSieve, please contact spamsieve@c-command.com for assistance or access to the SpamSieve SDK.
4.5 Apple Mail Customization
The following customizations are optional but recommended:
Notifications
You can adjust Mail’s settings so that you aren’t notified when you receive new messages that are all spam:
Choose Mail ‣ Settings… and click on General.
Change the New messages sound to None so that Apple Mail does not play a sound when spam messages arrive.
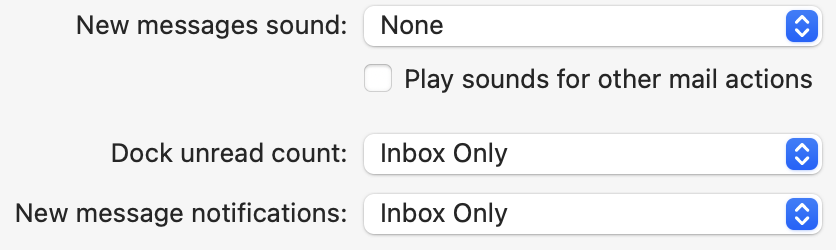
Change New message notifications to VIPs so that Mail does not notify you for spam messages that are temporarily in the Inbox. You can also go to System Settings ‣ Notification ‣ Mail if you prefer to turn off banner notifications for Mail entirely.
The Settings ‣ Notification window lets you control how SpamSieve notifies you when you receive new good messages.
Junk Mailbox
Click on the Accounts tab of Mail’s Settings window. For each account, if there is a Mailbox Behaviors tab, next to Junk Mailbox, choose the junk or spam mailbox that’s inside your account (not the one under On My Mac). If there are multiple such mailboxes, choose the one that your server junk filter is moving spam messages to. For a Gmail account, this is [Gmail]/Spam. There is more information about this here.
Download Attachments
Go to Mail ‣ Settings ‣ Accounts ‣ Account Information and set Download Attachments to All for each account. This will speed up filtering by having Mail pre-download the full message data.

Account Aliases
Tell Mail and SpamSieve about your account aliases, as described in the Why do good messages move to the wrong inbox when trained in Apple Mail? section.
Unread Smart Mailbox
If you have an “Unread” smart mailbox, please see the Why do I see spam messages in my “Unread” smart mailbox in Apple Mail? section for how to adjust it.
Additional customizations are described below:
4.5.1 Spam Message Colors in Apple Mail
Separating Spam Caught by SpamSieve and Server Filters
With the normal setup, spam messages caught by server junk filters and by SpamSieve both go to the Junk mailbox. It can be important to know which filter moved which messages there. For example, if a good message was incorrectly moved to Junk by SpamSieve, you should train it as good. Whereas, if it was moved by a server junk filter, training SpamSieve wouldn’t help and you might want to turn off the server filter or set SpamSieve to rescue the good messages.
The easiest way to see which messages SpamSieve moved to Junk is that they will have a colored background in Mail’s message list. When using the Mail extension the text will be brown:

There may also be a puzzle piece icon for messages processed by SpamSieve’s Mail extension, though other Mail extensions can also add such an icon.
When using the Mail plug-in the text will be black on a colored background:

Messages caught by server junk filters and Apple Mail’s junk filter will have brown text on a white background:

Note that the SpamSieve background colors only show up on the Mac where SpamSieve is running. Mail does not sync them to the server or to other Macs or iOS devices. If you need to see, on another device, which messages were caught by SpamSieve, you can use separate mailboxes as described in Setting the Junk Mailbox in Apple Mail. You can also look in SpamSieve’s log to see which messages SpamSieve has predicted to be spam.
Using Background Colors to Show Spam Levels
Please see the Color the background according to how spammy it is section.
Messages Marked as Junk
It is normal for Mail to show a brown bar above some messages that SpamSieve or a server filter classified as spam. SpamSieve marks the messages as junk to protect you from Web bugs. Do not click the Not Junk button. If the message is not spam, you should instead choose Train as Good from the menu.
![]()
4.5.2 Color Rules in Apple Mail
When using the Mail plug-in setup, you can optionally use multiple rules in Mail to file messages into different mailboxes (or otherwise process them differently) based on how spammy they are. The normal SpamSieve rule looks like this:
To separate spam messages by color (spamminess), you should instead create two or more rules. The first rule should be named SpamSieve [Score]. As above, you probably want the conditions to be Every Message. When this rule is applied, SpamSieve will calculate the spam score of the message and set its color accordingly. The actions of the [Score] rule will be ignored.
Below the [Score] rule, you can create one or more rules that process messages based on their color:
- Each of these rules should have a name that starts with SpamSieve, followed by one or more color names in square brackets. For example, to make a rule that matches the most spammy Blue and Gray messages, you would name it SpamSieve [Blue][Gray] (or SpamSieve [Gray][Blue]). You can include additional descriptive text after the brackets to remind you of what the rule does.
- The rule conditions should be Every Message.
- As a shorthand for listing all of the colors, you can simply write [Spam].
- To match non-spam messages you can write [White]. Additionally, if you have rules to process every color and those rules’ actions either move the messages or stop rule processing, any subsequent rules will automatically apply only to the non-spam messages.
Example 1: Blocklisted Messages in Trash
To move blocklisted messages to the trash and other spam messages to the Spam mailbox, you would need three rules:
SpamSieve [Score] (calculates the spam score/color) / Every Message / Move Message to mailbox All Junk

SpamSieve [Blue] (move very spammy messages to the trash) / Every Message / Move Message to mailbox All Trash
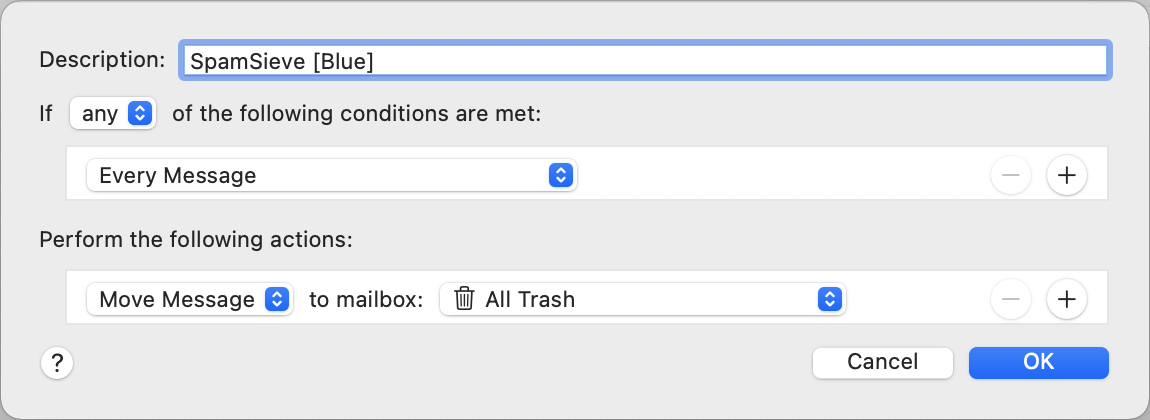
SpamSieve [Spam] (move the remaining spam messages) / Every Message / Move Message to mailbox All Junk

Example 2: Per-Color Spam Mailboxes
To put each color of spam in a separate mailbox, you would need seven rules:
- SpamSieve [Score] (calculates the spam score/color) / Every Message / Move Message to mailbox Spam
- SpamSieve [Blue] (messages with scores from 99 to 100) / Every Message / Move Message to mailbox Spam99
- SpamSieve [Gray] (messages with scores from 95 to 98) / Every Message / Move Message to mailbox Spam95
- SpamSieve [Purple] (messages with scores from 88 to 94) / Every Message / Move Message to mailbox Spam88
- SpamSieve [Red] (messages with scores from 81 to 87) / Every Message / Move Message to mailbox Spam81
- SpamSieve [Orange] (messages with scores from 75 to 80) / Every Message / Move Message to mailbox Spam75
- SpamSieve [Yellow] (messages with scores from 50 to 74) / Every Message / Move Message to mailbox Spam50
The unnumbered Spam mailbox will hold the messages that you manually train as spam. If desired, you can drag the other mailboxes inside the Spam mailbox.
Example 3: Sorting Messages By Spamminess
You can sort the messages by spamminess. Apple Mail in macOS 10.7 and later cannot sort messages by color, but it can sort them by flags. Thus, you can set up rules like this:
- SpamSieve [Score] (calculates the spam score/color) / Every Message / Move Message to mailbox Spam
- SpamSieve [Blue] (messages with scores from 99 to 100) / Every Message / Mark as Flagged Gray / Move Message to mailbox Spam
- SpamSieve [Gray] (messages with scores from 95 to 98) / Every Message / Mark as Flagged Purple / Move Message to mailbox Spam
- SpamSieve [Purple] (messages with scores from 88 to 94) / Every Message / Mark as Flagged Blue / Move Message to mailbox Spam
- SpamSieve [Red] (messages with scores from 81 to 87) / Every Message / Mark as Flagged Green / Move Message to mailbox Spam
- SpamSieve [Orange] (messages with scores from 75 to 80) / Every Message / Mark as Flagged Yellow / Move Message to mailbox Spam
- SpamSieve [Yellow] (messages with scores from 50 to 74) / Every Message / Mark as Flagged Orange / Move Message to mailbox Spam
and then choose View ‣ Sort By ‣ Flags. (The flag colors are chosen so that the messages will sort in order of spamminess; this is why they do not match the message colors.) When using this rule, you should set the AppleMailTrainGoodClearFlags option in the Esoteric Preferences to have SpamSieve clear the flags when training a message as good.
4.5.3 Processing Messages Before SpamSieve
Sometimes you may wish to prevent certain messages from being examined by SpamSieve. You can do this by making an Apple Mail rule that moves the messages to a different mailbox or deletes them. When using the Mail plug-in setup, this rule should be above the SpamSieve rule. When using the Mail extension setup, there is no SpamSieve rule so this rule can be anywhere.
You may receive messages that are unwanted but not spam, for example if someone you know sends you a certain type of annoying message. You don’t want to see these, but it’s not appropriate to train SpamSieve that they’re spam because they’re from a legitimate sender.
Solution: Make a Mail rule that moves these messages to the trash.
The messages may be ambiguously spam. For example, you may run a Web site that sends you an e-mail every time someone fills out a form. The messages themselves are not spam; they are being sent by your own server. But some of the content in the e-mails may be spammy, depending on what the users (or robots) filled into the form. You want to receive all these messages to review them, but you don’t want to train SpamSieve that all the user-generated text is good.
Solution: Make a Mail rule that moves these messages to a separate mailbox.
You may have a way of identifying certain messages as definitely spam, and you want Mail to delete them so that you don’t have to see them in your Junk mailbox.
Solution: Make a Mail rule that deletes the messages.
(If you merely want to move the more spammy messages to the trash, see the Spam Message Colors in Apple Mail section.)
Here’s an example of how to create a rule for #3:
Choose Settings… from the Mail menu and click the Rules button in the toolbar.
Click the Add Rule button.
Change the description to Delete Spam.
Say that you want to block messages from certain e-mail addresses. The rule conditions already say From contains. Enter the first address to block in the text field to the right of contains.
For each additional address, click the + button and enter the address in the new From contains condition.
At the bottom of the sheet, change Move Message to say Delete Message. The rule should now look like:
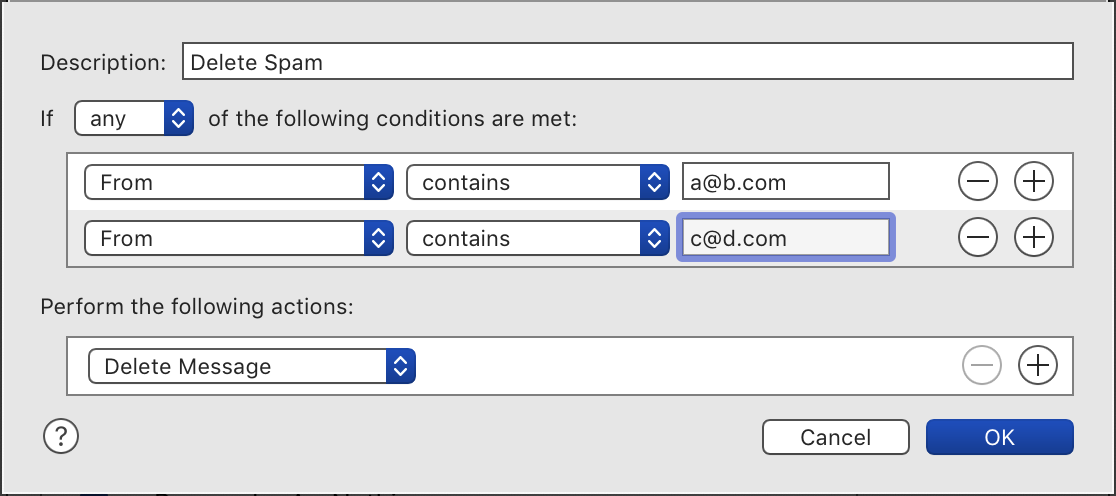
Now click OK to close the rule and save your changes. Mail may ask if you want to apply the rule; click Don’t Apply.
Drag the Delete Spam rule to the top of the list, above the SpamSieve rule (if applicable).
4.5.4 Setting the Junk Mailbox in Apple Mail
SpamSieve’s Mail extension always moves incoming spam messages to the Junk mailbox, and if you’re using the Mail plug-in instead, we strongly recommend configuring things that way, too. If desired, you can set a separate location where SpamSieve should move a message when you manually train it as spam. The Junk mailbox is displayed with a special icon in Mail:
![]()
Each account in Mail has its own Junk mailbox, and SpamSieve will move spam messages to the Junk mailbox of the account that received them.
Choose a Server Mailbox in “Mailbox Behaviors”
The Junk mailbox is not fixed; rather, Mail has a setting where you can designate which mailbox should be treated as the special Junk mailbox. We recommend that for each account you choose a mailbox that’s stored on the mail server and that you choose the same one that’s used by the server’s junk filter (if any). Mail normally does this automatically, but you can check its settings to be sure that it is set up to do this.
To choose the Junk mailbox, go to Settings ‣ Accounts ‣ Mailbox Behaviors in Mail. (With older versions, this is called Special Mailboxes.)
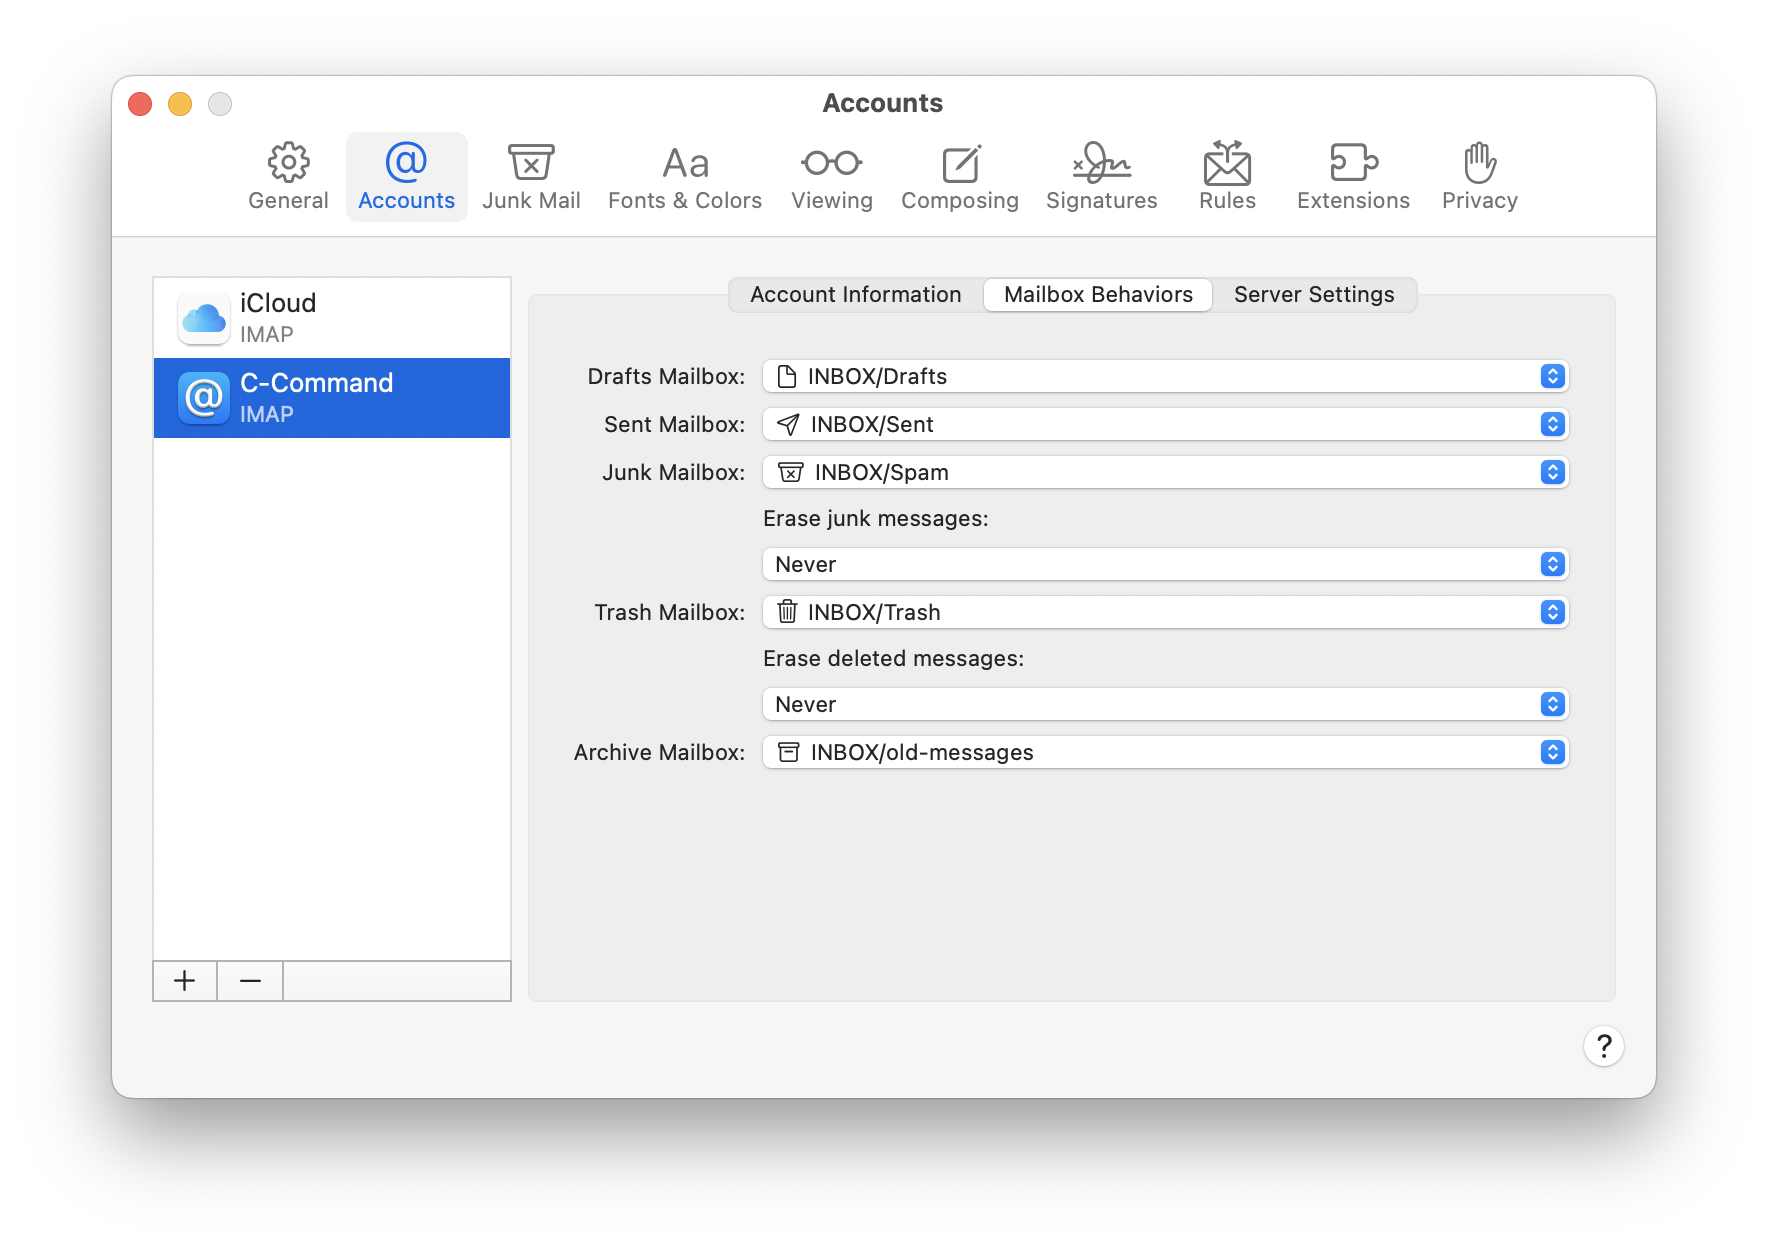
For each IMAP or Gmail account, next to Junk Mailbox, choose the junk or spam mailbox that’s inside your account (not the one under On My Mac). If there are multiple such mailboxes, choose the one that your server junk filter is moving spam messages to. For a Gmail account, this is [Gmail]/Spam. For a Yahoo account, this is Bulk. If you don’t see that, you may need to go to the Gmail settings and set the Spam mailbox to be shown in IMAP.
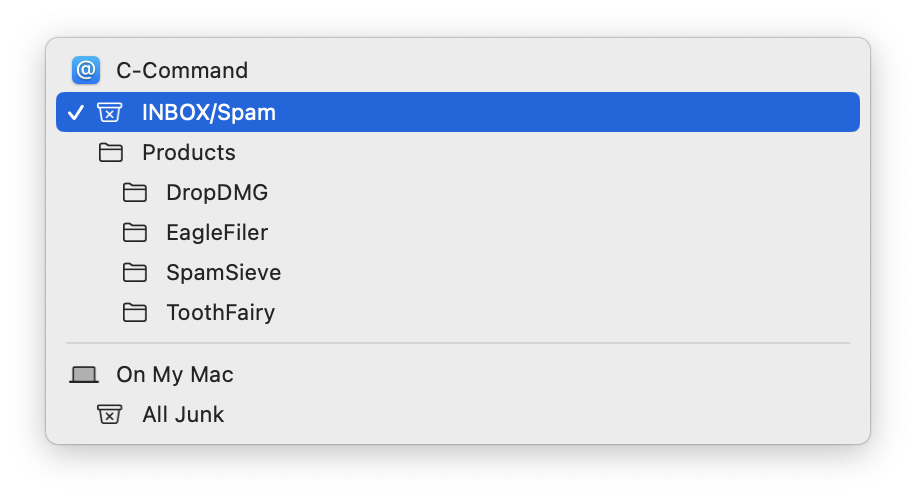
For each Exchange account, make sure that Store junk messages on the server is checked.

For each POP account, make sure that Mail’s sidebar shows a Junk mailbox (with the special icon) under the account. If there is no such mailbox, you can create one by selecting a spam message in the account’s inbox and choosing Message ‣ Move to Junk. (This is the only time when you should use that menu command when using SpamSieve. It is the only way to assign the Junk mailbox for a POP account, without which SpamSieve will not be able to move messages for that account to Junk.)
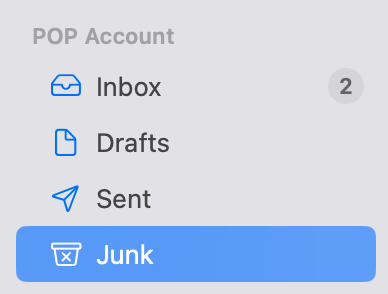
For example, the Gmail server junk filter will move the messages it catches to a mailbox called Spam (as shown when you log into Webmail or using IMAP). You should tell Mail to use this mailbox. Then, the Spam mailbox will disappear from the mailbox list in Mail, the spam messages will be displayed in the special Junk mailbox, and both Gmail and SpamSieve will move spam messages there.
The same list of spam messages will also be available on other devices and via Webmail, though the displayed name of the Junk mailbox may be different in different places.
All Junk
Although spam messages are stored in per-account Junk mailboxes, you may wish to view all the spam messages together in one place. This special “merged” Junk mailbox was automatic in previous versions of Mail and can be configured as option with macOS 11 and later. Click the + button when you hover over Favorites at the top of Mail’s mailbox list:
![]()
You can then add the special All Junk mailbox to the list:
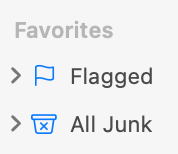
If necessary, you can still click the > next to All Junk to see the separate Junk mailbox for each account.
Separate Mailboxes for Each Spam Filter
Most users like All Junk because it offers a single, consolidated view of all the spam messages caught by SpamSieve and the server filters for all of your accounts. However, it is possible to use separate mailboxes for SpamSieve and the server filter. In most cases, you cannot change which mailbox the server filter uses. However, you can create a new SpamSieveSpam mailbox in Mail (with the Location set to within your IMAP account). Then select this mailbox as the Junk Mailbox in the Mailbox Behaviors settings. SpamSieveSpam will now appear as Junk in Mail and be used by SpamSieve. The server filter’s mailbox will reappear in Mail under a different name such as Spam, Junk (without the special icon), or Bulk Mail.
What If I Was Using the Spam Mailbox Before?
With earlier versions of SpamSieve, we recommended configuring Apple Mail to move the spam messages caught by SpamSieve to a Spam mailbox under On My Mac. With changes to how mail servers and Apple Mail work, we now strongly recommend using the Junk mailbox, as described above. This is automatic with the Mail extension setup. If you’re using the Mail plug-in, you can find the SpamSieve rule in Mail’s settings and update the pop-up menu at the bottom so that it moves the messages to All Junk. You can also go to the Settings ‣ Apple Mail ‣ Training window and set it to move trained spam messages to the Junk mailbox.
4.5.5 Only Filtering Certain Accounts
When Using the SpamSieve Mail Extension
SpamSieve normally filters all of the accounts set up in Apple Mail. To only filter certain accounts:
- Leave Enable spam filtering using Mail extension checked in SpamSieve’s Settings ‣ Apple Mail ‣ Setup.
- Uncheck Check inboxes for new messages not sent to Mail extension in Settings ‣ Apple Mail ‣ Setup.
- Uncheck SpamSieve in Mail’s Extensions settings.
- In Filter spam messages in other mailboxes, select the inboxes (and other mailboxes) of only those accounts that you want SpamSieve to filter.
When Using the SpamSieve Mail Plug-In
SpamSieve normally filters all of the accounts set up in Apple Mail. If you want to exclude certain accounts from filtering, you can edit the SpamSieve rule to list only the accounts that you do want filtered:
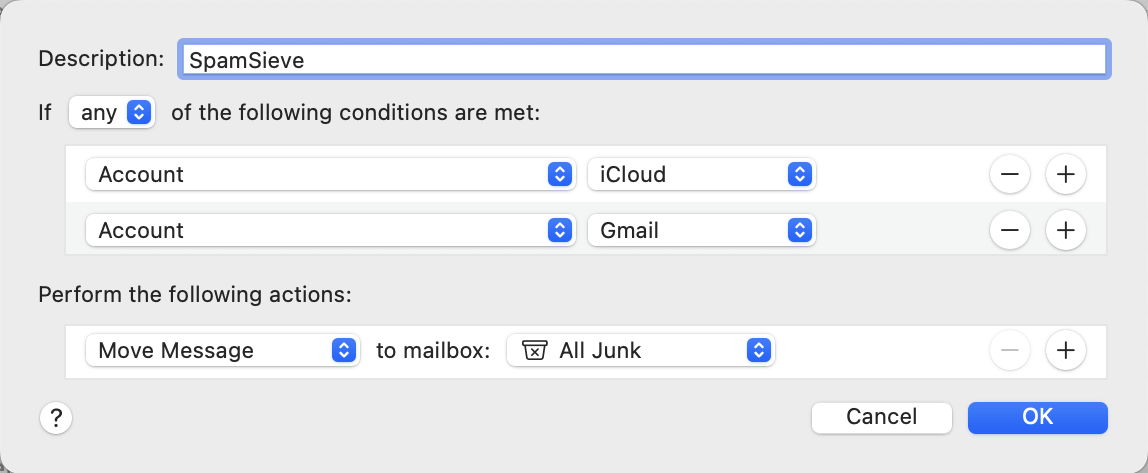
4.5.6 Rescuing Good Messages Caught By a Server Filter
You can use the Apple Mail - Rescue Good Messages script to work around a problematic server junk filter. Whenever the script runs, it will tell SpamSieve to examine the messages in the Junk mailbox, leaving the spam messages in place but moving any messages caught by the server filter that SpamSieve thinks are good to the inbox. In order for this to work, you should follow the instructions in the Setting the Junk Mailbox in Apple Mail section of the manual to make sure that SpamSieve and the server filters are both using the special Junk mailbox.
- You can change the pMoveBlueMessagesToTrash setting at the top of the script from false to true if you want it to move blocklisted spam messages from Junk to Trash, i.e. to match the Move it to the Trash if the spam score is at least setting.
- You can change the pMarkSpamMessagesRead setting at the top of the script from false to true if you want it to mark spam messages as read, i.e. to match the Mark it as read setting.
4.5.7 Filtering Spam During Power Nap
Keeping Your Mac Awake
In order for SpamSieve to filter your mail immediately, your Mac needs to be awake with the mail program running. Otherwise, there will be delays for iPhone spam filtering and for remote training using the drone setup. To prevent your Mac from going to sleep:
- On macOS 14 through macOS 26 on a laptop Mac, go to Battery ‣ Options… in System Settings and enable the Prevent automatic sleeping on power adapter when the display is off option.
- On macOS 14 through macOS 26 on a desktop Mac, go to Energy Saver in System Settings and enable the Prevent automatic sleeping when the display is off option.
- On macOS 13, go to Displays ‣ Advanced… in System Settings and enable the Prevent automatic sleeping on power adapter when the display is off option.
- On macOS 12 and earlier on a desktop Mac, go to Energy Saver in System Preferences and check the Prevent your Mac from sleeping automatically when the display is off option.
- On macOS 12 and earlier on a laptop Mac, go to Battery in System Preferences, click on Power Adapter, and check the Prevent your Mac from sleeping automatically when the display is off option.
Note that even though the Mac itself is awake, you can still save energy by setting the display and hard disks to sleep. That will realize most of the energy savings while still ensuring that it completes background tasks. Modern Macs use little power when on in that state if they are not being actively used.
Enabling Power Nap
It’s also possible for SpamSieve to filter mail, once per hour, while your Mac is asleep, using macOS’s Power Nap feature. To enable Power Nap:
- On Macs with Apple Silicon (M1 or M2), Power Nap is always enabled.
- On macOS 13 through macOS 26, you can control Power Nap from the Battery or Energy Saver pane of System Settings. Laptop Macs have separate settings for enabling Power Nap when on battery or AC power.
- On macOS 12 and earlier, you can control Power Nap from the Battery or Energy Saver pane of System Preferences.
In order for Power Nap to work, the Mac needs to be connected to the Internet, and Apple Mail needs to be running before you put the Mac to sleep. (Power Nap does not support other mail clients, nor the Check inboxes for new messages not sent to Mail extension and Filter spam messages in other mailboxes features.) macOS will suspend Power Nap operations in situations where your Mac is likely to overheat. When everything is set up as described above, Mail can check for new messages and filter them through SpamSieve once per hour if you’re purely using the Mail extension or Mail plug-in. However, depending on your Mac and on various factors which are out of user/app control, sometimes macOS chooses not to check for new mail during Power Nap. Thus, filtering is more reliable if you leave the Mac on but locked rather than relying on Power Nap.
4.5.8 Keeping Spam Messages Out of Gmail’s Archive
The standard Apple Mail setup has you configure Mail to move all spams that SpamSieve catches to the special Junk mailbox. This should prevent Gmail from archiving the spam messages in All Mail. Make sure that you’ve set the Junk mailbox in Mail’s settings to the same Spam mailbox that Gmail’s own junk filter uses (as described in Setting the Junk Mailbox in Apple Mail). Otherwise, you may see incoming spam messages in both the Archive and Junk mailboxes, and training messages as spam may not move them out of Archive. In some cases you may also want to hide the All Mail mailbox in IMAP, as described in Hiding Special Gmail Mailboxes From IMAP.
Local Spam Mailbox
If you’ve instead chosen to use a local Spam mailbox under On My Mac, you should tell Gmail not to archive messages that are deleted via IMAP (which includes messages moved to local mailboxes on your Mac):
Click the gear at the top right, choose Settings, then click on Forwarding and POP/IMAP.

Select Auto-Expunge off and Immediately delete the message forever.
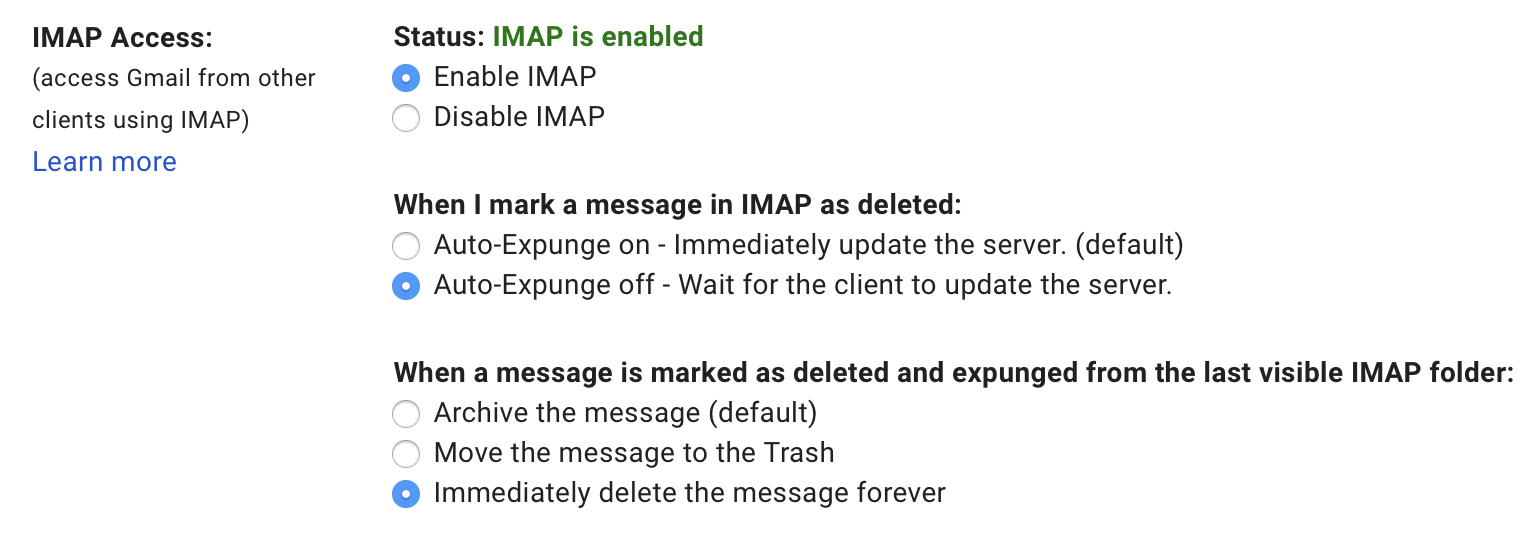
4.6 Outlook Customization
The following customizations are optional but recommended:
- Choose Outlook ‣ Settings… and click on Notifications & Sounds. Turn off the alerts and sounds for new mail notifications, and let SpamSieve notify you only when you receive new non-spam messages.
- If you’re using an IMAP account, choose Tools ‣ Accounts…. Select your account and click the Advanced… button. Make sure that Download headers only is unchecked.
Additional customizations are described below:
4.6.1 Duplicate Outlook Calendar Invitations
If you receive calendar invitations by e-mail and have Outlook set to automatically add them to your calendar, Outlook may see a good message that SpamSieve moves back from the InboxSpamSieve folder to Inbox as a new invitation. To prevent a duplicate calendar event from being created, you can set up your Outlook rules to not move the invitation e-mails to InboxSpamSieve. For example, you could add a rule above the SpamSieve rules that moves the invitation messages to another folder.
4.6.2 Filtering Other Outlook Folders
You can use Outlook rules to automatically organize messages into folders. If you want SpamSieve to filter these additional folders (rather than just the inbox), create an additional SpamSieve inbox folder for each folder that you want to be filtered. For example, if you messages from x@y.z to end up in folder XYZ, create two folders: XYZ and InboxSpamSieveXYZ. Create an Outlook rule called InboxSpamSieve (XYZ) that moves the desired messages into folder InboxSpamSieveXYZ. When SpamSieve checks for new messages, it will move the good messages in InboxSpamSieveXYZ to XYZ and the spam messages to Junk.
4.6.3 Spam Message Categories (Outlook)
SpamSieve colors spam messages in Outlook using one of two categories:
- Junk
- This is for messages that you mark as spam (using the SpamSieve - Train as Spam command) and for most incoming messages that SpamSieve thinks are spam.
- Uncertain Junk
- This is for incoming messages that SpamSieve thinks are spam, but whose scores are below the uncertainty threshold. For more information about scores and uncertainty, see the Uncertain Spam Messages preference.
To change the colors associated with these categories, choose Message ‣ Categorize ‣ Edit Categories….
To turn off the uncertain spam feature, so that all spam messages are marked using the Junk category, use the SpamSieve - Change Settings command.
Outlook 2011
Normally, both Junk and Uncertain Junk messages are put into the same Junk E-mail folder. It is also possible to separate the messages by category. To do this:
- Create a new folder in Outlook called Uncertain Junk.
- Create a third rule called SpamSieve - Move Uncertain Messages. It should say “If Category Is Uncertain Junk, Then Move message Uncertain Junk.”
- Drag the new rule between the SpamSieve - Set Category and SpamSieve - Move Messages rules.
4.6.4 Separate Spam Folders for Each Account (Outlook 2011)
Normally, SpamSieve puts the spam messages from all your Outlook 2011 accounts into a single folder called Junk E-mail.
If you want to have a separate spam folder for each account, first create the requisite empty folders.
Then, instead of the single SpamSieve - Move Messages rule described in the Setting Up Outlook 2011 section, create two rules per account. For example:
SpamSieve - Move messages - Account 1 - Junk
When a new message arrives: If all conditions are met:
- Category Is Junk
- Folder Is INBOX (Account 1)
Do the following:
- Move Message Junk E-mail (Account 1)
SpamSieve - Move messages - Account 1 - Uncertain Junk
When a new message arrives: If all conditions are met:
- Category Is Uncertain Junk
- Folder Is INBOX (Account 1)
Do the following:
- Move Message Junk E-mail (Account 1)
And similarly create two rules for Account 2, etc.
4.7 Hiding Special Gmail Mailboxes From IMAP
Gmail has some special mailboxes that most users do not want to appear in their mail client. This is because these mailboxes contain duplicate copies of messages that are already in your other mailboxes. Additionally, the contents of these mailboxes are not filtered by SpamSieve unless specifically selected. When using Gmail, it is recommended that you hide these mailboxes from IMAP:
In Gmail, click on the gear menu at the top right and select See all settings.
Click on Labels (which is next to General at the top of the screen).
In the System labels section:
- Uncheck Show in IMAP on the line for Starred.
- Uncheck Show in IMAP on the line for Important.
- Uncheck Show in IMAP on the line for All Mail.
- You do want Show in IMAP to be checked on the line for Spam.
Note: If you don’t see Show in IMAP as an option, first go to the Forwarding and POP/IMAP settings and make sure that Enable IMAP is selected.
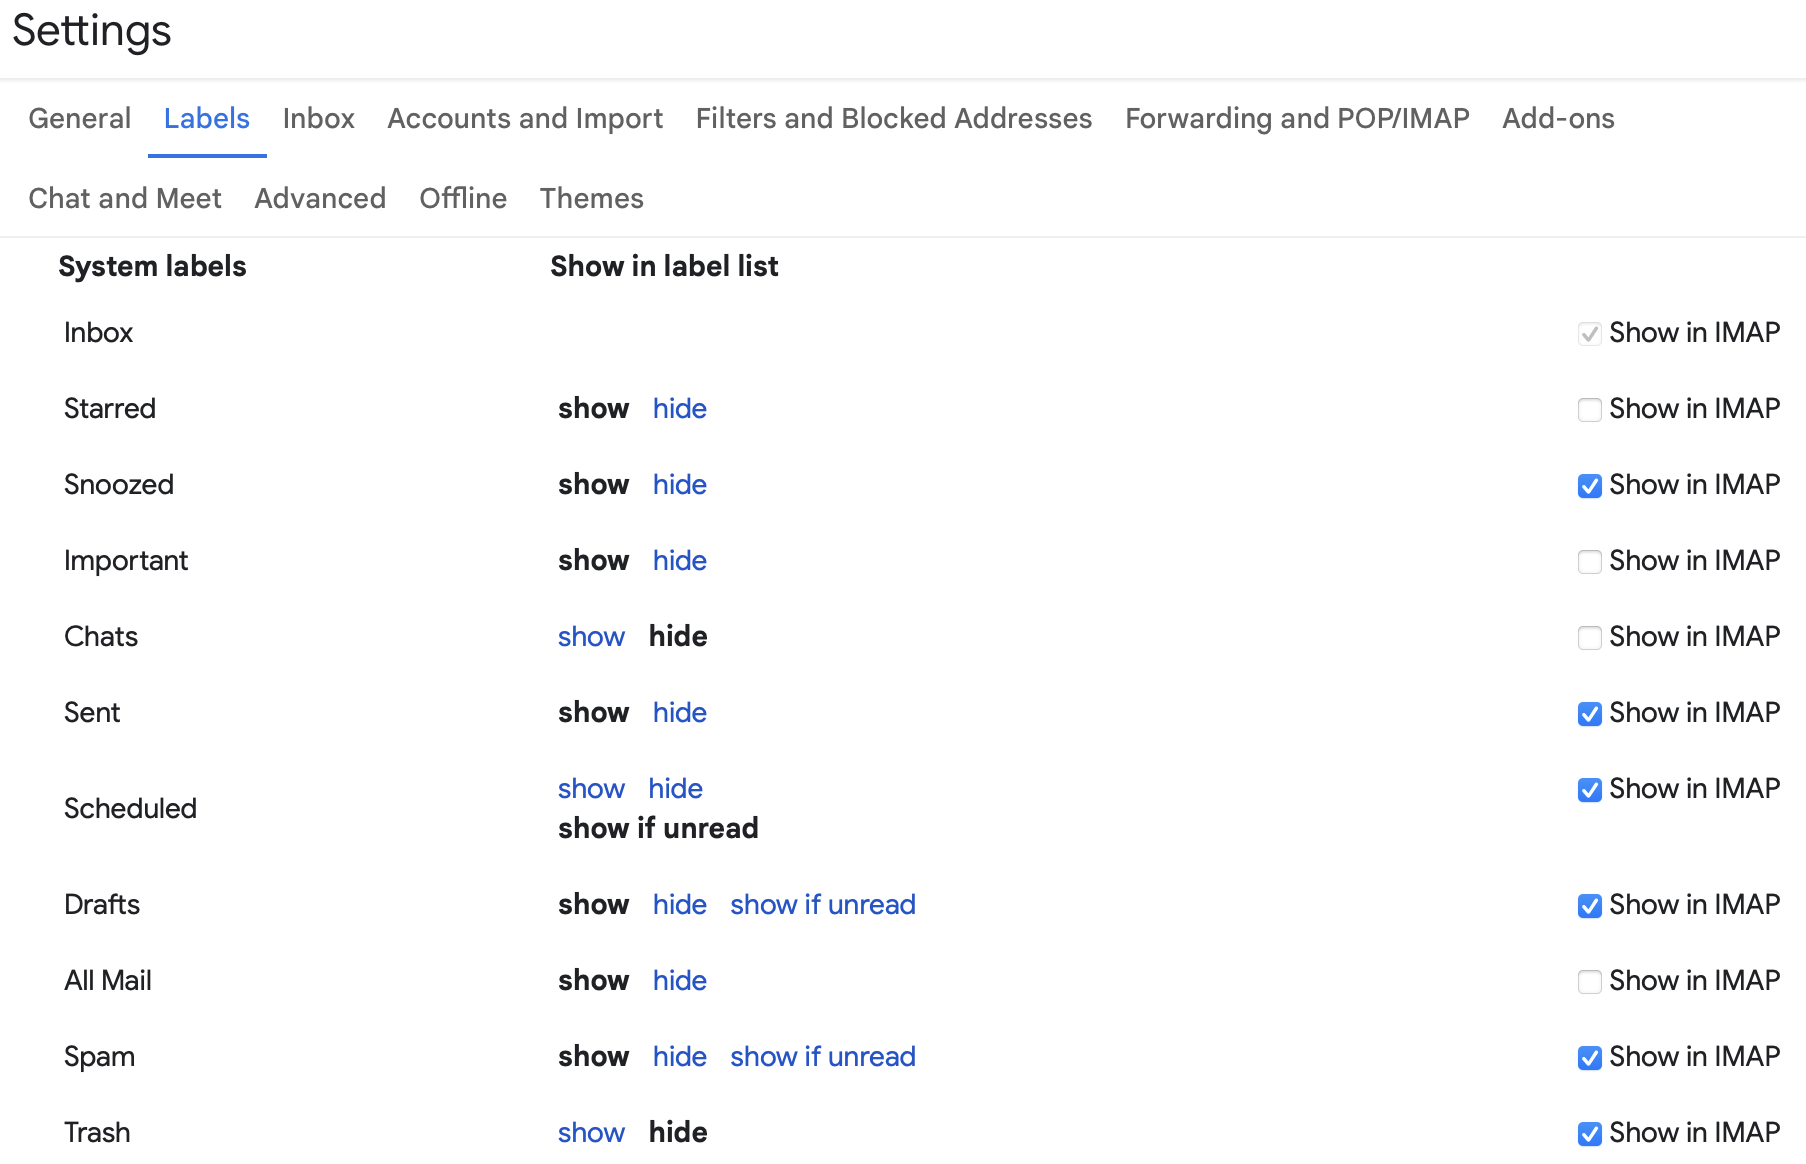
5 Menus
5.1 The SpamSieve Menu
After clicking on SpamSieve’s Dock icon, you will see the SpamSieve menu at the top-left of the screen, next to the Apple menu.
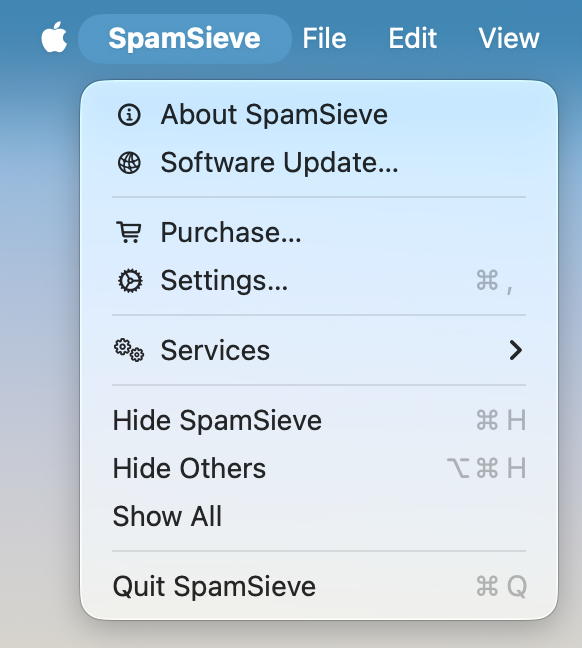
5.1.1 About SpamSieve
The About SpamSieve window shows the credits, download and support information, and the current version numbers of SpamSieve’s plug-ins.
You can always download the latest version of SpamSieve from the SpamSieve Web site.
Questions about SpamSieve may be sent to spamsieve@c-command.com. We’re always looking to improve SpamSieve, so please feel free to send any feature requests to that address.
To make sure that you have the latest version of SpamSieve, you can use the Software Update… command.
5.1.2 Software Update…
Checking for Updates
Click the Check Now button, and SpamSieve will tell you whether a newer version is available for download. By default, SpamSieve will automatically check for new versions each time it is launched and once per day. You can disable this feature by unchecking the Check for updates automatically checkbox.
Updating
If a new version is available, SpamSieve will tell you what’s new in that version. Click Download to have SpamSieve download the .dmg file for the new version to your downloads folder. Click Download & Install to have it download the .dmg and then update the installed SpamSieve application to the new version. For more information, please see Updating From a Previous Version.
Installing a Fresh Copy
You can hold down the Option key when you click Check Now to make SpamSieve always download the latest version, even if your version is already up-to-date. This is an easy way to download and re-install a fresh copy of SpamSieve if your copy is damaged.
Privacy
To check for a new version, SpamSieve contacts a Web server at c-command.com over a secure connection. SpamSieve transmits the following information to the server: the name of the product (SpamSieve) and its version, the version of macOS, the kind of Mac and processor, whether SpamSieve has been purchased, whether it is running in dark mode, the name and version of the current mail program, which method of filtering is selected, and the name of the current language. This information is used to guide future development. No personal information is transmitted.
Mac App Store
If you purchased DropDMG or EagleFiler via the Mac App Store, the Software Update… menu command is not present, and updates are available via the App Store application.
5.1.3 Purchase…
When you launch SpamSieve for the first time, the Purchase window will automatically open. You can also open it by choosing Purchase… from the SpamSieve menu.
Trial/Demo Period
SpamSieve has a free trial. During the trial period, SpamSieve is fully functional; the only difference in behavior is that it will periodically remind you that you are using the trial. To use SpamSieve in trial mode, you can simply close the Purchase window.
The trial period lasts for 30 days. (After the 30 days, if you haven’t had a chance to use SpamSieve very much, you can continue using it for up to a total of 7 launches.) To use SpamSieve beyond the trial period, you must purchase it. This entitles you to free updates and support.
Purchasing
Click the Purchase Online button to enter the online store.
After Purchasing
Soon after paying, you’ll receive an e-mail with your serial number. Enter the name and serial number from the e-mail into the Purchase window and click Personalize. You do not have to “install the purchased version”; rather, SpamSieve will then know that you have purchased and you can keep using it as before—with all the preferences that you had set and data that you had entered.
Reinstalling a Previous Purchase
If you need to re-install SpamSieve, you can simply re-enter your Serial Name and Serial Number and click Personalize; there’s no need to purchase again.
If you cannot find your serial number, click the Look Up My Serial Number button. This will open a form where you can enter your e-mail address and look up your order information.
License Information
A license for SpamSieve is good for one person or one computer. This means that you can use it on your desktop Mac and your laptop, or you and your family can use it (in separate user accounts) on a shared Mac. If there are multiple users on multiple Macs, you should purchase multiple licenses. Discounts for packs of 2, 10, and 50 licenses are available above. A family (all living in the same household) can share a 2-user license. If you already have a single license, you can upgrade to a family license. To do this, e-mail your old order number to sales@c-command.com, and we’ll send you a coupon code.
Upgrade Policy
All maintenance releases (1.0.1, 1.0.2, 1.6.1, etc.) and minor feature updates (1.1, 1.2, 1.5, etc.) are free. We have a track record of many such updates, and they have included significant new features. Major upgrades (2.0, 3.0) are free if you purchased the previous version within the last six months. If you purchased longer ago than that, you get a discount. (Note: The upgrade discounts are only available if you originally purchased direct from C-Command, since the Mac App Store does not support upgrades.)
Mac App Store
The Purchase… menu command is not present if you purchased via the Mac App Store. In that case, there is no trial period, and licensing is based on your iTunes account rather than the number of people or computers.
5.1.4 Mac App Store
Due to Apple’s store guidelines, SpamSieve is currently not available from the Mac App Store. It can be purchased direct from C-Command.
5.2 The File Menu
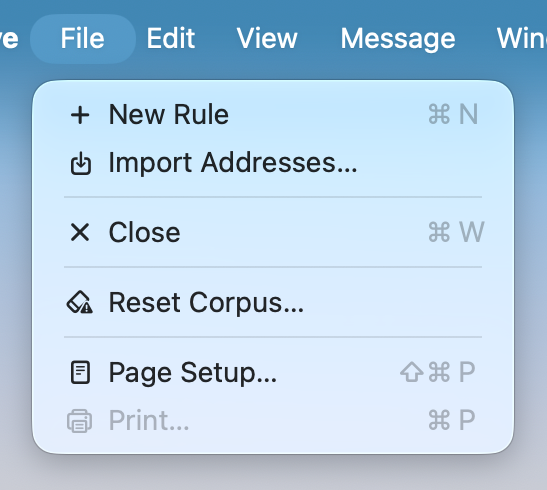
5.2.1 New Rule
This command creates a new rule in either the allowlist or blocklist. This is useful if you want to add your own rules to the allowlist or blocklist, rather than having SpamSieve learn the rules when you train it with messages. For example, you could create a blocklist rule to catch spam messages with a particular subject, or a allowlist rule to always accept messages sent from a certain domain.
5.2.2 Import Addresses…
This imports either good or spam e-mail addresses from a text file. For each address, a rule is created on the allowlist (or blocklist) that matches messages sent from that address. If such a rule already exists, SpamSieve makes sure that it’s enabled. Rules in the opposite list are not affected.
This feature is usually not needed, as SpamSieve will automatically create allowlist and blocklist rules based on the messages that you receive.
Many file formats are supported: the addresses can be return- or comma-delimited, or they can be mixed in with message text as part of a mbox file.
- To import addresses from Entourage, choose Export… from the File menu and select the option to Export contacts to a tab-delimited text file.
- To import addresses from Eudora, ask SpamSieve to import the Eudora Nicknames file inside the Eudora Folder (which is likely in your Documents folder).
- To import addresses from Outlook, choose Export… from the File menu and select the option for Contacts to a list (tab-delimited text).
- To import addresses from the macOS address book, open the Contacts (previously Address Book) program. Select all the names in the middle column and drag them to the desktop. This will create a .vcf file, which you can import into SpamSieve.
You may be wondering why you would want to import addresses from the macOS address book instead of using the Use macOS Contacts preference, or why you would import addresses from Entourage or Outlook instead of using the Use Outlook/Entourage contacts preference. The difference is as follows. When you ask SpamSieve to use an address book directly, it will always consider messages from senders in the address book to be good—even if you receive many spam messages that are forged to appear as if they were sent by your friends.
When the addresses are imported to the allowlist, however, they are subject to SpamSieve’s normal allowlist behavior. That is, if Train SpamSieve allowlist is checked, when you receive a spam message from someone on the allowlist, SpamSieve will disable the corresponding allowlist rule. Subsequent messages from that sender will no longer be allowlisted. In short, the address book is safer because it makes sure messages from people in your address book always get through. The allowlist is less safe, but it allows you to block forged spam messages.
If you prefer the address book behavior but don’t have all of your addresses entered into the address book, you can use Import Addresses… to create allowlist rules from your addresses, and then select the rules and use this script to convert the rules into address book cards.
5.2.3 Reset Corpus…
This command removes all the words and messages from the corpus. (It does not change the allowlist or blocklist.) After resetting the corpus, you can retrain SpamSieve from scratch, and SpamSieve will let you use your old messages in the retraining. Resetting the corpus and re-training SpamSieve with a proper mix of recent messages can increase SpamSieve’s accuracy and reduce its memory use.
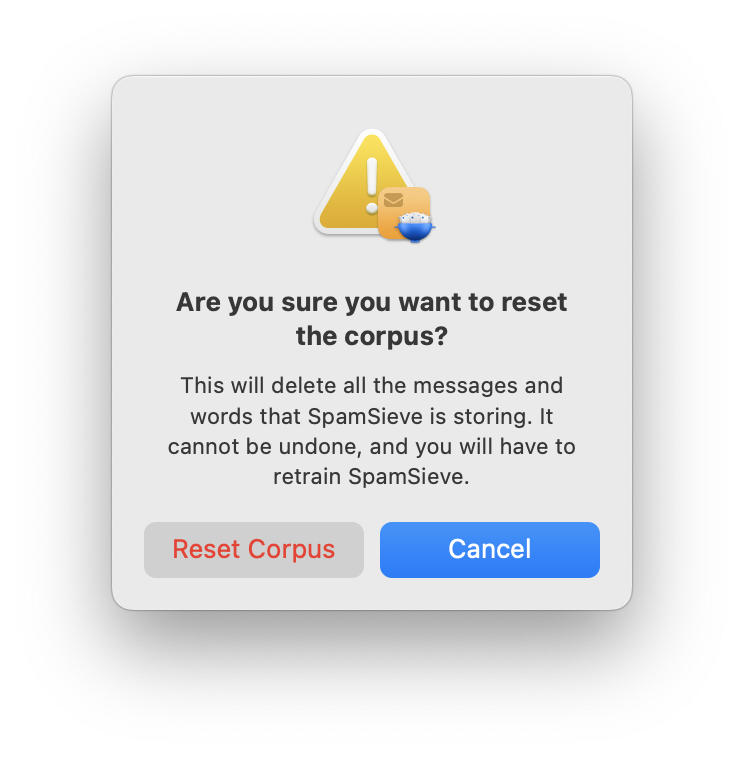
5.3 The Message Menu
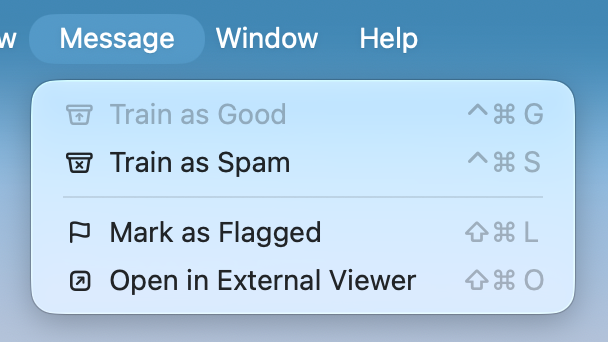
5.3.1 Train as Good/Spam
Training From Within SpamSieve
The Train as Good and Train as Spam commands in SpamSieve’s Message menu are not the primary way of training SpamSieve. These commands are only intended for correcting mistakes for messages that are already in SpamSieve.
For example, messages that SpamSieve has filtered will appear in the Log window, and messages that you’ve trained (or that SpamSieve has auto-trained) will appear in the Corpus window. You can use the training commands in SpamSieve’s Message menu with messages in these windows to tell SpamSieve that the messages were incorrectly predicted (i.e. that SpamSieve thought a message was good but it’s actually spam) or incorrectly trained (i.e. some time ago you accidentally trained a message as good when you meant to train it as spam). The messages may no longer be in your mail client or it may simply be easier to find and correct them in SpamSieve.
If you try to use the Message menu training commands without having a message selected in SpamSieve’s Log or Corpus window, you probably meant to train the message from your mail client instead, so SpamSieve will open this help page.
Training From Your Mail Client
![]()
Normally, you will do an initial training and correct mistakes by selecting messages directly in your mail client. You will then tell SpamSieve to train them without leaving your mail client. With Apple Mail and Microsoft Outlook, you can use the Train as Good or Train as Spam commands in SpamSieve’s menu bar icon or Dock icon. For other mail clients, choose the appropriate command within your mail program.
- The SpamSieve menu bar icon (shown at left above) is normally at the top of the screen, near the clock. If you don’t see it, please see the Where is SpamSieve’s menu bar icon? instructions.
- The SpamSieve Dock icon (shown at right above) is normally at the bottom or side of the screen. When using the Dock menu, it’s important to click and hold on the SpamSieve icon to open the menu while still in your mail client. You don’t want to just click the icon because that will switch SpamSieve to be the active app.
- With macOS 13 Ventura and earlier, the SpamSieve training commands are also available in the Message menu in Apple Mail. macOS 14 Sonoma and later no longer support Mail plug-ins, so it’s no longer possible for SpamSieve to add its commands to Mail’s Message menu. Please send feedback to Apple if you would like Mail extensions to be able to add menu items.
- The keyboard shortcuts for the training commands are Command-Control-S (for Train as Spam) and Command-Control-G (for Train as Good). These can be customized via the esoteric preferences.
5.3.2 Mark as Flagged
You can flag messages of note in the Corpus and Log windows so that you can easily find them later. You can also log entries that you want to bring to the attention to custom support when you save a diagnostic report. Because you’ve identified flagged log entries as important, their data is not automatically pruned from the log.
You can flag rules in the Allowlist and Blocklist windows, e.g. to keep track of a rules that you’re observing or tweaking or that you’ve put on probation and may deactivate or delete.
5.3.3 Open in External Viewer
When viewing a message in SpamSieve’s corpus or log, you can use the Open in External Viewer command in SpamSieve’s Message menu to open SpamSieve’s copy of the message in Apple Mail. This lets you view the message and its attachments and search or copy its contents. You can also reply to the message or use Apple Mail’s Message ‣ Copy Message menu command to copy it back to the mail server or into a local mailbox in Mail’s data store. For example, this can be used to restore a message that had been inadvertently deleted in Mail or lost due to a malfunction of Mail or your mail server.
If you’re using a mail client other than Apple Mail, you can set it as the default app for opening message files. Drag the message from SpamSieve to Finder to export it as a .eml file. Select the file in Finder and choose Get Info from the File menu. In the Open with section of the info window, select the desired app and click Change All….
5.4 The Window Menu
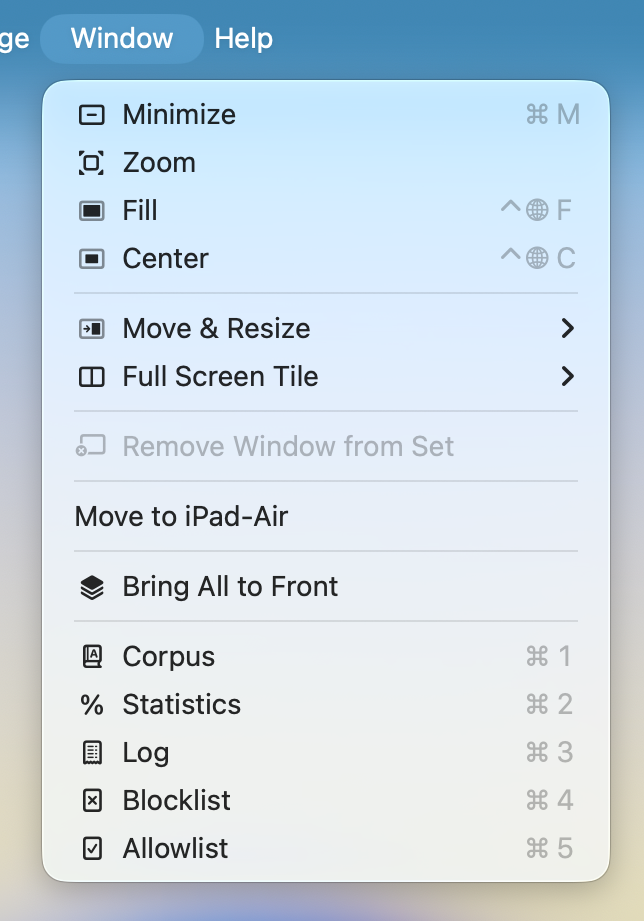
5.4.1 Corpus
The corpus is a collection of messages, both spam and good, with which you have trained SpamSieve. SpamSieve’s Bayesian classifier analyzes the contents of the messages and uses this information to predict whether future messages are spam or good. The contents of the corpus are managed by SpamSieve; therefore, once you’ve trained SpamSieve with a message, deleting the message from your e-mail program will not affect SpamSieve because the information from that message is stored in the corpus.
For information about searching the corpus, please see the Searching section.
Good Messages and Spam Messages
This section shows the lists of good and spam messages that you’ve trained, as well as ones that SpamSieve has auto-trained. If you find that SpamSieve classified a message incorrectly, it’s best to correct the mistake by training it from your mail client. However, you can also use the Train as Good/Spam commands in the corpus window to correct messages that you don’t see in the mail client. Looking at the lists of messages in the corpus is a good way to make sure that no messages were mis-trained and that no mistakes went uncorrected.
The following columns are shown:
- ⚑
Whether the message has been marked as flagged.
- #
The number of attachments.
- Subject
The message’s subject.
- Received
When the message was received by your mail server.
- Trained
When you (or SpamSieve’s auto-training feature) added the message to SpamSieve’s corpus.
- Size
The size of the message’s Raw Source, if it’s stored by SpamSieve. You can sort by this column to find messages that are using a lot of disk space.
The Info tab shows summary information about the message itself, as well as how it was trained.
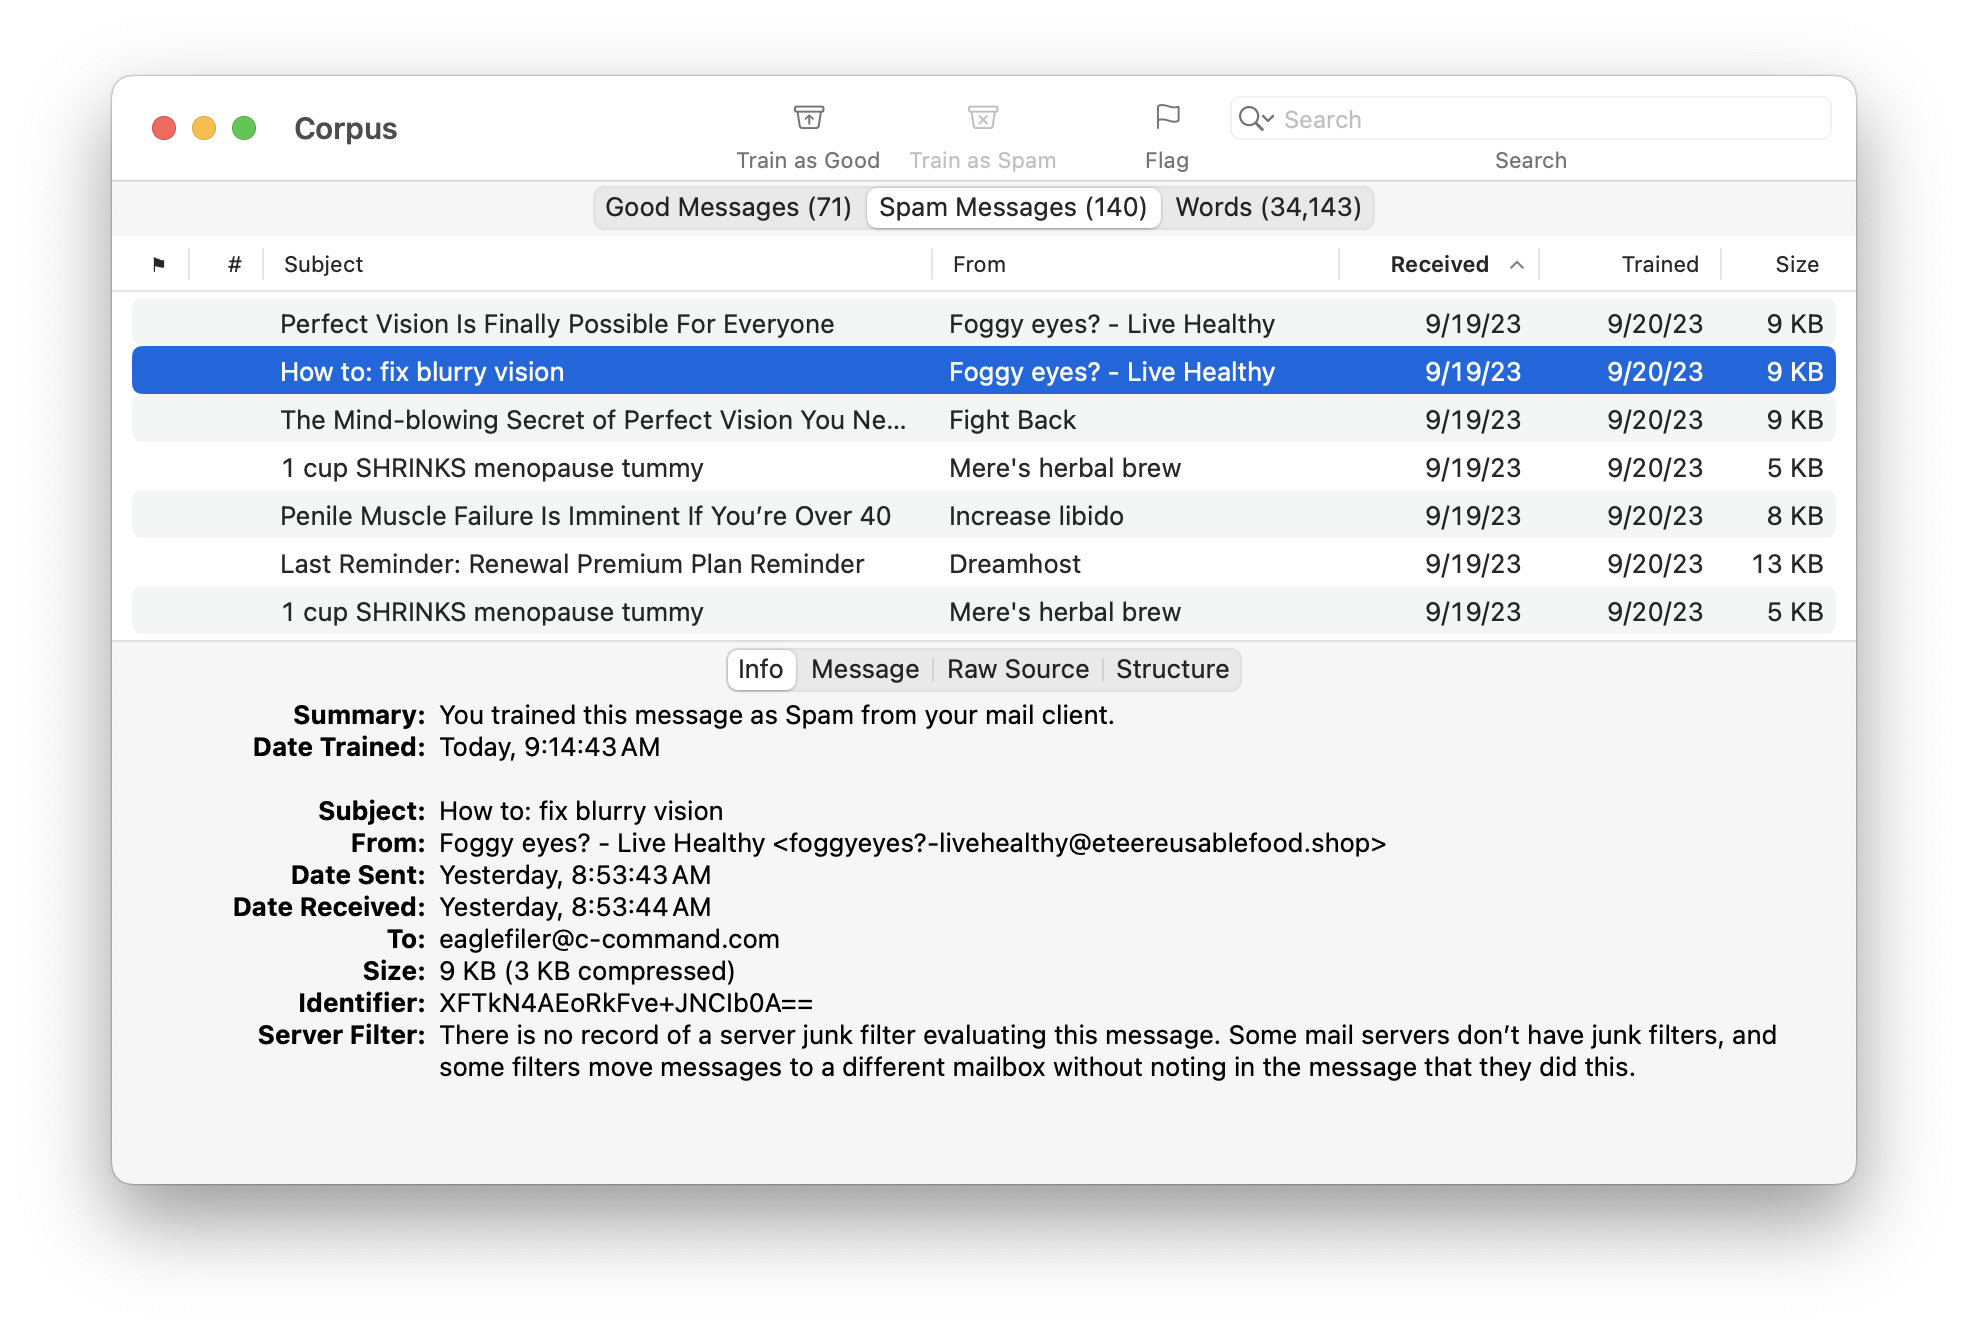
The Message tab shows a preview of the message’s contents. SpamSieve does not load remote images here, so you are protected from Web bugs. You can also use the Open in External Viewer command to open the message in your mail client.
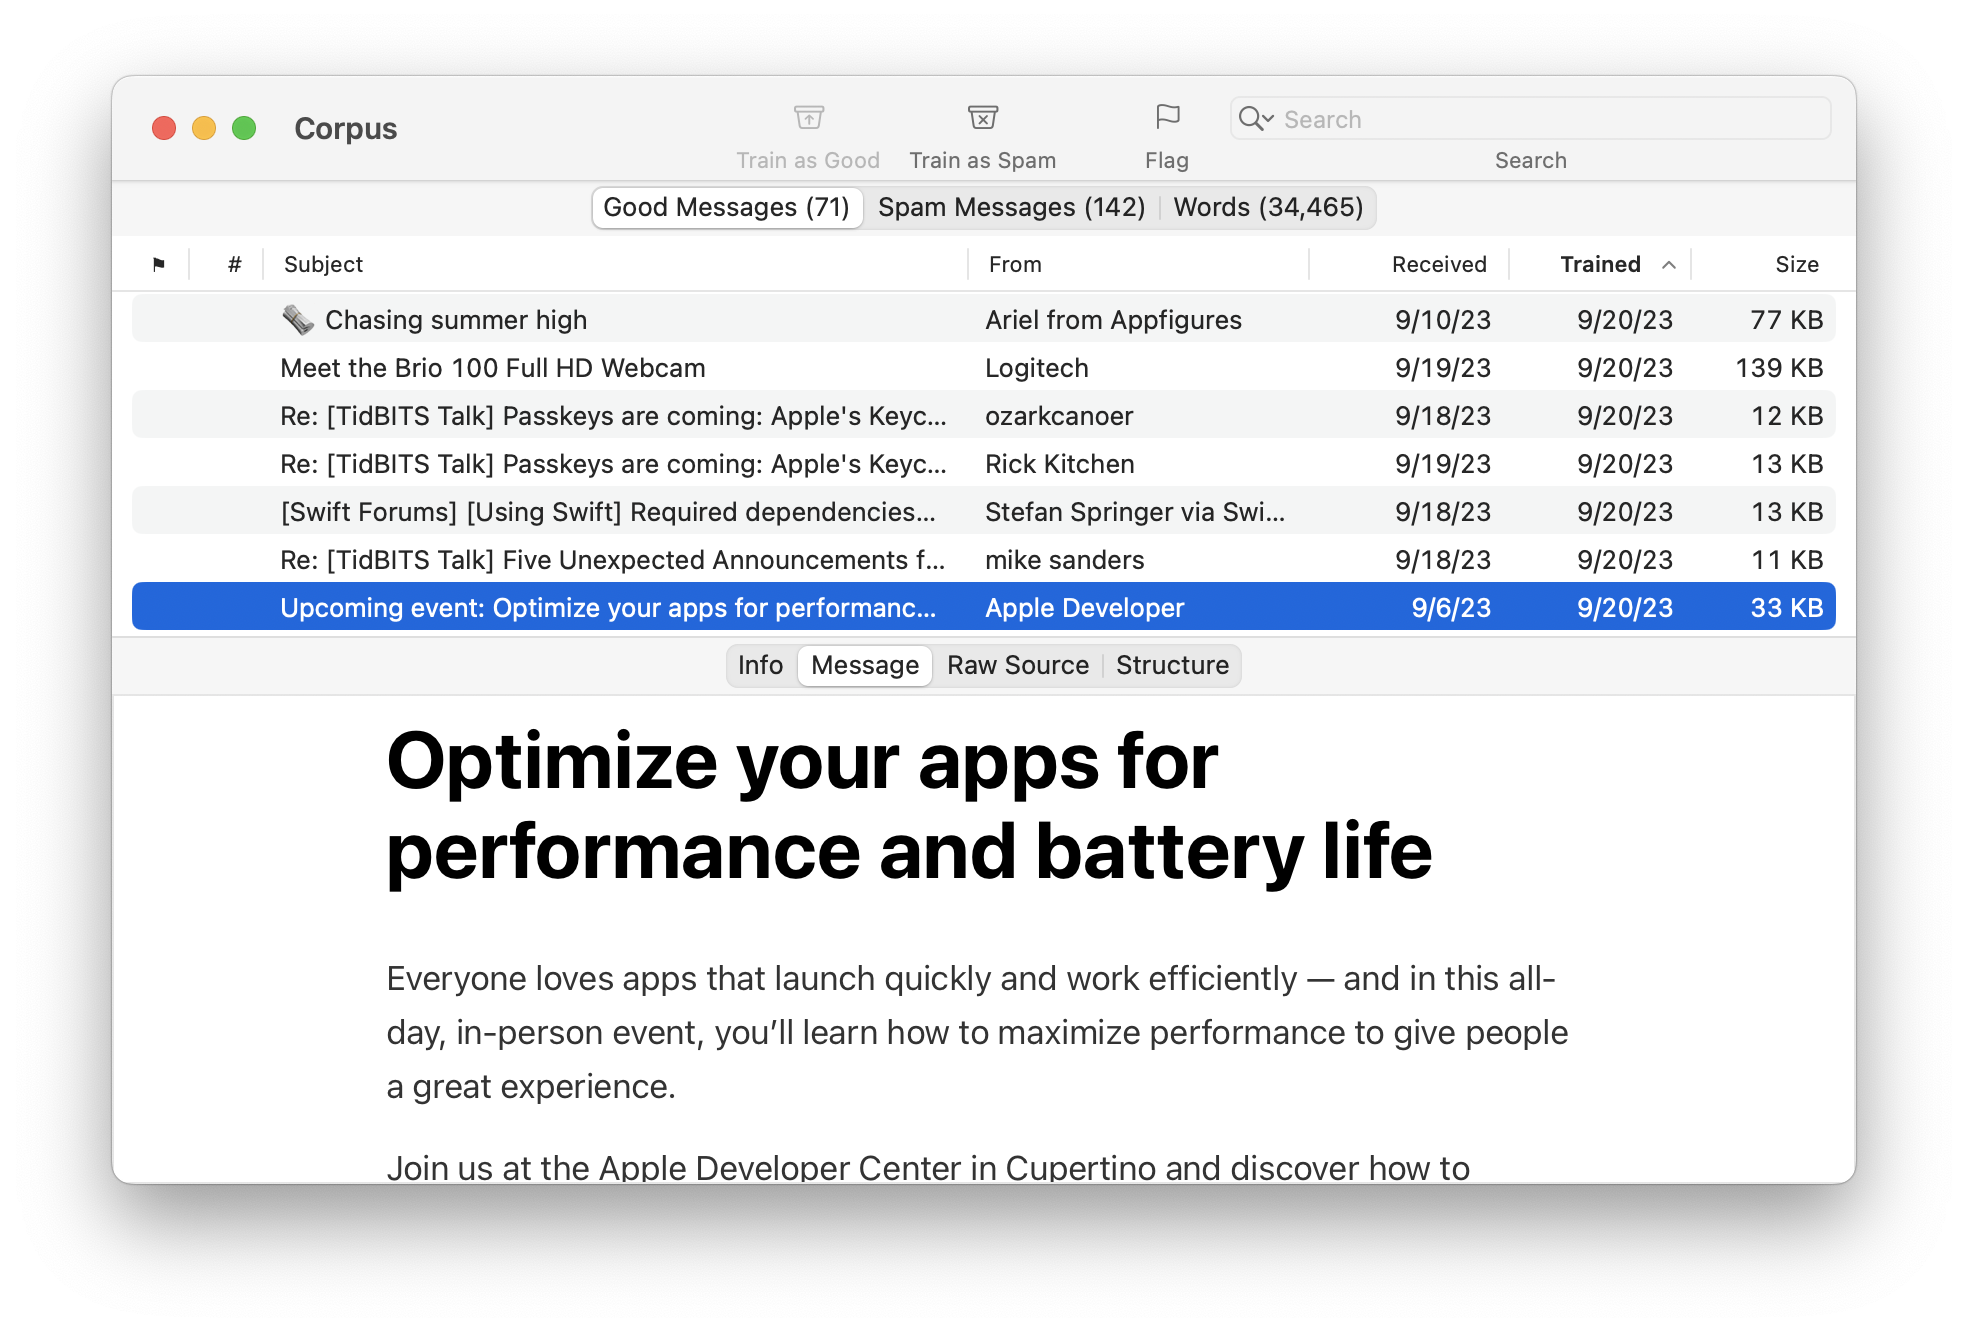
The Raw Source tab shows the message data that SpamSieve received from your mail client. You can export a message’s raw source by dragging the message from the list to the Finder.
The Structure tab shows information about how SpamSieve interpreted the raw source.
Words
This section shows the words that SpamSieve has extracted from the trained messages.
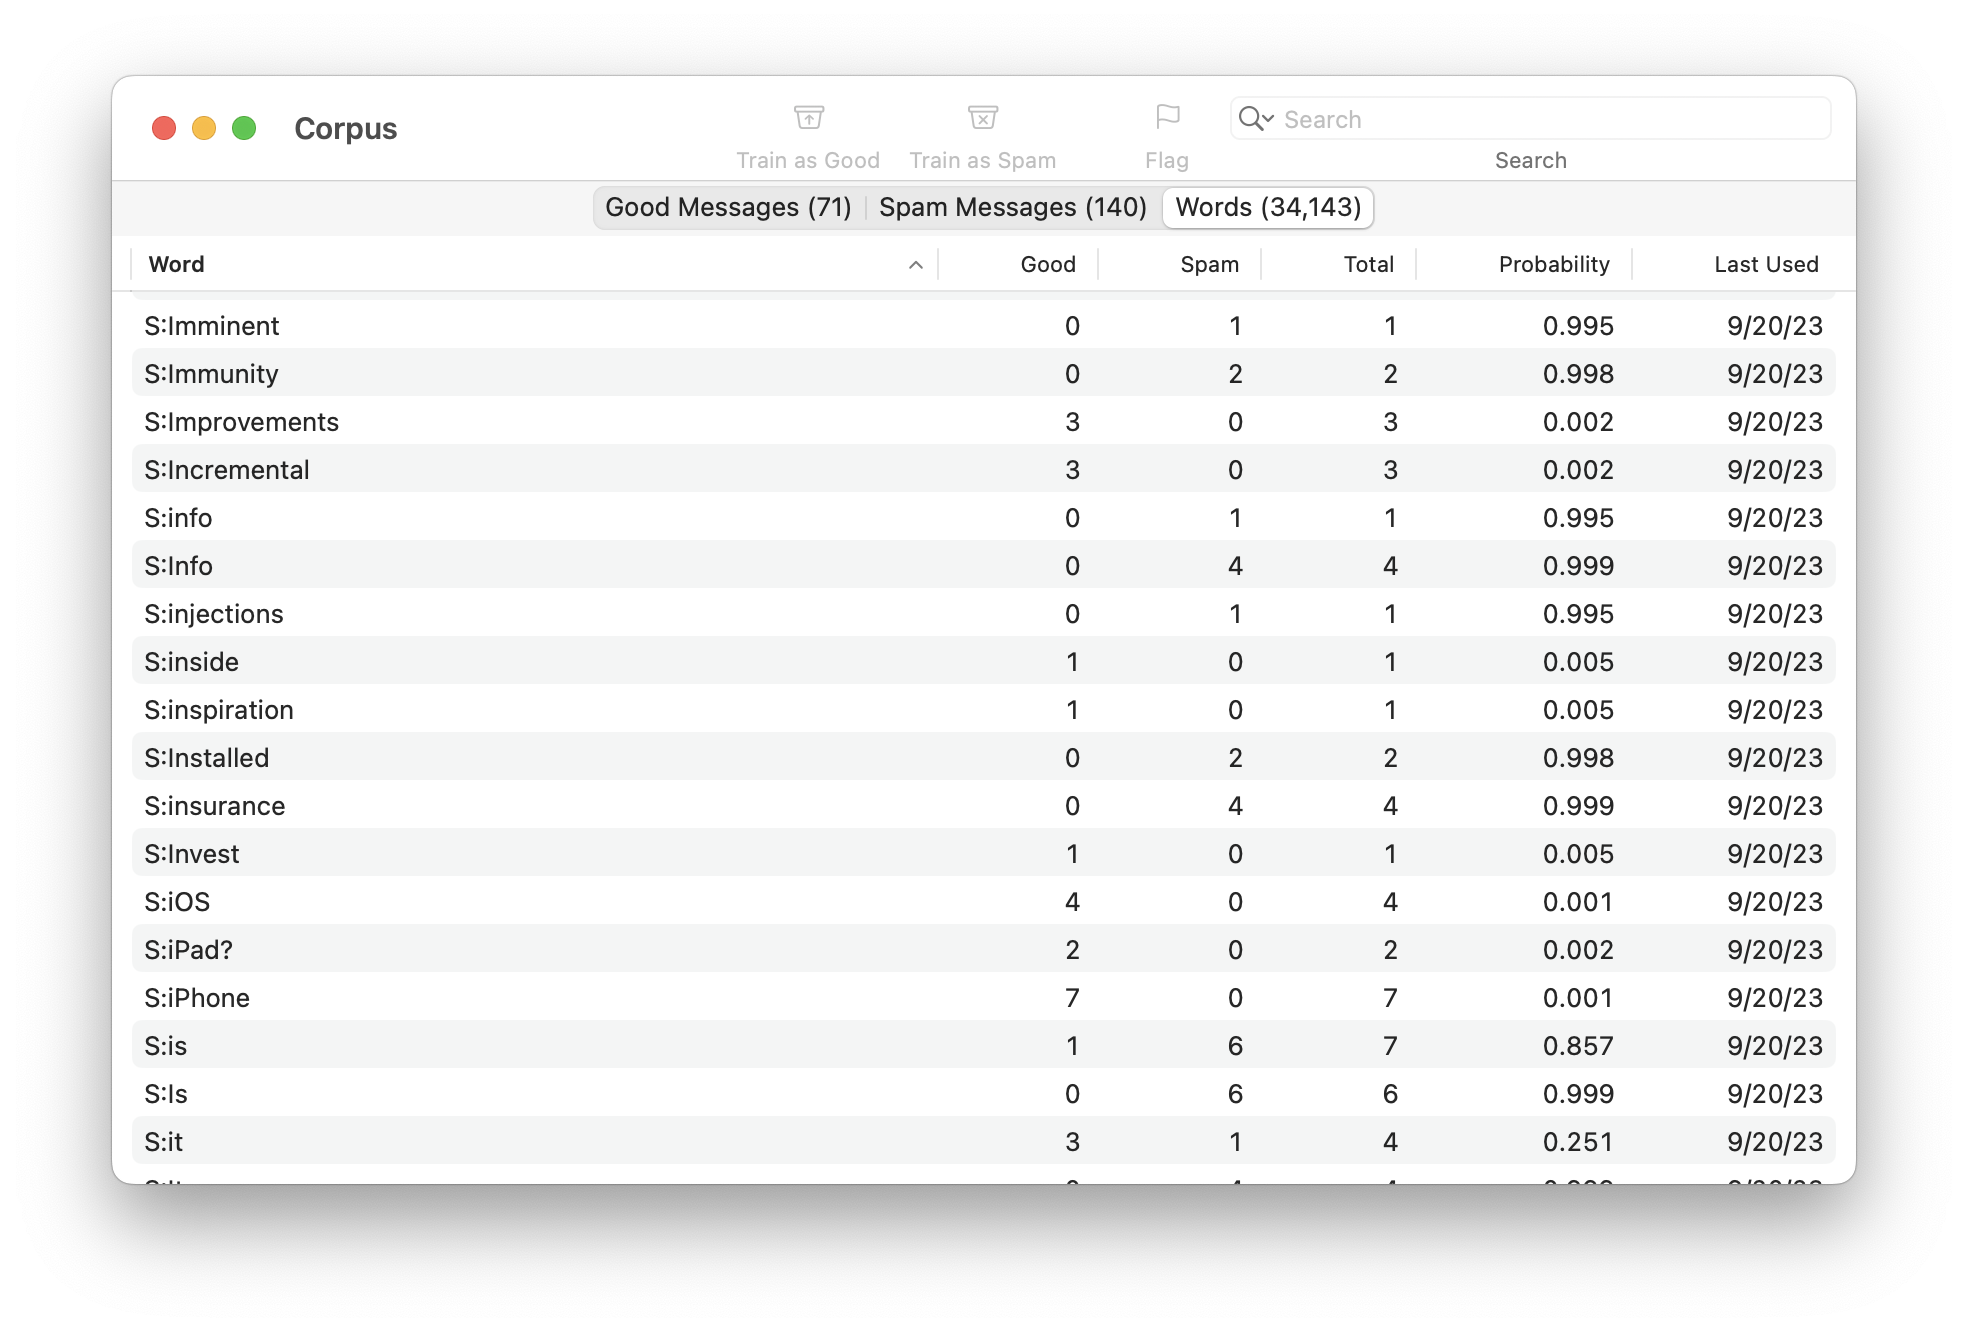
The following columns are shown:
- Word
- A word in the corpus. Some words are words that you would see, while others are tokens that relate to how the message or its attachments were formatted or structured.
- Spam
- The number of spam messages in which the word has occurred.
- Good
- The number of good messages in which the word has occurred.
- Total
- The total number of messages in which the word has occurred.
- Probability
- The probability that a message is spam, given that it contains the word (and in the absence of other evidence).
- Last Used
- The date that the word was added or updated in the corpus, or the date that it last appeared in a received message (whichever is later).
5.4.1.1 Searching
SpamSieve supports searching in the Corpus, Log, Blocklist, and Allowlist windows. Using the search field in the toolbar, you can filter the top of the window to display to show only those items that match the search criteria. You can open this help page by selecting Search Syntax Reference from the search field menu.
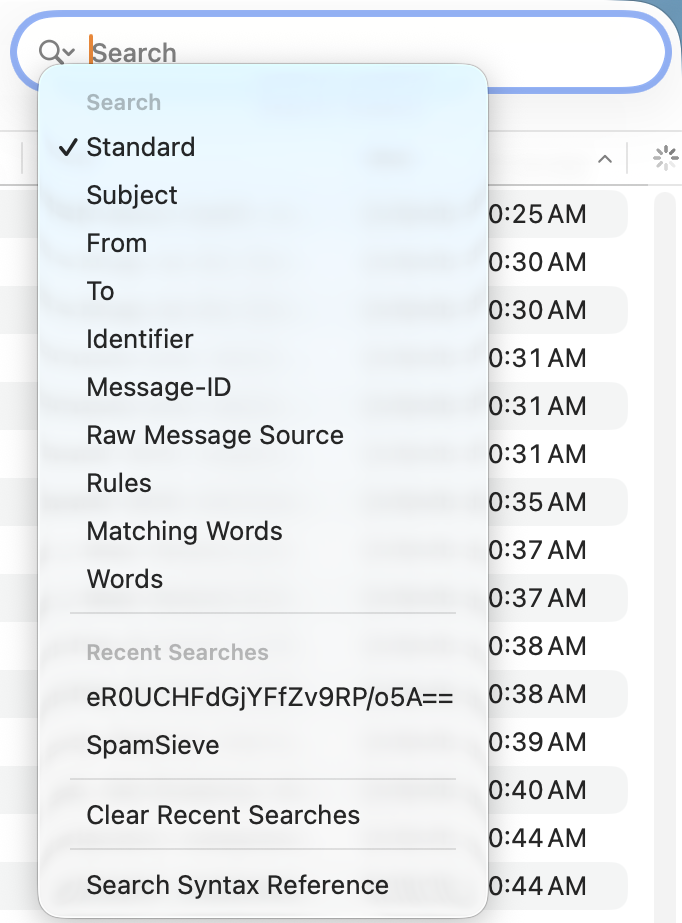
Additionally, you can choose Edit ‣ Find ‣ Find to search within the Info, Raw Source, and Structure tabs at the bottom of the window. The rest of this section concerns the search field at the top.
Search Scope
When searching messages in the corpus or log entries in the log, you can choose between a Standard search or one of the other search scopes:
- Standard
- This is normally what you want, as it will search almost everything in the message or log entry. However, in some circumstances you may want to choose a more specific scope, either to make the search faster or to narrow the results. Note that this does not search the Raw Message Source, the Words, or descriptive text in the Type or Subject column that’s not part of the message or an error.
- Subject
- Searches the subject of the message.
- From
- Searches the name and address of the message’s sender.
- To
- Searches the address where you received the message (which may be different from what’s shown in the message’s To: header).
- Identifier
- Searches for messages with the given SpamSieve identifier (which will look something like xiNVGwM5KM7sGk71w7KNZQ==). You can find a message’s identifier in the Info tab. The identifier is computed based on the headers of the message, and SpamSieve uses this to determine whether it’s seeing the same message again (e.g. so it can tell during training whether you’re correcting a mistake or teaching it a new message).
- Message-ID
- Searches the message’s Message-ID: header. This is the identifier generated by the message’s sender and may look something like <4824BBE7-3B56-4702-9F6C-13C45C8D7C7E@c-command.com>. Note that multiple messages with different SpamSieve identifiers may have the same Message-ID. For example, if you receive two copies of a message sent to different e-mail addresses, the Message-ID will be the same but the SpamSieve identifiers will be different because the messages took different paths (documented in the Received: header) to reach you.
- Raw Message Source
- Searches the message’s RFC 822 data, i.e. the full message data (headers, body, attachments) that your mail client downloaded from the server, as shown in the Raw Source tab. The data may be transfer encoded (Quoted-Printable or Base64) and include HTML and CSS.
- Rules
- Searches the Text to Match of any Blocklist or Allowlist rules that were created or edited or that matched a message.
- Matching Words
- Searches words that the Bayesian classifier used to predict whether a message was good or spam. These are also shown in the Info tab of a Predicted log entry. This includes regular words found in the message body as well as special words like S:Apple, R:^relay2^apple^com, and ^a-style-fontfamilyArialsansserifcolorwhite that SpamSieve uses to track more specific message characteristics. (For examples, see the Words tab of the Corpus window.)
- Words
- Searches the corpus words in the message. This is different from Matching Words in that it searches all the words in a message (or in a Predicted or Trained log entry) even if SpamSieve deemed them to be neutral (not a strong indicator of good vs. spam) and so they do not appear among the significant Words in the Predicted log entry.
Note that Raw Message Source and Words searches are slower than the other types and are only possible for messages where SpamSieve is storing the full message data. This includes all messages in the corpus that were trained using SpamSieve 3.0 or later. If you’re using the Prune full message data in log setting, only newer log entries will have their full data stored.
Search Query Syntax
Except where noted below, searches are case-insensitive and diacritic-insensitive. A multi-word query is treated as a phrase search. Searches support wildcards such as * (which matches any number of additional characters) and ? (which matches a single character). To search for a literal wildcard character, you can escape it, e.g. \? to search for a question mark.
When searching by Identifier or Message-ID, you must search for the entire identifier, not just a some of the letters. This is case-sensitive, and wildcards are not supported. Typically, you would know the exact identifier because you are copying and pasting it from elsewhere. If you need to search for a fragment of a Message-ID: header you can do that using Raw Message Source.
When searching by Raw Message Source, searches are case-sensitive and do not support wildcards. Non-ASCII search terms may not directly match the raw source because it may be encoded.
Search Examples
- A From search for @apple.com will find messages sent to you from Apple.
- If you have multiple mail accounts or aliases, a To search can help you find messages sent to a particular address.
- If you see a message in the Log and copy its Identifier from the Info tab, you can search for that identifier to find all the log entries pertaining to that message. For example, if a spam message went to your inbox, it may have been Predicted: Good and then Trained: Good (Auto), then you corrected the mistake so it was Trained: Spam (Manual). Or there may be multiple Predicted entries for the same message if you mail program kept seeing it as new and sent it to SpamSieve for analysis multiple times.
- Searching by Message-ID can be useful if you are trying to find a message that you see in your mail client or in a server log. In that case, you don’t know the SpamSieve identifier to uniquely identify the message, but this search will narrow the results down much more than searching by Subject or From.
- If you see that a message was classified as good or spam due to a particular rule, you can do a Rules search to see when and why that rule was created and which other messages were also classified using that rule. If a rule is not fully reliable, but you’ve locked it so that SpamSieve keeps it enabled, you can find all the messages classified using that rule—both correctly and incorrectly classified—to help evaluate whether you still want to use that rule.
- If you see that the Bayesian classifier predicted a message to be good or spam (in part) due to a particular word, a Matching Words search can find other messages where that word also played a role. This can also be useful (instead of a Words search, as below) in searching the log for messages that contain a particular corpus word. It will not find all messages with that word because it’s only searching messages where that word was one of the ones that SpamSieve deemed important to that classification. However, it may find some messages that a Word search doesn’t because, if you’re using the Prune full message data in log setting, older messages in the log won’t have their full message data stored, so it won’t be possible to search all their words.
- Words searches can be useful in checking the training when a message was not classified correctly. For example, if the Bayesian classifier incorrectly predicted a spam message to be good, the Words in the Info tab will show which key words SpamSieve used to make this determination. Suppose you see v1agra(0.005) there. This seems like a word that would only appear in spam messages, but the spam probability being very close to zero means that SpamSieve thinks it’s a strong indication that the message is good. Something isn’t right here. You could go to the Good Messages section of the Corpus window and do a Words search for v1agra to find which messages SpamSieve was trained with that made it think this word was good. If you find messages in the Good section that are spam (e.g. trained by mistake or auto-trained messages that you failed to correct) you could fix that by training them as spam. There’s more information about this in the Fixing Uncorrected Mistakes section of the manual.
5.4.2 Statistics
This command opens the Statistics window, which displays the following information:
- Filtered Mail
- Good Messages
- The number of non-spam messages that SpamSieve has filtered.
- Spam Messages
- The number of spam messages that SpamSieve has filtered.
- Spam Messages Per Day
- The average number of spam messages received per 24-hour period.
- SpamSieve Accuracy
- False Positives
- The number of good messages that SpamSieve identified as spam.
- False Negatives
- The number of spam messages that SpamSieve identified as good.
- % Correct
- The percent of messages that SpamSieve identified correctly.
- Corpus
- Good Messages
- The number of non-spam messages that are used to identify spam messages.
- Spam Messages
- The number of spam messages that are used to identify spam messages.
- Total Words
- The total number of unique words in the corpus.
- Rules
Normally, SpamSieve shows statistics for all the messages that it has processed since it was installed. Because the accuracy and the number of messages that you receive change with time, you may wish to only see recent statistics. To do this, you can edit the Showing Statistics Since date. If you’ve chosen a suitable date and the Filtered Messages section shows zero filtered messages, that means that your mail program did tell SpamSieve about any of the incoming messages. You should check to make sure that the mail program setup is correct.
You can copy all the statistics to the clipboard using the Copy Statistics button.
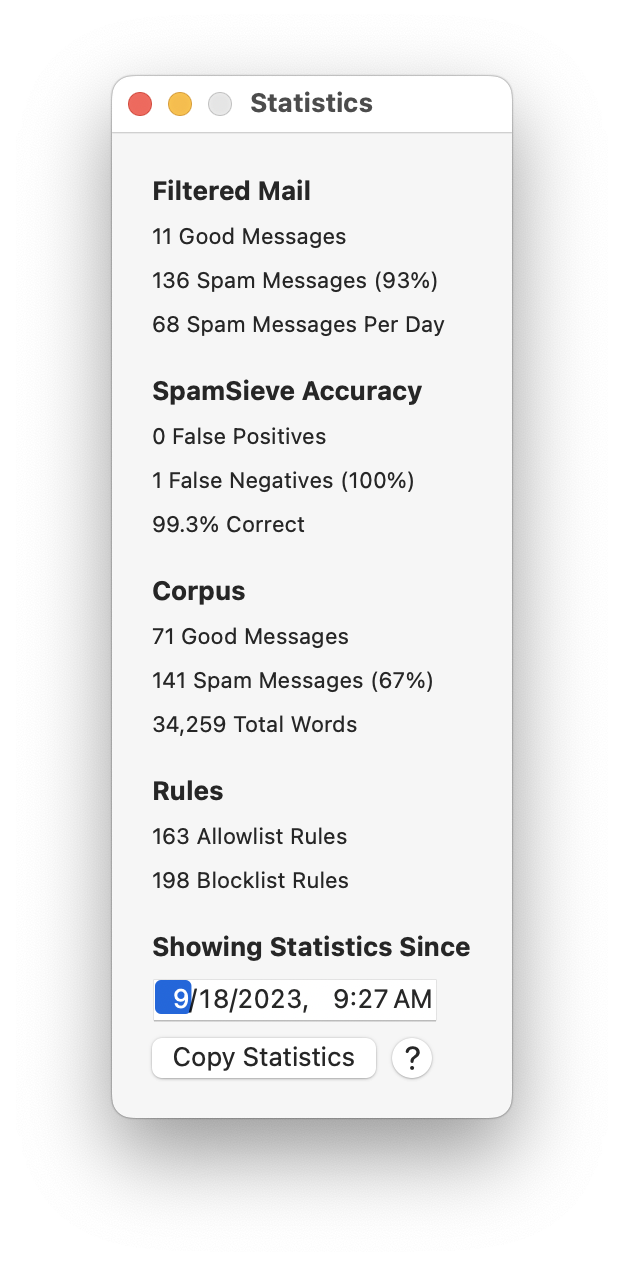
5.4.3 Log
From the Window menu, you can open the Log window, which keeps track of which messages SpamSieve has filtered, which messages you’ve trained it with, changes that you’ve made to the rules, any errors that have occurred, and more. The log is the first place to look to understand what SpamSieve is doing or to troubleshoot a problem. The Sending in an Error Report section describes how you can e-mail part of your log to spamsieve@c-command.com if you need help interpreting it. You can also Copy/Paste individual log entries from the list.
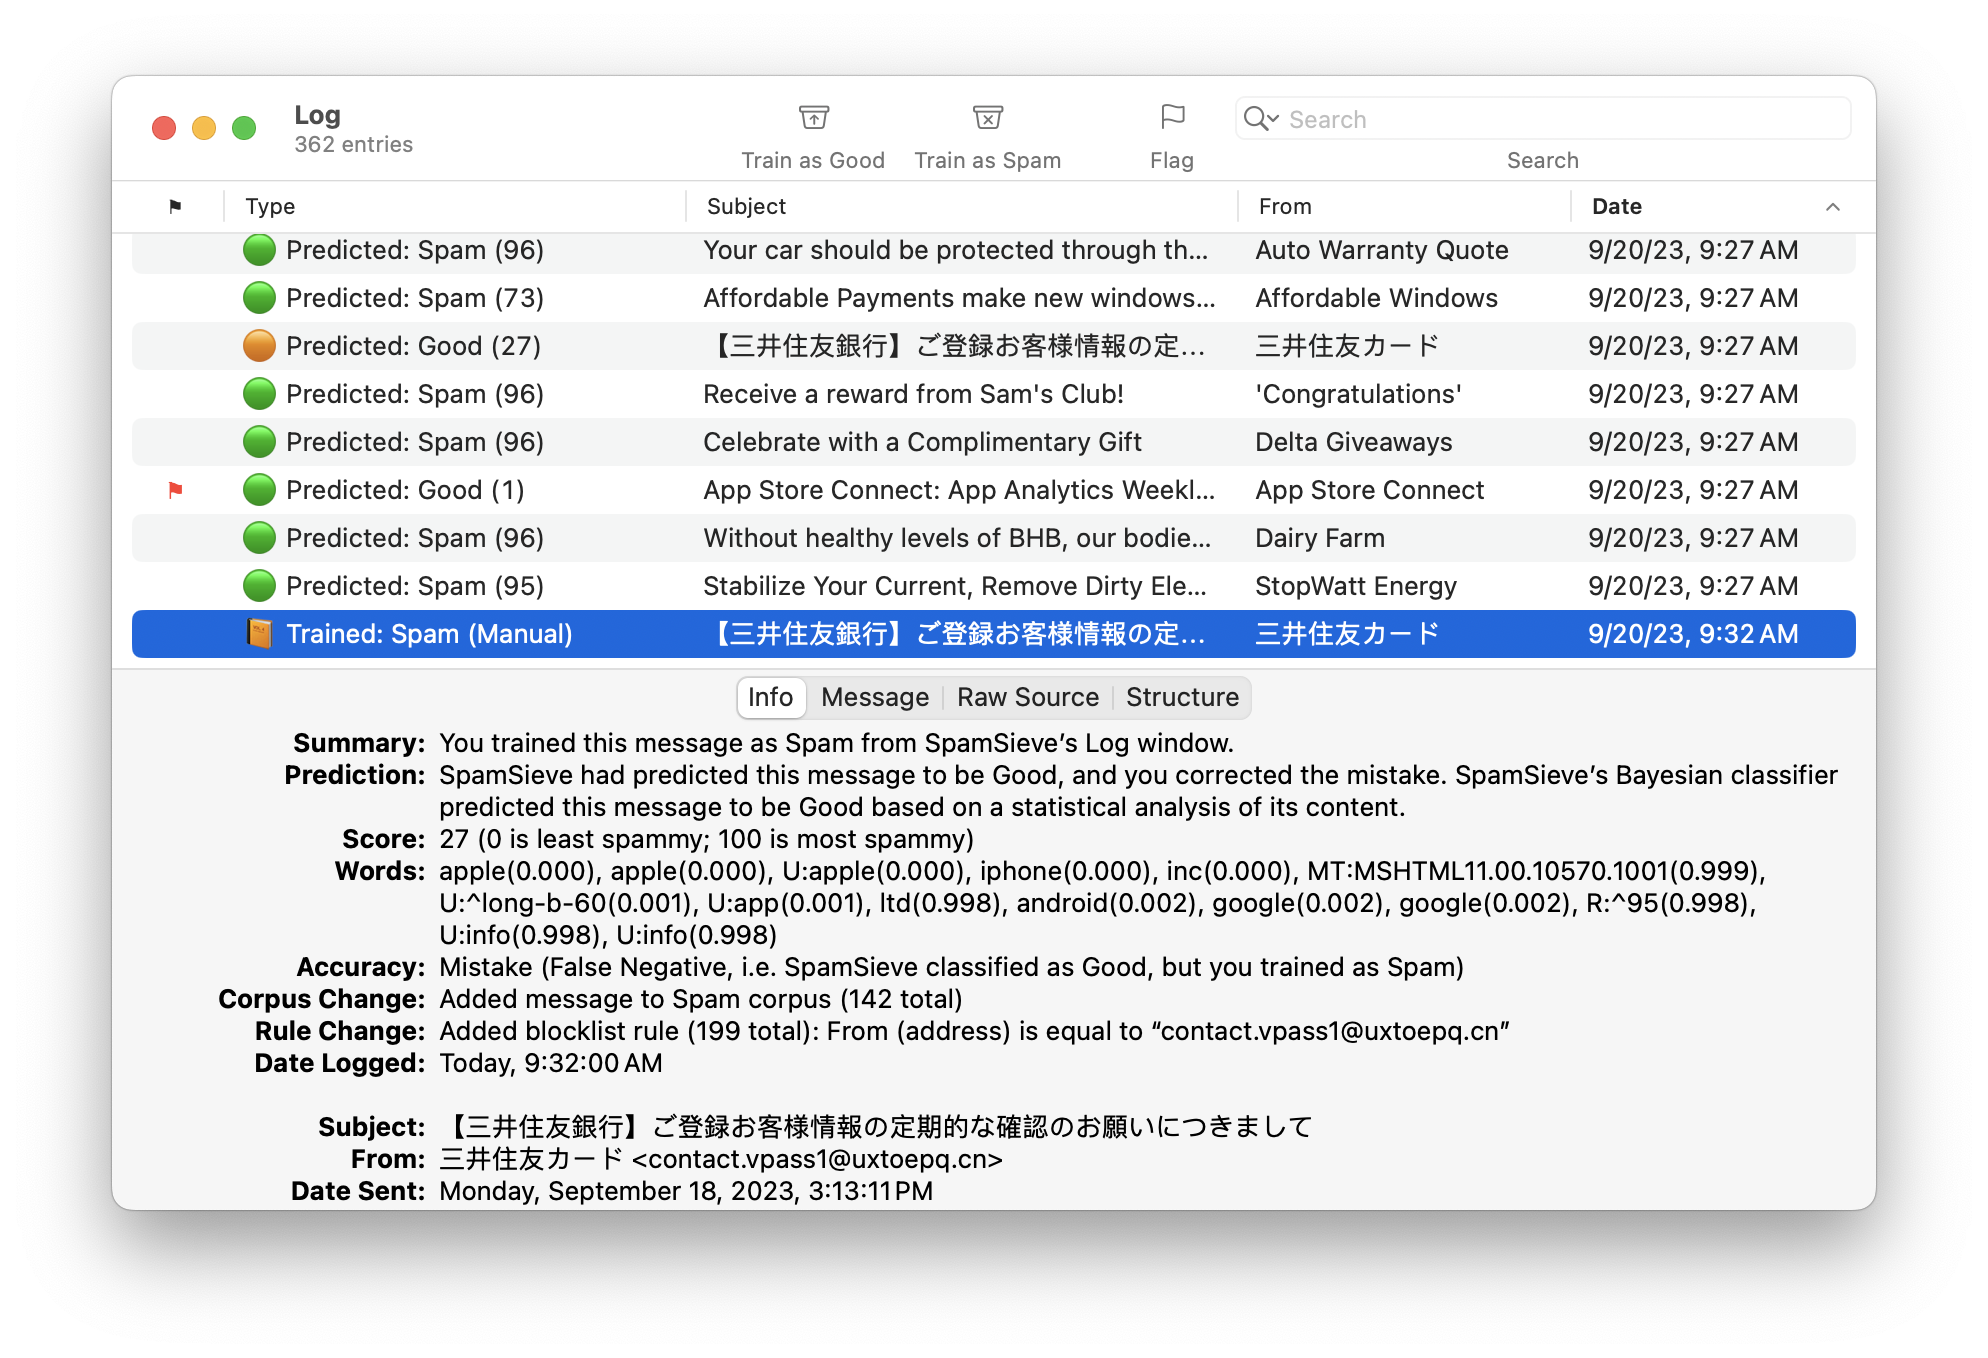
For information about searching the log, please see the Searching section.
Log Table Columns
The following columns are shown:
- ⚑
Whether the log entry has been marked as flagged.
- Type
An icon and a short description of what kind of log entry this is.
- Subject
The message’s subject, or a short summary for a non-message log entry.
- From
The message’s sender, or information about the source of a non-message log entry.
- Date
When SpamSieve performed whatever operation led to the log entry. In other words, this might show the date that SpamSieve classified a message (not the date when the message was sent or received).
Unlike with other windows in SpamSieve, the sorting in the Log window is not configurable. For performance reasons, it is always sorted by date, with newer log entries at the bottom. If a new log entry is recorded while you have a log entry selected, SpamSieve will continue showing the selected log entry. If no log entry is selected—you can deselect by Command-clicking—when a new log entry is recorded, SpamSieve will auto-scroll the window to the bottom so that you can always see the latest entries.
Log Detail Tabs
The Info tab shows basic information about the message and what SpamSieve did with it. The Summary and Help sections have advice from SpamSieve about what you might want to do if the message was not processed the way you expected.
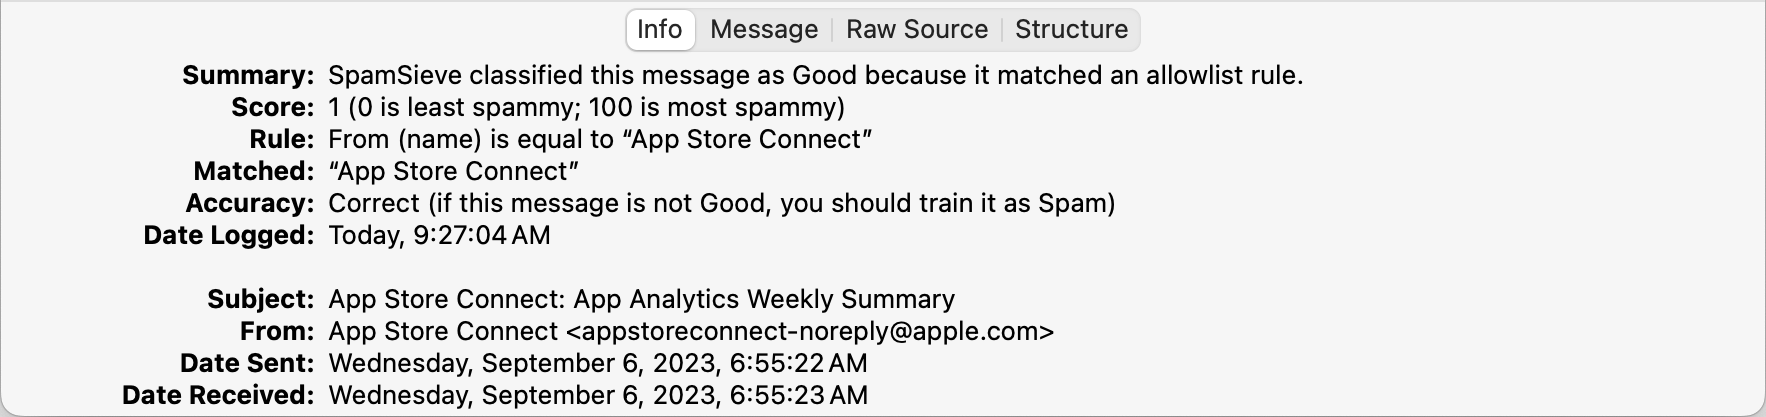
The Message tab shows a preview of the message’s contents. SpamSieve does not load remote images here, so you are protected from Web bugs. You can also use the Open in External Viewer command to open the message in your mail client.
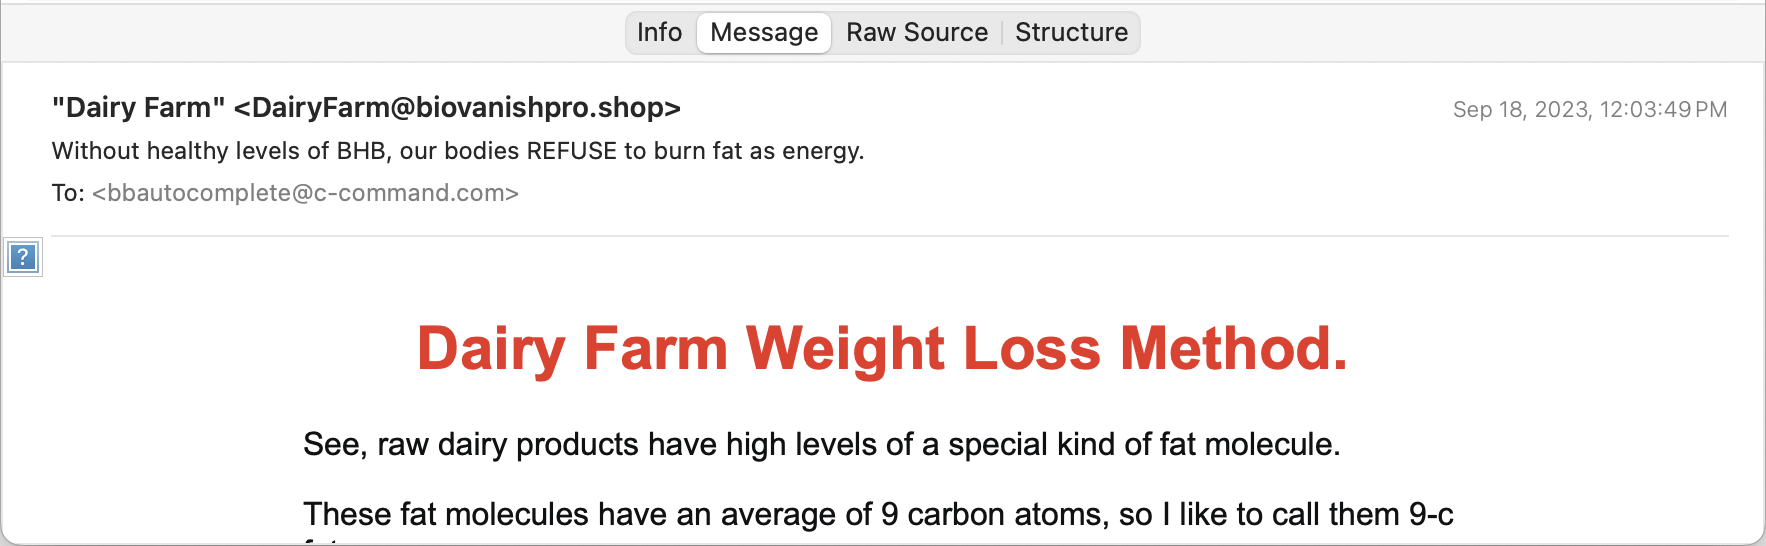
The Raw Source tab shows the message data that SpamSieve received from your mail client. You can export a message’s raw source by dragging the message from the list to the Finder.
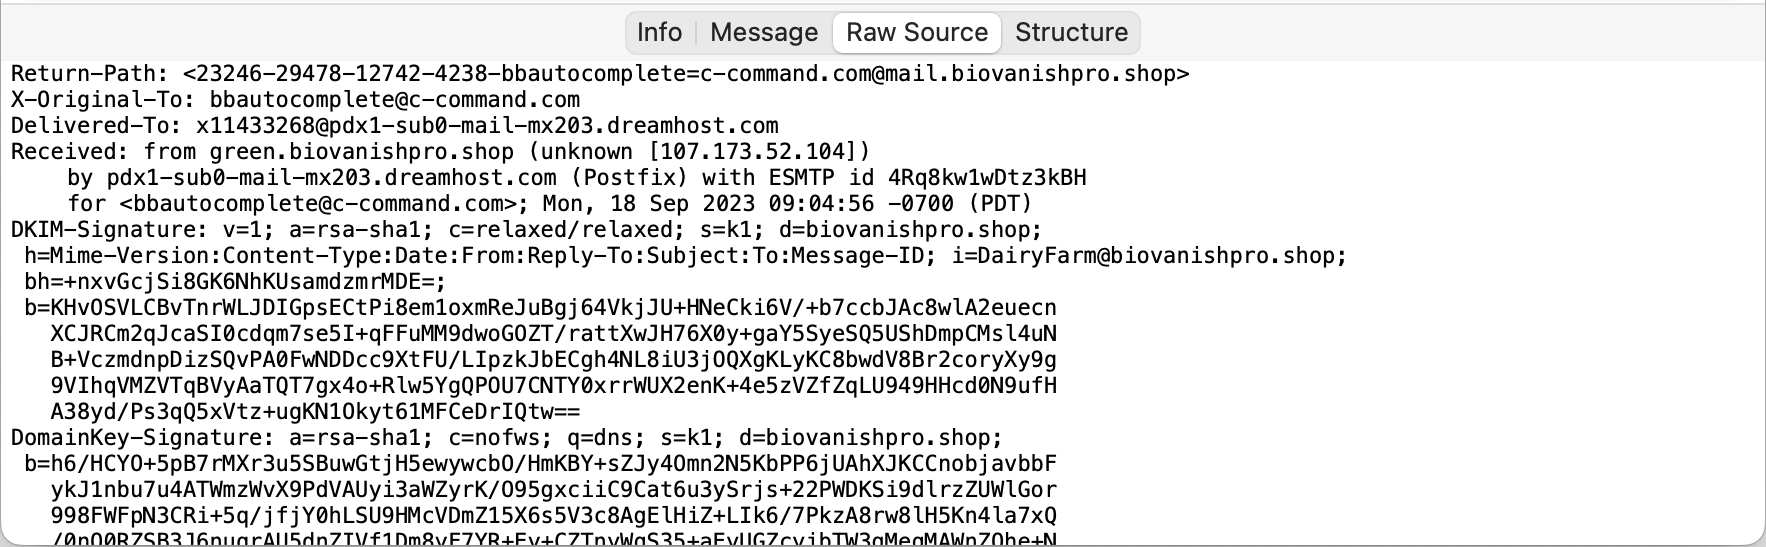
The Structure tab shows information about how SpamSieve interpreted the raw source.
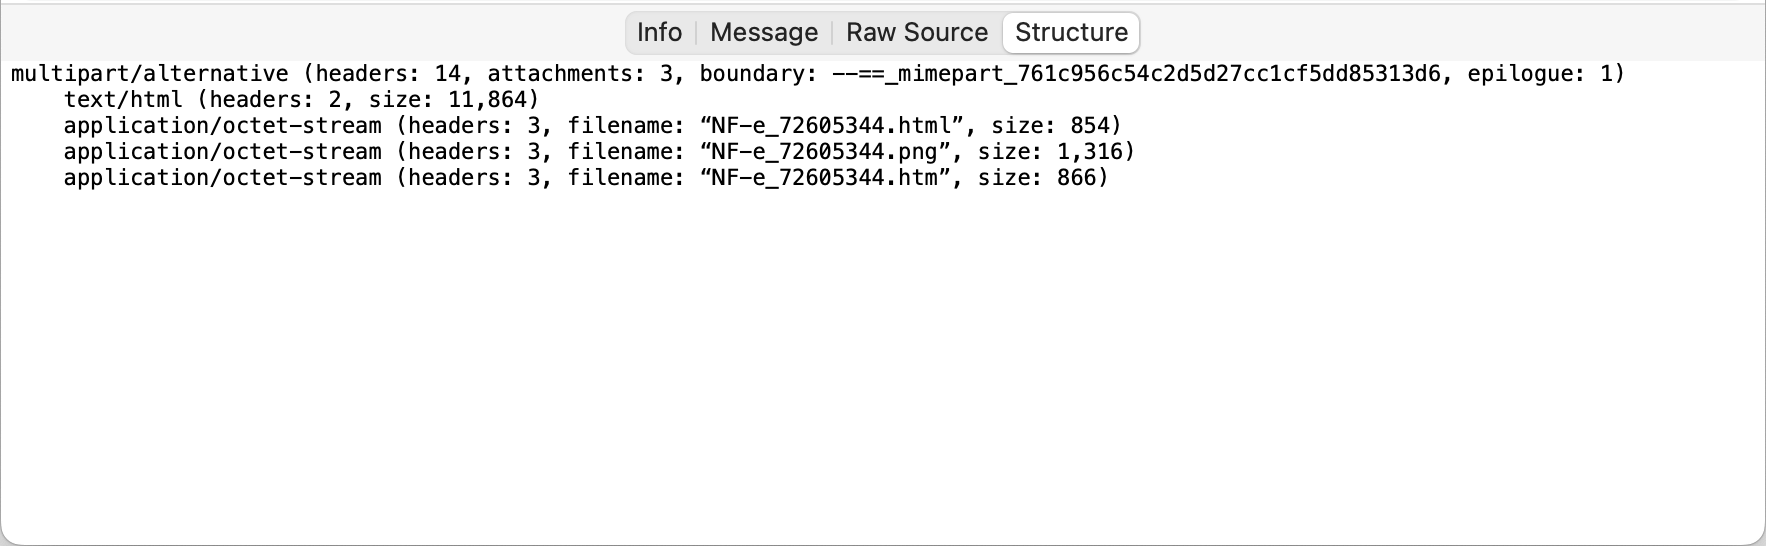
Types of Log Entries
Predicted: Good
This means that SpamSieve examined an incoming message and thought it was good. The Info tab will show why:
A green circle indicates that SpamSieve thinks it correctly predicted the message to be good. If the message is not actually good, you should train it as spam.

An orange cirlce indicates that SpamSieve predicted the message to be good, but then you trained it as spam. In other words, SpamSieve knows that it made a mistake (false negative) and should have caught that message. If spam messages are being predicted as good and you don’t understand why, please see the Sending in an Error Report section.

If there is no Predicted: Good log entry for the message in your inbox, that means that SpamSieve was never given a chance to analyze it. You may want to check the setup of your mail program, as described in the Why is SpamSieve not catching my spam? section.
Predicted: Spam
This means that SpamSieve examined an incoming message and thought it was spam. The Info tab will show why:
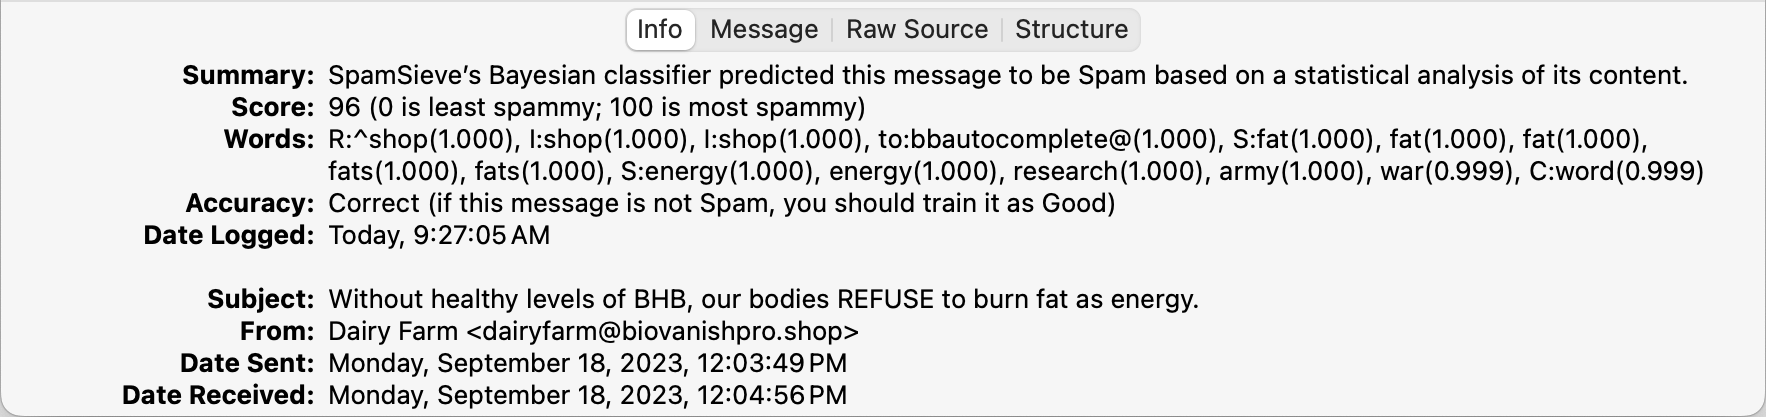
A green circle indicates that SpamSieve thinks it correctly predicted the message to be spam. If the message is not actually spam, you should train it as spam.

A red circle indicates that SpamSieve predicted the message to be spam, but then you trained it as good. In other words, SpamSieve knows that it made a mistake (false positive) and should have left that message alone. If good messages are being predicted as spam and you don’t understand why, please see the Sending in an Error Report section.

If there is no Predicted: Spam log entry for the message in the Junk mailbox, that means it was moved to Junk by something other than SpamSieve. Please see the Why do good messages keep going to the Junk or Spam mailbox? section.
Trained: Good/Spam (Manual)
These log entries represent messages that you had trained as good or spam, either as part of an initial training or when correcting mistakes.
A green book icon means that SpamSieve had not been trained with that message before and that, at the time of training, it did not conflict with a previous prediction that SpamSieve had made for that message, so the training was not correcting a mistake.

See also:
A blue book icon indicates that you had unnecessarily trained SpamSieve a second time with the same message.
An orange book icon means that you had corrected a false negative.
A red book icon means that you had corrected a false positive.
Trained: Good/Spam (Auto)
These log entries represent messages that SpamSieve auto-trained. It’s normal for SpamSieve to auto-train a message as good if it thinks that the message isn’t spam. This will add the sender to the allowlist to ensure that future messages from that sender get through to your inbox. If you later train the message as spam, SpamSieve will disable (uncheck) the allowlist rule. Thus, auto-training should not ordinarily cause problems unless you receive a large flurry of messages from the same sender address, or if you forget to train the message as spam and then the address remains enabled on the allowlist. For more information, see the Auto-train as needed section.
Arrow Icons
An arrow icon after a Predicted log entry means that the same message has been processed multiple times:
A rightward pointing arrow mean superseded. In other words, there was another Prediction for the same message later on.

A two arrows chasing each other mean repeated. In other words, there was an earlier Prediction for the same message.

If you have the Check inboxes for new messages not sent to Mail extension option enabled, SpamSieve will do an extra pass over the inbox in case Mail didn’t send it all the new messages to examine. This can result in SpamSieve processing the same message twice in the event that Mail was working properly, so it would be normal to see two log entries for the same message with these arrows. In other situations, or for messages not in the inbox, each message should only be processed once, so these arrows could indicate that something unexpected happened or that you manually told SpamSieve to reprocess a message.
Compacting the Log
To reduce the amount of disk space that the log uses, see the pruning options in Settings ‣ Storage.
5.4.4 Blocklist
The Blocklist command in the Window menu opens the Blocklist window. The blocklist consists of a list of rules. If a message matches one or more enabled rules on the blocklist (and Use SpamSieve blocklist is checked), SpamSieve will predict that it is spam. As always, SpamSieve does not prevent you from receiving the spam messages; rather, the blocklist ensures that they will go to the spam mailbox rather than the inbox. You can also configure Apple Mail so that the blocklisted messages go directly to the trash.
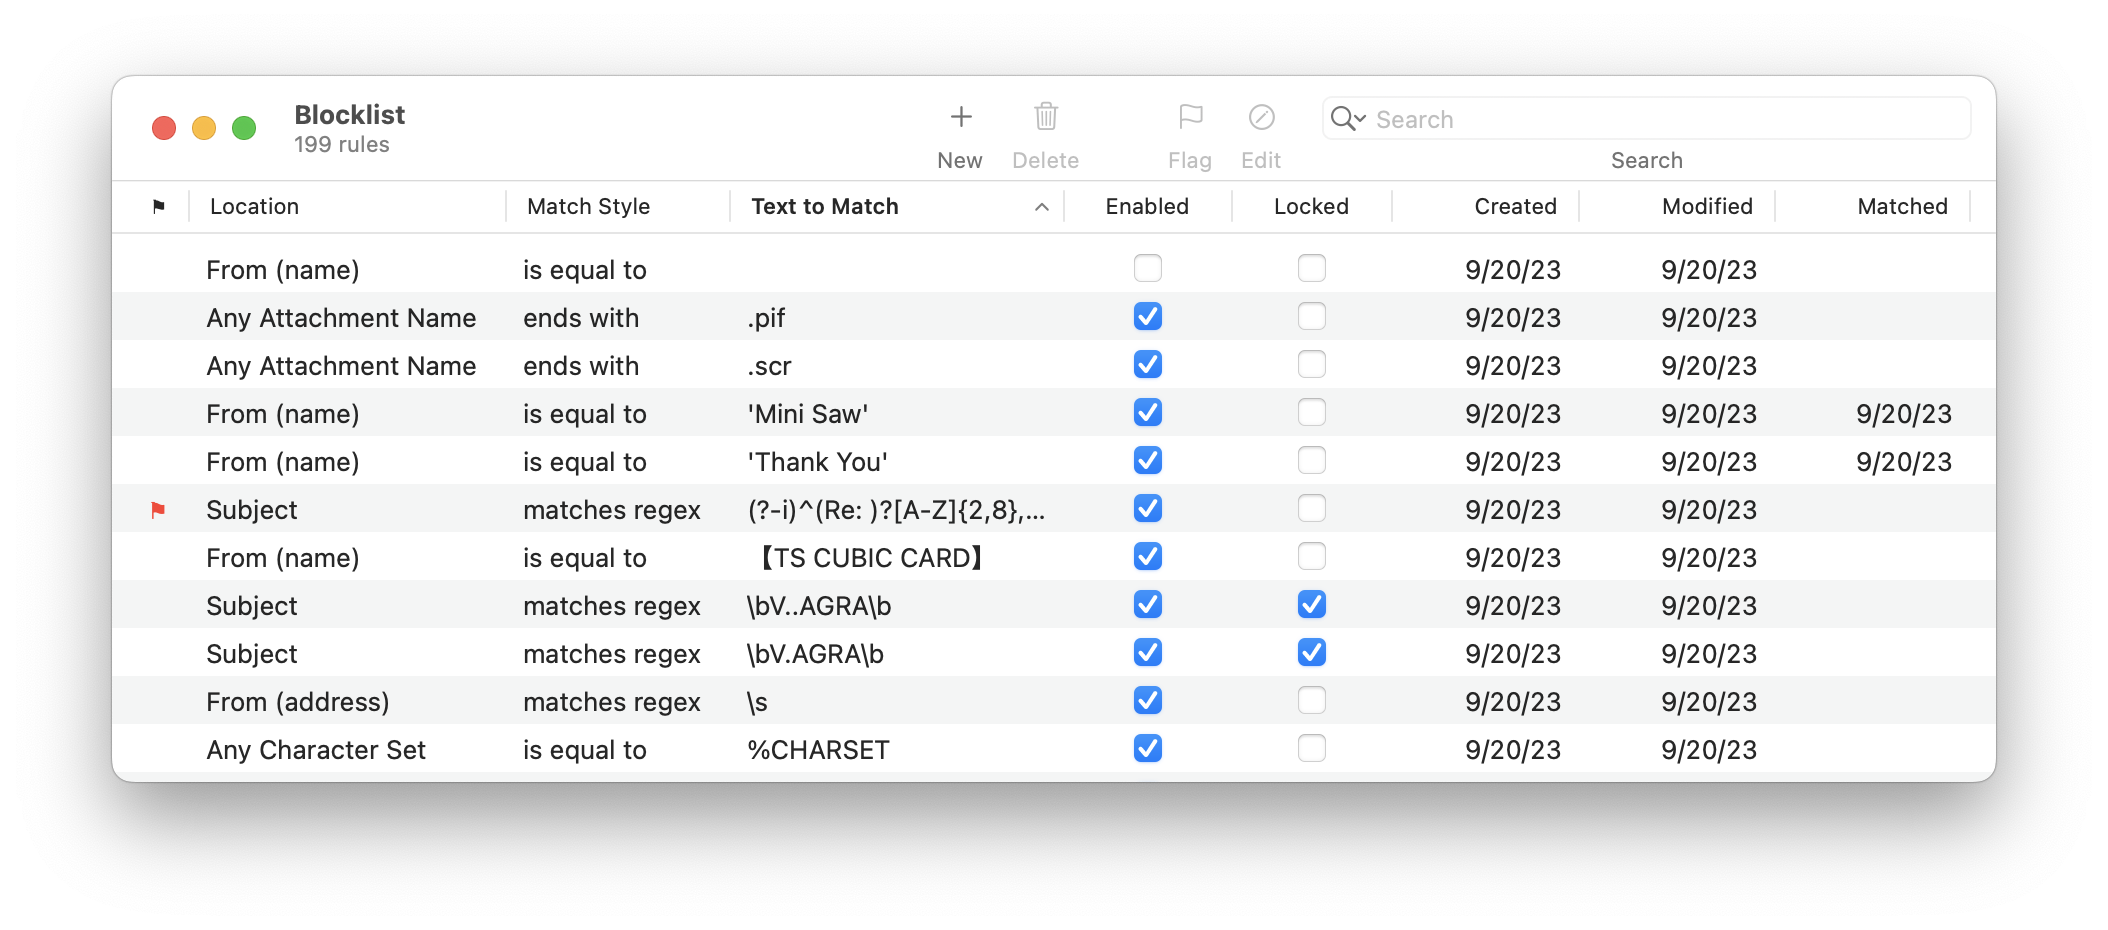
The counterpart to the blocklist is the allowlist.
For information about searching the blocklist, please see the Searching section.
Creating Rules
There is normally no need for you to manually create or delete blocklist rules because SpamSieve learns to recognize your spam automatically. Thus, it’s OK if you receive spam from constantly changing addresses; you don’t have to worry about creating blocklist rules to match all of them. If a lot of spam is in your inbox, your first step should be to follow the instructions in Why is SpamSieve not catching my spam? rather than to create blocklist rules that may not be needed or even used (e.g. if the real problem is that your mail program isn’t set up properly).
Rules and Training
By default, the Train SpamSieve blocklist preference is enabled. This means that SpamSieve will automatically create blocklist rules when you train a message as spam. You won’t get spam from the same address or sender name twice.
SpamSieve will also disable (uncheck) matching blocklist rules when you train a message as good. This prevents a bad blocklist rule from blocking similar good messages.
Editing Rules
To edit a rule, double-click it in the list or click the Edit button in the toolbar. For more information about the available options see the Rule Columns, Locations, and Match Styles section. The Comments field lets you enter additional information to help you remember why you created a rule or how a regex was intended to work. You can search for rules by comment.
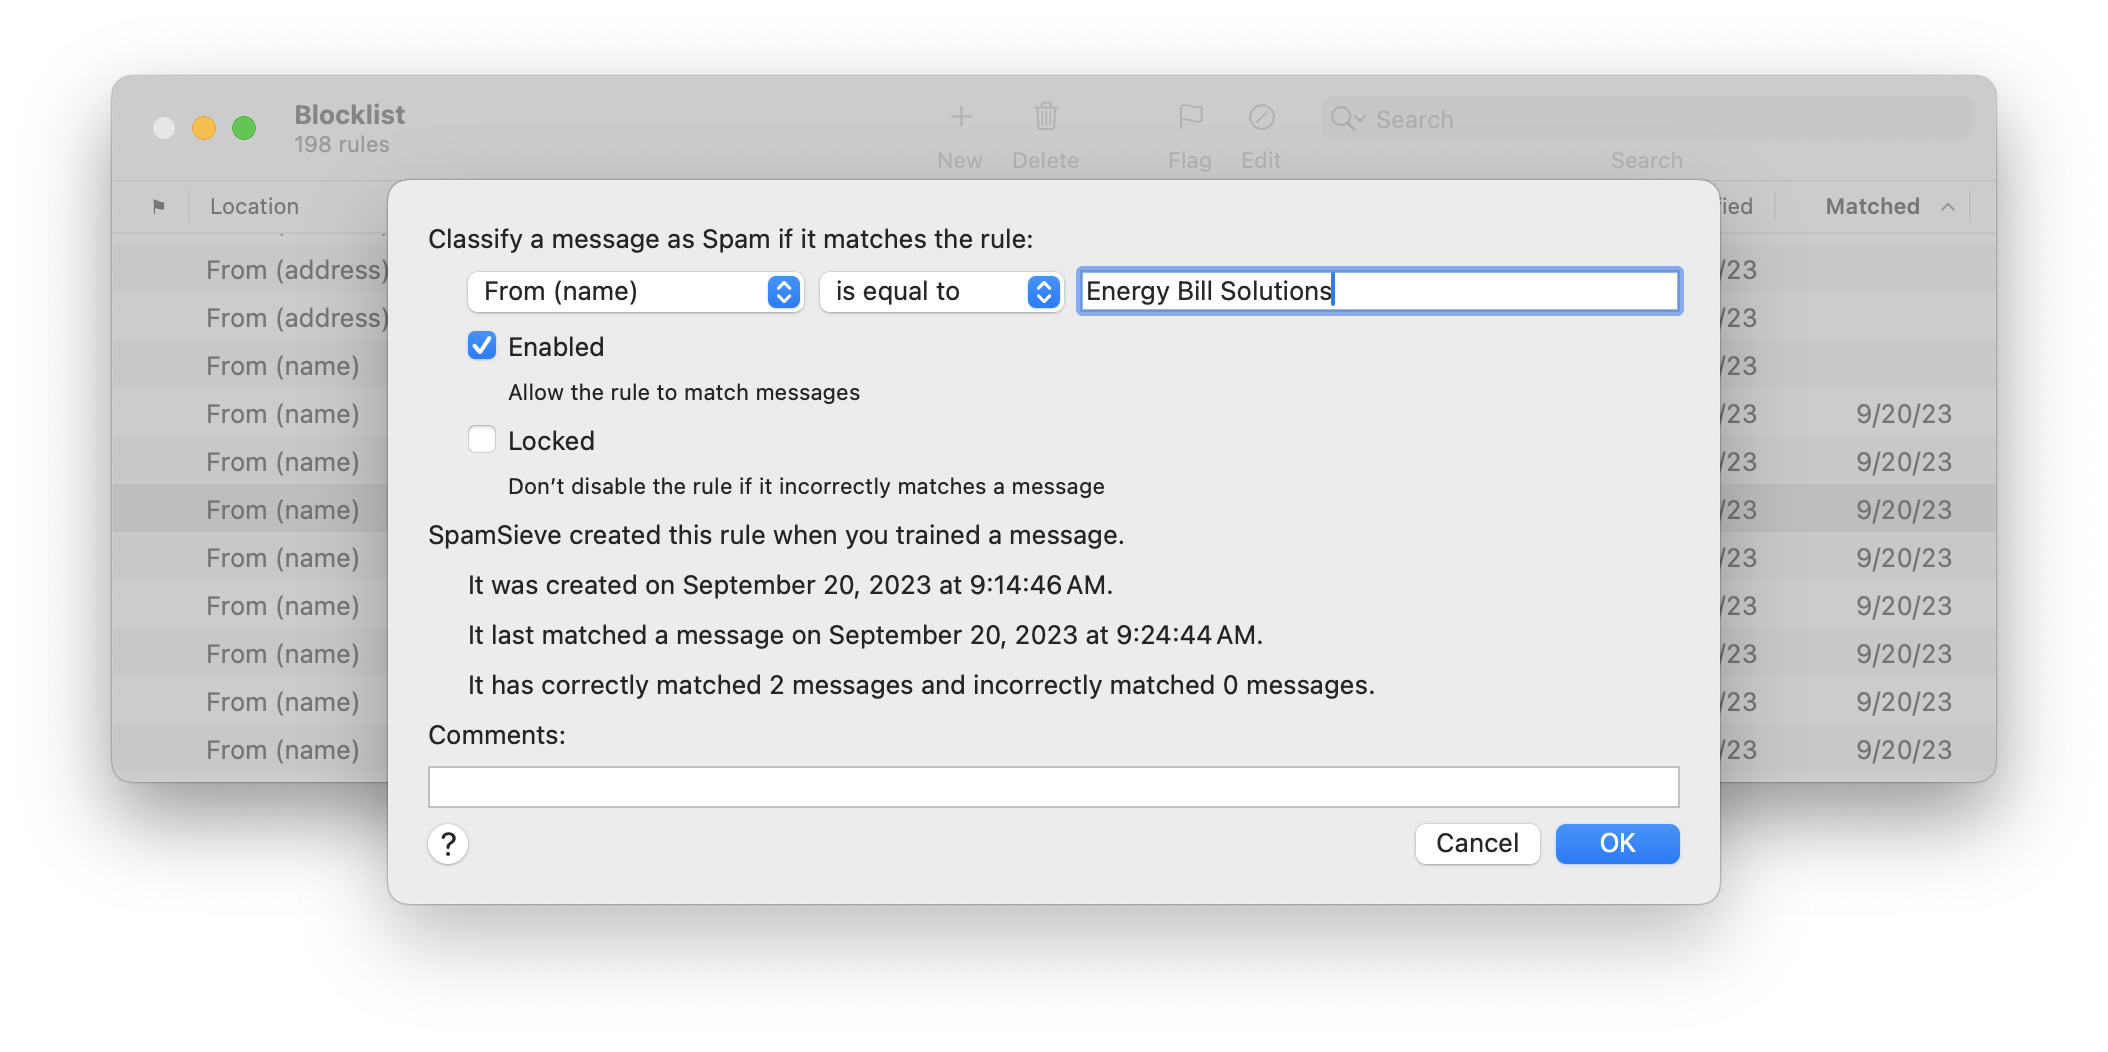
Deleting and Disabling Rules
You can delete a rule from the blocklist by selecting it and pressing Delete. Generally, there is little reason to delete rules. SpamSieve is optimized such that having lots of rules does not reduce performance.
If you don’t like what a rule is doing, you should uncheck the rule rather than deleting it. This will prevent SpamSieve from re-learning the rule automatically (see “Rules and Training” above). For example, say that you get forged spam messages from your own address. When you receive such a message, and tell SpamSieve that it’s spam, any rule on the allowlist with your address would be disabled. This will enable future such spam messages to be caught. If you later get a legitimate message from your own address and tell SpamSieve that it’s good, the allowlist rule will remain disabled, so SpamSieve will still be able to catch that spam. If you had previously deleted the rule instead of disabling it, telling SpamSieve that the message was good would create a new, enabled allowlist rule, which would prevent those spam messages from being caught.
Blocklisting Domains and Countries
You can tell SpamSieve to classify every message from a particular domain as spam. For example, to block every message from Spammy Company, open the Blocklist window, click the + button, and create a rule that says From (address) Ends With @spammycompany.com. You can also create rules for particular countries. For example, to block every message from an e-mail address in Nigeria, create a rule that says From (address) Ends With .ng
Blocking Messages to Invalid Addresses
If you have your own domain name, it’s best to configure the server not to have a catch-all address because that would lead to your receiving spam messages send to addresses that are not even valid. SpamSieve could filter out those spams, but it’s better if you can avoid downloading them and cluttering your spam mailbox in the first place.
If you cannot configure your server in that way, you can use the Matches Regex match style to create a blocklist rule that matches messages sent to invalid addresses at your domain. For example, this regex:
^.*(?<!^sales|^support)@domain\.com$
would match all messages where the match field ends with @domain.com but is not sales@domain.com or support@domain.com.
Finding Rules
You can type the first few letters of a rule’s Text to Match to quickly locate that rule, or use the search field in the toolbar to focus on a group of related rules.
Exporting Addresses
You can use the Copy Whitelist/Blocklist Addresses script to get a list of addresses, e.g. to add to the configuration of a server-side spam filter.
Troubleshooting Rules
Blocklist rules will not match a message if:
- One of the Filters above the blocklist classified the message as good.
- The blocklist rule is disabled.
- The mail program did not send the message to SpamSieve for analysis. See the Why is SpamSieve not catching my spam? section.
5.4.4.1 Rule Columns, Locations, and Match Styles
This section explains the options available for each rule in SpamSieve’s blocklist and allowlist windows.
Rule Columns
The meanings of the columns are as follows:
- ⚑
Whether the rule has been marked as flagged. You may want to flag rule that you’re observing or tweaking or that you’ve put on probation so that you can easily find it again later.
- Location
The part of the message that will be matched against the rule.
- Match Style
How the rule text will be matched against the text from the message.
- Text to Match
The text that will be matched against the message.
- Enabled
If this is checked, the rule is enabled. Disabled rules do not block any messages, but they are useful because they prevent SpamSieve from re-learning a rule that you don’t want. (See Rules and Training.) If an auto-trained rule is incorrect, you should generally not disable or delete it; instead, train the message that caused SpamSieve to create the rule.
- Locked
If this is checked, SpamSieve will keep the rule enabled even if you train it with a message that contradicts the rule. Normally, when you train a message as spam, SpamSieve will disable any matching allowlist rules; and when you train a message as good, SpamSieve will disable any matching blocklist rules. This prevents such “incorrect” rules from causing filtering mistakes for future messages. Locking which prevents rules from being automatically disabled in this manner. This is useful when you are really sure that a rule does what you intend, for example if you want messages matching a certain rule to always be classified as good, even if some spam messages also match that rule.
- Created
The date that the rule was added to the blocklist or allowlist.
- Modified
The date that the rule was last edited or updated.
- Matched
The date that the rule was last used to classify a message.
- Correct
The number of times the rule was used to correctly classify a message.
- Incorrect
The number of times the rule was used to classify a message but then you trained the message to tell SpamSieve that it was mistaken.
Rule Locations
When SpamSieve checks whether a message matches a rule, it compares the part of the message named by the Rule Location column with the contents of the rule’s Text to Match column. The following are the message parts that may be used in the Location column:
- From (address)
The e-mail address of the message’s sender.
- From (name)
The name of the message’s sender.
- To (any address)
The e-mail addresses of the primary recipients of the message. SpamSieve checks each recipient separately to see whether it matches the rule.
- CC (any address)
The e-mail addresses of the carbon copy recipients of the message. SpamSieve checks each recipient separately to see whether it matches the rule.
- Reply-To (address)
The address that you would be sending to if you replied to the message. This is often the same as the From address, but it could also be a mailing list or an alternate address for the sender. If the message does not specify a Reply-To, then the rule will not match.
- SendTo
The message’s SendTo header.
- Any Recipient
The To and CC addresses.
- Any Address
The From, To, CC, Reply-To, and SendTo addresses.
- List-ID
For mailing list messages, this hidden header indicates which mailing list the message was sent to.
- List-Unsubscribe
For mailing list messages, this hidden header indicates how to unsubscribe from the mailing list. Some mailing list messages that do not have a List-ID header do have a List-Unsubscribe header.
- Mailing-List
For mailing list messages, this hidden header indicates which mailing list the message was sent to. Some mailing list messages that do not have a List-ID header do have a Mailing-List header.
- Received (any)
The Received headers contain information about the servers that relayed the message on its journey from the sender to the recipient.
- Return-Path
This header contains information about where the message originated.
- Subject
The subject of the message.
- Body (any text part)
The contents of the message. Some messages contain more than one text part (for instance, plain text and HTML representations of the same message). The rule matches the message if any of the text parts matches the rule’s text.
- Any Character Set
The character set often indicates the language of the message. Many spam messages are sent using Asian or Cyrillic character sets, and SpamSieve is pre-configured to block these. The IANA maintains a list of character sets.
- Any Attachment Name
Many spam messages contain attachments whose names end with .pif or .scr. SpamSieve ships with some blocklist rules pre-configured to catch messages containing spammy attachments.
Rule Match Styles
There are several different ways in which SpamSieve can compare the text in the message’s header to the rule’s text. In all cases, capitalization does not matter; lowercase letters are considered the same as their uppercase counterparts.
- Is Equal to
The message matches the rule if its text is exactly the same as the rule’s text. This is the fastest style of matching. If you leave the text blank, the rule will match messages that have blank values for that header—for example when there is an empty Subject header. Sometimes, messages (especially spam ones) omit headers. To match an omitted header, enter <SpamSieve-Unknown-Subject>, <SpamSieve-Unknown-From>, <SpamSieve-Unknown-FromName>, or <SpamSieve-Unknown-To> depending on the header selected.
- Contains
The message matches the rule if the message text contains the rule text.
- Starts with
The message matches the rule if the message text begins with the rule text.
- Ends with
The message matches the rule if the message text ends with the rule text. This is useful for matching domain names. For example, to match messages sent from Apple, you could create an Ends with rule with text @apple.com.
- Matches Regex
This is like Contains, except that the rule text is treated as a ICU regular expression. Regular expressions are a powerful way of specifying patterns of text, for instance: e-mail addresses that contain numbers before the @ sign or subjects that are longer than 30 characters.
If the regular expression entered in the Text to Match column is invalid, SpamSieve will color it in red, and it will not match any messages.
Rule Comments
There’s a space to enter comments for each rule, e.g. to help you remember why you created a rule or how a regex was intended to work. You can search for rules by comment.
5.4.5 Allowlist
The Allowlist command in the Window menu opens the Allowlist window. The allowlist consists of a list of rules. If a message matches one or more enabled rules on the allowlist (and Use SpamSieve allowlist is checked), SpamSieve will predict that it is good. The allowlist is most commonly used for matching messages sent from particular addresses, domains, or mailing lists.
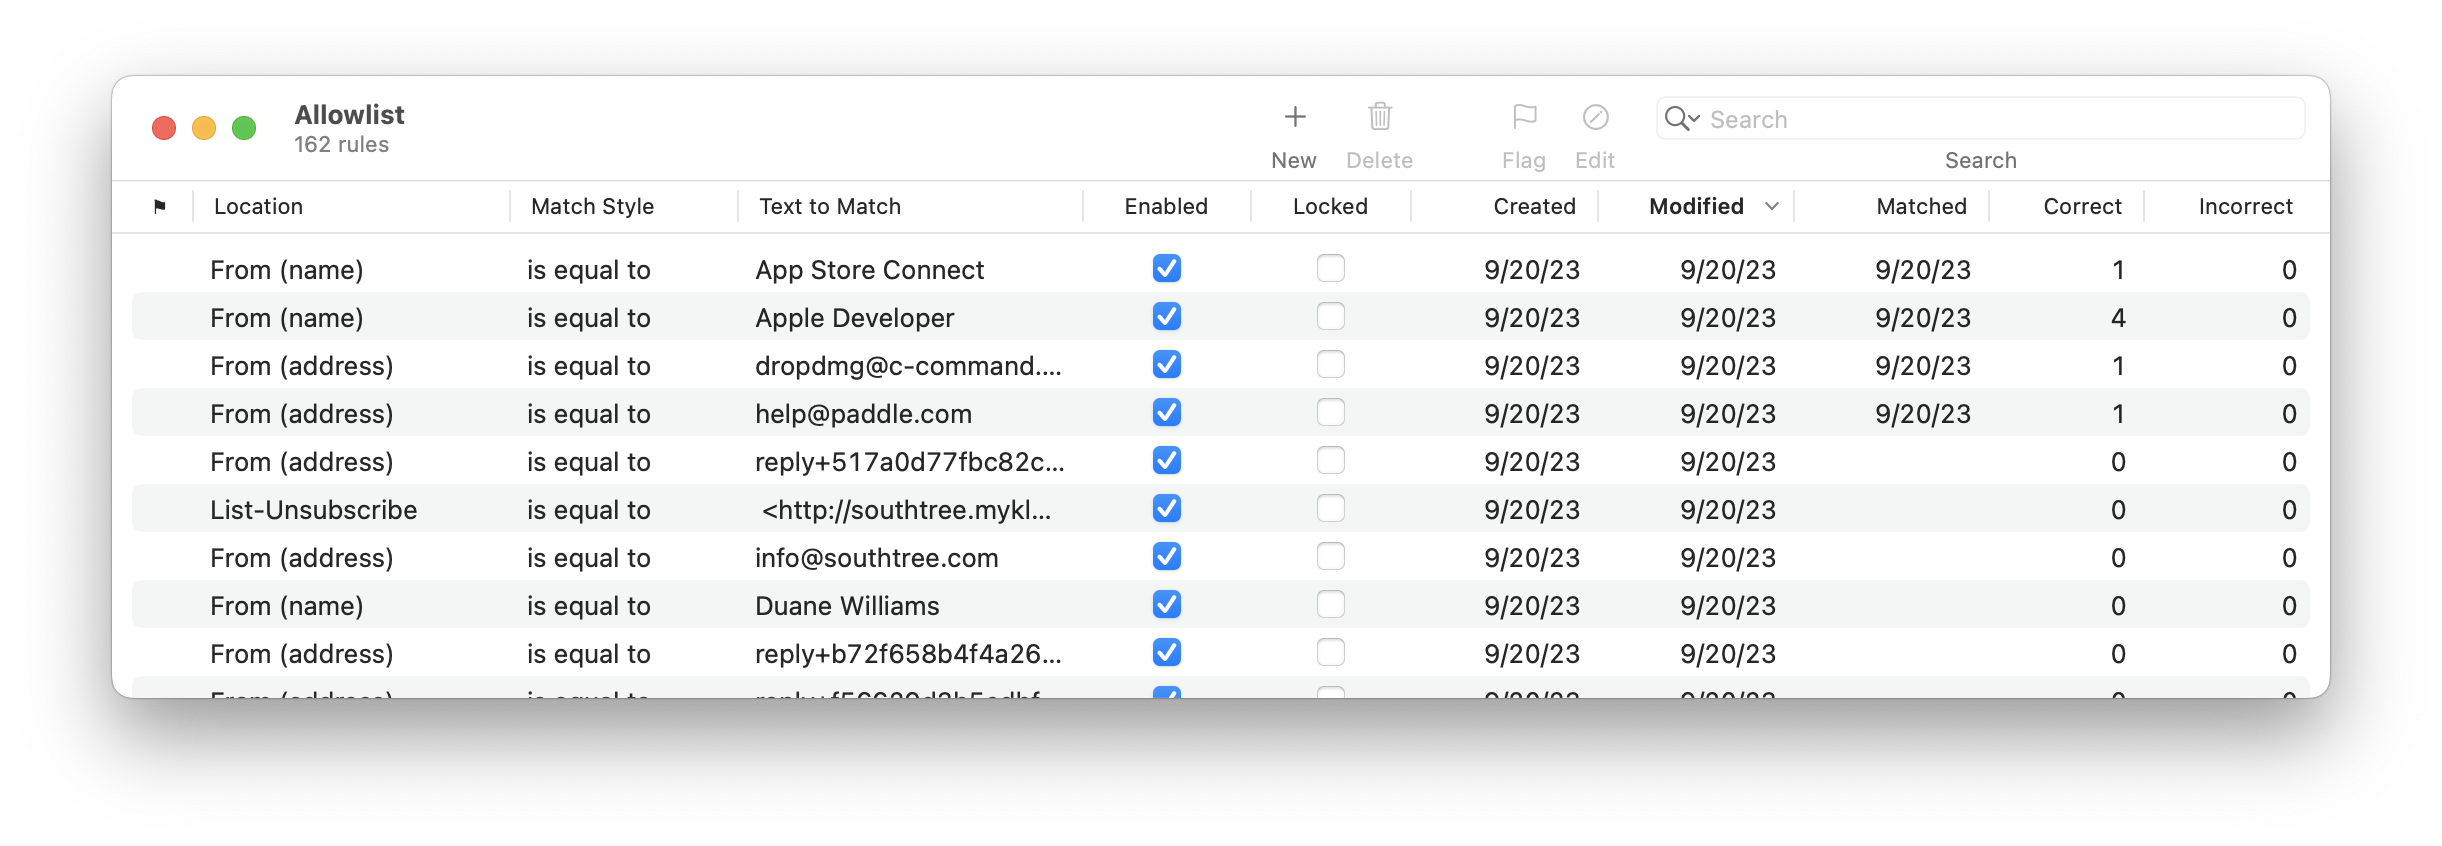
The counterpart to the allowlist is the blocklist.
For information about searching the allowlist, please see the Searching section.
Creating Rules
There is normally no need for you to manually create or delete allowlist rules because SpamSieve learns to recognize your good automatically. If a lot of good messages are in your Spam mailbox, your first steps should be to check the setup in your mail program and to check the log rather that to create allowlist rules.
Rules and Training
By default, the Train SpamSieve allowlist preference is enabled. This means that SpamSieve will automatically create allowlist rules when you train a message as good. Once you receive one good message from a person, all future messages will get through to your inbox.
SpamSieve will also disable matching allowlist rules when you train a message as spam. This prevents a bad allowlist rule from letting through similar spam messages.
By default, the Auto-train as needed preference is enabled. This means that if you receive a message that SpamSieve thinks is good, SpamSieve will automatically add allowlist rules so that future messages from that same sender are also classified as good. Thus, it is important to correct all the mistakes to avoid having incorrect allowlist rules.
Editing Rules
You can edit a rule’s Header or Match Style by clicking in the corresponding column and choosing from the pop-up menu. To edit a rule’s Text to Match, double-click the text. For more information about the available options see the Rule Columns, Locations, and Match Styles section.
Deleting and Disabling Rules
You can delete a rule from the allowlist by selecting it and pressing Delete. Generally, there is little reason to delete rules. SpamSieve is optimized such that having lots of rules does not reduce performance.
Spammy Allowlist Rules
It is normal to see spammy rules on the allowlist that are unchecked. This is because of auto-training. When SpamSieve thinks an incoming message is good, SpamSieve also adds a rule to the allowlist. SpamSieve may be wrong about that message, and that’s OK. If SpamSieve makes a mistake and lets a spam message through, when you train the message as spam it will disable the corresponding allowlist rules. The rules will then be shown as unchecked. A disabled rule won’t match any messages, so it won’t cause any spam to get through.
If you see spammy rules that are checked, this is not normal. It means that you have not been correcting all the mistakes.
Do not delete spammy allowlist rules. This is almost never a good idea:
- If the rules are disabled, you should leave them in place to prevent SpamSieve from creating those incorrect rules again in the future.
- If the rules are enabled, you should find the spam messages from those addresses and train them as spam. Not only will this disable the rules, but it will also update SpamSieve’s corpus and statistics.
Allowlisting Domains
You can tell SpamSieve to classify every message from a particular domain as good. For example, to allowlist every message from Apple, open the Allowlist window, click the + button, and create a rule that says From (address) Ends With @apple.com.
Mailing List Messages
The allowlist has special support for mailing lists. If you train SpamSieve with a good message from a mailing list, it will add a rule to the allowlist that matches the message’s mailing list header (List-ID, List-Unsubscribe, or Mailing-List). Then SpamSieve will know that all messages from that mailing list are good, regardless of who sent them.
Codewords
You can use the allowlist to create codewords. For instance, you could create a rule in the allowlist that matches subjects containing “eggplant” (or some other word unlikely to occur in regular mail). You can tell select people to put “eggplant” in the subject of messages that they send you, and then you can be assured that their messages will get through, even if the sender addresses are not in your address book or allowlist.
Finding Rules
You can type the first few letters of a rule’s Text to Match to quickly locate that rule, or use the search field in the toolbar to focus on a group of related rules.
Exporting Addresses
You can use the Copy Whitelist/Blocklist Addresses script to get a list of addresses, e.g. to add to the configuration of a server-side spam filter.
Troubleshooting Rules
Allowlist rules will not match a message if:
6 Settings
To access the settings, click on the SpamSieve icon in the Dock. Then choose Settings… from the SpamSieve menu at the top of the screen (next to the Apple menu).
6.1 Settings ‣ Filters
SpamSieve uses a variety of filters to determine whether messages are spam or good. It consults the filters in the order listed in this window. When a filter decides that the message is good or spam, SpamSieve stops moving down the list. Thus, the order of the filters makes a difference. You can see from the order that if a message’s sender is on the allowlist, it will be marked as good even if the Bayesian classifier would have predicted it to be spam. Normally this is what you want; the point of a allowlist is that you can be sure that certain messages will never be marked as spam.
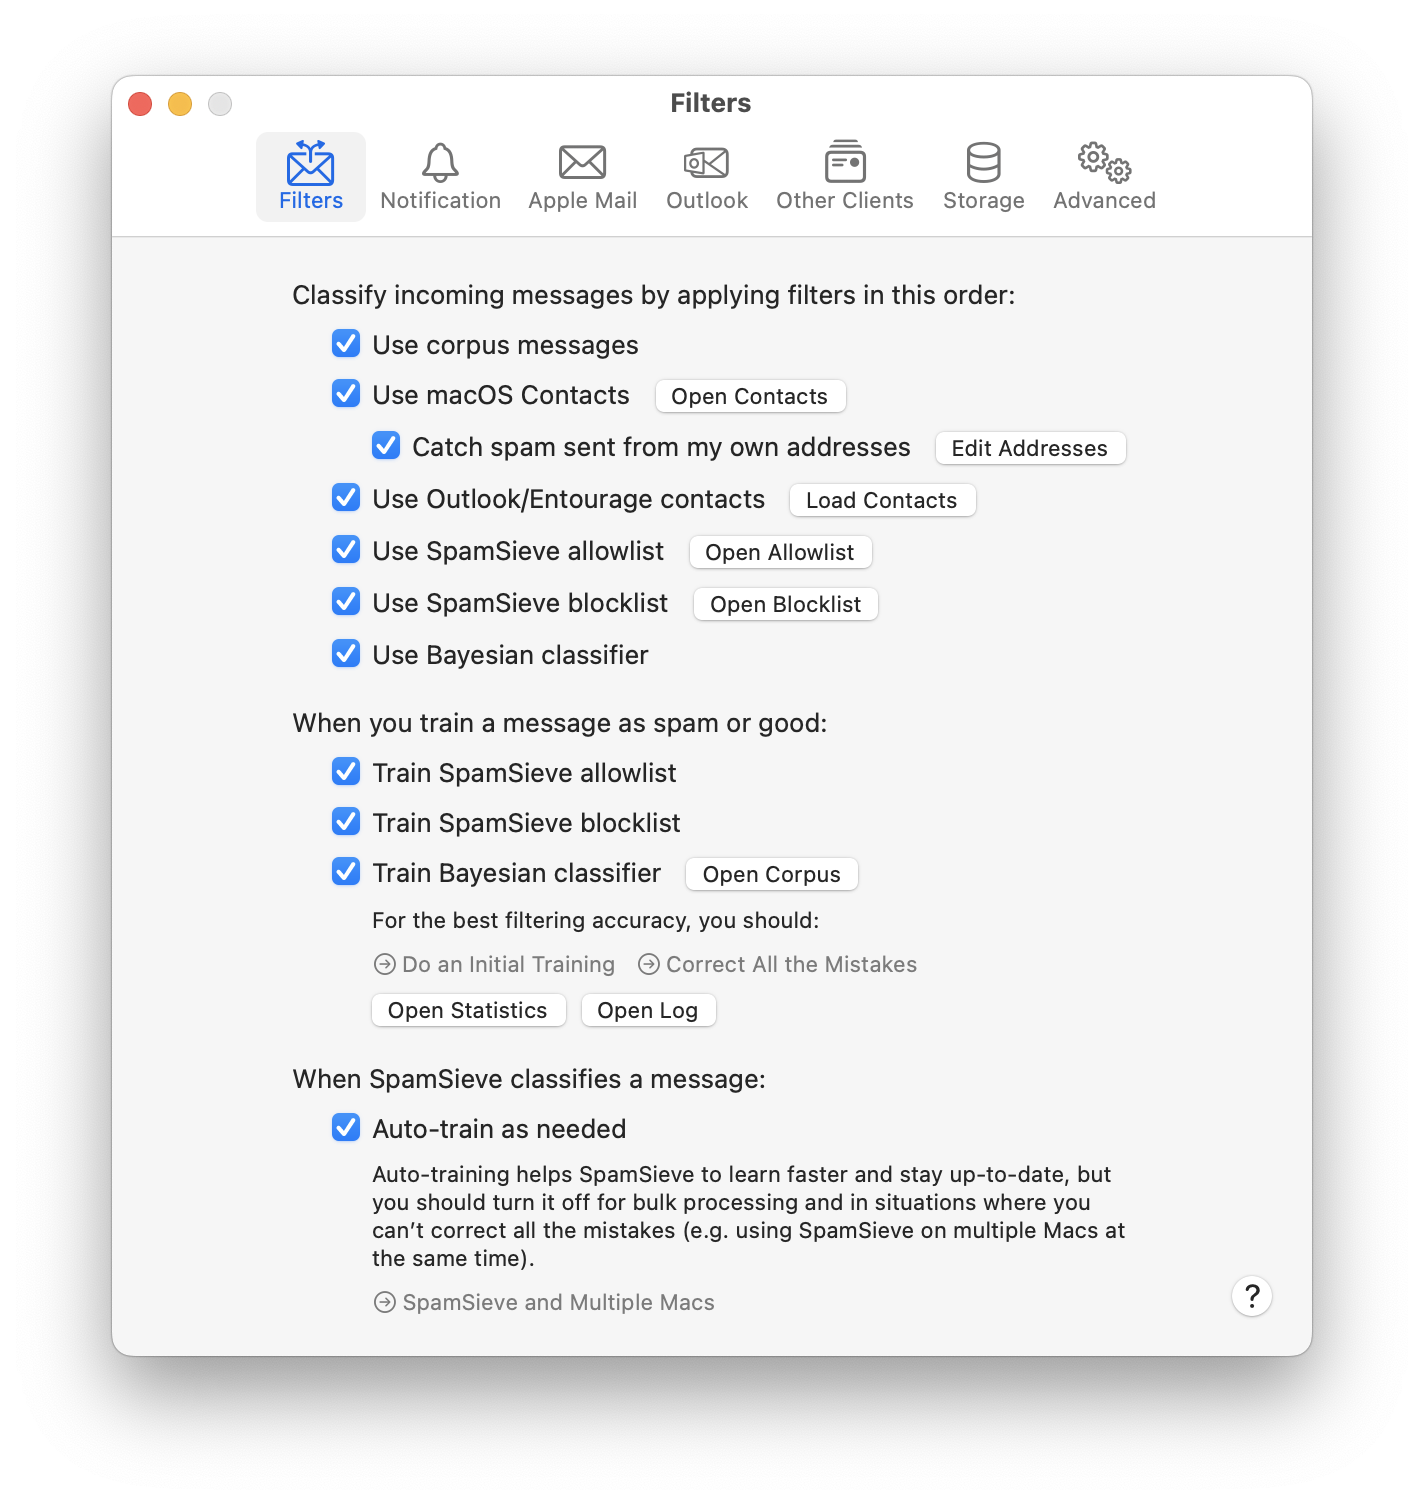
6.1.1 Use corpus messages
SpamSieve learns as you train it, but training is not instant. Training SpamSieve with a message will not necessarily give it enough information to classify that message correctly based only on the words in the message. However, once you have added a message to the corpus, SpamSieve knows whether it is good or spam, even though it might not make the correct prediction based on word probabilities. This option causes SpamSieve to see if it knows whether a message is good or spam before trying to calculate its spam probability. This is especially useful when testing the setup in your mail program. If SpamSieve has seen the message before, it will always classify it correctly. You can disable this option if you want to see what SpamSieve would have predicted if it did not already know whether the message was good or spam.
6.1.2 Use macOS Contacts
With this option enabled, SpamSieve will never predict a message to be spam if its sender’s e-mail address is in the Contacts (previously Address Book) application.
You can add addresses to the system address book using the Contacts or Address Book application (located in the /Applications folder), or directly from an e-mail program that supports the system address book.
If spam messages get through to your inbox because they are sent from addresses in your address book, you can either uncheck Use macOS Contacts or see the Catch spam sent from my own addresses section.
The Granting Contacts Access section explains how you can make sure that SpamSieve has access to read the macOS Contacts database.
Mail Client Contacts
Outlook and Entourage users may prefer to use Microsoft’s address book as an allowlist instead of Apple’s. This is described in the Use Outlook/Entourage contacts section.
PowerMail users should be sure to enable the option to use Apple’s address book.
6.1.3 Catch spam sent from my own addresses
Sometimes spammers forge one of your e-mail addresses and send you spam messages that appear to be coming from yourself. If SpamSieve is not properly configured, these spams will keep coming into your inbox even after you train them as spam. (Yes, you should train them as spam if they get through to your inbox.) Once you fix the configuration, SpamSieve will be able to catch these messages as easily as any other spams.
Why does SpamSieve let these obvious spams into my inbox?
SpamSieve does what you tell it to do. Under the standard configuration, the Use macOS Contacts option is enabled in SpamSieve’s settings. This is safety feature so that messages from people in your address book are never marked as spam. If your address is in the address book and a spammer sends a message from that address, SpamSieve will let it through to your inbox. It will do this no matter how blatantly spammy the message is; doing otherwise would counteract the safety feature.
How can I tell whether I need to fix the setup?
The Log section of the manual explains how SpamSieve keeps a log of all the messages that it filtered and why it thought they were good or spam. For each incoming message that SpamSieve thought was not spam, there is a Predicted: Good entry in the log. If it says the reason is that the sender address was in your Contacts or in Outlook’s contacts, that means that SpamSieve thought the message was good because it was sent from an address that’s in your address book. If the address is one of your addresses, please follow the instructions below. (If there’s no Predicted entry for the message, please see the Why is SpamSieve not catching my spam? section for instructions on checking the setup in your mail program.)
How do I make SpamSieve catch these spams?
SpamSieve has a feature specifically for catching this kind of spam. For messages sent from your address, SpamSieve will ignore the fact that your own address is in your address book. It will apply its normal Bayesian filtering engine to examine the entire contents of the message and evaluate whether it is spam. To use this feature, you need to do two things:
Make sure that Catch spam sent from my own addresses is checked in SpamSieve’s settings. This tells SpamSieve to pretend that your address is not in the address book, thus bypassing the Use macOS Contacts safety feature (but only for messages sent from one of your own addresses).
Tell SpamSieve which addresses are yours. You do this by listing them on your card in the Contacts application.
If the addresses are already entered in your e-mail program’s settings, you can quickly add them by clicking the Edit Addresses button. Make sure to enter them in the e-mail address section rather than the phone number section.
Your card is the one that has your name and photo (or login image). It says “me” on top of the photo, and in the name list it has a black silhouette of a head and shoulders instead of a white address book card. To find your “me” card, choose Card ‣ Go to My Card. If you don’t have a “me” card, you can make one by creating a new card with your name and addresses and choosing Card ‣ Make This My Card.
Excluding Extra Addresses
You can also use this feature to catch spam messages sent from certain addresses in your address book. Normally, if you have Use macOS Contacts checked, messages from addresses in your address book will never be classified as spam. This is generally what you want, but there may be one or two particular addresses that spammers keep forging. By using Catch spam sent from my own addresses and adding those addresses to the “Me” card in Contacts, you can get SpamSieve to analyze the full contents of those messages to determine whether they are spam. SpamSieve will continue to use the other addresses in the address book as before, always classifying messages from them as good.
You can use Terminal to add additional addresses that you want to exclude but that you don’t want to list on the “Me” card. Enter a command such as:
defaults write com.c-command.SpamSieve ExtraAddressesToExclude -array a@b.com d@e.com
To remove the list of addresses to exclude, enter this command:
defaults delete com.c-command.SpamSieve ExtraAddressesToExclude
Changes take effect the next time you launch SpamSieve. You can see which extra addresses are excluded by entering this command:
defaults read com.c-command.SpamSieve ExtraAddressesToExclude
6.1.4 Use Outlook/Entourage contacts
With this option enabled, SpamSieve will never predict a message to be spam if its sender’s e-mail address is in the contacts list for Entourage or Outlook. When you install SpamSieve, you should click the Load Contacts button to make SpamSieve read in the addresses in the Outlook or Entourage address book. The addresses are loaded into SpamSieve’s memory and stored in its preferences file, but they are not displayed in the Allowlist window because they are not allowlist rules. When SpamSieve classifies a message, you can see in the Log window how many Outlook contacts SpamSieve had loaded at that time.
Re-loading Addresses
Whenever you add addresses to the Outlook or Entourage address book, you should go back to SpamSieve’s settings and click Load Contacts so that SpamSieve learns about the new addresses. (This is not necessary for addresses that have already sent you e-mails, as SpamSieve will automatically see those messages and add the addresses to its allowlist.)
If you remove addresses from the Outlook or Entourage address book, you should hold down the Option key when clicking Load Contacts; this tells SpamSieve to forget the old addresses before loading the new ones. Do not click Load Contacts while Outlook Entourage is downloading and filtering mail, as this may cause it to freeze.
Your Own Addresses
If you have Catch spam sent from my own addresses checked, addresses on the macOS Contacts app’s “Me” card will not be checked against Entourage or Outlook’s address book. This helps prevent forged spams from getting through.
Multiple Identities
If you have multiple Outlook orEntourage identities, you can load the addresses into SpamSieve in sequence. Click Load Contacts, then change to another identity and click Load Contacts again, etc.
6.1.5 Use SpamSieve allowlist
Enable this option so that messages that match (enabled) rules on the SpamSieve allowlist are never marked as spam.
6.1.6 Use SpamSieve blocklist
Enable this option so that messages that match (enabled) rules on the SpamSieve blocklist are always marked as spam.
6.1.7 Use Bayesian classifier
This enables SpamSieve’s main spam detector, which uses the corpus and word probabilities to identify spam messages. If you uncheck Use Bayesian classifier, SpamSieve will stop examining the full contents of the incoming messages, so this should only be done for testing purposes.
6.1.8 Train SpamSieve allowlist
With this option enabled, training SpamSieve with a good message will add the message sender’s name and address to SpamSieve’s allowlist. This will make SpamSieve classify all future messages from that sender as good. Training SpamSieve with a spam message will disable the name and address if they appear in the allowlist (unless you’ve changed DisableWhitelistRules in the esoteric preferences).
Example
You receive an Amazon order receipt and train SpamSieve with it as a good message. This puts auto-confirm@amazon.com on the allowlist so that future order receipts are always marked as good. A spammer might decide that auto-confirm@amazon.com would make a good fake return address. If you receive such a spam, SpamSieve would mark it as good because the sender was on the allowlist. If you then tell SpamSieve that the message is spam, it will disable the allowlist rule so that it can catch future spam messages with that return address.
6.1.9 Train SpamSieve blocklist
With this option enabled, training SpamSieve with a spam message will add the message sender’s name and address to SpamSieve’s blocklist. This will make SpamSieve classify all future messages from that sender as spam. Training SpamSieve with a good message will disable the sender’s name and address if they appear in the blocklist.
6.1.10 Train Bayesian classifier
With this option enabled, training SpamSieve with a message will add the words from that message to SpamSieve’s corpus. It is highly recommended that you train the Bayesian classifier, as it is what SpamSieve uses to catch most spam messages.
6.1.11 Auto-train as needed
This option causes SpamSieve to automatically train itself with newly received messages based on their predicted categories. The allowlist will stay up-to-date so that messages from previous correspondents are never marked as spam. Also, after the initial training you would only need to train SpamSieve to correct its mistakes. It would automatically learn from the other new messages, as needed, trying to keep a proper balance of good and spam messages in the corpus. As the corpus increases in size, the rate of auto-training will automatically decrease to prevent it from growing too large.
Most SpamSieve users should keep auto-training on at all times. Reasons that you might turn it off include:
- Testing Purposes
- If you’re trying to figure out why SpamSieve is processing a certain kind of message in a certain way, turning off auto-training reduces the interactions among SpamSieve’s components and makes it easier to see what’s happening.
- Unable to Correct Mistakes
- When auto-training is enabled, it is imperative that you correct SpamSieve when it makes a mistake; otherwise it will “learn” things that aren’t true and begin making predictions based on that incorrect information. If your mail program and filters are set up such that you cannot tell when SpamSieve has made a mistake (or if you can see the mistakes but sometimes forget to correct them), then you should not use auto-training.
- Multiple Copies of SpamSieve
- If you are using multiple copies of SpamSieve (on different Macs) to filter the same IMAP account, it’s hard to know which one(s) to correct when a mistake is made. With auto-training off, you don’t have to worry about that.
- Bulk Processing
- For example, if SpamSieve will be processing a large number of incoming messages in a row, and you will not be able to correct any mistakes until later. In this case, using auto-training could magnify one or two mistakes into many, as SpamSieve would assume that it had classified the earlier messages correctly, and learned from that (possibly incorrect) assumption.
- Delayed Corrections
- If it will be a long time between when SpamSieve filters some messages and when you can correct any mistakes, the situation is similar to Bulk Processing, so you may want to turn off auto-training. If you’ll be away from your SpamSieve Mac but have other mail access, you can eliminate the delay by using remote traininng. See the Drone Setup and Remote Training section.
SpamSieve automatically suppresses auto-training when using the Filter Messages command.
6.2 Settings ‣ Notification
All e-mail programs can notify you when you receive new messages, but some will also notify you even when all the new messages are spam. If your e-mail program is not savvy in this way, you can turn off its notification and let SpamSieve notify you only when there are new good messages.

6.2.1 Play sound
This makes SpamSieve play a sound when new good messages are received (as described in the Settings ‣ Notification section). To add a sound to the menu, copy the sound file to the Sounds folder in your Library folder. (See the How can I open the Library folder? section.) SpamSieve will also look for sounds that are built into your installed e-mail programs.
You can adjust the Alert volume in the Sound Effects tab of the Sound pane in System Settings. If the volume is set to zero, the Mac flashes the screen instead of playing the sound.
If you are not hearing the sounds, make sure that you have selected an appropriate speaker in the Play sound effects through pop-up menu.
6.2.2 Bounce Dock icon
This makes SpamSieve bounce its Dock icon once when new good messages are received.
6.2.3 Keep bouncing
You might not be looking at the Dock icon when it first bounces, so this makes SpamSieve continue bouncing its Dock icon until you activate SpamSieve or your e-mail program.
6.2.4 Show number of new good messages in Dock
People often like to be notified that they have received new messages, but they don’t want to hear about new spam messages (those should be ignored), only good ones.
This option makes SpamSieve show the number of new good messages in its Dock icon. “New” means “since the last time the number was reset”; it’s not related to the number of messages that are unread. “Good messages” means “messages for which there is a Predicted: Good entry in SpamSieve’s Log window.” If the number is unexpectedly high, you can look in the log to see which messages SpamSieve processed recently. Perhaps it was asked to reprocess old messages. If the same message was processed multiple times, that only counts as one message.
If there are no new good messages or if SpamSieve or the mail program is frontmost, SpamSieve will not show any number (rather than showing zero).
Clicking the Dock icon, activating your e-mail program, or training SpamSieve with a message will reset the count.
Note: In order for SpamSieve to show a number in the Dock icon, System Settings ‣ Notifications ‣ SpamSieve ‣ Badge application icon must be checked.
6.2.5 Flash PowerMate
If you have a Griffin PowerMate, this option will make it flash when new good messages arrive. The flashing will stop when you activate SpamSieve or your mail program.
This feature is compatible with version 3.0 of the PowerMate software.
6.2.6 Notification Center shows
The following notifications are available:
- Good messages sent from Contacts
- This posts one notification for each good message that arrives (where the sender is in your Contacts), showing the message’s subject, the first few lines of its body, and (if possible) a picture of the sender.
- Other good messages
- This posts one notification for each good message that arrives (where the sender is not in your address book), showing the message’s subject and the first few lines of its body.
- The number of new good messages
- This notification mimics the red number in SpamSieve’s Dock icon (see Show number of new good messages in Dock). After a batch of good messages arrives, it tells you how many new messages there are and then fades away.
- Uncertain spam messages
- This notification helps you spot false positives by telling you when a message has arrived that SpamSieve thinks is spam, but that may actually be good. For more information, see the Uncertain Spam Messages preference. By watching these notifications, you can spot false positives without having to look through the entire contents of the Junk mailbox in your mail program. When using this notification, you may want to go to System Settings ‣ Notification and set the SpamSieve notifications to display as Alerts to make sure that you see all the notifications. Clicking to close the notification does not change whether SpamSieve thinks the message is spam. For messages that are actually spam, you don’t need to do anything. For messages that are not spam, you can click to open the message in SpamSieve’s Log window and then train it as good.
6.2.7 Uncertain spam messages
SpamSieve assigns each message a score between 0 and 100, and it considers messages with scores 50 or greater to be spam. The farther the score is away from the middle (50), the more confident SpamSieve is about whether the message is spam. Put another way, if you are trying to double-check SpamSieve’s work, you should focus your attention on the messages with scores closer to 50. If SpamSieve has made any mistakes, it is more likely to be with messages scored at 70 or 30 than with those scored at 95 or 5.
Spam messages that SpamSieve thought were good (false negatives) are generally easy for humans to spot. They tend to stick out amongst lots of good messages in the inbox.
Good messages that SpamSieve thought were spam (false positives) are harder to spot. They can be buried amongst piles of messages in the junk mailbox. To help you find these messages, SpamSieve can notify you about uncertain spam messages, i.e. the messages in the junk mailbox that you should focus your attention on.
The pop-up menu lets you control the range of scores that SpamSieve considers to be uncertain. For example, if you set it to 75 (the default), messages that SpamSieve thought were spam but which have scores below 75 will be considered uncertain.
- Notification Center can show a notification each uncertain message.
- In Outlook, the uncertain messages will be categorized as Uncertain Junk instead of Junk and will appear in a different color. For more information, see the Spam Message Categories (Outlook) section.
By making it easier to spot uncertain messages, these mechanisms help you to efficiently verify whether SpamSieve has filtered your mail correctly.
Uncertain messages are considered to be spam, unless you tell SpamSieve otherwise, so you should not train SpamSieve that they are spam.
See also: Move it to the Trash if the spam score is at least.
6.3 Settings ‣ Apple Mail
6.3.1 Settings ‣ Apple Mail ‣ Setup
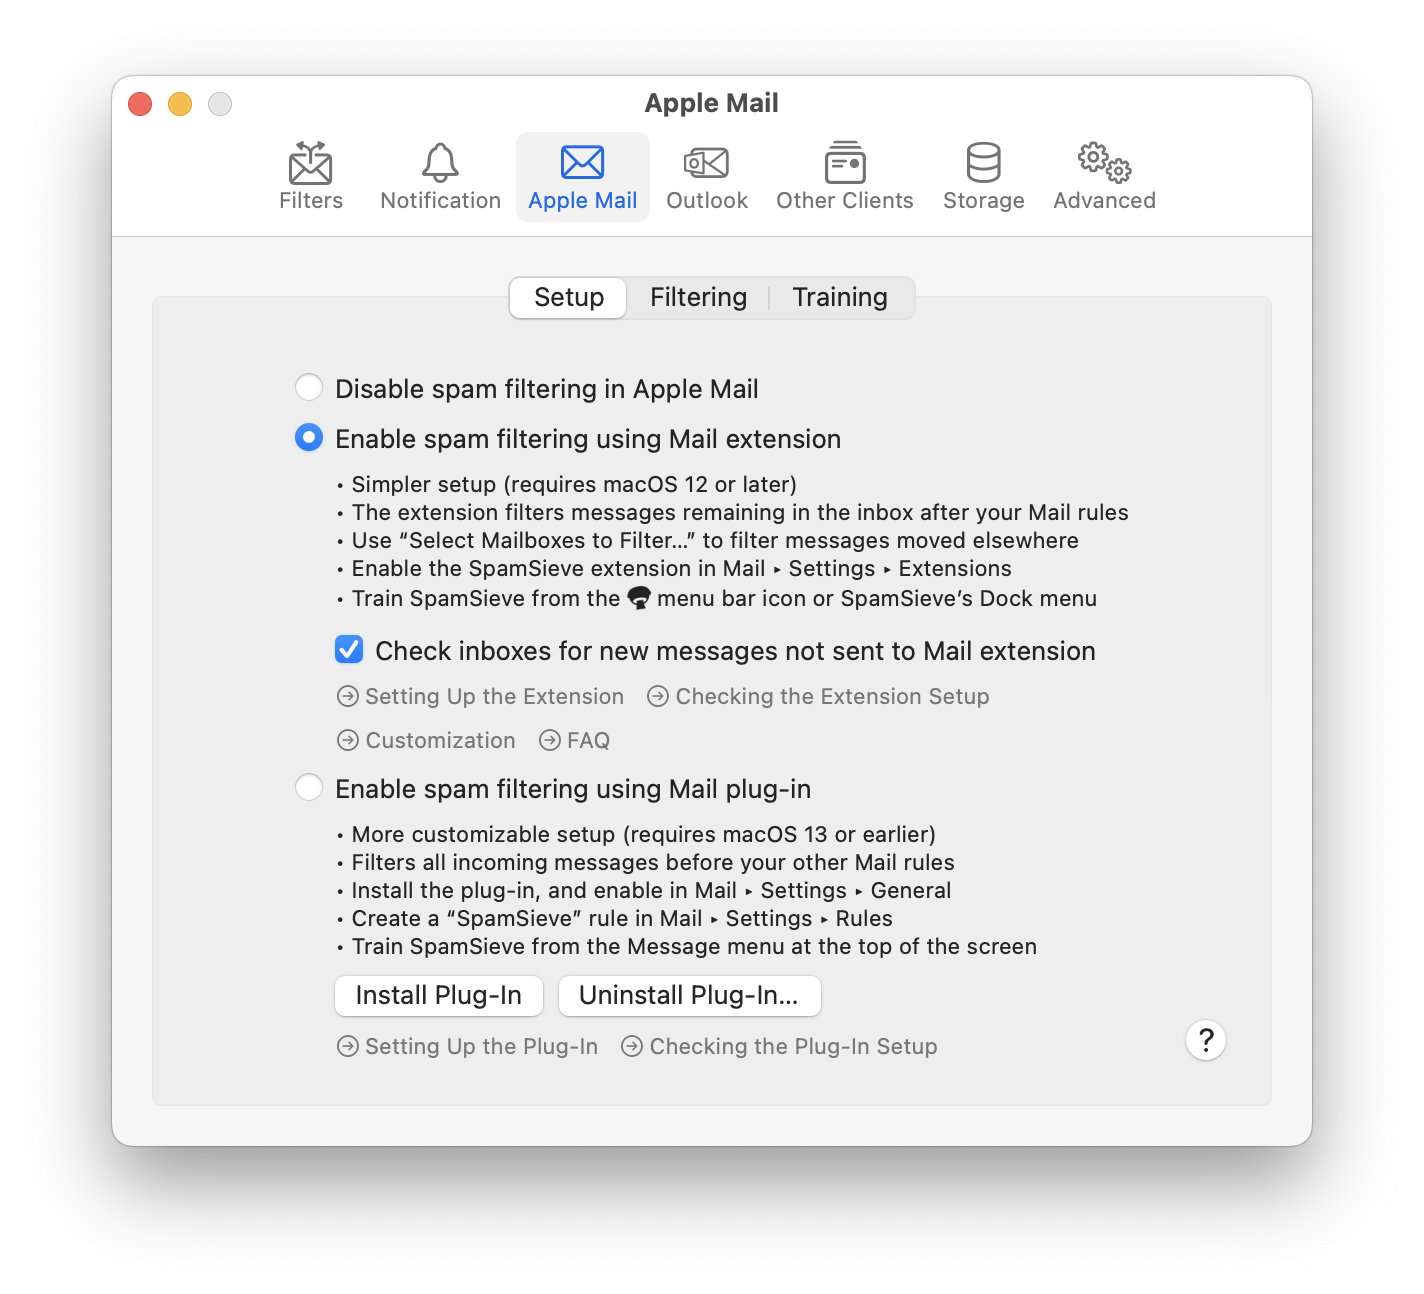
- Disable spam filtering in Apple Mail
This turns off automatic spam filtering in Apple Mail, including the Filter spam messages in other mailboxes feature. If the Apple Mail plug-in and rule are still enabled in Mail, SpamSieve will tell Mail that each message is good so that stays in the inbox. You can still manually tell SpamSieve to filter messages using the Filter Messages command in the menu bar icon.
- Enable spam filtering using Mail extension
This enables spam filtering in Apple Mail, as described in the Setting Up Apple Mail section. The summary of the Mail extension setup is:
- Simpler setup (requires macOS 12 or later)
- The extension filters messages remaining in the inbox after your Mail rules
- Use Select Mailboxes to Filter… to filter messages moved elsewhere
- Enable the SpamSieve extension in Mail ‣ Settings ‣ Extensions
- Train SpamSieve from the menu bar icon or SpamSieve’s Dock menu
- Enable spam filtering using Mail plug-in
This enables spam filtering in Apple Mail, as described in the Setting Up Apple Mail (Plug-In) section. The summary of the Mail plug-in setup is:
- More customizable setup (requires macOS 13 or earlier)
- Filters all incoming messages before your other Mail rules
- Install the plug-in, and enable in Mail ‣ Settings ‣ General
- Create a SpamSieve rule in Mail ‣ Settings ‣ Rules
- Train SpamSieve from the Message menu at the top of the screen in Mail
6.3.1.1 Check inboxes for new messages not sent to Mail extension
SpamSieve 3 brought a new way of integrating with Apple Mail—using a Mail extension—that’s compatible with macOS 14 Sonoma and later. Most customers have had success with this simpler system, where there’s no plug-in to install or rule to set up. Unfortunately, some customers have encountered a macOS bug where Apple Mail stops sending new messages to SpamSieve’s Mail extension. This causes spam messages to be left in the inbox, not because SpamSieve thought they were good, but because it hasn’t actually seen them.
The Check inboxes for new messages not sent to Mail extension option is a workaround for this bug. It automatically filters all of your inboxes, without your having to configure anything. Just make sure that option is checked in the Settings ‣ Apple Mail ‣ Setup window and make sure that SpamSieve has Full Disk Access. (Without Full Disk Access, the feature will still work, but it will be slower and report an error for mailboxes containing more than 5,000 messages.)
Inboxes are periodically checked for new messages according to the same schedule as Filter spam messages in other mailboxes. Thus, there can be a slight delay before SpamSieve detect new messages. You can optionally enable the Add green flag to unread good messages option if you want to see whether a message in the inbox has in fact been processed.
See also: Why are Apple Mail inbox messages not being processed?.
6.3.1.2 Install Apple Mail Plug-In
The Install Plug-In button in Settings ‣ Apple Mail ‣ Setup installs (or updates) the plug-in that SpamSieve uses to integrate with Apple Mail. If the plug-in is successfully installed, you will see the SpamSieve commands in Mail’s Message menu. For more information, see the Setting Up Apple Mail and Why don’t I see the SpamSieve commands in Apple Mail’s Message menu? sections of the manual.
Installing the plug-in also causes SpamSieve to install a launch agent so that the SpamSieve application will launch and be available for filtering when Apple Mail launches. On macOS 13, this will cause macOS to show a notification saying Background Items Added. This is normal. SpamSieve will show up under System Settings ‣ General ‣ Login Items ‣ Allow in the Background, and you should not uncheck it there, as that would prevent it from working with Apple Mail. The login item will automatically be removed if you select Disable spam filtering in Apple Mail.
A macOS 13 bug can cause the system to incorrectly and/or repeatedly report Background Items Added when SpamSieve didn’t change anything. This may stop after a safe boot. If it doesn’t, please click here to enable some additional debug logging and send in a diagnostic report after the next time the problem occurs.
6.3.1.3 Uninstall Apple Mail Plug-In…
This Uninstall Plug-In… button will prompt you to remove any SpamSieve Mail rules, then uninstall the SpamSieve plug-in and launch agent. The SpamSieve application and training data files will remain. SpamSieve will then quit Mail itself so that the plug-in code is unloaded.
For more information, see the Uninstalling SpamSieve section.
6.3.2 Settings ‣ Apple Mail ‣ Filtering
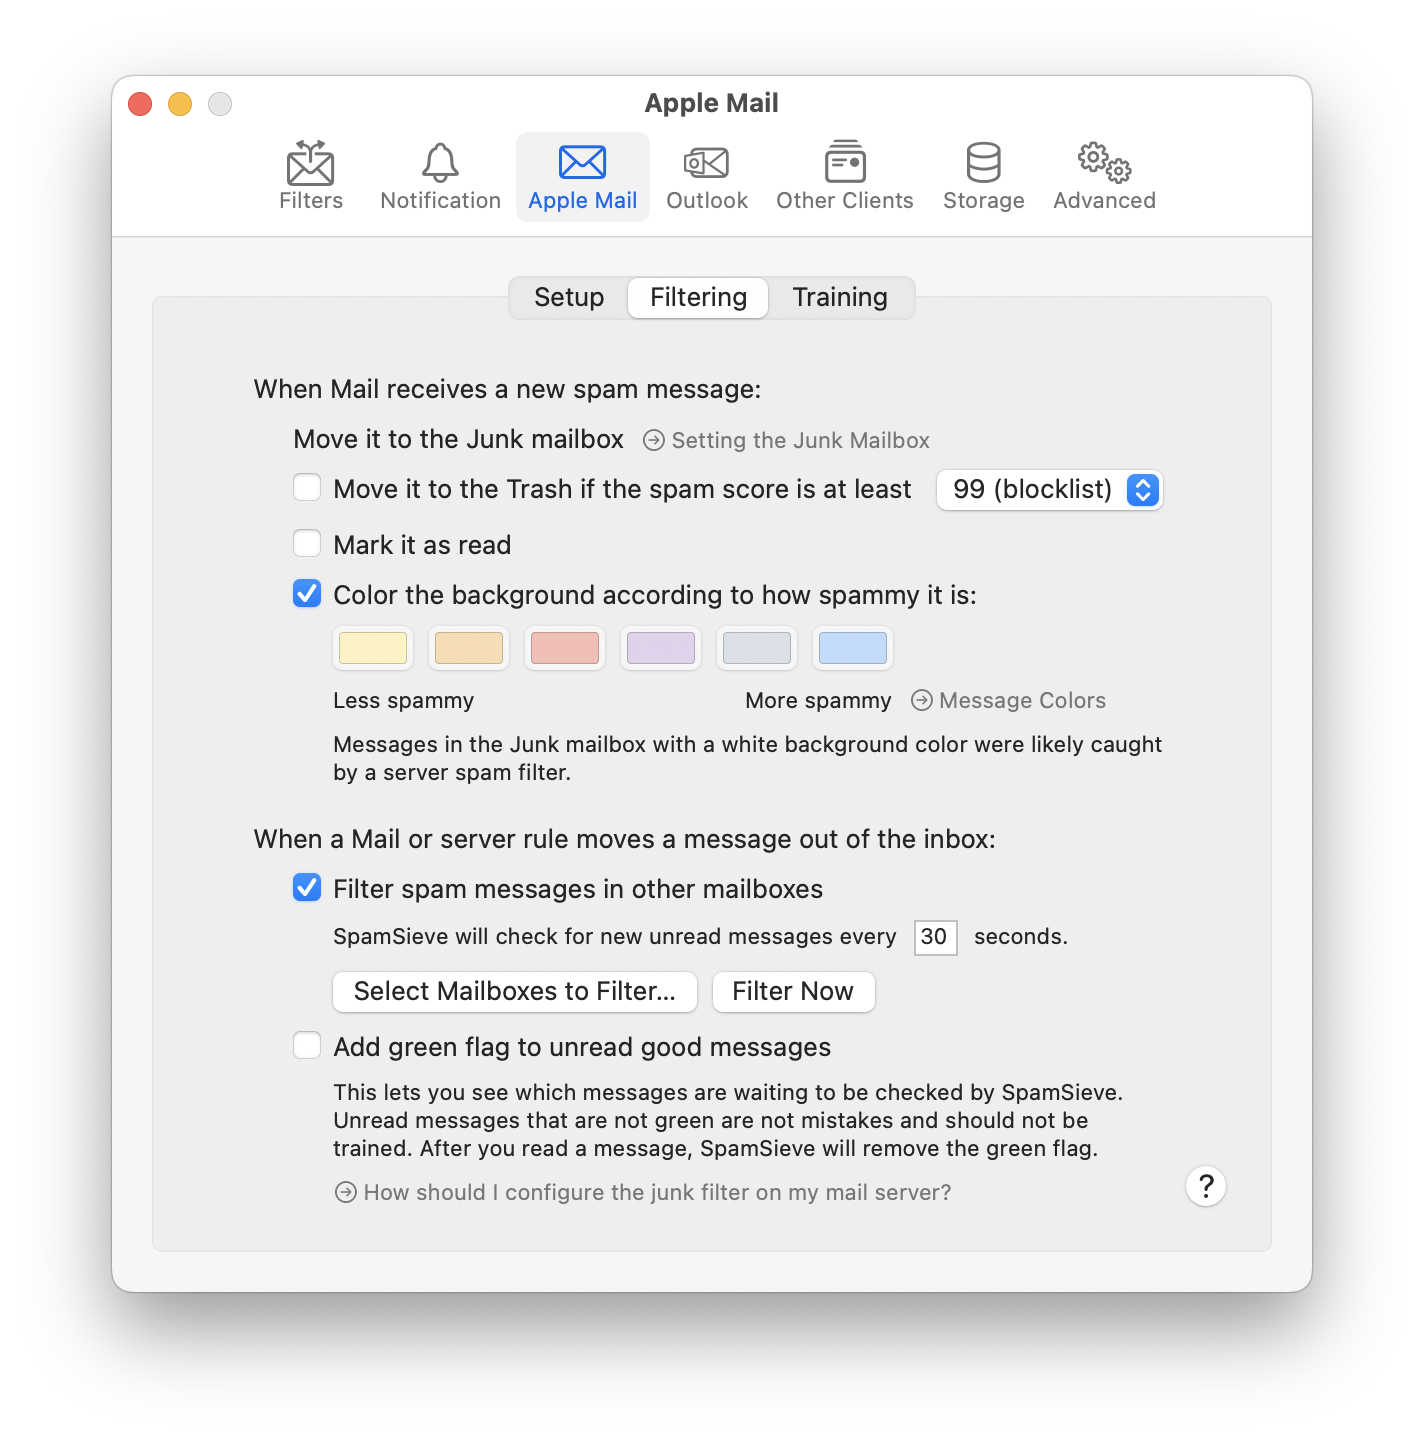
6.3.2.1 Move it to the Trash if the spam score is at least
SpamSieve normally moves spam messages to the Junk mailbox. When using the Mail extension setup, the Move it to the Trash if the spam score is at least setting can be used to move certain (more spammy) messages to the Trash mailbox instead. Separating the more spammy messages, which are less likely to be mistakes, from the less spammy ones lets you concentrate your efforts on reviewing the ones in Junk that are closer to the border line.
(It’s still a good idea to check that no good messages were caught as spam in the Trash. If you really want to just empty the Trash sight unseen or set it to auto-delete messages, it’s best to turn off auto-training.)
For example:
- If you set the score to 99, when you train a message as spam, its sender will go on SpamSieve’s blocklist, and future messages from the same name or address will go directly to the Trash. You can also make your own blocklist rules to match the messages that you consider to be the most spammy.
- If you set the score to 50, SpamSieve will move all the spam messages to the Trash instead of to the Junk mailbox.
- To move particular colors (i.e. spam levels) of messages to the Trash, set the score to: 99 (blue), 95 (gray), 88 (purple), 81 (red), 75 (orange), 50 (yellow). These numbers are also shown in the tooltips for the colors in the Settings window.
- If you only want messages from a certain sender (i.e. not all messages matching the blocklist) to go to the Trash, you can create a rule in Mail’s Settings to do this. It should be above the SpamSieve rules (if any). These messages will bypass SpamSieve completely, so it cannot protect you if your rule accidentally matches a good message.
Server Junk Filters
The Move it to the Trash if the spam score is at least feature only applies to messages filtered by SpamSieve. If a server junk filter moves a spam message to the Junk mailbox before it gets to your Mac, SpamSieve normally would not see the message, so it would stay in the Junk mailbox (not move to the Trash) no matter what the spam score would have been. If you want SpamSieve to refilter message that were already caught by a server junk filter, please see the Rescuing Good Messages Caught By a Server Filter section of the manual.
See Also
6.3.2.2 Mark it as read
Mail Extension
When using the Mail extension, the Mark it as read setting tells SpamSieve to mark new messages as read if SpamSieve thinks they’re spam, e.g. so that you aren’t distracted by the unread count in Mail’s sidebar. When all the messages in a mailbox are marked as read, Apple Mail will stop showing a number next to the mailbox.
Mail Plug-In
When using the Mail plug-in, you can customize the actions of the SpamSieve rule in Mail’s settings. For example, to mark the spam messages as read, click the + button at the bottom of the rule sheet and choose Mark as Read from the pop-up menu.
Do not add an action that changes the color of the message, as it will not do what you expect.
Server Junk Filters
Note that the Mark it as read feature only applies to messages filtered by SpamSieve. If a server junk filter moves a spam message to the Junk mailbox before it gets to your Mac, SpamSieve normally would not see the message, so it would not mark it as read. You can tell which messages SpamSieve processed because of their coloring and because they will be listed as Predicted: Spam in the Log window. If you want SpamSieve to refilter message that were already caught by a server junk filter, please see the Rescuing Good Messages Caught By a Server Filter section of the manual.
6.3.2.3 Color the background according to how spammy it is
SpamSieve sets the background colors of spam messages to reflect how spammy it thinks they are. The order, from most to least spammy, is: Blue, Gray, Purple, Red, Orange, Yellow. Good messages are left uncolored (with a white background).
Thus, if you are skimming the Junk mailbox for false positives, pay the most attention to the yellow and orange messages. The Color the background according to how spammy it is setting lets you enable or disable colors for spam messages. With it disabled, all spam messages will have a white background color and brown text. To filter messages differently depending on their color, see the Move it to the Trash if the spam score is at least and Color Rules in Apple Mail sections.
6.3.2.4 Filter spam messages in other mailboxes
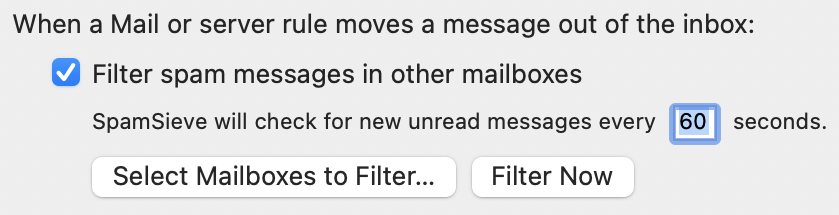
This makes it possible for SpamSieve to filter messages that other rules (either in Mail or on your mail server) moved out of the inbox. This is especially important when using the Mail extension, because Mail only sends new messages to the extension if they remain in the inbox after processing your Mail rules. With the Mail plug-in, this was not a concern because the SpamSieve rule was at the top of the list, so it was applied first. However, even with the plug-in, Mail does not apply rules to messages that were moved out of the inbox by a server rule or another device before they got to your Mac. With this option, it is possible for SpamSieve to filter all new messages, no matter where they are. (Please let Apple know if you would like Mail extensions to be able to directly filter messages in other mailboxes.)
The Select Mailboxes to Filter… button lets you tell SpamSieve which mailboxes it should check for spam:
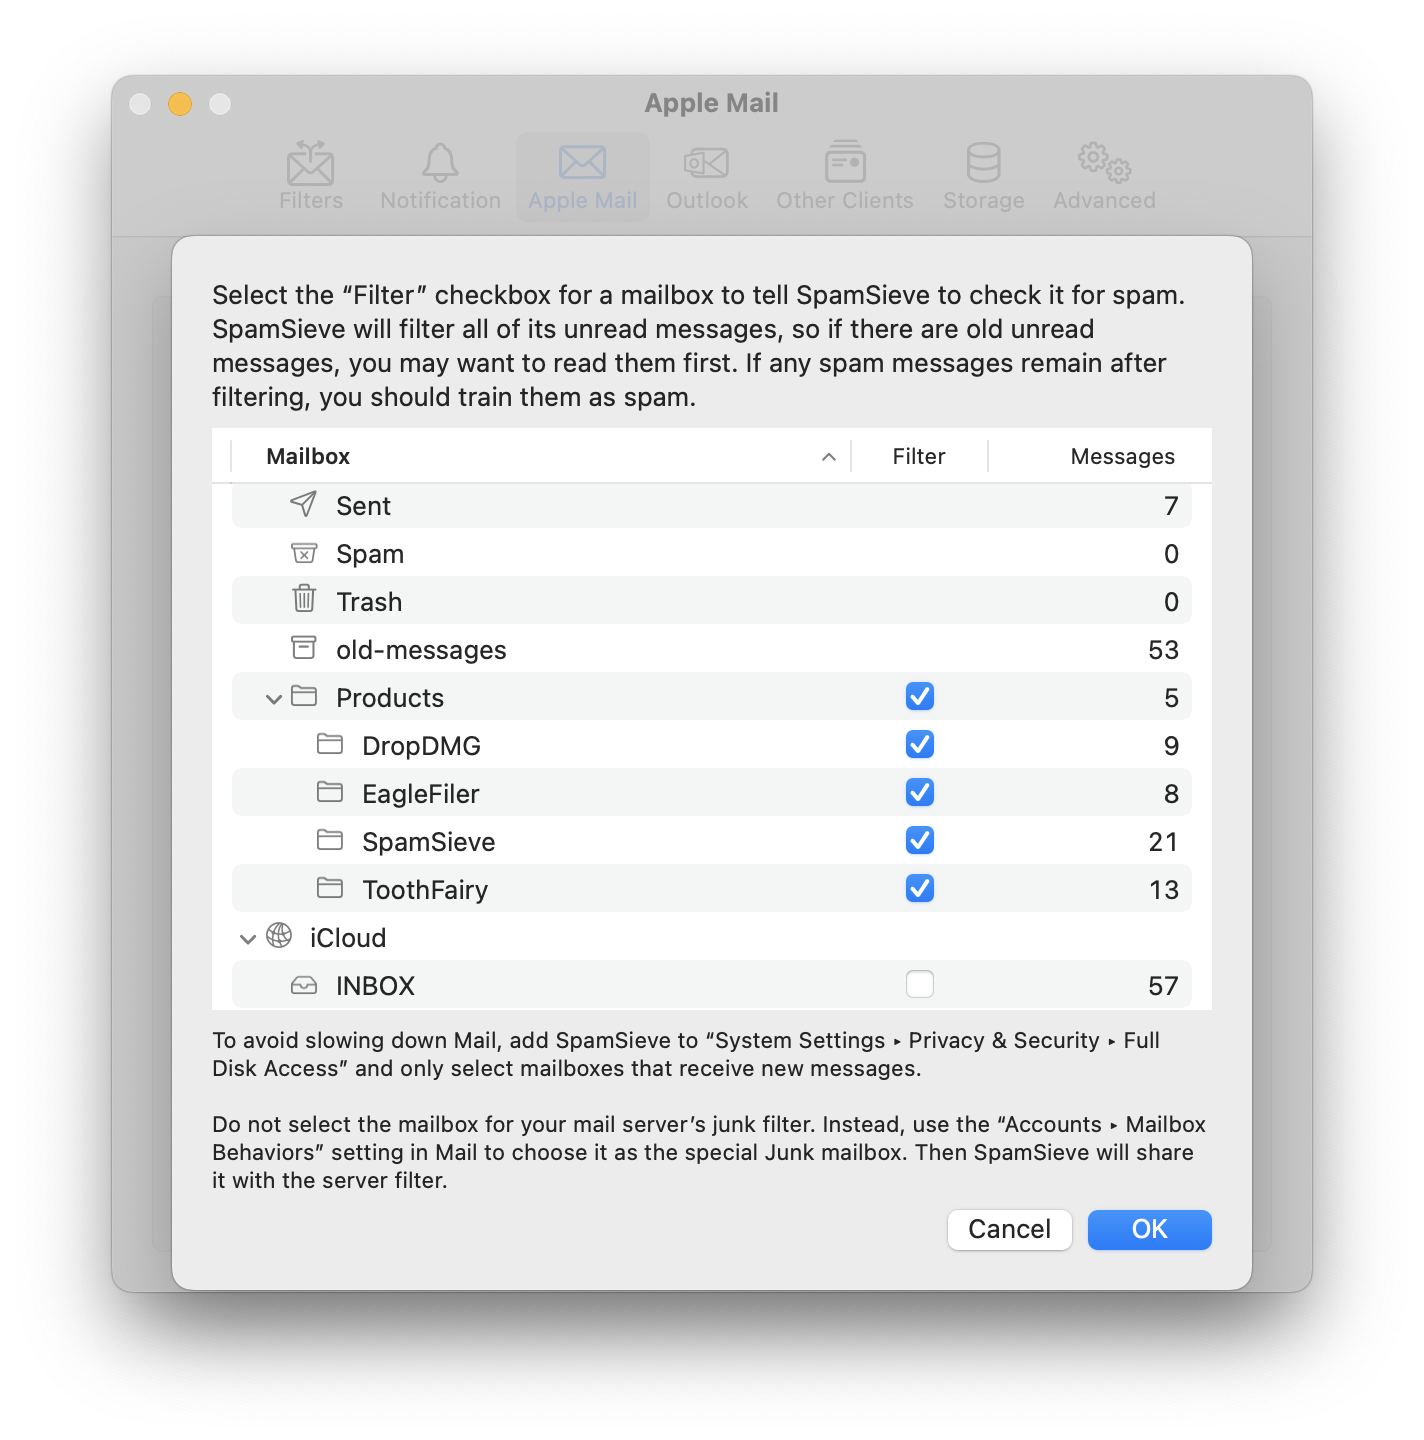
SpamSieve will filter all of the unread messages in the selected mailboxes, so if there are old unread messages, you may want to read them first before telling SpamSieve to filter the mailboxes. (SpamSieve will not filter any messages older than when you installed SpamSieve or activated this feature.)
When Messages Are Processed
SpamSieve will check for new messages every 60 seconds (or whichever interval you specify). You can also click Filter Now to make it check right away. While checking, it will show the name of the mailbox that is currently being processed. You can also hover the cursor over it to see in a tooltip which account it’s from.
If many mailboxes are selected, or if they contain a large number of messages, it may take longer than the specified interval to check them all. You can speed up checks by moving older messages to another mailbox that’s not selected for filtering.
If any spam messages remain after filtering, you should train them as spam. The Add green flag to unread good messages option can be helpful to know which messages have already been processed (and so should be trained if they are spam) and which have not yet been processed (and so they should be left alone).
Which Mailboxes to Select
Large Mailboxes
To avoid slowing down Mail, only select mailboxes that receive new messages. SpamSieve can check for new messages much more quickly if you give it Full Disk Access, as described in the Granting Full Disk Access section. Otherwise, if there are lots of old messages, move them to an unfiltered mailbox. A mailbox’s message name will be shown in orange or red if the message count is large enough that it might make filtering slow, time out, or cause Mail to freeze. SpamSieve will skip filtering red mailboxes to avoid disrupting Mail. The Why are other Apple Mail mailboxes not being processed? section explains what you can do if this is happening.
Junk and Spam Mailboxes
Do not select the mailbox for your mail server’s junk filter. Instead, use the Accounts ‣ Mailbox Behaviors setting in Mail to choose it as the special Junk mailbox, as described in the Setting the Junk Mailbox in Apple Mail section. Then SpamSieve will share it with the server filter. If you want SpamSieve to check for good messages that were incorrectly caught by a server junk filter, see the Rescuing Good Messages Caught By a Server Filter section.
INBOX
It is usually unnecessary to select INBOX, because the Check inboxes for new messages not sent to Mail extension feature will automatically check all the inboxes. However, you can manually select inboxes here if you only want some of them to be filtered.
Mailbox Changes
If you rename an account or mailbox in Mail, you will need to go back to Select Mailboxes to Filter… and reselect the mailboxes. If you delete a mailbox in Mail, you should go back to Select Mailboxes to Filter… and remove it so that SpamSieve does not keep reporting errors accessing the mailbox.
Keyboard Shortcuts
You can jump to a mailbox in the list by starting to type its name. You can toggle whether a mailbox is selected for filtering by pressing the spacebar. This also works if you have selected a range of mailboxes (e.g. by Shift-clicking).
If You Don’t See All Your Mailboxes
In rare cases, an Apple Mail bug may prevent the Select Mailboxes to Filter… sheet from showing all of an account’s mailboxes. You can use a Terminal command to tell SpamSieve about one or more missing top-level mailboxes that you want it to show in the list. For example, if account A has a missing mailbox named M and account B has a missing mailbox named N, you would enter this command in Terminal:
defaults write com.c-command.SpamSieve AppleMailMailboxListerExtraMailboxes -array "A|M" "B|N"
Leave the account name blank (e.g. "|M") for local mailboxes under On My Mac.
6.3.2.5 Add green flag to unread good messages
Filtering mail using the Check inboxes for new messages not sent to Mail extension and Filter spam messages in other mailboxes features is not immediate: SpamSieve needs to periodically check whether any new messages have arrived. If you receive lots of new messages and spend a lot of time in Mail, it may not be clear whether a spam message is visible because SpamSieve made a mistake and thought it was good or simply because SpamSieve hadn’t yet had a chance to examine it and move it to the Junk mailbox.
The Add green flag to unread good messages option reduces this confusion by letting you choose to mark good messages that have been checked by SpamSieve with a green flag. Messages with no flag are pending processing; they are not mistakes and do not need to be trained as spam.
Adding a green flag will make new good messages show up in the Flagged section of Mail’s sidebar, which can be useful for finding new messages that are spread across multiple mailboxes. After you read a message, SpamSieve will automatically remove the green flag, and the message will disappear from Flagged.
Because SpamSieve removes the flags automatically, you should not enable this option if you use green flags for other purposes, e.g. manually flagging certain messages that are important to you.
The green flags can also be useful when troubleshooting the Mail extension. If you uncheck Check inboxes for new messages not sent to Mail extension, the green flags will then let you see which messages Mail has sent to the extension. There is more information about this in the Why are Apple Mail inbox messages not being processed? section.
We strongly recommend granting SpamSieve Full Disk Access. Otherwise, the green flags feature will be be slower and report an error for mailboxes containing more than 5,000 messages.
6.3.3 Settings ‣ Apple Mail ‣ Training
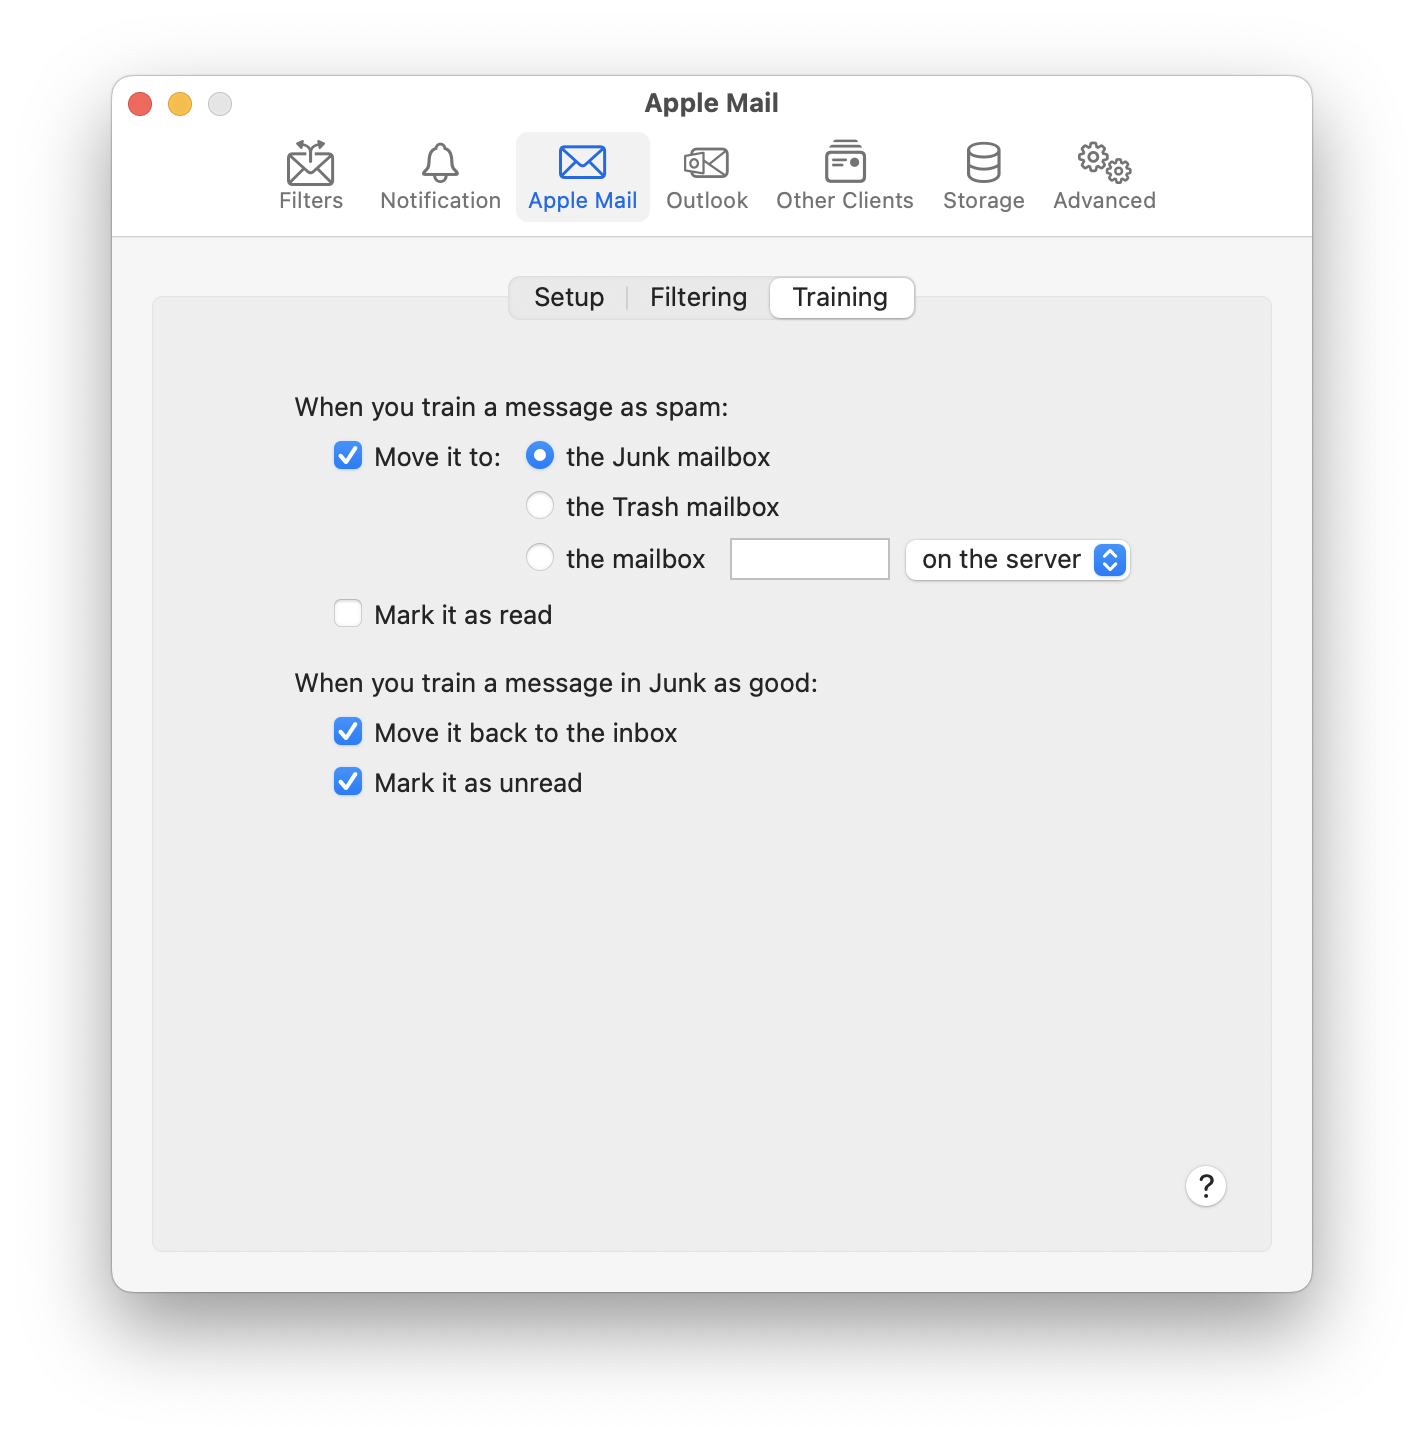
When you train a message as spam:
- Move it to
- This lets you control whether SpamSieve leaves it in its current location or moves to the Junk mailbox, to the Trash, or to another mailbox that you specify. See also: Setting the Junk Mailbox in Apple Mail.
- Mark it as read
- SpamSieve will mark the message as read so that you aren’t distracted by the unread count in Mail’s sidebar.
When you train a message in Junk as good:
- Move it back to the inbox
- If the message is in a Junk or Spam mailbox, SpamSieve will move it back to the inbox. Normally, this is what you want because good messages don’t belong in Junk. However, if you want to use Mail’s Apply Rules command after training, it can be easier to leave the messages in Junk where they would remain selected, so you don’t have to find them again in the inbox, mixed in with your other messages.
- Mark it as unread
- SpamSieve will mark the message as unread, so that it’s now treated as a new message.
6.3.3.1 Train messages in TrainSpam and TrainGood
This option is part of the drone setup for Apple Mail.
With Train messages in TrainSpam and TrainGood selected, when away from your Mac (or when using a Mac mail client that doesn’t support SpamSieve), if you find a spam message in the inbox, you can move it to the TrainSpam mailbox. If you find a good message in the Junk mailbox, you can move it to the TrainGood mailbox. SpamSieve will process these mailboxes and then move the messages to Junk or to the inbox.
Once you’ve enabled remote training by selecting the checkbox, SpamSieve will automatically create the special TrainSpam and TrainGood mailboxes in each account in Apple Mail. You can move these mailboxes around (e.g. reorder them in the mailbox list or move them into another mailbox), but do not rename them.
As long as SpamSieve filtering for Apple Mail is enabled, SpamSieve will automatically process the training mailboxes about once per minute. You can also tell it to process them manually by clicking the Filter Now button in the Settings ‣ Apple Mail ‣ Filtering window. While SpamSieve is processing the training mailboxes, it will show a spinning progress indicator next to the checkbox.
Keyboard Shortcuts
If desired, you can set up keyboard shortcuts on any non-drone Macs to make it easier to move messages into the Train mailboxes. In Mail’s View menu, choose Show Favorites Bar. Then drag the TrainGood and TrainSpam mailboxes to the favorites bar. There will then be keyboard shortcuts for these messages in the Mailbox ‣ Move to Favorite Mailbox submenu.
What If I Don’t See the Train Mailboxes on All Devices?
For IMAP accounts, it’s important that the IMAP Path Prefix be set the same way on all devices. Here’s where the setting is located:
- Apple Mail for Mac: Mail ‣ Settings… ‣ Accounts ‣ [account name] ‣ Server Settings ‣ Advanced IMAP Settings ‣ IMAP Path Prefix
- Apple Mail for iOS: Settings ‣ Apps ‣ Mail ‣ Mail Accounts ‣ [account name] ‣ Account Settings ‣ Advanced ‣ IMAP Path Prefix
- Microsoft Outlook: It is currently not possible to set the root folder in New Outlook. This means that Outlook will always show all the folders, but the Train folders may appear at different places (e.g. within the inbox) compared with other mail clients.
If you see the Train mailboxes in Apple Mail on your Mac, but not on other devices, this could be because Mail created the mailboxes but did not sync them to the server. You can fix this by deleting them on your Mac, quitting Mail, and then creating TrainSpam and TrainGood mailboxes using Webmail.
Legacy AppleScript
The Apple Mail - Remote Training script was available for previous versions of SpamSieve and offered similar functionality. We recommend switching to Train messages in TrainSpam and TrainGood, as it’s much more efficient and better integrated with SpamSieve’s settings. You can then delete the old script file (~/Library/Application Scripts/com.apple.mail/Apple Mail - Remote Training.scpt) and the associated Remote Training rule in Mail ‣ Settings ‣ Rules.
6.4 Settings ‣ Outlook
6.4.1 Settings ‣ Outlook ‣ Setup
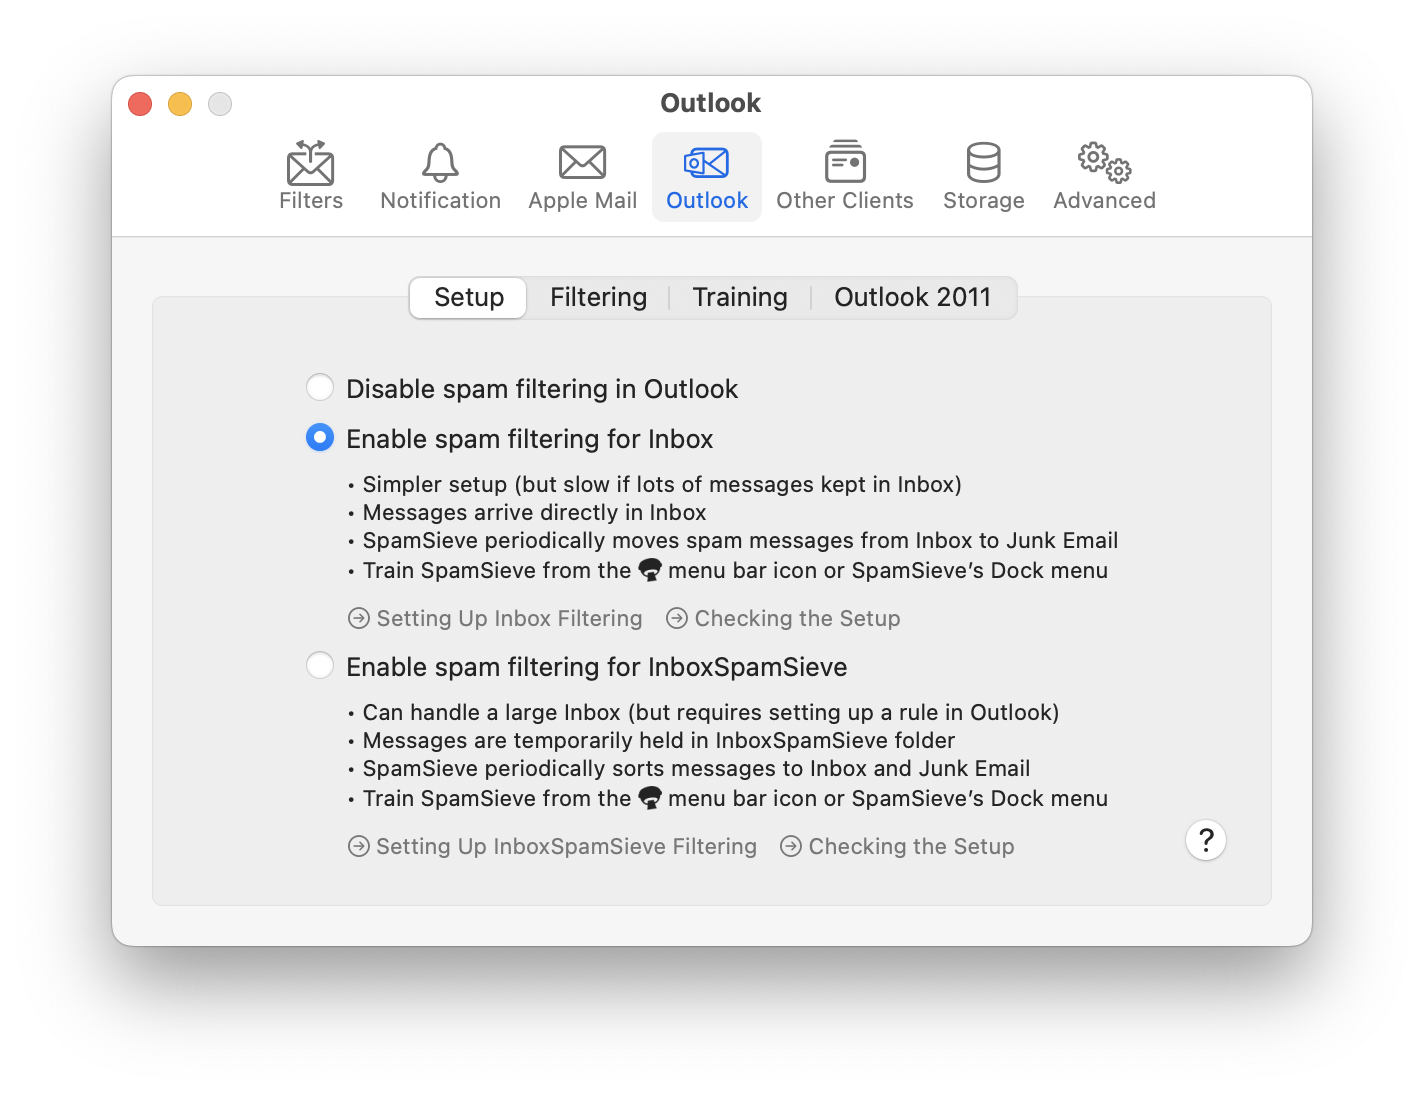
- Disable spam filtering in Outlook
This turns off automatic spam filtering in Outlook. You can still manually tell SpamSieve to filter messages using the Filter Messages command in the menu bar icon. If you are using the InboxSpamSieve setup, you would also need to uncheck the SpamSieve rules in Outlook’s settings to prevent messages from collecting in the InboxSpamSieve folder.
- Enable spam filtering for Inbox
This enables spam filtering in Apple Mail, as described in the Setting Up Outlook section. The summary of this setup option is:
- Simpler setup (but slow if lots of messages kept in Inbox)
- Messages arrive directly in Inbox, marked Good after processing
- SpamSieve periodically moves spam messages from Inbox to Junk Email
- Train SpamSieve from the menu bar icon or SpamSieve’s Dock menu
- Enable spam filtering for InboxSpamSieve
This enables spam filtering in Apple Mail, as described in the Setting Up Outlook (Large Inboxes) section. The summary of this setup option is:
- Can handle a large Inbox (but requires setting up a rule in Outlook)
- Messages are temporarily held in InboxSpamSieve folder
- SpamSieve periodically sorts messages to Inbox and Junk Email
- Train SpamSieve from the menu bar icon or SpamSieve’s Dock menu
6.4.2 Settings ‣ Outlook ‣ Filtering
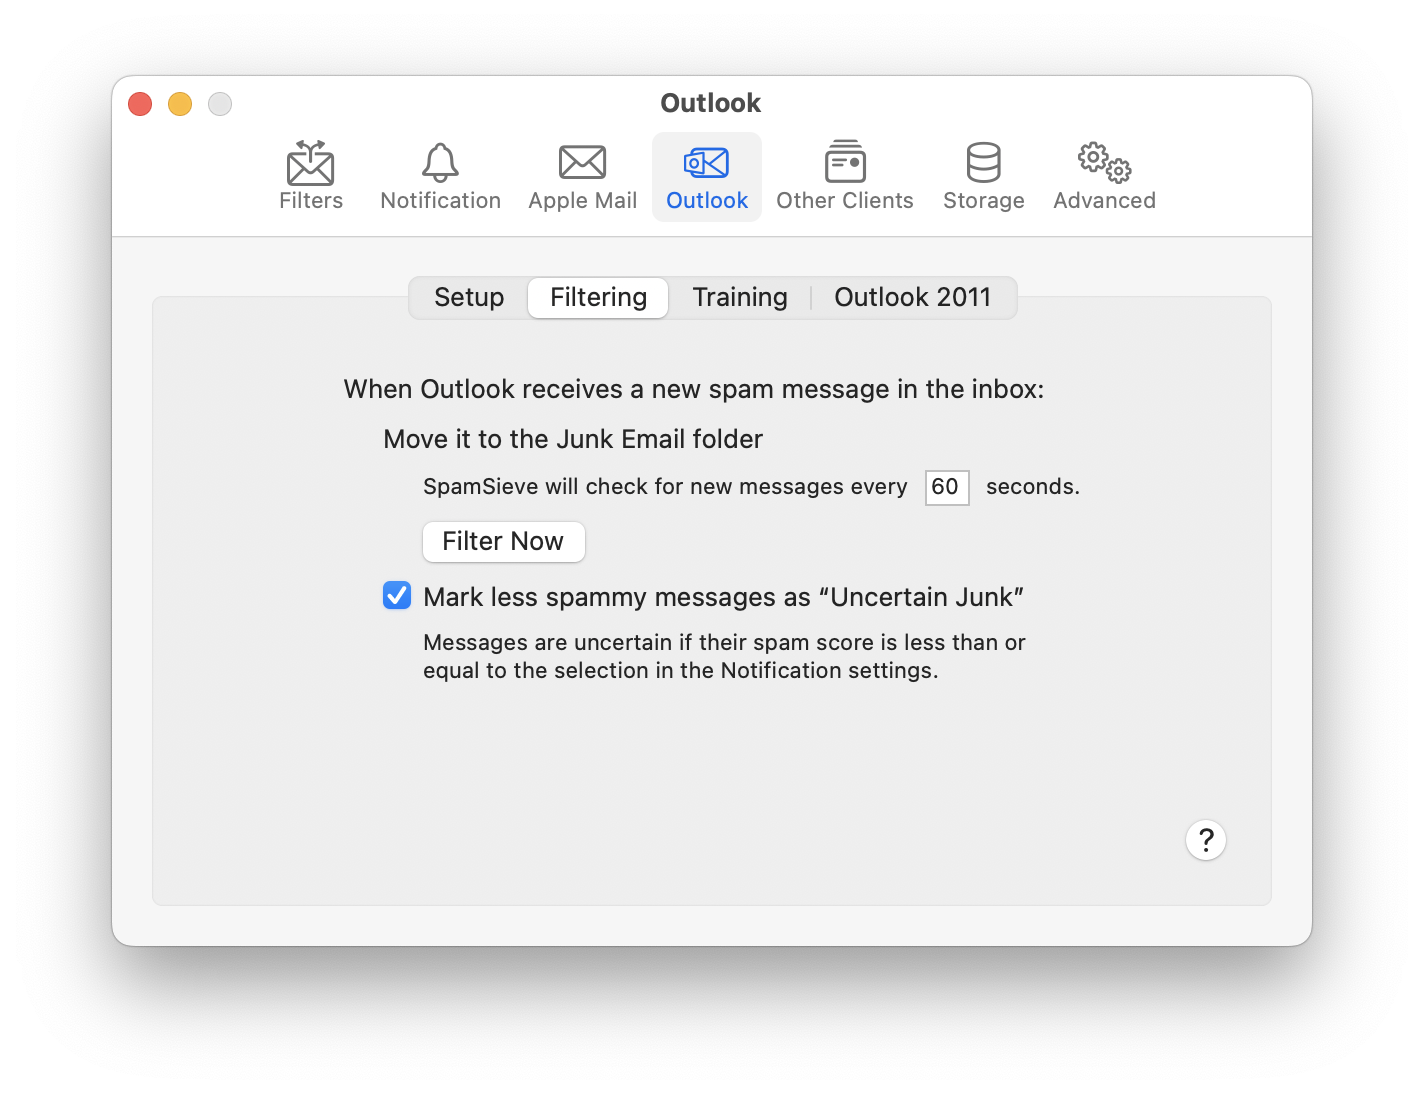
After checking the Inbox or InboxSpamSieve folder (see Settings ‣ Outlook ‣ Setup) for new messages to filter, SpamSieve will wait 60 seconds (or whichever interval you specify) before checking again. You can also click Filter Now to make it check right away.
Mark less spammy messages as “Uncertain Junk”
Messages are uncertain if their spam score is less than or equal to the selection in the Notification settings. With this option enabled, SpamSieve will assign such messages the Uncertain Junk category and color in Outlook. Otherwise, all spam messages will be assigned the Junk category and color.
6.4.3 Settings ‣ Outlook ‣ Training
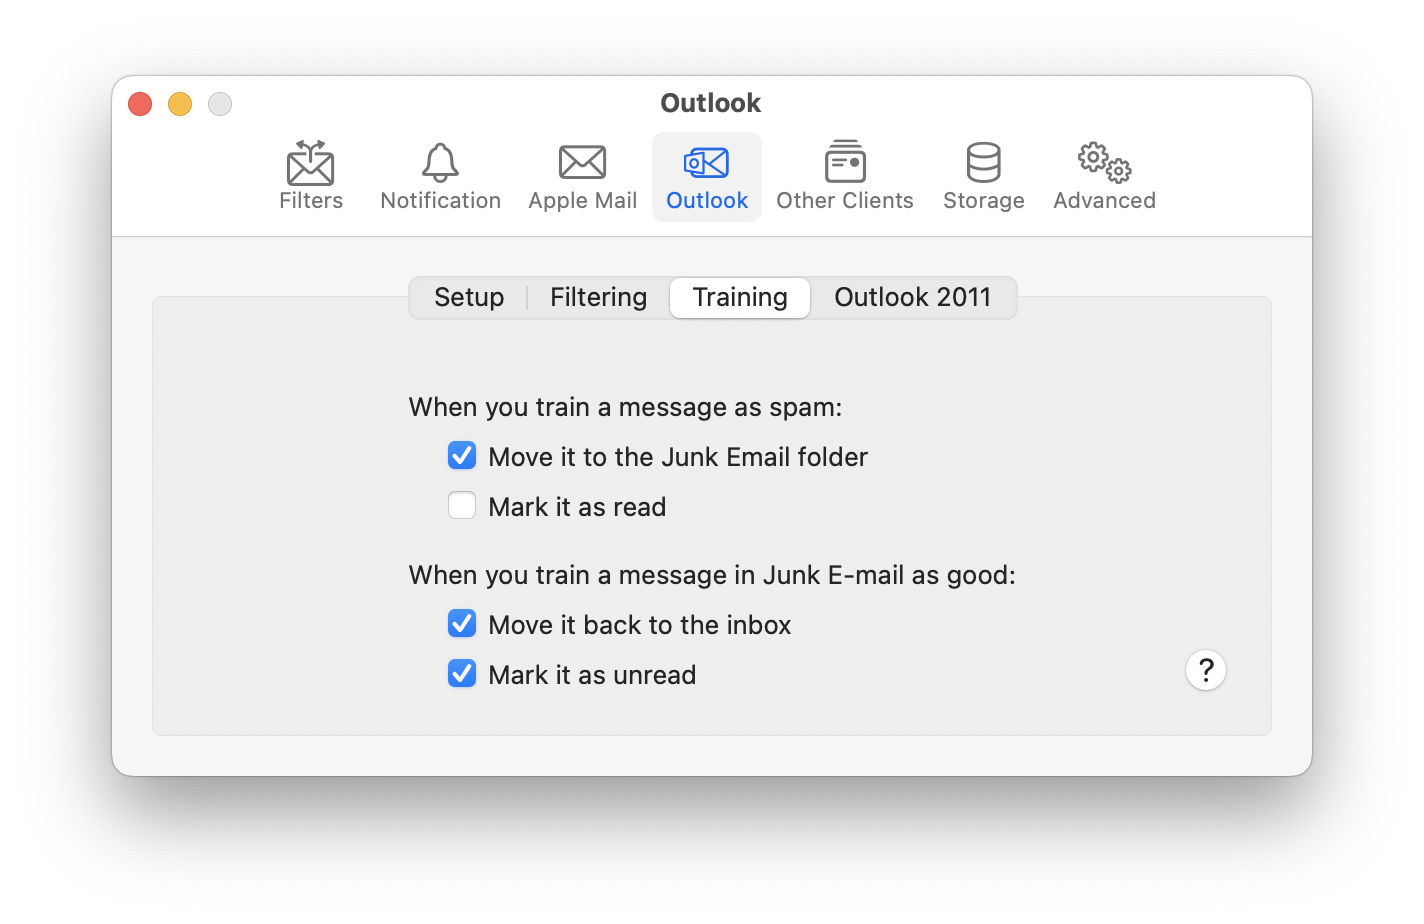
When you train a message as spam:
- Move it to the Junk Email folder
- This lets you control whether SpamSieve leaves it in its current location or moves to the Junk Email folder.
- Mark it as read
- SpamSieve will mark the message as read so that you aren’t distracted by the unread count in Outlook’s sidebar.
When you train a message in Junk Email as good:
- Move it back to the inbox
- If the messages is in the Junk Email folder, SpamSieve will move it back to the inbox.
- Mark it as read
- SpamSieve will mark the message as unread, so that it’s now treated as a new message.
If you don’t see the training commands in SpamSieve’s menu bar icon, please see the Show menu bar icon section.
6.4.4 Settings ‣ Outlook ‣ Outlook 2011
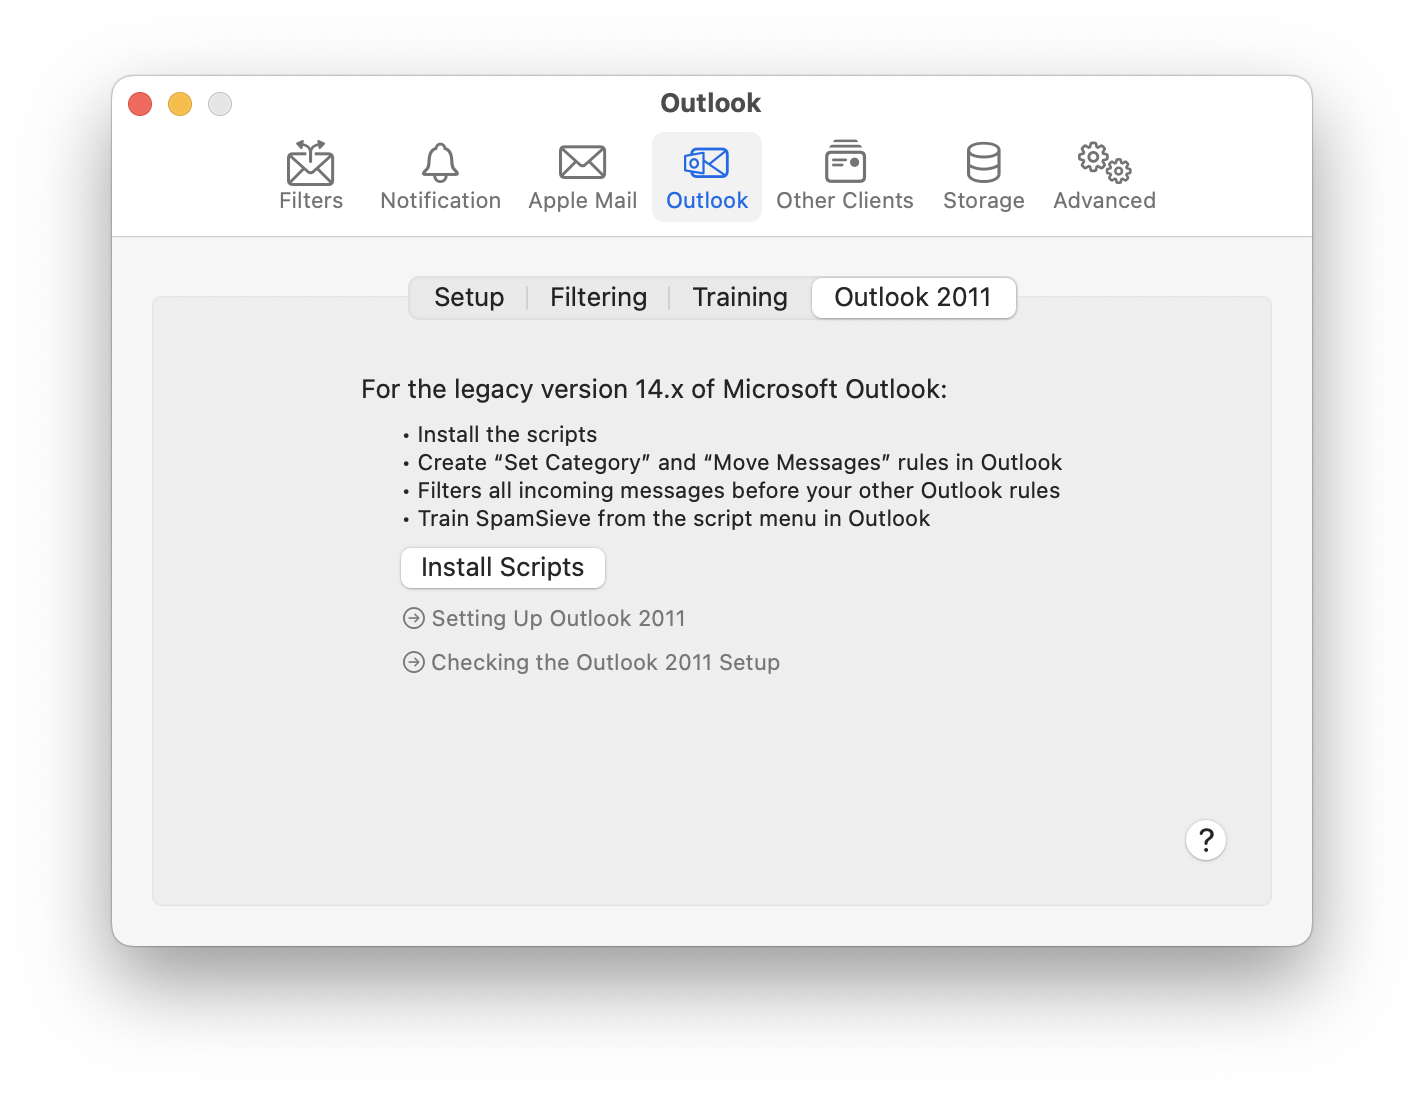
To use SpamSieve with the legacy version 14.x of Microsoft Outlook, please see the Setting Up Outlook 2011 section. The summary of this setup option is:
- Install the scripts by clicking the Install Scripts button
- Create Set Category and Move Messages rules in Outlook
- Filters all incoming messages before your other Outlook rules
- Train SpamSieve from the script menu in Outlook
6.5 Settings ‣ Other Clients
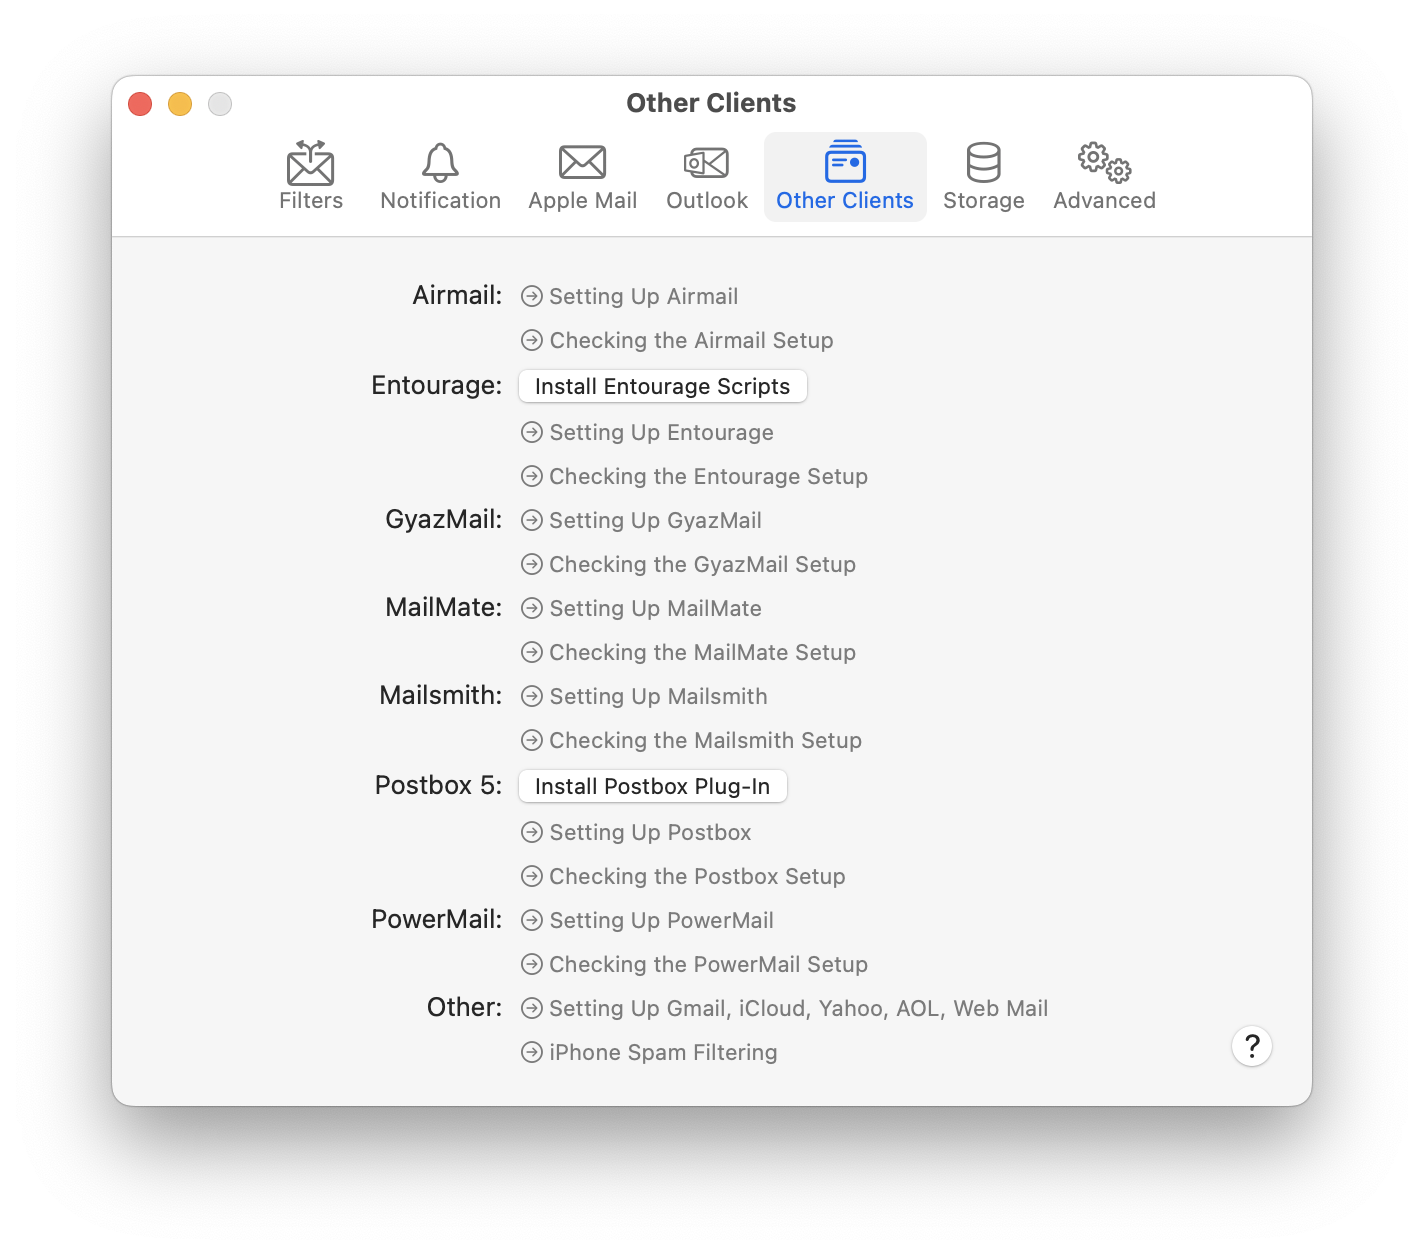
Airmail
See the Setting Up Airmail section.
Entourage
See the Setting Up Entourage section. The Install Entourage Scripts button installs (or updates) the AppleScript files that SpamSieve uses to integrate with Entourage. Occasionally, the script files can become damaged, causing Entourage to ask you to locate the SpamSieve application each time you receive mail or try to train SpamSieve. Using this command to install fresh copies of the scripts should fix that problem. This command also makes sure that you have an Entourage category called Uncertain Junk.
GyazMail
See the Setting Up GyazMail section.
MailMate
See the Setting Up MailMate section.
MailMaven
See the Setting Up MailMaven section.
Mailsmith
See the Setting Up Mailsmith section.
Postbox 5
See the Setting Up Postbox section.
PowerMail
See the Setting Up PowerMail section.
Other
See the Setting Up Gmail, iCloud, Yahoo, AOL, or Other Web Mail and iPhone Spam Filtering sections.
6.6 Settings ‣ Storage
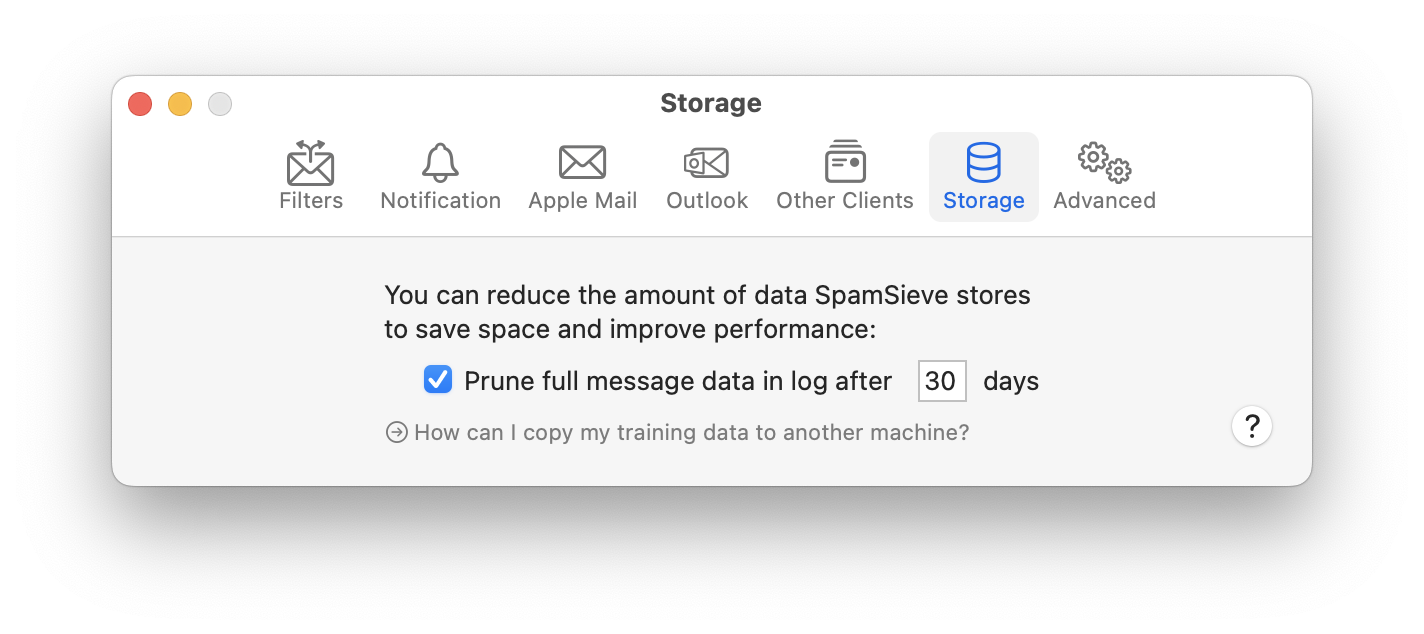
The settings let you reduce the amount of data SpamSieve stores to save space and improve performance.
See also the How can I copy my training data to another machine? section.
6.6.1 Prune full message data in log
SpamSieve stores a copy of the full message data for each message that’s predicted or trained. This makes it possible for you to view the messages in SpamSieve and to train them again if you need to correct a mistake. Normally, it’s better to train from within your mail client, but sometimes you can’t find a message in the mail client or it’s already been deleted:
- SpamSieve might have classified the message as spam and moved it to Junk, and you erased the Junk mailbox.
- A small percentage of users are running into bugs in Apple Mail on macOS 10.15 that can cause messages to be deleted or turn blank when they’re moved. The bugs can manifest with or without SpamSieve installed. They can apply to messages that you drag and drop, as well as those that are moved by rules or by AppleScript.
- Even if your Mac and its mail program are functioning normally, another computer or device that accesses the same mail account could inappropriately move or delete some of the messages. (Moving messages to a local mailbox deletes it from the server.) These changes would then be synced back to your Mac.
Because SpamSieve backs up the full message data, you’ll never lose a good message. However, storing the full data for all these messages in the safety net can use a lot of storage. You can select the Prune full message data in log checkbox to make SpamSieve automatically remove the data after 30 days (or another interval that you choose), when you’re sure that you’ll no longer need it. SpamSieve does not prune the data for messages that you’ve flagged. This lets you save certain ones for troubleshooting or backup purposes.
For message data imported from SpamSieve 2’s backup feature or False Negatives folder, the clock starts ticking when you update to SpamSieve 3. That way you will have at least 30 days to review any backed up messages even if they were originally received a long time ago.
6.6.2 What can I do if the corpus is damaged?
A damaged corpus database can prevent SpamSieve from launching or cause it to report errors. Corpus database damage can be caused by crashes or disk errors or if you are storing SpamSieve‘s files in the cloud and using them with more than one Mac at the same time (which is not supported). To fix this:
Quit both your mail program and SpamSieve.
If you have a backup from before the damage occurred, you can replace the folder:
/Users/<username>/Library/Application Support/SpamSieve/Corpus.spamsieve-corpus
with a working copy. See the How can I open the Library folder? section for how to find this file.
If you don’t have a backup, you can delete the damaged Corpus.spamsieve-corpus folder, and SpamSieve will start a new one. You will need to re-train SpamSieve as described in the Do an Initial Training section. You can also re-train SpamSieve using messages in the Log window.
6.6.3 What can I do if the log is damaged?
A damaged log database can prevent SpamSieve from launching, cause it to report errors, or make it show incorrect accuracy numbers in the Statistics window. Log database damage can be caused by crashes or disk errors or if you are storing SpamSieve‘s files in the cloud and using them with more than one Mac at the same time (which is not supported). To fix this:
Quit both your mail program and SpamSieve.
If you have a backup from before the damage occurred, you can replace the folder:
/Users/<username>/Library/Application Support/SpamSieve/Log.spamsieve-logd
with a working copy. See the How can I open the Library folder? section for how to find this file.
If you don’t have a backup, you can delete the damaged Log.spamsieve-logd folder, and SpamSieve will start a new one.
6.6.4 What can I do if the rules are damaged?
A damaged rules database can prevent SpamSieve from launching, cause it to report errors, or prevent the Allowlist and Blocklist from working properly. Rules database damage can be caused by crashes or disk errors or if you are storing SpamSieve‘s files in the cloud and using them with more than one Mac at the same time (which is not supported). To fix this:
Quit both your mail program and SpamSieve.
If you have a backup from before the damage occurred, you can replace the folder:
/Users/<username>/Library/Application Support/SpamSieve/Rules.spamsieve-rules
with a working copy. See the How can I open the Library folder? section for how to find this file.
If you don’t have a backup, you can delete the damaged Rules.spamsieve-rules folder, and SpamSieve will start a new one.
6.7 Settings ‣ Advanced
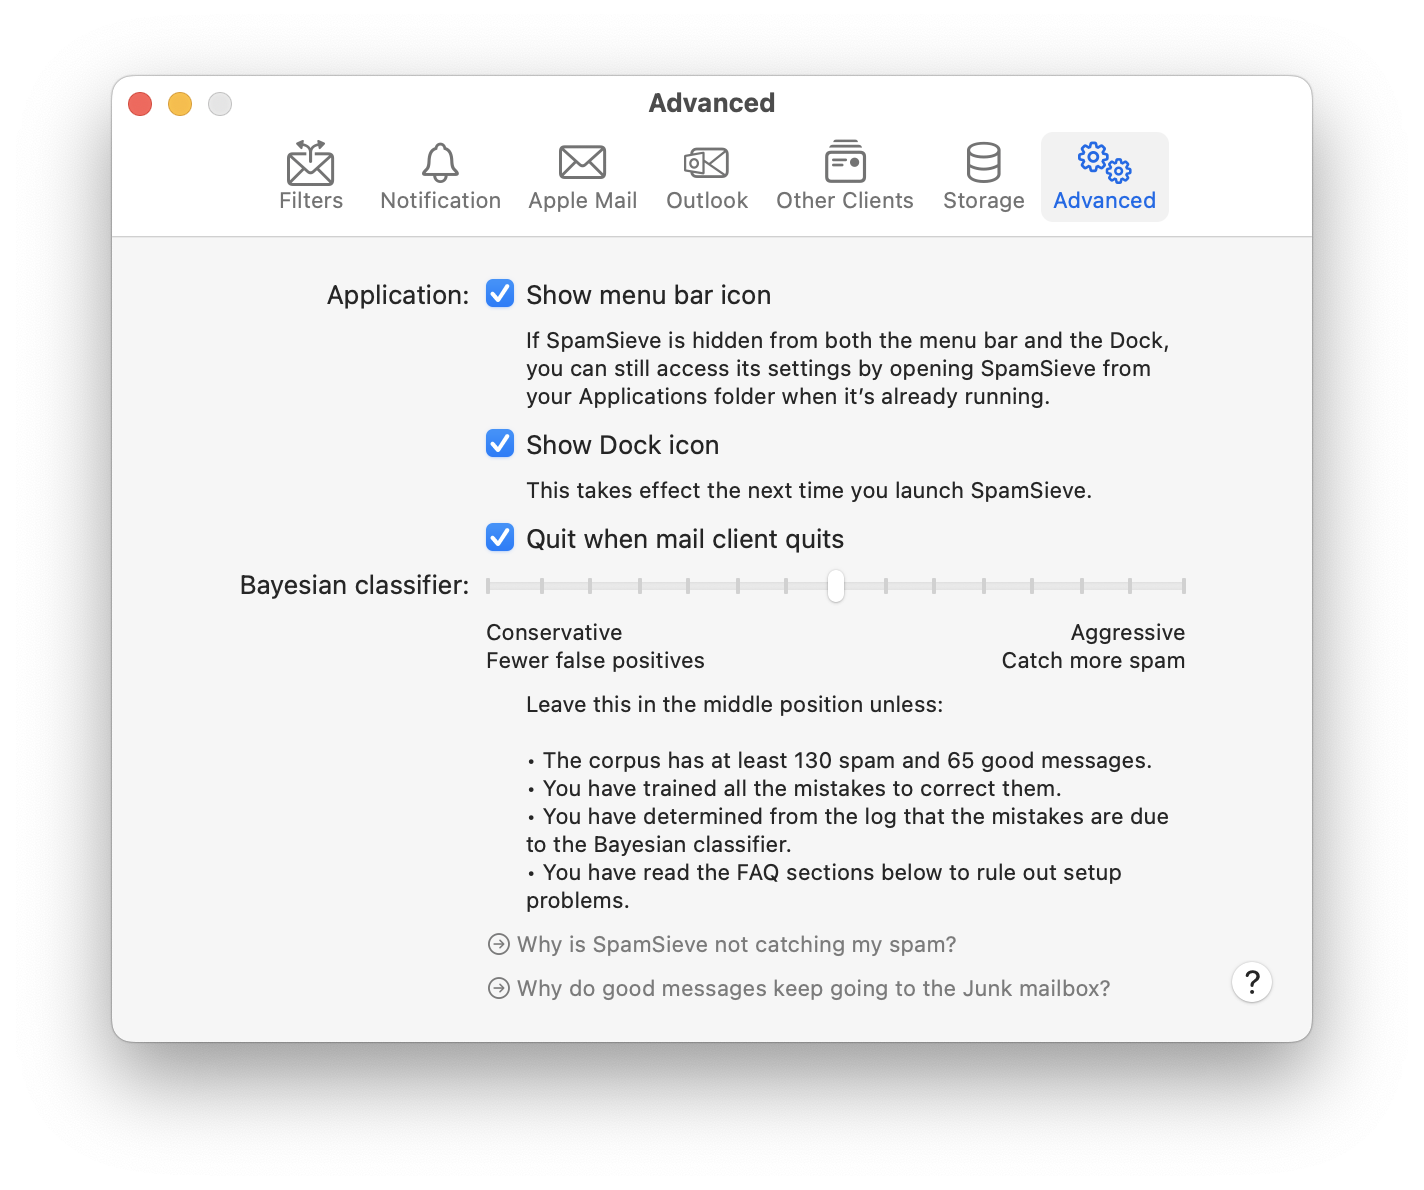
6.7.1 Show menu bar icon
Access SpamSieve Commands From Your Mail Client
You can train SpamSieve from within Apple Mail or Outlook using the SpamSieve menu bar icon at the top of the screen. (If you have the Show menu bar icon option checked but don’t see the icon in the menu bar, please see this section.)
![]()
- The Train as Good/Spam commands operate on the messages that are selected in Apple Mail or Outlook (rather than in SpamSieve’s Corpus or Log window).
- The Filter Messages command lets you manually tell SpamSieve to filter the selected messages in your mail program. For example, you can select a mix of spam and good messages, and Filter Messages will move the spam messages to the Junk mailbox and leave the good ones in place. Filter Messages skips auto-training and notification, so it is suitable to use for bulk processing.
Menu Bar Icon Colors
The SpamSieve menu bar icon changes color while an operation initiated by the menu or a hotkey is in progress (blue when filtering messages, green when training as good, and brown when training as spam).
When the Dock Icon Is Hidden
You can access all of SpamSieve’s menu commands from the menu bar icon if the Dock icon is hidden.
If SpamSieve is hidden from both the menu bar and the Dock, you can still access its settings by opening SpamSieve from your Applications folder when it’s already running.
Menu Not Shown
Due to a macOS bug, clicking the menu bar icon does not show the menu when the Mac has multiple displays, a window on the secondary display is full screen, and you are clicking the menu bar icon on that display. You can work around this by accessing the SpamSieve commands in another way (e.g. via keyboard shortcuts or the menu bar icon on the main display) or by unchecking Show Dock icon in the settings.
6.7.2 Show Dock icon
You can uncheck Show Dock icon to hide SpamSieve’s icon from the Dock. This will also hide it from the Command-Tab application switcher and hide its menus. The menu commands can still be accessed from the SpamSieve menu bar icon. If SpamSieve is hidden from both the menu bar and the Dock, you can still access its settings by opening SpamSieve from your Applications folder when it’s already running.
You can also control the Dock icon setting by clicking the special links below:
- To hide SpamSieve’s Dock icon, click this link.
- To show SpamSieve’s Dock icon, click this link.
If the SpamSieve Icon Is Still In Your Dock
Please note that hiding the Dock icon takes effect after you quit and relaunch SpamSieve.
macOS 10.14 and later include a section of the Dock for recent applications, and this can include the icons even of applications that have hidden their icons. To hide SpamSieve from this section, first quit SpamSieve. Then you can either:
Click and hold on the SpamSieve Dock icon and choose Options ‣ Remove from Dock from the menu; or
Drag the SpamSieve icon off the Dock; or
If SpamSieve is in the suggested/recent section of the Dock, drag it to the regular part of the Dock and then remove it from there.
Go to System Settings ‣ Desktop & Dock ‣ Dock and uncheck Show suggested and recent applications in Dock to hide that section entirely.
Note: On earlier versions of macOS, this is in System Settings ‣ Dock & Menu Bar ‣ Show recent applications in Dock or System Preferences ‣ Dock ‣ Show recent applications in Dock.
Status in Dock Icon
If System Settings ‣ Notification ‣ SpamSieve ‣ Badge application icon is checked, SpamSieve will show status information in a red badge in the top-right corner of its Dock icon.
If you have the Show number of new good messages in Dock option enabled, the Dock icon will show a red number indicating how many good messages have been received since SpamSieve or the mail program was last activated.
Additionally, SpamSieve will show a status symbol when it’s processing a message:
- A ✓ indicates that it’s training a message as good.
- A × indicates that it’s training a message as spam.
- A ⬇︎ indicates that it’s classifying an incoming message.
6.7.3 Quit when mail client quits
With this checked, SpamSieve will quit itself when you quit an e-mail program, provided that there are no other mail programs running. This prevents SpamSieve’s icon from filling up your Dock when it’s not actually being used (unless you have Show recent applications in Dock checked in the Dock pane of System Settings). Also, it prevents SpamSieve from relaunching Mail or Outlook if it’s in the middle of filtering when that application quit.
6.7.4 Spam-catching strategy
This slider lets you adjust SpamSieve’s bias. The bias controls how aggressive SpamSieve’s Bayesian classifier is at catching spam. When SpamSieve is more aggressive, it is better at catching spam messages that share some characteristics with your good mail. When SpamSieve is more conservative, it will be better at marking borderline messages such as order confirmations and press releases as good. This setting is very powerful, and most users should stick to the middle range. It is also not a substitute for training SpamSieve or making sure that it’s set up properly. Only change the bias if SpamSieve is consistently making errors in the same direction.
6.8 Esoteric Preferences
You can set esoteric SpamSieve preferences by clicking the links on this page. Unlike with regular settings, you must generally quit and re-launch SpamSieve in order for an esoteric preference to take effect.
- AddStandardRules
- Normally, SpamSieve will create its standard set of allowlist and blocklist rules if it detects that they are missing. You can also turn this feature off if you prefer to manage the rules yourself.
- AppleMailAllJunkMessagesUseBlackText
- Apple Mail shows messages that its junk filter (or a server filter) thinks are junk using a low-contrast brown/gold/yellow text color. Click here to have SpamSieve override this and display the messages with the traditional black text color; for the default low-contrast text color click here. This setting is only available when using the SpamSieve Mail plug-in.
- AppleMailMarkGoodRead
- Normally, SpamSieve leaves messages unread when it thinks they’re good, but you can also set it to mark them as read for a less cluttered appearance. (This cannot be done with a Mail rule, since marking the messages as read before SpamSieve sees them would exclude them from filtering.)
- AppleMailPlugInSetFlagged
- Normally, when SpamSieve classifies an incoming message in Apple Mail as spam, it leaves the message unflagged. You can also tell SpamSieve assign a gray flag to spam messages. This can be useful if you want to see which messages in the Junk mailbox were moved there by SpamSieve vs. a server junk filter.
- AppleMailPlugInSetIsJunk
- Normally, when SpamSieve classifies an incoming message as spam, it tells Apple Mail that the message is junk. This makes sure that Mail will not display remote images for that message, thus protecting you from Web bugs. You can also tell SpamSieve not to mark the messages as junk. This will speed up mail filtering (especially on macOS 10.9), as it will reduce the amount of communication with the mail server. This setting is only available when using the SpamSieve Mail plug-in.
- HotKeyTrainAsGood and HotKeyTrainAsSpam
The keyboard shortcuts for Train as Good/Spam from Apple Mail and Outlook are Command-Control-G (for Train as Good) and Command-Control-S (for Train as Spam). These can be customized (to change the letters, not the modifiers) using a Terminal command such as:
defaults write com.c-command.SpamSieve HotKeyTrainAsGood g
defaults write com.c-command.SpamSieve HotKeyTrainAsSpam s
- MailboxesOutlineOrangeMessageCountThreshold
When SpamSieve has not been granted Full Disk Access, in order to avoid slowing down or freezing Mail, the Check inboxes for new messages not sent to Mail extension feature will skip filtering an inbox if it contains more than 5,000 messages. Such mailboxes will be shown as orange in the Select Mailboxes to Filter… sheet. In most cases, you should handle this by moving some older messages to the Archive or to another mailbox that you create such as Inbox2. However, if you really want SpamSieve to try to filter a larger inbox, you can change the limit by entering a Terminal command such as:
defaults write com.c-command.SpamSieve MailboxesOutlineOrangeMessageCountThreshold 5000
- MailboxesOutlineRedMessageCountThreshold
When SpamSieve has not been granted Full Disk Access, in order to avoid slowing down or freezing Mail, the Filter spam messages in other mailboxes feature will skip filtering a mailbox if it contains more than 10,000 messages. Such mailboxes will be shown as red in the Select Mailboxes to Filter… sheet. In most cases, you should handle this by moving some older messages to the Archive or to another mailbox that you create. However, if you really want SpamSieve to try to filter a larger mailbox, you can change the limit by entering a Terminal command such as:
defaults write com.c-command.SpamSieve MailboxesOutlineRedMessageCountThreshold 10000
- MJTUpdaterDeleteDiskImage
- Normally, the Software Update… feature will clean up after itself after downloading a new version. You can also set it to leave the disk image file in your Downloads folder.
- QuitMailWhenMacSleeps
- As described in the Why are messages marked as spam in Apple Mail but not moved? section, an OS bug can sometimes cause Mail not to move spam messages out of the inbox if they were received right after the Mac woke from sleep. You can click here to enable a workaround where SpamSieve quit Mails when the Mac sleeps and relaunches it when the Mac wakes. Or click here to disable the workaround.
7 Frequently Asked Questions (FAQ)
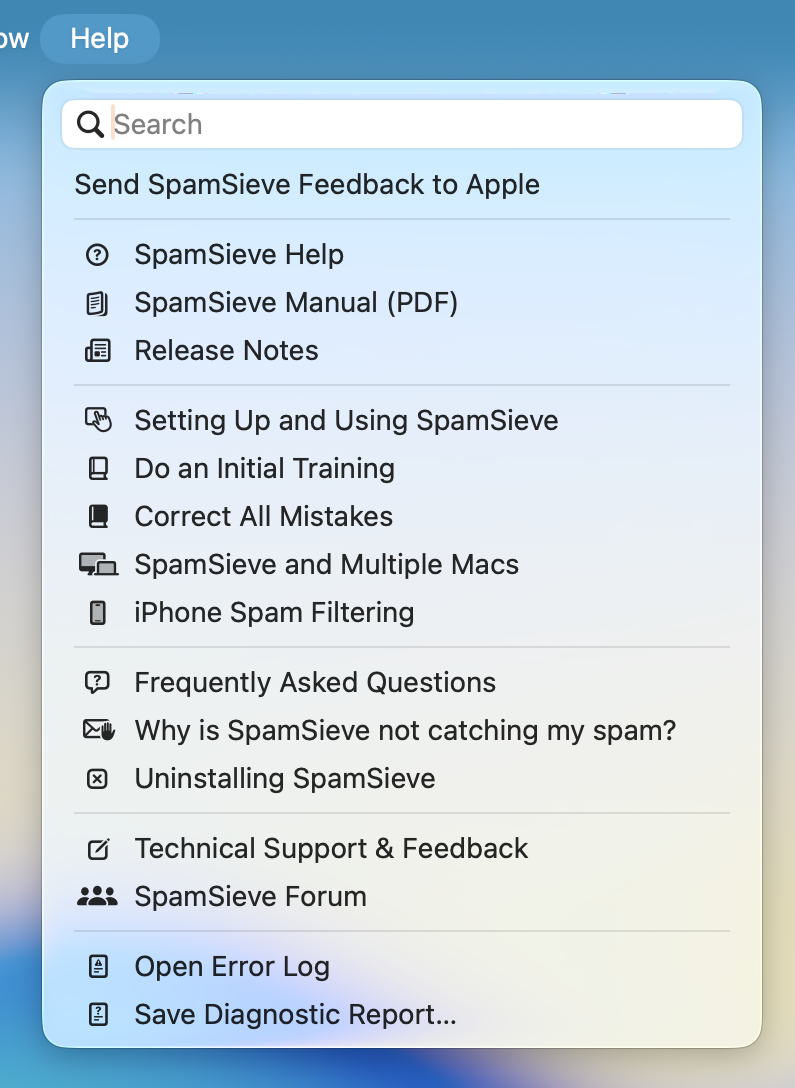
7.1 Why is SpamSieve not catching my spam?
SpamSieve is normally highly accurate at filtering out spam messages, and once properly trained it will usually keep working well. If you notice a sudden drop in the filtering accuracy, this is usually because of a problem in your mail program’s setup, not because a new type of spam message is evading SpamSieve. (Even if the setup initially worked, it can become incorrect over time due to file corruption or iCloud syncing problems.) This section will help you to fix such setup problems yourself. You can also ask for help if you need additional assistance.
- When you receive new messages, the mail program needs to send them to SpamSieve for analysis. To make sure that it’s set up to do this, please follow the instructions in the Checking the Apple Mail Setup or Checking the Outlook Setup section. There are also additional sections listed below for other mail programs.
- When using the Apple Mail extension, the sections Why are Apple Mail inbox messages not being processed? and Why are other Apple Mail mailboxes not being processed? are also relevant. It may be that filtering is working but delayed. You can use the Add green flag to unread good messages option to investigate this.
- The mail program will only apply SpamSieve (and your other rules) to
messages that arrive in the Mac’s inbox and are unread.
- Are you reading the messages on a phone or other computer before your Mac sees them? Mark them as unread again before the Mac downloads them if you want SpamSieve to filter them. Having server rules/filters that mark messages as read before they get to your Mac will also prevent SpamSieve from filtering those messages.
- Do you have rules set up on your mail server that move the messages out of the inbox? For example, if you have multiple iCloud aliases and are using server rules to separate the messages by alias, none of the messages will arrive in the Mac’s inbox. You may want to enable the Filter spam messages in other mailboxes option.
- Is a server junk filter moving the messages to a Junk mailbox? Those messages are not SpamSieve mistakes do not need to be trained as spam.
- SpamSieve keeps a log of all the messages that it examined and why it thought they were good or spam. The Log section describes how the log can tell you whether a spam message was missed because of the mail program’s settings, SpamSieve’s settings, or SpamSieve’s training. For example, if a spam message shows up in the log as Predicted with an orange circle, that means SpamSieve made a mistake; if it has a green circle that means you forgot to train it as spam; if it doesn’t show up as Predicted at all that means there’s a setup problem.
- The mail program may be having trouble communicating with SpamSieve. To check for communication errors, see the Sending in an Error Report section.
- For the best filtering accuracy, SpamSieve needs to be properly trained.
- The Checking the Training section has more information about this.
- Also, make sure that you do not have other rules (besides SpamSieve) in your mail program that move messages to the spam mailbox or trash. Such rules can prevent you from properly training SpamSieve.
- You can contact technical support at spamsieve@c-command.com. Before sending your message, please read the What information should I include when I report a problem? section. Make sure that you’ve included all of the general information, as well as the items requested in the If you have spam messages in your inbox section.
7.1.1 Checking the Apple Mail Setup
This section is about checking the setup of Apple Mail and SpamSieve when using the Mail extension setup. If you are using the Mail plug-in setup, you should instead go to the Checking the Apple Mail Setup (Plug-In) section.
- In Apple Mail:
- Go to Settings ‣ Extensions and make sure that SpamSieve is checked.
- In Settings ‣ Junk Mail ‣ Junk Mail Behaviors, make sure that Enable junk mail filtering is unchecked.
- In Settings ‣ Junk Mail ‣ Blocked, make sure that Enable blocked mail filtering is unchecked.
- In Settings ‣ Accounts ‣ Mailbox Behaviors:
- For each IMAP or Exchange account, check the Junk Mailbox setting and make sure that you select a Junk/Spam/Bulk mailbox that’s on the server, not under On My Mac.
- For each Gmail account, select [Gmail]/Spam for the Junk Mailbox. If you don’t see that choice, you may need to log into Gmail on the Web and set the Spam label to Show in IMAP. You can see what this looks like in the Hiding Special Gmail Mailboxes From IMAP section.
- For each POP account, make sure that a Junk mailbox is visible under the account in the sidebar of Mail’s main window.
- For more information about all of this, see the Setting the Junk Mailbox in Apple Mail section.
- In Settings ‣ Accounts, make sure that each account has a unique name. Duplicate Apple Mail Accounts can prevent messages from being filtered.
- In Settings ‣ Rules, there should be no active rules that have SpamSieve at the beginning of the rule name or that move messages to Spam, Junk, or Trash.
- In System Settings ‣ Privacy & Security:
- Under Automation, make sure that SpamSieve has access to control Mail. This is described more in the Granting Automation Access section.
- Under Full Disk Access, make sure that SpamSieve is listed and that access is enabled. This is described more in the Granting Full Disk Access section.
- In SpamSieve, go to Settings ‣ Apple Mail ‣ Setup:
- Make sure that Enable spam filtering using Mail extension is selected.
- Make sure that Check inboxes for new messages not sent to Mail extension is checked. In the event that a macOS bug prevents the Mail extension from filtering new messages, this will double-check the inboxes to remove any spam.
- If you have new messages arriving in mailboxes other than in the inbox (e.g. because of rules in Apple Mail or on your mail server), go to Settings ‣ Apple Mail ‣ Filtering in SpamSieve and make sure that Filter spam messages in other mailboxes is checked. Click Select Mailboxes to Filter… and make sure that Filter is checked for each mailbox that you want to be filtered.
- To test that messages are able to move properly for manual operations:
- Make sure that you see the SpamSieve menu bar icon at the top of the screen or follow the Where is SpamSieve’s menu bar icon? instructions.
- Drag a spam message to the inbox. Select it and choose Train as Spam from the SpamSieve menu bar icon. Its background color should change to gray. It should move to the Junk mailbox or to whichever location you selected in Settings ‣ Apple Mail ‣ Training.
- Drag the spam message back to the inbox again. This time, select it and choose Filter Messages from the SpamSieve menu bar icon. It should move to the Junk mailbox or to the Trash, depending on how you have the Move it to the Trash if the spam score is at least option configured.
- Finally, we need to check whether automatic operations work:
- When you receive a new spam message, go to Settings ‣ Apple Mail ‣ Filtering. Click the Filter Now button and wait for it to finish to ensure that SpamSieve has processed all the new messages.
- Then go to the Window menu and choose Log to open the Log window. Scroll to the bottom.
- There should be a log entry for the new message:
- Predicted: Spam indicates that the message was processed, and SpamSieve correctly thought it was spam.
- Predicted: Good indicates that SpamSieve made a mistake on this message, but at least it is automatically processing new mail.
- If there is no Predicted log entry, something is not right, and there will probably be an Error log entry explaining what the problem is.
- If it works with Filter Now, it should work automatically, although there may be a slight delay before messages are filtered, depending on how often you’ve set SpamSieve to check for new messages and how much mail you have. You can use the Add green flag to unread good messages option to help see when SpamSieve has finished processing your inbox.
If something is not as described above, check the Log window in SpamSieve to see whether an error was reported. If you don’t understand what the problem is, please go to SpamSieve’s Help menu and choose Save Diagnostic Report. Contact technical support, attaching the report file, and explain what happened when you followed these instructions.
7.1.2 Checking the Apple Mail Setup (Plug-In)
This section is about checking the setup of Apple Mail and SpamSieve when using the Mail plug-in setup. If you are using the Mail extension setup, you should instead go to the Checking the Apple Mail Setup section.
- Go to the Settings ‣ Apple Mail ‣ Setup window in SpamSieve:
- Make sure that Enable spam filtering using Mail plug-in is checked.
- If you do not see the SpamSieve training commands in Mail’s Message menu, click Install Plug-In button in the Settings ‣ Apple Mail ‣ Setup window. There is more information about this in the Why don’t I see the SpamSieve commands in Apple Mail’s Message menu? section.
- Make sure that SpamSieve has Full Disk Access and Automation access to control Mail (if you are using macOS 10.14 or later).
- Go to the Junk pane of Mail’s Settings window and make sure that Enable junk mail filtering is unchecked.
- Go to the Rules pane of Mail’s Settings window and make sure
that you have a rule like the one shown in the Setting Up Apple Mail
(Plug-In) section:
- Make sure there is a check mark next to the SpamSieve rule, indicating that it’s active.
- Make sure that the rule’s name starts with SpamSieve.
- Make sure that the rule’s conditions say Every Message.
- Make sure that the rule does not have any Set Color actions.
- Make sure there are no other rules that move spam messages to another mailbox or the trash. (Exception: in rare cases, you may want to create an “unwanted messages” rule, as described in the Correct All Mistakes section.)
- Drag the SpamSieve rule to the top of the list, if it isn’t there already. (Exceptions: If you’re using the drone setup, the Remote Training rule should be above the SpamSieve rule. If you are using an “unwanted messages”, as in (e), it should be above the SpamSieve rule.)
- Even if the rule looks correct, it can help to delete it and create a new one. (If you do this, be sure to click Don’t Apply when it asks whether you want to re-apply the rules.)
- iCloud syncing can cause problems with Apple Mail. If you are not actually using Mail on multiple Macs, you can turn off its iCloud support to prevent these problems. Open System Settings, click on Apple ID, click on iCloud, click on iCloud Drive, click on Apps syncing to iCloud Drive, then uncheck Mail.app.
- If training a spam message in the inbox as spam does not cause it to change color and move to the spam mailbox, please see Duplicate Apple Mail Accounts section. If you are using macOS 10.14 or later, check that SpamSieve has Automation access.
Testing That the Rule Works
Select a spam message in Mail.
Choose SpamSieve - Train as Spam from the Message menu to tell SpamSieve that it is spam. (If messages don’t move to the spam mailbox when trained, please see the Duplicate Apple Mail Accounts section.)
Drag the message to your inbox and select it again.
Choose Apply Rules from the Message menu.
Note: This will also apply your other Mail rules.
If the message moved to the Junk mailbox after Step 4, the rule worked. SpamSieve will be able to catch other messages like this if it’s properly configured and trained.
If something is not as described above check the Log window in SpamSieve to see whether an error was reported. If you don’t understand what the problem is, please go to SpamSieve’s Help menu and choose Save Diagnostic Report. Contact technical support, attaching the report file, and explain what happened when you followed these instructions.
7.1.2.1 If the Apple Mail Plug-In Doesn’t Appear in the List or Doesn’t Stay Enabled
In rare cases, you may not be able to enable the SpamSieve plug-in in Mail because the plug-in is not listed in the Manage Plug-ins… sheet. Or you may click the checkbox to enable it, but it will not stay enabled when you restart Mail.
First, try to uninstall and reinstall the plug-in. Choose Uninstall Plug-In… in Settings ‣ Apple Mail ‣ Setup, restart Mail, and then choose Install Plug-In in Settings ‣ Apple Mail ‣ Setup. Mail maintains its own separate copy of installed plug-ins, and restarting after uninstalling can get it to clear out its damaged copy, whereas simply installing a fresh copy of the plug-in will not. You may want to temporarily uncheck your SpamSieve rules in Mail’s settings before doing this, so that the uninstaller doesn’t offer to delete them, and so that Mail doesn’t move any messages to the Junk mailbox while the plug-in is uninstalled.
If that doesn’t help, make sure that you have not redirected Mail’s plug-ins folder to be stored in a different location. If you haven’t tried to move Mail’s files or your home folder, you can skip this step. The folder:
/Users/<username>/Library/Mail/Bundles
must be stored on the same volume as your home folder (and, ideally, on the boot volume) or Mail will not trust its contents. So you should not try to redirect the whole Mail folder to another location, e.g. using a symlink. If you really want your mail to be stored on a different volume, you can move just the V10 or V9 folder and replace it with a symlink, or use the Users & Groups settings pane to move your entire home folder to a different volume.
If you still can’t enable the plug-in, or if Mail reports “Incompatible Plug-ins Disabled,” the problem may be that Mail’s private plug-ins folder is damaged and needs to be reset. Please see the instructions in Resetting Mail’s Private Plug-Ins Folder.
7.1.2.2 Resetting Mail’s Private Plug-Ins Folder
Sometimes, after you try to enable the SpamSieve plug-in, Mail will report “Incompatible Plug-ins Disabled” (even though the version that you installed is compatible) or the installed plug-in will not appear or not stay checked in the Manage Plug-ins… sheet. Such problems generally mean that something is wrong with Mail’s private plug-ins folder, the place where it stores an extra copy of plug-ins that you have installed and enabled in Manage Plug-ins…. For example, this folder often gets messed up when migrating to a new Mac or restoring from backup.
Since the private plug-ins folder only stores duplicate copies of plug-ins that are also in the public folder (/Users/<username>/Library/Mail/Bundles/), you can safely delete the private folder without losing any data, and Mail will then let you enable the plug-in. Please follow the instructions below for the version of macOS that you’re using:
macOS 11 and Later
To delete Mail’s private plug-ins folder:
/Users/<username>/Library/Application Support/Mail/Plug-ins/
Quit Mail.
Open your user Library folder as described in How can I open the Library folder?.
Open the Application Support folder, then the Mail folder.
Drag the Plug-ins folder to the trash. If macOS won’t let you delete the folder, e.g. because it says you don’t have permission, try renaming it to Plug-ins Disabled instead.
If you were able to delete or rename the folder, launch Mail and click on Manage Plug-ins… in Settings ‣ General to enable the SpamSieve plug-in. You can skip the rest of the steps below.
Otherwise, you will need to temporarily turn off System Integrity Protection (as instructed below) so that Mail will let you delete the folder. This may also be necessary before you can empty the trash.
You may want to print these instructions, write them down, or open them on another computer or device so that you have access to them while rebooting your Mac.
Restart your Mac in Recovery Mode. The steps for doing this depend on which type of processor your Mac has:
- On an Intel-based Mac, click on the Apple menu and choose Restart…. Hold down the Command and R keys so that your Mac will reboot in Recovery Mode.
- On an Apple Silicon–based Mac, click on the Apple menu and choose Shut Down…. Press and hold the power button on your Mac until you see “Loading startup options.” Click Options, then click Continue, then click Continue again.
From the Utilities menu at the top of the screen, choose Terminal.
Type csrutil disable and press Return. (This is what turns off SIP.) If it asks Allow booting unsigned operating systems and any kernel extensions for OS, enter n.
Click on the Apple menu and choose Restart.
You can now repeat Steps 2–4 to delete the Plug-ins folder.
Launch Mail and click on Manage Plug-ins… to enable the SpamSieve plug-in.
Repeat Steps 7–10, typing csrutil enable instead, in order to turn SIP back on.
macOS 10.14 and macOS 10.15
Ask Mail to Reset the DataVaults
In most cases, asking Mail to reset the DataVaults folder will work. To do this:
Quit Mail.
Open the Terminal app in the Utilities folder.
Enter this command:
defaults delete com.apple.mail EnableBundles
and press Return.
Launch Mail and then quit it.
Enter this command in Terminal:
defaults write com.apple.mail EnableBundles -bool YES
and press Return.
Delete the DataVaults Folder
If asking Mail to reset the folder doesn’t work, you can delete the DataVaults folder without losing any important data, and then Mail will recreate it when you try to enable the SpamSieve plug-in, hopefully fixing the problem:
You may want to print these instructions, write them down, or open them on another computer or device so that you have access to them while rebooting your Mac.
Click on the Apple menu and choose Restart…. Hold down the Command and R keys so that your Mac will reboot in Recovery Mode. This will enable you to temporarily turn off System Integrity Protection (as instructed below) so that you have access to delete the protected DataVaults folder.
From the Utilities menu at the top of the screen, choose Terminal.
Type csrutil disable and press Return. (This is what turns off SIP.) If it asks Allow booting unsigned operating systems and any kernel extensions for OS, enter n.
Click on the Apple menu and choose Restart.
The folder:
/Users/<username>/Library/Containers/com.apple.mail/Data/DataVaults/
needs to be dragged to the trash. (See How can I open the Library folder? if you have trouble finding it.)
Launch Mail and click on Manage Plug-ins… to enable the SpamSieve plug-in.
You can then repeat Steps 2–5, typing csrutil enable instead, in order to turn SIP back on.
7.1.2.3 If SpamSieve Tells You the Apple Mail Plug-In Isn’t Loading, But It Is
If you see the SpamSieve commands in Mail’s Message menu, that means its plug-in has loaded. In rare cases, SpamSieve may think that the plug-in has not loaded, and ask you to enable it, even though it was actually working properly. For example, this can happen if SpamSieve lacks access to communicate with the plug-in or if Mail takes a very long time to launch.
First, make sure that SpamSieve has Full Disk Access.
If that doesn’t fix the problem, please:
- Click this link to enable some additional debug logging.
- If Mail takes a long time to launch, please use Activity Monitor to record a few samples of it while it’s launching. There are also some tips for how to speed up Mail if it is launching slowly.
- The next time SpamSieve incorrectly reports that the plug-in has not loaded, please save a diagnostic report and send it in (along with the sample logs) so that we can investigate what is going wrong on your Mac.
7.1.3 Checking the Airmail Setup
The Setting Up Airmail section describes how to set up Airmail to filter your mail using SpamSieve.
- The SpamSieve application must be stored directly in your Applications folder, as shown in the Installing SpamSieve section.
- In Airmail’s Settings ‣ Accounts ‣ Mapping, each account must have a Spam folder configured.
- Make sure that Airmail has Automation access to control SpamSieve (if you are using macOS 10.14 or later).
To test that the setup works:
- When you receive a new message, note its subject.
- Click on SpamSieve’s icon in the Dock.
- Choose Log from the Window menu.
The setup is correct if there’s a log entry (near the bottom) that says Predicted: Good or Predicted: Spam and shows the subject for the new message.
If you don’t see the expected log entries for new messages:
- Uncheck Use SpamSieve in Airmail’s settings.
- Quit Airmail, and then launch Airmail.
- Check Use SpamSieve in Airmail’s settings.
- Repeat the steps above to test whether the setup works.
If you don’t see the expected log entries for new messages, please contact technical support and explain what happened when you followed these instructions.
Reinstalling Airmail
Sometimes it may help to uninstall Airmail, remove its files from your Library folder, reinstall Airmail, and add all your accounts back.
Messages Classified as Spam But Not Moved to Spam Mailbox
If you see spam messages in your inbox, it might be because SpamSieve thought they were good, but it might also be that SpamSieve thought they were spam but Airmail was unable to move them to the Spam mailbox. To see whether this is the case:
- Choose Log from the Window menu. If the log entries for the messages in question say Predicted: Spam, that means that SpamSieve did correctly classify them as spam.
- From Airmail’s Window menu, choose Operations. This will show a log of Airmail’s actions, which may provide clues about messages that Airmail tried to move out of the inbox.
7.1.4 Checking the Entourage Setup
- Choose Install Entourage Scripts from the SpamSieve menu.
- Choose Junk E-mail protection… from Entourage’s Tools menu and make sure it’s set to None.
- Choose Mailing List Manager from Entourage’s Tools menu. If there are any rules, for each rule click on the Advanced tab and make sure that Do not apply rules to list messages is unchecked. (If you continue to experience problems, try unchecking each rule itself, to disable it.)
- Choose Rules… from Entourage’s Tools menu and make sure that
you’ve created two SpamSieve rules, as shown in the Setting Up
Entourage section:
- Make sure that the rules are of the proper type. That is, if you have a POP mail account, you need two POP rules; if you have an IMAP account, you need two IMAP rules.
- Make sure that the SpamSieve - Move Messages rule says “if any criteria” rather than “if all criteria.”
- Make sure that the SpamSieve rules are at the top of the list.
- Make sure that the SpamSieve - Move If Spam rule is above the SpamSieve - Move Messages rule.
- Make sure both SpamSieve rules have check marks next to their names, indicating that they are enabled.
- Make sure there are no other rules that move messages to the Junk E-mail folder.
To test that the rules work:
- Select a spam message in Entourage.
- Choose SpamSieve - Train Spam from the Scripts menu to tell SpamSieve that it is spam.
- Change the category of the message to None (using Edit ‣ Categories ‣ None).
- Choose Apply Rule ‣ SpamSieve - Move If Spam from the Message menu.
If the message’s category was changed to Junk after Step 4, the rule worked. SpamSieve will be able to catch other messages like this if it’s properly configured and trained.
If the message’s category did not change to Junk, there is some other problem with Entourage or SpamSieve. Please contact technical support and explain what happened when you followed these instructions.
7.1.5 Checking the GyazMail Setup
- Make sure that you have followed the instructions in the Setting Up GyazMail section.
- Make sure that the SpamSieve rule is at the top of the list.
- If you are using macOS 10.14 or later, make sure that GyazMail has Automation access to control SpamSieve.
To test that the rules work:
- Select a spam message in GyazMail.
- From the Message menu, choose Junk ‣ Mark as Junk.
- Drag the message back to your inbox and select it there.
- From the Message menu, choose Apply Rule ‣ All Rules.
If the message moves back to your spam mailbox, the rule worked. SpamSieve will be able to catch other messages like this if it’s properly configured and trained.
Otherwise, there is some other problem with GyazMail or SpamSieve. Please contact technical support and explain what happened when you followed these instructions.
7.1.6 Checking the MailMate Setup
- Make sure that you have followed the instructions in the Setting Up MailMate section. It may help to toggle the Enable for messages in setting to a random mailbox and then back to Inbox.
- If you are using macOS 10.14 or later, make sure that MailMate has Automation access to control SpamSieve.
- If you are using an Apple Silicon Mac, make sure that you are using version r5782 of MailMate or later to work around a suspected bug in Rosetta.
- Make sure that you have no other MailMate rules for catching spam messages and moving them to Junk or Trash.
To test that the setup works:
- When you receive a new message, note its subject.
- Click on SpamSieve’s icon in the Dock.
- Choose Log from the Window menu.
The setup is correct if there’s a log entry (near the bottom) that says Predicted: Good or Predicted: Spam and shows the subject for the new message.
If you don’t see the expected log entries for new messages, please contact technical support and explain what happened when you followed these instructions.
MailMate Debug Logging
It may also help to enable MailMate debug logging by entering this command in Terminal:
defaults write com.freron.MailMate DebugSpamDetection -bool YES
Then launch MailMate from a Terminal window like this:
/Applications/MailMate.app/Contents/MacOS/MailMate
Now, you can review whether or not MailMate detected an incoming message and how it acted on it.
Resetting MailMate Messages
If you think the issue is related to a specific message, you can “emulate” the message arriving in your Inbox using Message ‣ Reset…. This makes MailMate forget it saw the message, and it will then re-discover it when synchronizing (which should happen automatically). This should include triggering the SpamSieve integration.
Some messages will have the IMAP keyword $NotJunk set. This should only happen if the user explicitly moved or marked a message as not being junk. Resetting such a message will not work since it’s ignored by MailMate.
You can view the IMAP keywords of a message by enabling the Raw Flags column in the message list.
7.1.7 Checking the MailMaven Setup
The Setting Up MailMaven section describes how to set up MailMaven to filter your mail using SpamSieve.
- Make sure that the SpamSieve application is stored directly in your Applications folder, as shown in the Installing SpamSieve section.
- Make sure that Evaluate arriving messages using SpamSieve is selected in MailMaven’s settings.
- In MailMaven’s Settings ‣ Accounts ‣ Mail Accounts, make sure that each account as the right Junk mailbox selected.
- Make sure that MailMaven has Automation access to control SpamSieve.
To test that the setup works:
- When you receive a new message, note its subject.
- Click on SpamSieve’s icon in the Dock.
- Choose Log from the Window menu.
The setup is correct if there’s a log entry (near the bottom) that says Predicted: Good or Predicted: Spam and shows the subject for the new message.
If you don’t see the expected log entries for new messages, please contact SpamSieve technical support and/or SmallCubed and explain what happened when you followed these instructions.
7.1.8 Checking the Mailsmith Setup
The Setting Up Mailsmith section describes how to set up Mailsmith to filter your mail using SpamSieve.
- Make sure that you are using version 2.3.1 or later of Mailsmith.
- Make sure that Use SpamSieve is checked in the preferences. If that
option is disabled:
- Make sure you have only one copy each of Mailsmith and SpamSieve installed. If there are any old versions in the trash, empty the trash.
- Launch SpamSieve directly from the Finder, by double-clicking its icon. (Do not use the Dock icon or an application launcher.)
- Launch Mailsmith (again, by double-clicking its icon).
- Open Mailsmith’s Preferences window, and verify that the Use SpamSieve option is enabled.
- If you are using the Leave it in “(incoming mail)” option, make sure that a deposit or transfer filter isn’t acting on the spam messages before your spam filter can.
- To test the connection between Mailsmith and SpamSieve, select a message and choose Recalculate Spam Score from Mailsmith’s Message menu. Then choose Log from the Window menu and verify that a “Predicted” entry for that message was added to the log.
7.1.9 Checking the Outlook 2011 Setup
- Make sure that Outlook has Automation access to control SpamSieve (if you are using macOS 10.14 or later).
- Click Install Scripts in Settings ‣ Outlook ‣ Outlook 2011.
- Choose Junk E-mail protection… from Outlook’s Tools menu and make sure it’s set to None.
- Choose Mailing List Manager… from Outlook’s Tools menu. If there are any rules, for each rule click on the Advanced tab and make sure that Do not apply rules to list messages is unchecked. (If you continue to experience problems, try unchecking each rule itself, to disable it.)
- Choose Rules… from Outlook’s Tools menu and make sure that
you’ve created two SpamSieve rules, as shown in the Setting Up
Outlook 2011 section:
- Make sure that the rules are of the proper type. That is, if you have a POP mail account, you need two POP rules; if you have an IMAP account, you need two IMAP rules.
- Make sure that the SpamSieve - Move Messages rule says “If any conditions” rather than “If all conditions.”
- Make sure that the SpamSieve rules are at the top of the list.
- Make sure that the SpamSieve - Set Category rule is above the SpamSieve - Move Messages rule.
- Make sure both SpamSieve rules have check marks next to their names, indicating that they are enabled.
- Make sure there are no other rules that move messages to the Junk E-mail folder.
- Choose Accounts… from Outlook’s Tools menu. If you have any IMAP accounts, click the Advanced… button, then click the Folders tab, and make sure that it’s set to Move deleted message to this folder. Otherwise, the caught spams may still appear on your iPhone.
- Choose Settings… from the Outlook menu and click on Reading. Make sure that Hide IMAP messages marked for deletion is checked. This will ensure that you do not see spam messages that were caught on another computer.
To test that the rules work:
- Select a spam message in Outlook.
- Choose SpamSieve - Train as Spam from the Scripts menu to tell SpamSieve that it is spam.
- Remove the categories of the message (using Message ‣ Categorize ‣ Clear All).
- Drag the message back to your inbox and select it there.
- Choose Rules ‣ Apply ‣ SpamSieve - Set Category from the Message menu.
If the message’s category was changed to Junk after Step 5, the rule worked. SpamSieve will be able to catch other messages like this if it’s properly configured and trained.
If the message’s category did not change to Junk, there is some other problem with Outlook or SpamSieve. Please contact technical support and explain what happened when you followed these instructions.
7.1.10 Checking the Outlook Setup
This section is about checking the setup of Microsoft Office 365 (also known as Outlook 2016 and Outlook 2019, versions 15.x and 16.x) and SpamSieve when using the Inbox setup. If you are using the InboxSpamSieve setup, you should instead go to the Checking the Outlook Setup (Large Inboxes) section. For older versions of Outlook, please see the Checking the Outlook 2011 Setup section.
- In Outlook, go to the Outlook menu and make sure that Legacy Outlook is checked or that New Outlook is unchecked. (Some versions of Outlook don’t have these settings, which is OK.)
- In System Settings ‣ Privacy & Security ‣ Automation, make sure that SpamSieve has access to control Outlook. This is described more in the Granting Automation Access section. (This step only applies if you are using macOS 10.14 or later.)
- In SpamSieve, go to Settings ‣ Outlook ‣ Setup. Make sure that Enable spam filtering for Inbox is selected. (If Outlook is hanging or acting unresponsive, reduce the number of messages stored in your inbox or switch to Enable spam filtering for InboxSpamSieve, as described in the Setting Up Outlook (Large Inboxes) section.)
- To test that messages are able to move properly for manual operations:
- Make sure that you see the SpamSieve menu bar icon at the top of the screen or follow the Where is SpamSieve’s menu bar icon? instructions.
- Drag a spam message to the inbox. Select it and choose Train as Spam from the SpamSieve menu bar icon. Its category and color should change to Junk. It should move to the Junk Email folder.
- Drag the spam message back to the inbox again. This time, select it and choose Filter Messages from the SpamSieve menu bar icon. It should move to the Junk Email folder.
- Finally, we need to check whether automatic operations work:
- Drag the spam message from the previous step to the inbox and mark it as unread.
- Go to Settings ‣ Outlook ‣ Filtering and click the Filter Now button. The message should move to the Junk Email folder.
- If it works with Filter Now, it should work automatically, although there may be a slight delay before messages are filtered, depending on how often you’ve set SpamSieve to check for new messages and how much mail you have.
If something is not as described above check the Log window in SpamSieve to see whether an error was reported. If you don’t understand what the problem is, please go to SpamSieve’s Help menu and choose Save Diagnostic Report. Contact technical support, attaching the report file, and explain what happened when you followed these instructions.
7.1.11 Checking the Outlook Setup (Large Inboxes)
This section is about checking the setup of Microsoft Office 365 (also known as Outlook 2016 and Outlook 2019, versions 15.x and 16.x) and SpamSieve when using the InboxSpamSieve setup. If you are using the Inbox setup, you should instead go to the Checking the Outlook Setup section. For older versions of Outlook, please see the Checking the Outlook 2011 Setup section.
- In Outlook:
- Go to the Outlook menu and make sure that Legacy Outlook is checked or that New Outlook is unchecked. (Some versions of Outlook don’t have these settings, which is OK.)
- Make sure that each account has an InboxSpamSieve folder. You need to be able to move messages into this folder. With some mail hosts, this is only possible if the InboxSpamSieve folder is created inside the Inbox or if the IMAP Root Folder in Outlook’s settings is set to the Inbox. Otherwise, Outlook may report the error “Client tried to access nonexistent namespace. (Mailbox name should probably be prefixed with: INBOX.).”
- In the Tools ‣ Rules window, make sure that each account has a rule for moving new messages to the InboxSpamSieve folder, as described in the section Outlook IMAP/Exchange Account Rules, Outlook Gmail Account Rules, or Outlook POP Account Rules (depending on the type of the account).
- In System Settings ‣ Privacy & Security ‣ Automation, make sure that SpamSieve has access to control Outlook. This is described more in the Granting Automation Access section. (This step only applies if you are using macOS 10.14 or later.)
- In SpamSieve, go to Settings ‣ Outlook ‣ Setup. Make sure that Enable spam filtering for InboxSpamSieve is selected.
- To test that messages are able to move properly for manual operations:
- Make sure that you see the SpamSieve menu bar icon at the top of the screen or follow the Where is SpamSieve’s menu bar icon? instructions.
- Drag a spam message to the inbox. Select it and choose Train as Spam from the SpamSieve menu bar icon. Its category and color should change to Junk. It should move to the Junk Email folder.
- Drag the spam message back to the inbox again. This time, select it and choose Filter Messages from the SpamSieve menu bar icon. It should move to the Junk Email folder.
- Finally, we need to check whether automatic operations work:
- When new messages are sent to you, they should temporarily move to the InboxSpamSieve folder. They will stay there longer depending on the time interval set in Settings ‣ Outlook ‣ Filtering.
- Good messages in the InboxSpamSieve folder should move to the inbox, and spam messages there should move to the Junk Email folder. After filtering is complete, the InboxSpamSieve folder should be empty (unless new messages have arrived in the interim).
- You can test this by dragging a spam message to the InboxSpamSieve folder. Then go to Settings ‣ Outlook ‣ Filtering and click Filter Now.
- If it works with Filter Now, it should work automatically, although there may be a slight delay before messages are filtered, depending on how often you’ve set SpamSieve to check for new messages and how much mail you have.
If something is not as described above check the Log window in SpamSieve to see whether an error was reported. If you don’t understand what the problem is, please go to SpamSieve’s Help menu and choose Save Diagnostic Report. Contact technical support, attaching the report file, and explain what happened when you followed these instructions.
7.1.12 Checking the Postbox Setup
The Setting Up Postbox section describes how to set up Postbox to filter your mail using SpamSieve. Versions 2.x through 5.x of Postbox are supported.
- Go to Postbox’s Tools menu and choose Add-ons. The Installed Add-Ons section of the window should show SpamSieve Postbox Plug-in.
- Make sure that Do not mark mail as junk if the sender is in… is not checked.
- Make sure that Trust junk mail headers set by… is not checked.
To test that the setup works:
- When you receive a new message, note its subject.
- Click on SpamSieve’s icon in the Dock.
- Choose Log from the Window menu.
The setup is correct if there’s a log entry (near the bottom) that says Predicted: Good or Predicted: Spam and shows the subject for the new message.
If you don’t see the expected log entries for new messages, please contact technical support and explain what happened when you followed these instructions.
7.1.13 Checking the PowerMail Setup
Quit PowerMail, delete the folder:
/Users/<username>/Library/Application Support/PowerMail
and then re-launch PowerMail. (See the How can I open the Library folder? section.) If the script files that PowerMail uses to communicate with SpamSieve are damaged, this will fix them.
Make sure that you’ve followed the instructions in the Setting Up PowerMail section.
- Make sure that the conditions for the Spam: evaluate filter are not excluding the messages that you want SpamSieve to filter. For example, try editing the filter so that it has just a single condition that says Always.
- Make sure that the Spam: evaluate filter is at the top of the list.
- Make sure that the Spam: actions filter is directly below the Spam: evaluate filter.
To test that the setup works:
- Select a spam message in PowerMail.
- Choose Mark as Spam from the Mail menu to tell SpamSieve that it is spam.
- Choose Perform Filter ‣ Spam: evaluate from the Mail menu.
- Click on SpamSieve’s icon in the Dock. Then choose Log from the Window menu.
The setup is correct if the last entry in the log says Predicted: Spam and shows the subject for the message that you had selected. SpamSieve will be able to catch other messages like this if it’s properly configured and trained.
Otherwise, there is some other problem with PowerMail or SpamSieve. Please contact technical support and explain what happened when you followed these instructions.
7.1.14 Checking the Training
SpamSieve is nearly 100% accurate, but only when properly trained. Here’s how you can check the training:
The most common problem is not training all the mistakes, so that SpamSieve thinks some good messagse are spam and/or some spam messages are good. The Correct All Mistakes section describes how to properly train the mistakes. The Fixing Uncorrected Mistakes section describes how you can confirm that you have been doing this and fix the training if necessary.
Choose Statistics from the Window menu. Does the Corpus section show at least 100 spam messages and 100 good messages? If not, follow the instructions in the Do an Initial Training section.
Check the percentage of spam messages in the Corpus section of the Statistics window. It should be between 55% and 75%. If not, train SpamSieve with more spam or good messages so that the percentage is in this range.
Check the number of spam and good messages in the Corpus section of the Statistics window. If the corpus is very large (more than 4,000 messages) and SpamSieve is not catching your spam, the corpus may contain incorrect or obsolete messages that reduce SpamSieve’s effectiveness and make it slower to adapt. Choose Reset Corpus… from the File menu and then follow the instructions in the Do an Initial Training section.
Note: You should only reset the corpus after you’ve checked all the other items in the Why is SpamSieve not catching my spam? section.
7.1.15 Fixing Uncorrected Mistakes
SpamSieve’s filtering accuracy depends on proper training, the most important part of which is training all the mistakes. If you lead SpamSieve to think that a spam message is good, it will think you want to see more messages like that. The more prompt and consistent you are at training, the less of it you’ll actually have to do.
If there’s been a lapse in training the mistakes, e.g. because of a setup problem or because you were temporarily away from your Mac or overwhelmed by spam, SpamSieve has some tools so that you can fix the training without having to reset and start over. Here are some different areas to check:
Find any spam messages in the inbox in your mail program and train them as spam.
If there were any spam messages in your inbox that you deleted from your iPhone instead of training, find them in the trash and train them as spam. (In the future, if you see spams in the inbox when you’re away from your Mac, move them to the special TrainSpam mailbox instead of deleting them.)
Check the Good Messages and Spam Messages tabs of the Corpus window. If you see any messages that are in the wrong section, you can fix them by training from that window.
Check the Allowlist window, sorted to show recently created rules. If you see any spammy names or addresses, they should already be disabled. If there are spammy rules that are enabled, don’t disable them. These enabled rules are a sign that there are spam messages that were not trained as spam. When you fix the training of those messages (as described below), SpamSieve will automatically disable the rules.
When using the Auto-train as needed option, some messages with cause the blocklist and allowlist to be trained without the messages being added to the corpus. Thus, they cannot be fixed as described in Step 3. To fix these, you can go through the Log window, starting at the bottom (the newest messages). If you see any spam messages that say Predicted: Good in green, that means SpamSieve thinks it was correct about the message being good. You should train these messages as spam. Likewise, if you see any good messages that say Predicted: Spam in green, train them as good.
It may not be not practical to go through all the old messages in the log as described in Step 5. If there’s a particular spam message that SpamSieve thought was good, you can look into why and then focus on correcting the messages that led to SpamSieve not catching that spam. In the Log window, find the Predicted: Good entry for the message:
- If SpamSieve thought it was good because of the allowlist, you can go to the Info tab and look for where it says Rule. The rule’s Text to Match will be shown in “”. You can then do a Rules search in the log for that text to find when and how the rule was created and which other messages were filtered using that rule. If you find any spam messages that were Predicted: Good and still have a green circle, train them as spam.
- If SpamSieve thought it was good because of the Bayesian classifier, you can go to the Info tab and look for where it says Words. Words that have lower probabilities (closer to 0 than 1) are the reason SpamSieve thought the message was good. If there’s a word that seems spammy to you, it’s worth checking why it didn’t seem spammy to SpamSieve. You can do a Words or Matching Words search in the Log window to find other messages that contained this word. If you find any spam messages that were Predicted: Good and still have a green circle, train them as spam.
There’s more information about this in the examples in the Searching section of the manual.
In following Steps 5–6, you may find that there are messages in the log that SpamSieve won’t let you train. It is only possible to train messages in this way if SpamSieve is storing the full message data. Normally, it does this for messages that were received in the last 30 days, and this can be adjusted using the Prune full message data in log setting. Once you’ve fixed the training of the available messages, you can go back to the allowlist (Step 4) and disable any spammy rules that remain.
Resetting SpamSieve
If it seems like there are too many old messages for you to go through and fix, the other option is to start over with a clean slate. To reset all of of SpamSieve’s training:
Quit SpamSieve and your mail program.
Open the Library folder and drag the SpamSieve folder to the trash:
/Users/<username>/Library/Application Support/SpamSieve/
Follow the instructions in the Do an Initial Training section.
7.2 What information should I include when I report a problem?
It will be faster and easier to help you if your e-mail includes all of the following information:
- The version of macOS that you are using
- Click on the Apple menu and choose About This Mac.
- The version of SpamSieve that you are using
- Click on the SpamSieve menu and choose About SpamSieve. (Please do not say “the latest version,” as this is ambiguous.)
- The name and version of your e-mail program
- In your mail program, click on the application menu and choose About <Mail Program Name>. (If you’re using Apple Mail, it’s not necessary to specify the version.)
- Information about your e-mail setup
- Do you access your e-mail from multiple computers? If so, on how many of them is SpamSieve installed?
- If you are using SpamSieve with the same e-mail account on multiple Macs, which one of the four approved setups are you using?
- Do you access your e-mail from a mobile device such as an iPhone, iPad, iPod, or BlackBerry?
- Are you using SpamSieve with multiple e-mail accounts? If so, does the problem pertain to all of them?
- If you have uncaught spam messages
- Are the uncaught spam messages in your inbox or in another folder?
- When you first saw the uncaught spam messages on your Mac, were they marked as read or unread?
- Please do not forward the problem messages using your mail program. Instead, flag the messages in SpamSieve’s Log window, make a new e-mail to spamsieve-fn@c-command.com and include the diagnostic report file as an attachment (see Sending in an Error Report).
- Depending on the situation, we may ask you to send in any applicable false negatives files by dragging them from SpamSieve’s Log window to the e-mail window to include them as attachments.
- If you have good messages in your Junk mailbox
- What are the sender address and subject for each good message that you’re referring to?
- Please do not forward the problem messages using your mail program. Instead, flag the messages in SpamSieve’s Log window, make a new e-mail to spamsieve-fn@c-command.com and include the diagnostic report file as an attachment (see Sending in an Error Report).
- If it will help you explain what’s happening or what you are seeing
- Please see Sending in Screenshots.
- If something aside from SpamSieve’s filtering is not working properly
- Please see Sending in an Error Report.
- If SpamSieve or the mail program hangs, freezes, or is very slow
- Please see Sending in a “Sample” Report.
- If the mail program crashes
- Please see Sending in Crash Log Files and What can I do if Apple Mail is crashing?.
For other types of problems, please describe what you did, what happened, and what did you expect to happen instead. This will make it easier for us to understand the issue that you are reporting.
7.2.1 Sending in an Error Report
If an error window appeared on your screen, please include the exact text of the error message in your e-mail. (It may help to use Copy and Paste.)
Please also send in any errors that were reported in the system log:
- From SpamSieve’s Help menu, choose Save Diagnostic Report… at the bottom. (If you can’t access the Help menu because the Dock icon is hidden, click this link to save a diagnostic report. If you can’t launch SpamSieve to access its Help menu, see below.)
- Choose a location such as your desktop and click Save. Saving the report may take a minute or so.
- Create an e-mail to spamsieve@c-command.com and drag the Diagnostic Report.tbz file into the e-mail message to include it as an attachment/enclosure. (Do not post it in the forum or in reply to a forum e-mail.) If the file is too large to e-mail, you can share a link using iCloud Drive or Dropbox or use the C-Command Forum to send it to us via private message.
If you can’t launch SpamSieve, you can access the log directly (if you’re using macOS 10.15 or later), rather than using the automated diagnostic reporter:
- Click on Finder in the Dock.
- Open the Library folder, as described in the How can I open the Library folder? section.
- Open the Logs folder.
- Open the “SpamSieve” folder.
- Find the App Log.log file and attach it to your e-mail message.
7.2.2 Sending in Screenshots
To help troubleshoot problems in your mail program, please include screenshots of:
- Any errors that were reported (if applicable).
- The message list in your mail program.
- The rule list in your mail program (including both regular rules and mailing list manager rules, if applicable).
- The individual SpamSieve rule(s) that you created in the mail program (if any).
To take a screenshot, hold down the Command and Shift keys and press the number 4. Then use the mouse to select the area of the screen that you want to take a picture of. This will create a file called Screen Shot <date> at <time>.png on your desktop. Pressing the keys again will create Screen Shot <date> at <new time>.png, etc.
You can also take screenshots using the File ‣ Take Screenshot command in the Preview application.
To send in screeenshots, drag the files into your e-mail window to attach them to your message. If you’re using Apple Mail, be sure to set the Image Size pop-up menu at the bottom of the message window to Actual Size.
7.2.3 Sending in a “Sample” Report
If an app is slow, hangs (e.g. with a spinning beachball), or freezes, a “sample” report can record what your Mac was doing in order to locate the source of the problem. Depending on which app is slow or not responding, you may want to record samples from SpamSieve, Apple Mail, and/or another app.
- Click on Finder in the Dock.
- From the Go menu, choose Utilities.
- Double-click the Activity Monitor program.
- Select the app in the Activity Monitor window.
- Do whatever it is in the app that causes the slowness, hang, or freeze. Immediately, click on Activity Monitor in the Dock and choose Sample Process from the View menu.
- After Activity Monitor has finished taking the sample, click the Save… button in the “Sample of <App>” window. Save the file to your desktop and then include it in your e-mail message to spamsieve@c-command.com as an attachment. (Please do not copy and paste the text from the Activity Monitor window.)
7.2.4 Sending in Crash Log Files
If SpamSieve itself crashes, the SpamSieve Crash Reporter window should automatically come up. Make sure that you enter a valid e-mail address and then click the Send Report button.
If your mail program (or a helper process such as spamsieve-reader) crashes, you’ll need to send in the crash log file manually.
Crash logs are stored in the folder:
/Users/<username>/Library/Logs/DiagnosticReports/
First click on the Finder in the Dock, then click on the Go menu, and hold down the Option key as you choose Library. Open the Logs folder, then DiagnosticReports.
Once you’ve opened the DiagnosticReports folder, find the most recent crash log file for the app that crashed and add it to your e-mail message to spamsieve@c-command.com as an attachment.
The crash log file’s name will end with either .crash or .ips. It may be in the DiagnosticReports folder or in the Retired folder inside of DiagnosticReports.
Note: On macOS 13 and earlier, you may be able to temporarily stop crashes in Apple Mail by removing all of the .mailbundle files from the folder:
/Users/<username>/Library/Mail/Bundles/
7.3 Why is every message going to the Spam mailbox?
All E-mail Clients
It is unlikely that SpamSieve is mistakenly thinking that all your mail is spam. To see whether the messages are going to the spam mailbox because of SpamSieve, you can use the Log window.
More likely, the messages are being moved by a mail program on another computer, by a server filter, or by a problem with your mail program, as described below:
Apple Mail
- If you are using macOS 14 Sonoma or later, due to changes in Apple Mail, there should no longer be a SpamSieve rule in Mail. If there is, Mail will move every message to the Junk mailbox without consulting SpamSieve. The first time you launch SpamSieve on macOS 14, it will advise you to click the Uninstall Plug-In button to remove the rule. It will also check each time you launch SpamSieve to make sure that there is no rule. However, SpamSieve will not be able to do this if its Automation access to control Mail has been revoked. In such cases, you should go to the Rules tab of Mail’s Settings window and deactivate or remove the SpamSieve rule yourself. On macOS 14, SpamSieve should be set up to use the Mail extension instead of the rule, as described in the Setting Up Apple Mail section.
- If you are using the Mail plug-in setup, but SpamSieve’s plug-in is not installed or not enabled, Mail will move every message to the Junk mailbox without consulting SpamSieve. To re-install the plug-in, go to the Settings ‣ Apple Mail ‣ Setup window and click Install Plug-In. When the plug-in is property installed and loaded, you will see the training commands in Mail’s Message menu. If you don’t see these, please follow the instructions in the the Why don’t I see the SpamSieve commands in Apple Mail’s Message menu? section.
- Make sure that you’ve disabled Mail’s built-in junk mail filter, as described in Step 7 of the Setting Up Apple Mail section.
- Make sure that the only spam/junk rule that you have in Mail’s settings is SpamSieve. Or, if you are using macOS 14 or later or the Mail extension setup, there should be no SpamSieve rule, either.
- If you are using the Mail plug-in setup, the name of the SpamSieve rule in Apple Mail must begin with “SpamSieve”. Make sure that there are no leading spaces in the name. If the rule name does not begin with “SpamSieve”, Mail will move every message to the Junk mailbox without even showing the messages to SpamSieve.
Entourage
- Make sure that you’ve disabled Entourage’s built-in Junk Mail Filter.
- Make sure that the SpamSieve rule in Entourage are set up exactly as shown.
- Make sure that the only spam/junk rules that you have in the Rules window are the two SpamSieve rules.
Outlook 2011
- Make sure that you’ve disabled Outlook’s built-in Junk Mail Filter.
- Make sure that the SpamSieve rule in Outlook are set up exactly as shown.
- Make sure that the only spam/junk rules that you have in the Rules window are the SpamSieve rules.
7.4 Why do good messages keep going to the Junk or Spam mailbox?
Normally, as soon as you train one message as good, SpamSieve will add the message’s sender to its allowlist. This means that SpamSieve will never classify future messages from that sender as spam. Also, by default, SpamSieve will never classify messages from senders in your contacts as spam. Nevertheless, there a several reasons why such messages might keep ending up in the Junk or Spam mailbox:
A junk filter on the server might be classifying the messages as spam. This is especially likely to be the case if the messages are going to a different mailbox than the one that SpamSieve uses. If SpamSieve and the server filter are both configured to use the Junk mailbox, the messages caught by the server will show up in Apple Mail’s message list with a white background and/or brown text, as compared with the messages caught by SpamSieve, which have black text and a colored background. In many cases, there is no visible switch to turn a server filter on/off, so it will be on unless you create a specific rule to turn if off. Please see the How should I configure the junk filter on my mail server? section about how to disable a server junk filter. Also, the Rescuing Good Messages Caught By a Server Filter section describes how to work around a server filter that can’t be disabled.
Regardless of whether SpamSieve thinks a message is spam, the message can still end up in the Junk mailbox if you have created other rules in your mail client that move messages to the Junk mailbox. It is recommended that you disable or delete such rules. Also, make sure that your mail client’s built-in junk filter is off.
Another computer that accesses your mail account may have rules or a spam filter that are moving the messages. If you are using SpamSieve and multiple Macs, a message trained as good on one Mac may not necessarily be treated as good on another Mac. Outlook, in particular, may keep moving the message back to Junk Email until you train it as good on the other Mac. You can look at SpamSieve’s log on each Mac to see which copy of SpamSieve (if any) predicted that a message was spam.
If the messages in Apple Mail have an icon of a red circle with a slash, they were caught by Mail’s blocked mail filter. We recommend going to Mail’s Junk Mail settings and unchecking Enable blocked mail filtering. Please also make sure that Enable junk mail filtering is unchecked. If you have an iPhone or iPad, also make sure that the sender is not blocked there.
Your mail client may be moving all incoming messages to the spam mailbox because of a setup problem. Please see the Why is every message going to the Spam mailbox? section.
SpamSieve might have classified the message as spam. You can see whether it has done this by using the Log command and looking for a Predicted: Spam entry for the message.
How could this happen when you had trained similar messages as good? If you train a message as good and then subsequently train a message from that same sender as spam, SpamSieve will disable the allowlist rule and add a rule to the blocklist. Then SpamSieve will classify messages from that sender as spam until you train another one as good. At that point, there will be rules on both the allowlist and the blocklist, both disabled, so SpamSieve will determine whether messages are spam by looking at their complete contents. If you don’t want it to do this, but to instead treat all the messages from that sender as good, you can add the sender to your address book or find the sender’s rule in the Allowlist window and click the checkbox to re-enable it.
You can contact technical support at spamsieve@c-command.com. Before sending your message, please read the What information should I include when I report a problem? section. Make sure that you’ve included all of the general information, as well as the items requested in the If you have good messages in your Spam mailbox section.
7.5 Can I delete spam messages that are in the Junk mailbox?
Yes. It is not necessary to keep the spam messages in your e-mail program’s spam folder because SpamSieve stores the information that it has extracted from the messages elsewhere.
Before you delete any messages, make sure that you have corrected all the mistakes. To make it easier to find any good messages that are accidentally in the Junk mailbox, you may find it helpful to sort by subject or to separate the spam messages by color.
To manually delete old spam messages, you can simply select them in your mail program (using Edit ‣ Select All may help) and press the Delete key. In Apple Mail, you can hold down the Option key when pressing Delete if you want to delete the messages immediately rather than moving them to the trash.
To automatically delete old spam messages, please see the Automatically Deleting Old Spam Messages page.
7.6 How should I configure the junk filter on my mail server?
SpamSieve moves the spam messages that arrive in your inbox into a separate mailbox, usually called Junk. When you train a message as spam, SpamSieve also puts it in that mailbox. You may find that other messages also go to the Junk mailbox. These spams were likely caught by a junk filter on your mail server. The server filter catches its spam messages before the Mac sees them. You can tell whether the messages were moved by SpamSieve because of their coloring and because the Log will say that SpamSieve predicted them to be spam.
Spam in Other Locations
A server junk filter may also move spam messages to a separate Spam or Bulk mailbox. The Setting the Junk Mailbox in Apple Mail section describes some ways to make sure that SpamSieve and other filters put the spam messages in the same place. If you prefer to have the server filter use a different mailbox:
- It is normal for some spams to be in the server’s spam mailbox rather than SpamSieve’s or to be in the same mailbox as SpamSieve’s spam but unmarked. SpamSieve never had a chance to process these messages, so they are not mistakes. You should not train them as spam.
- It is normal for there to be some good messages in the server’s spam mailbox. These are also not SpamSieve mistakes, since the server filter put them there without SpamSieve seeing them. You should not train them as good.
SpamSieve vs. Server Filters
SpamSieve is compatible with junk/spam filters that run on the mail server, however we recommend that most users turn them off because:
- In most cases, SpamSieve will catch the same spam messages (and more), so the server spam filter is not providing much benefit. Exception: If your Mac and SpamSieve will often be off or disconnected from the Internet, the server spam filter can help keep spam off your iPhone during that time.
- Server spam filters are more likely to mistakenly classify your good messages as spam. Because the server filters the messages before they get to your Mac, SpamSieve cannot “save” you from these mistakes. In some cases, these good messages may be deleted sight-unseen or “lost,” only visible when you log into a special spam quarantine mailbox via a Web browser.
Turning Off Your Server-Side Spam Filter
Please find the “Turning Off” section below that corresponds to your mail provider. Note that some mail hosts, such as Media Temple, have both per-account and per-user spam filters, so there may be more than one switch to turn off.
If your mail provider does not let you turn off its spam filter:
- You may be able to at least turn down the sensitivity of the server filter, to reduce the problems that it causes.
- You can follow the Rescuing Good Messages Caught By a Server Filter instructions to have SpamSieve look for good messages in the Junk mailbox and move them back to the inbox.
- We recommend switching to one of the Recommended Mail Hosts or another host that does provide this level of control.
Bulk Mail and Quarantine
Some mail providers have a mailbox called Bulk Mail or a special Web site to view messages that are “quarantined.” If possible, we recommend turning off these features for the same reasons described above. Regardless, there are two important points to keep in mind:
- The server puts the messages in the bulk mailbox before SpamSieve sees them. Thus, there is no setting you can change in SpamSieve to prevent this from happening.
- Since these messages are invisible to SpamSieve, it is not necessary or recommended that you train it with them.
If you cannot turn off your server’s Bulk Mail mailbox, you can use the Apple Mail - Server Junk Mailbox script to have SpamSieve sort through the bulk mail for you.
7.6.1 Turning Off the AOL Spam Filter
It is not possible to turn off the AOL spam filter, however:
- You can set up SpamSieve to rescue good messages caught by AOL’s junk filter and move the spam messages to SpamSieve’s mailbox.
- You can tell AOL to move certain known good messages to a specific
folder to prevent them from being moved to Junk:
- Log into your AOL account using a Web browser.
- Go to Options ‣ Mail Settings ‣ Filter Settings ‣ Create filter.
- Under Look for incoming messages matching all of the follow, select From contains and enter an e-mail address or domain.
- Next to Move matched messages to folder, select a folder for your good messages. (Unfortunately, AOL does not let you select the inbox itself.)
- Click Save.
7.6.2 Turning Off the DreamHost Spam Filter
You can set certain addresses to always be allowed or turn off spam filtering entirely.
7.6.3 Turning Off the Fastmail Spam Filter
Log into Fastmail’s Web mail and click on the Mail menu at the top left.
Click on Settings, then Filters & Rules:
Then click Advanced settings:
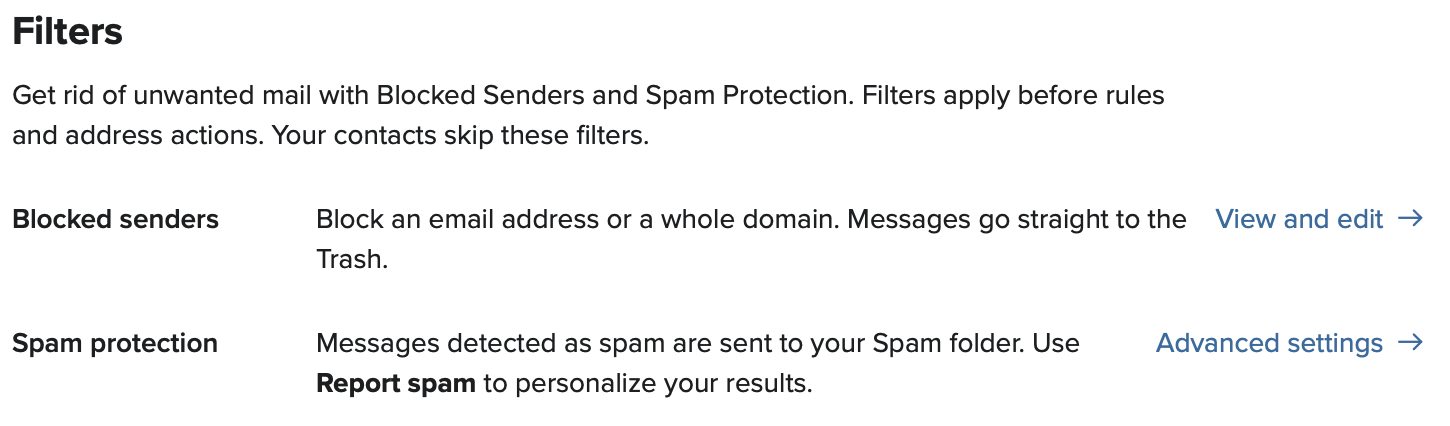
Make sure that Off is selected:
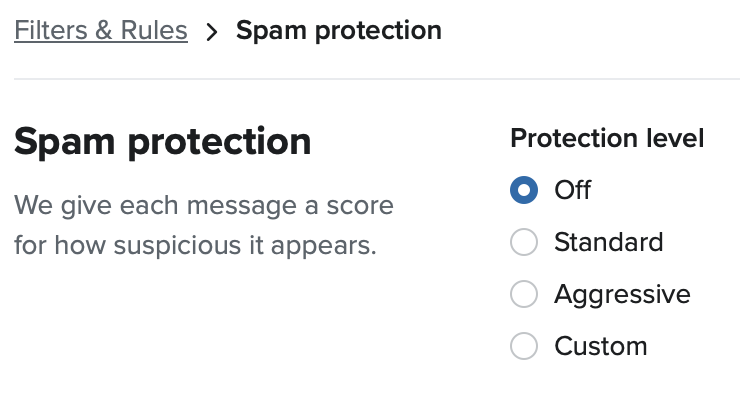
Make sure that Mark spam as read is unchecked.
You can optionally go to the Backscatter section and select With bounce spam: Do nothing to have Fastmail ignore messages where it thinks a spammer impersonated you to send spam.
7.6.4 Turning Off the Gmail Spam Filter
SpamSieve users often find that Gmail’s spam filter is unnecessary because SpamSieve catches more of the spam, and they want to turn off the Gmail filter to prevent any good messages from accidentally being caught. To disable Gmail’s junk mail filter:
If you normally log into https://gmail.com in your browser, do that now and then move on to Step 2. If you normally use https://inbox.google.com, you can get to regular Gmail by clicking the 3×3 grid button at the top and then clicking the Gmail icon:
Click the gear at the top right, choose Settings, then click on Filters and Blocked Addresses.
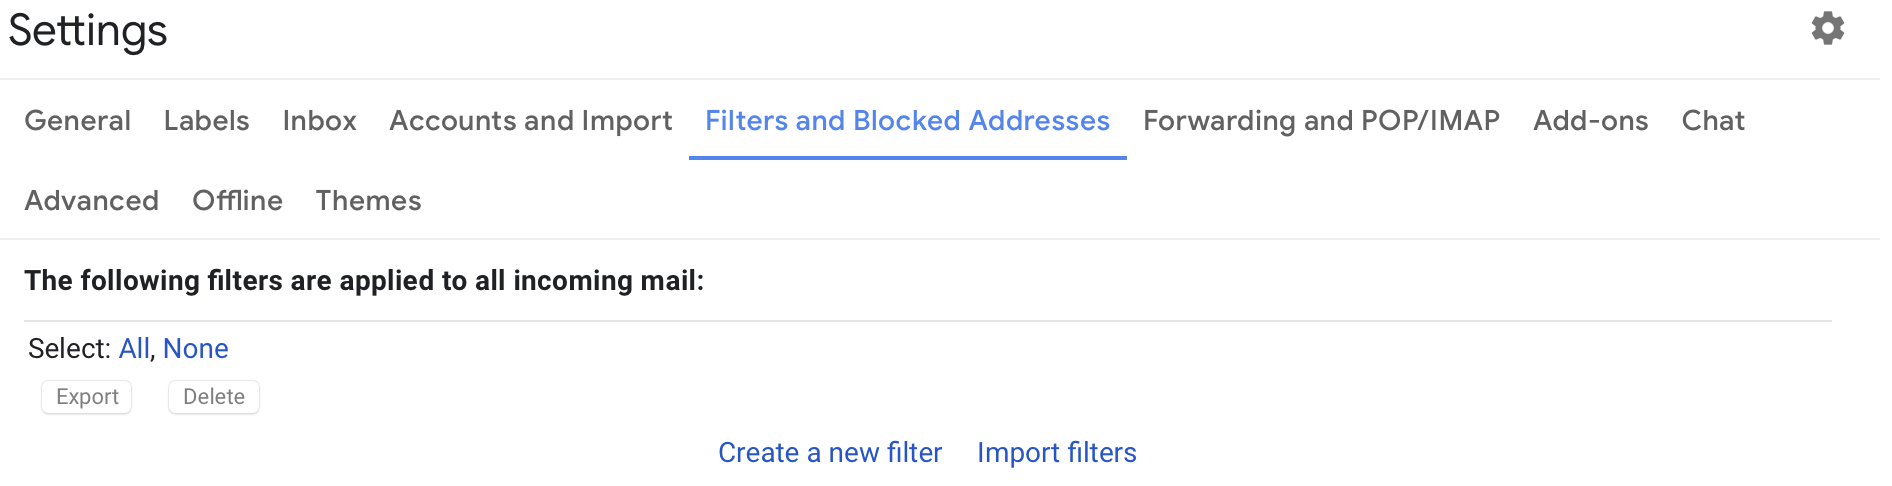
Click Create a new filter. Enter {(to:me) (deliveredto:USERNAME@gmail.com)} in the Has the words field (replacing USERNAME with your actual Gmail username). Click Create filter.

Make sure that Never send it to Spam is checked and click Create filter.

Your filter should now look like this:

If you use multiple variants of your Gmail address, e.g. some with periods and some without, you may need to create an addition filter using the USERNAME for each variant.
7.6.5 Turning Off the GoDaddy Spam Filter
GoDaddy has two levels of junk mail filtering. The mail servers (both Exchange and IMAP) have built-in global spam filtering (affecting all users) that cannot be disabled. There are also per-user additional settings that can be disabled by selecting Turn off filtering.
7.6.6 Turning Off the HostGator Spam Filter
The instructions here explain how to disable SpamAssassin.
7.6.7 Turning Off the Hover Spam Filter
- Log into your Hover Webmail at https://mail.hover.com.
- Go to Settings ‣ Spam Settings.
- Change the folder so that spam messages are moved to your inbox.
7.6.8 Turning Off the iCloud Spam Filter
It is not possible to turn off iCloud’s junk filter, and iCloud deletes some suspected spam messages without even putting them in your Junk mailbox. Thus, iCloud is not one of our Recommended Mail Hosts.
If iCloud’s junk filter is moving good messages to the Junk mailbox, they will show up in Apple Mail’s message list with a white background and/or brown text, as compared with the messages caught by SpamSieve, which have black text and a colored background.
You can can train iCloud with those messages using iCloud.com (not from within Mail) or set up SpamSieve to scan the Junk mailbox and rescue the good messages.
7.6.9 Turning Off Microsoft Spam Filters
Rule Method
To turn off the server junk filter for an Outlook.com, Hotmail, or Office 365 mail account:
Log into the account using your Web browser, e.g at https://outlook.live.com.
Click on the gear icon at the top right, then click View all Outlook settings.
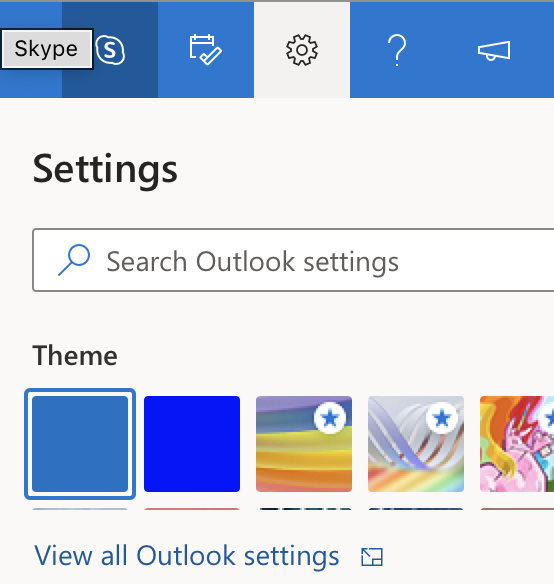
Click on Mail, then Rules, then Add new rule.
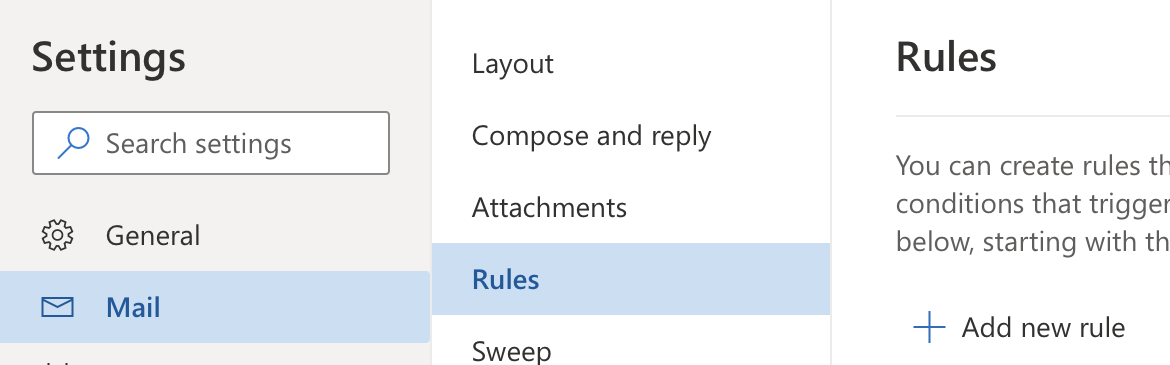
Set the rule’s name to Turn off Spam Filter, set the condition to Apply to all messages, and set the action to Move to Inbox.
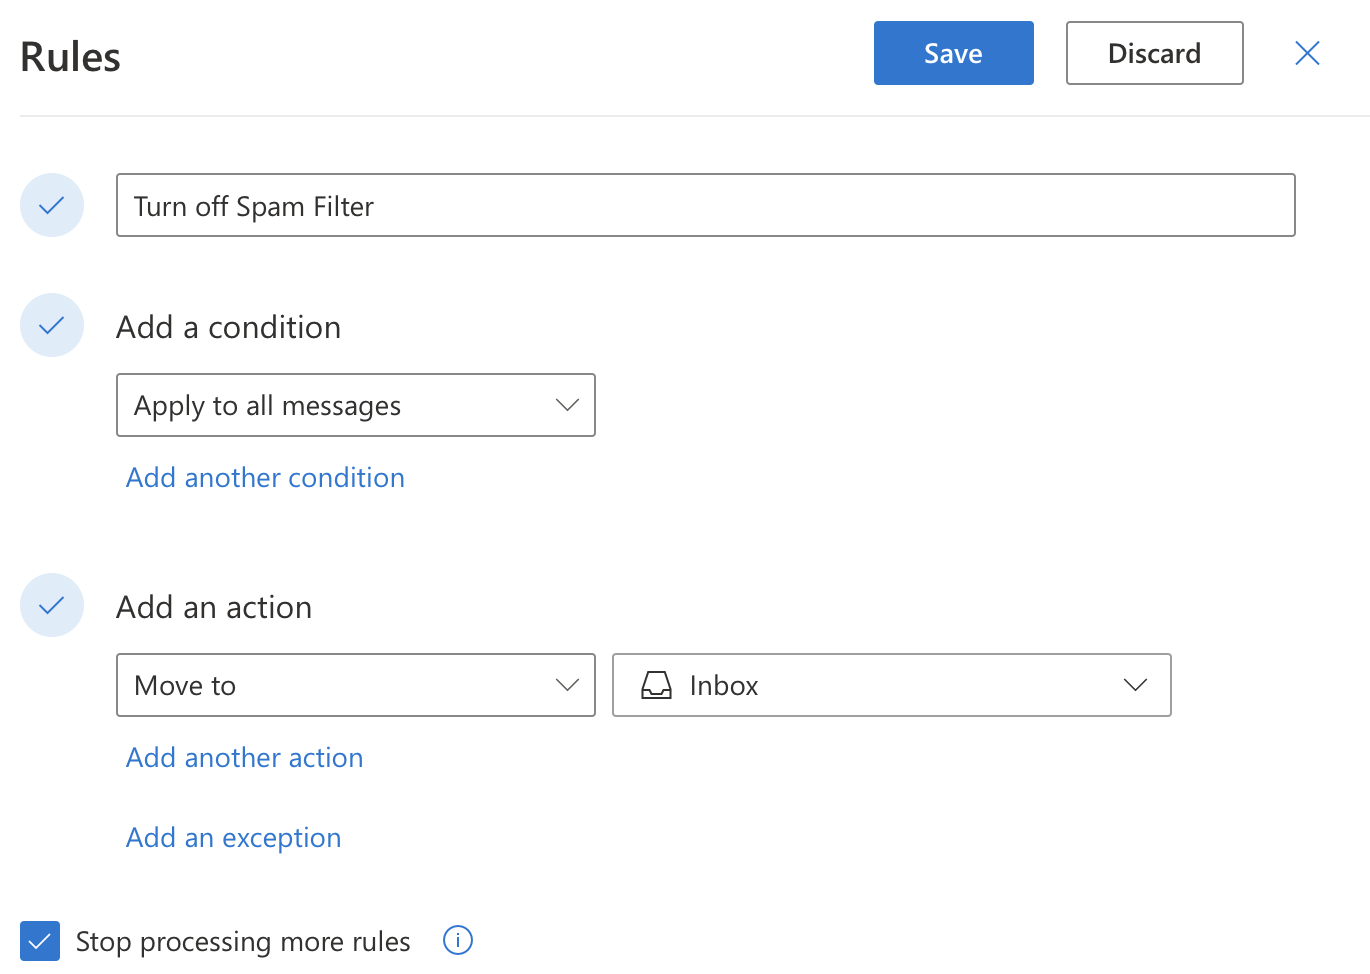
Click the Save button.
Power Automate Method (Requires School or Work Account)
We’ve heard that for some users Outlook does not honor a rule created in the above manner. In such cases, there is another way to disable the server junk filter using Power Automate:
Log into Microsoft Flow.
Click on Connectors at the left, then Outlook.com (not Office 365 Outlook).
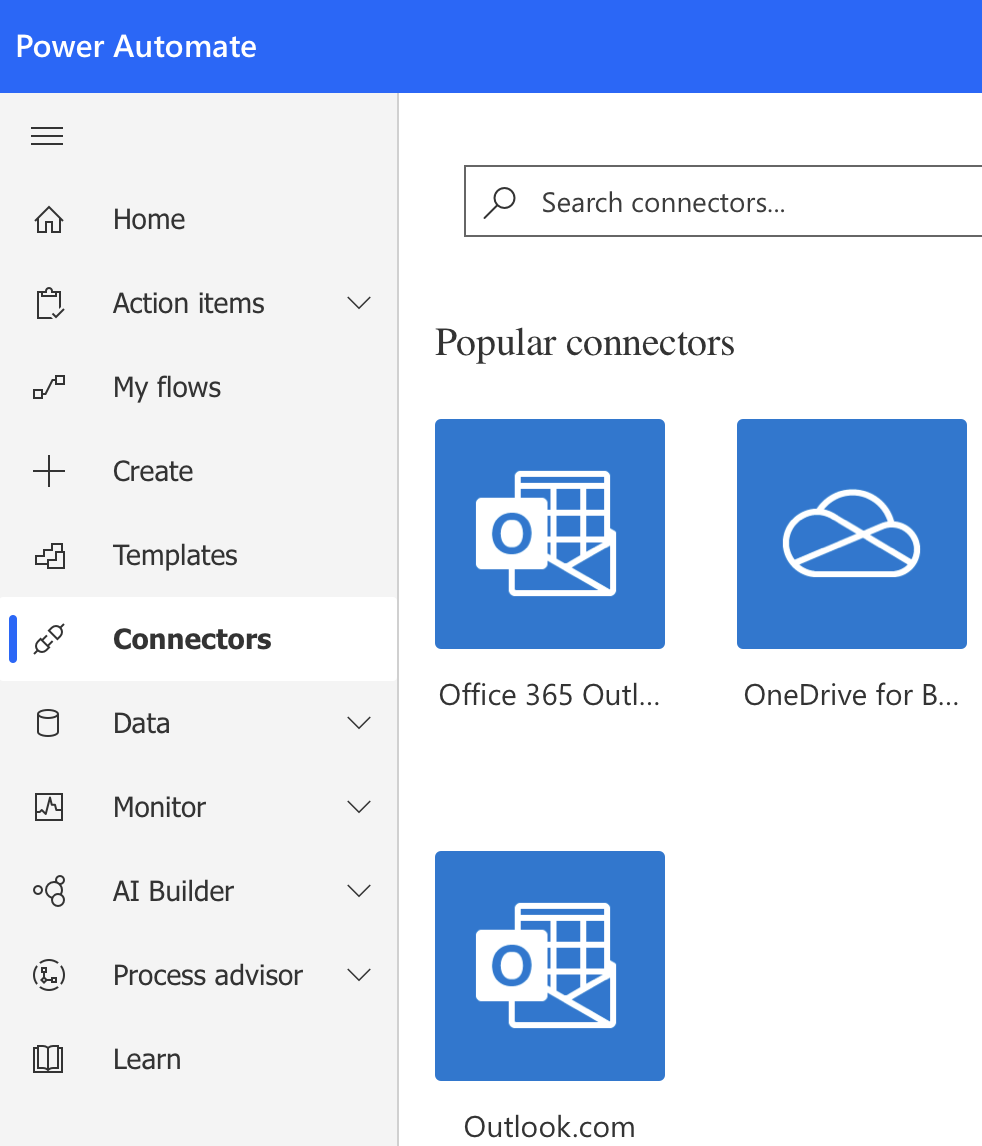
Click on the When a new email arrives (V2) trigger.
Choose Junk Email for the Folder and click New Step.
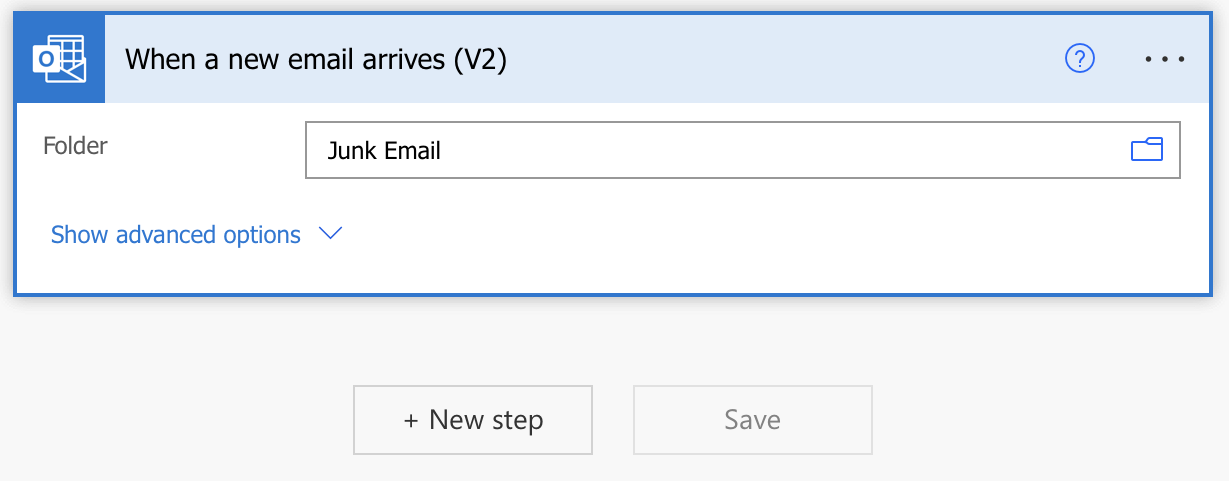
Search for move email and select Move email (V2) as the action.
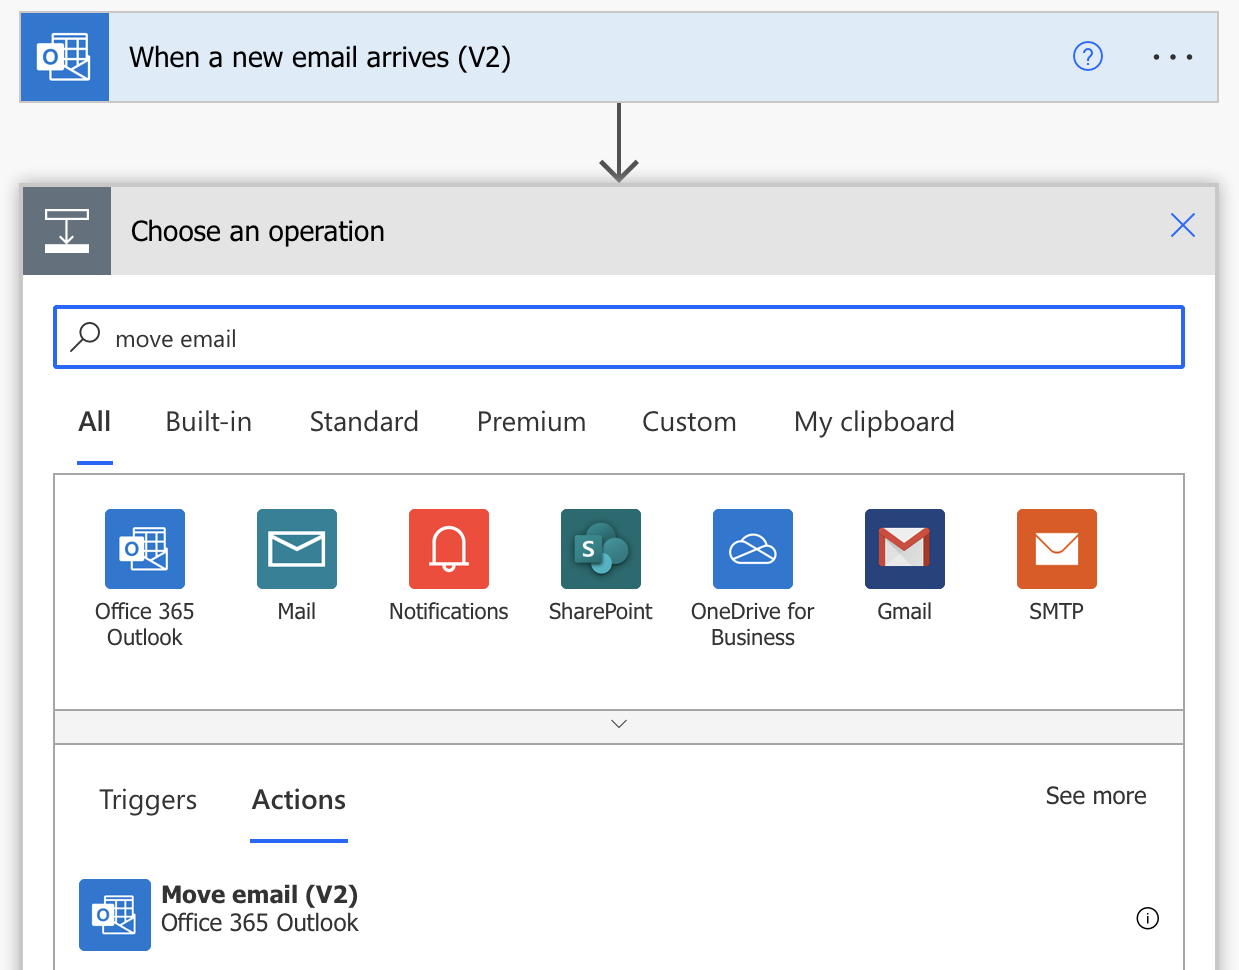
Set the Folder to Inbox and click Save.
7.6.10 Turning Off the Proton Mail Spam Filter
This can be done by creating a custom filter using SIEVE (unrelated to SpamSieve):
Log into Proton Mail with your browser.
Go to Settings ‣ Filters.
Click the Add sieve filter button.
Replaced the existing code in the text box with:
require “fileinto”;
fileinto “Inbox”;
7.6.11 Turning Off the Yahoo Mail Spam Filter
Note: As of December 2024, we’ve received a report that Yahoo rules can no longer move messages that its spam filter caught, so it’s possible that the workarounds below will no longer work. However, other users have not reported this problem, so we continue to offer these instructions in the hope that they’re helpful. If you are unable to turn off the Yahoo filter, another option is to follow the Rescuing Good Messages Caught By a Server Filter instructions.
New Yahoo Mail
Log into your Yahoo Mail at https://mail.yahoo.com.
Click on the gear menu.

Click on More Settings.

Click on Filters.
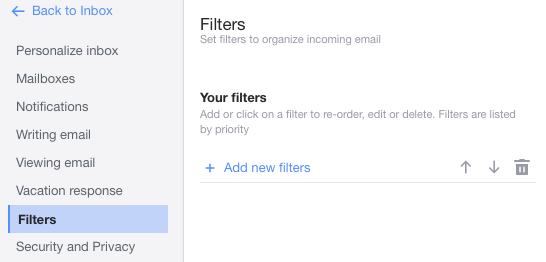
Click + Add new filters and create a filter named Turn Off Spam Filter, with From contains @ that moves the messages to Inbox. If Inbox is not selectable from the Choose folder to move to menu at the left, you may need to type Inbox in the text field that says Folder name.
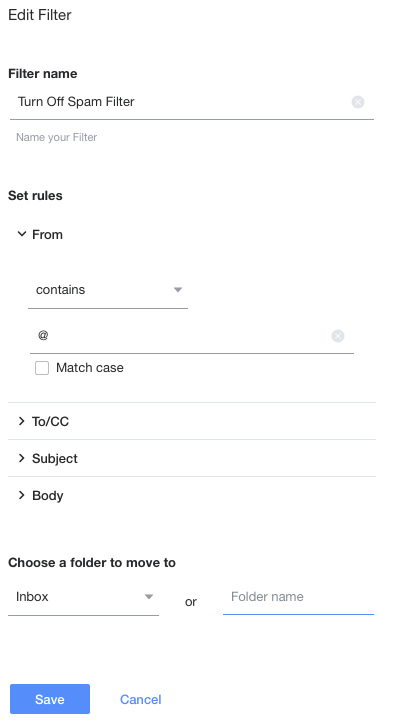
Click Save.
Make sure that the new rule is at the bottom of the list. You can move it by selecting the rule and clicking the down-arrow button.
Classic Yahoo Mail
Log into your Yahoo Mail at https://mail.yahoo.com.
Click on the gear menu.

Click on Settings, then Filters.
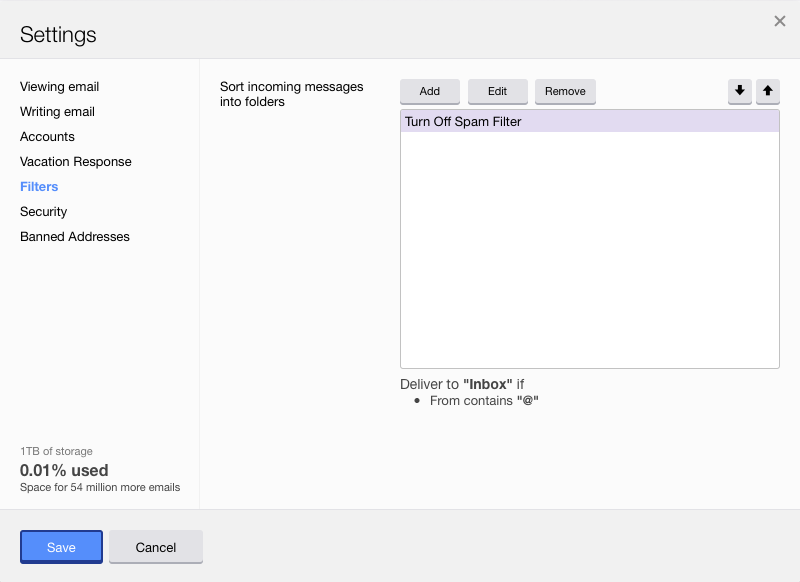
Click Add and create a filter that matches @ in the sender and delivers the messages to Inbox.
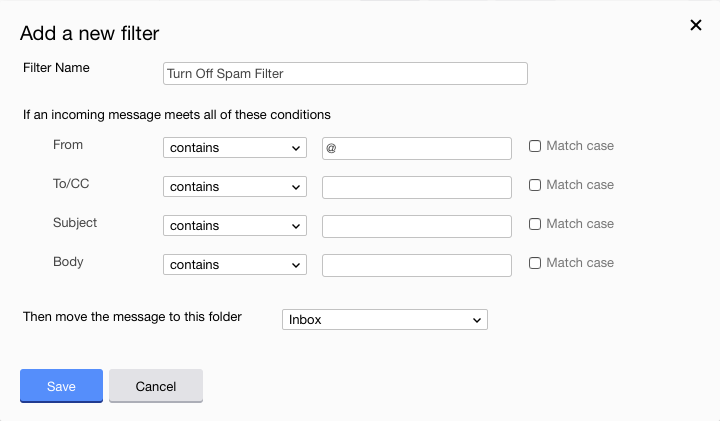
Click Save.
Make sure that the new rule is at the bottom of the list. You can move it by selecting the rule and clicking the down-arrow button.
7.6.12 Turning Off Other Spam Filters
Many mail hosts offer SpamAssassin or a similar filter. Make sure the filter is set not to add **Junk**, [Spam], or another tag to the message’s subject. Also, try to configure the filter not to move the messages out of the inbox. It is actually good if you can leave the filter on, but set so that it only tags the message’s headers (e.g. by adding X-Spam-Status and X-Spam-Report headers). This will allow SpamSieve to incorporate the work that the server filter has done into its analysis.
7.7 Why does a message disappear or go back to the Junk mailbox after I train it as good?
When you train a message in the spam mailbox as good, SpamSieve normally moves it back to the inbox. Mac Mail programs do not automatically re-apply rules (or SpamSieve) to old messages, so normally the message will stay in the inbox. However, there are several reasons that a message might stay in the Junk mailbox, “bounce back” to the Junk mailbox, or disappear from the Junk mailbox but not appear in the inbox (in which case you can recover it from the Log window):
When you train a message as good, SpamSieve will purposely leave it in its current mailbox if:
- You’ve unchecked Move it back to the inbox in the Apple Mail or Outlook settings.
- SpamSieve thinks the message is not in a spam mailbox or the trash. SpamSieve knows common names of spam/junk mailboxes. You can each it a custom name in the settings.
When SpamSieve moves the message to the inbox, a server filter or a mail program on another computer may see the message as new and move it elsewhere. The other computer might think the message is spam and move it right back to the shared server spam mailbox. Or, if the other computer is using a local spam mailbox, it would move the message off the server and into the spam mailbox on that computer. This would make it appear—on the first computer—as though the message had disappeared, but it would still be accessible in the local mailbox on the second computer.
For more information about multi-computer setups, please see the SpamSieve and Multiple Macs section. You can also uncheck Mark it as unread in the Apple Mail or Outlook Training settings to tell SpamSieve not to mark messages as unread when you train them as good. This may prevent other computers from seeing them as new messages.
If the message is moved to the inbox of an account that’s marked as inactive/disabled in Mail’s settings, it will not be visible in Mail because that inbox is hidden. Normally, SpamSieve only moves messages to the inbox of an enabled account, however there is a bug in the macOS 10.15 Catalina version of Apple Mail that causes an error when SpamSieve asks if an account is enabled (FB7035263). Thus, if the disabled account is the best match for the message, SpamSieve could move it there. Versions 2.9.38 and later of the SpamSieve plug-in work around this Mail bug; you can click Install Plug-In to make sure that you have the latest version of the plug-in installed. (This workaround does not work on macOS 14 and later, which don’t support Mail plug-ins.)
You can enable the account in Mail’s settings to view its inbox and find the “missing” messages.
The message might be in an inbox, just not in the one that you expected. Please see the Why do good messages move to the wrong inbox when trained in Apple Mail? section.
It’s possible that moving a message can make it disappear from Apple Mail due to a bug in macOS 10.15 and later that affects a small percentage of users. You can avoid the bug by making sure that your inbox and spam mailbox are stored in the same server account. The easiest way to do this is to follow the Setting the Junk Mailbox in Apple Mail instructions.
It’s possible that moving a message can make it disappear from Apple Mail if Mail’s database is damaged. The message file is usually still visible on your Mac and on the server. To make the message re-appear in Mail, please see the How can I rebuild Apple Mail’s database? section.
Messages can “bounce back” to the spam mailbox due to being refiltered by another computer (#2), having a disabled account (#3), a server error, or a damaged Mail database (#5).
7.8 Does SpamSieve protect me from viruses?
Computer viruses generally do not cause problems for Mac users because there is no automated way for them to execute their malicious code. If you receive a virus in an e-mail attachment, it will not do anything if the message is just sitting in your inbox. Even opening the attached file is not, by itself, dangerous because macOS will not execute code from a single file. You would need to, for example, decompress the ZIP archive and then double-click the extracted .app file. Even if you do all this, the Mac is likely to warn you that you are launching an unknown application.
SpamSieve will generally classify messages with viruses as spam and move them to the Junk mailbox. This will prevent them from cluttering your inbox and provide some protection if you access your mail on a Windows PC (where attached .exe files can more easily cause harm).
Anti-virus Software
If you are running anti-virus software, it is normal for it to find viruses in your Junk mailbox. You can safely ignore these warnings because the viruses are embedded in the e-mail messages and are inert.
Anti-virus software such as Avira and Bitdefender can interfere with the operation of Apple Mail. One manifestation is that the software will find messages with viruses, which SpamSieve has put in the Junk mailbox, and delete the message files or move them to a holding area. Mail will then report errors because the files are no longer where it was expecting to find them, and this may prevent you from deleting the messages in Mail. You can get rid of the orphaned messages in Mail by rebuilding its database. However, it is better to configure your anti-virus software so that it doesn’t touch Mail’s files. For example, in Avira, go to the Real-Time Protection settings, then Basic Settings, and change the Default action if a thread is found so that files are not moved into quarantine.
7.9 Does SpamSieve stop Web bugs?
A Web bug is a tracking image in an HTML-formatted e-mail message. The image is referenced on a remote server, rather than included as an attachment to the message. When a mail client displays the message, it loads the image from the remote server. When the server receives the request for the image data, it knows that the e-mail has been read, and it can record the address of the computer that requested the image. Additionally, the image’s URL may include tracking information such as your e-mail address, so the server can tell who read the e-mail.
Some legitimate mailing list providers use Web bugs to track how many of their messages were read, when they were read, and where (approximately) the recipients are located.
Spammers use Web bugs to track who is reading their messages. This lets them tell which e-mail addresses are valid as well as which variants of their message content get through spam filters. An e-mail address that is known to be valid is likely to receive more spam.
SpamSieve protects you against Web bugs by telling the mail program not to load remote images for messages that it thinks are spam. Since SpamSieve catches almost all spam messages, you only risk triggering a Web bug if SpamSieve lets a spam message through and you view that message. (If you know that a message is spam and don’t want to select it to train it as spam, you can train it from SpamSieve’s Log window use or the drone setup and drag the message to the TrainSpam mailbox.)
Note: On macOS 10.15 and macOS 11, SpamSieve does not tell Apple Mail to load remote images because this triggers a Mail bug that can prevent rules from moving messages to the proper mailbox.
For full protection, most mail clients have an option to disable the automatic loading of remote images for all messages, rather than just known spams. The downside to this approach is that to fully view a good message containing remote images you would need to click an extra button to tell the mail client to load the images.
Since SpamSieve is highly accurate, most users opt for the convenience of its automatic protection. If you want full protection and don’t mind manually loading the images for all your messages, follow the these instructions for your mail client:
- Apple Mail
- It is more private to uncheck the Protect Mail Activity option in Mail because otherwise Mail will load Web bugs even if you don’t view the message.
- On macOS 12 and later, in the Settings window, click on the Privacy tab. Make sure that Block All Remote Content is checked.
- On macOS 10.14 through macOS 11, in the Preferences window, click on the Viewing tab. Make sure that Load remote content in messages is unchecked.
- On macOS 10.13 and earlier, in the Preference window, click on the Viewing tab. Make sure that Display remote images in HTML messages is unchecked.
- Airmail
- In the Settings window, click on the General tab. Make sure that Autoload Remote Images is unchecked.
- GyazMail
- In the Settings window, click on the Display tab. Make sure that Show remote images in HTML messages is unchecked.
- MailMate
- In the Settings window, click on the Security tab. Make sure that Image Blocking is checked and set to All Messages.
- Mailsmith
- Mailsmith does not display remote images, so no setting is necessary.
- Outlook
- In the Settings window, click on Reading. Make sure that Automatically download pictures from the Internet is set to Never.
- Postbox
- In the Preferences window, click on the Privacy tab. Make sure that Block loading of remote images in mail messages is checked.
- PowerMail
- In the Preferences window, click on HTML reader. Make sure that Download external pictures if connected, for non spam messages is unchecked.
You can use Email Privacy Tester to verify that remote content is not being loaded.
7.10 Does SpamSieve bounce spam messages back to the sender?
SpamSieve does not have a feature to “bounce” spam messages back to the sender, e.g. by sending an e-mail reply saying that the message was not delivered. Apple Mail used to have a built-in Message ‣ Bounce command, but Apple has removed it.
The thought behind bouncing is that a spammer will stop sending to your address if he thinks that the address was invalid and his message didn’t get through. Unfortunately, sending a “bounce message” back would be ineffective or even counter productive for a variety of reasons:
- Spammers probably don’t care. They have lists of thousands or millions of e-mail addresses, and it’s cheap to keep sending messages to the entire list. They may get paid based on the size of their list, no matter whether all the addresses are valid. In any case, it wouldn’t be worth the effort to prune it down.
- You can’t contact them. Even if you believe that spammers care, your bounce message probably wouldn’t get to them. Spammers use hijacked machines and forged return addresses, so if you reply to a spam message you’re likely sending your bounce to an invalid address or to an innocent bystander.
- If you could, it might be bad for you. There is a narrow window of time in which rejecting a spam message might work. When the mail server is in the process of receiving a message, it’s talking to the sending server, and so theoretically it could communicate that the address is invalid. By the time the message has been delivered to your account, downloaded by the mail program on your Mac, and filtered by SpamSieve, this window has long since closed. At this point, if the spammer were listening, he’d already know that the message had been delivered. If you were able to get a bounce back to him, he’d know that it was a fake bounce. The original message must have gotten all through, so he should send you more spam.
Since bouncing doesn’t work, it would be a waste of your time and network resources to do it. Including such a feature in SpamSieve would falsely imply that it should be used.
7.11 Does SpamSieve prevent me from receiving messages?
Spam Messages
SpamSieve does not prevent spammers from sending you spam. This is not possible to do. However, since SpamSieve protects you from viewing the spam that you do receive, the spammers will not see their messages get through, so they are less likely to send you more.
SpamSieve also does not block spam messages from being received by your Mac. This would be dangerous because if it made a mistake (no filter can be perfect) you could completely miss a good message.
Instead, what SpamSieve does is make sure that incoming spam messages end up in your spam mailbox rather than your inbox. No messages are deleted without your knowledge, so you always have the opportunity to review them.
You can optionally configure SpamSieve so that messages from known spam senders go directly to the trash rather than to the spam mailbox.
Good Messages
SpamSieve is designed with safety in mind so that, even if there is a bug in SpamSieve, it will never prevent you from receiving good messages or damage your local mail store. This follows directly from how SpamSieve works:
- SpamSieve does not communicate with your mail server at all. It does not need or affect your network connection or change whether your mail client is online or offline.
- Messages are not received through SpamSieve. It does not sit between your mail client and mail server. Instead, after your mail client has downloaded the new messages, it asks SpamSieve which of them are spam and moves those to the spam mailbox.
- SpamSieve does not read from or write to your mail client’s data store. Instead, it simply decides whether a message is spam and lets the mail client itself move the message from the inbox to the spam mailbox. If SpamSieve thinks that a message is good, it doesn’t touch it at all.
- SpamSieve does not affect how your mail program filters good messages. It moves the spam message to the spam mailbox, where they stay; the good messages are processed by your other rules as normal.
- SpamSieve does not touch or even see your sent messages. It only sees the messages that the mail client specifically sends to it for analysis: new, unread messages that arrive in the inbox and messages that you manually train it with.
- Some spam filters make changes to the messages that they process, e.g. adding subject or headers tags to indicate whether they are spam. SpamSieve does not modify the messages in any way, so there is no possibility of it damaging them.
Troubleshooting
If you are missing e-mail messages or seem to not be receiving them, here are some things to check:
- Because of the design described above, it is impossible for SpamSieve to cause you to lose messages or to interfere with the connection between your mail client and mail server. That said, people sometimes want to “know for sure” that SpamSieve is not the cause of the problem. You can see this by following the instructions in the Uninstalling SpamSieve section to temporarily disable SpamSieve or completely remove it.
- Check SpamSieve’s Log window to see whether there are Predicted: Spam or Predicted: Good entries for the missing messages. If so, this means that the messages went missing after they were downloaded to the inbox on your Mac and seen by SpamSieve. If not, this means that the messages never made it to your Mac or SpamSieve.
- Sometimes Mail loses track of messages when moving them from a server mailbox to a local mailbox. You can work around this by Setting the Junk Mailbox in Apple Mail.
- Use Web mail or a mail client on another computer or device to check the contents of your various mailboxes. If the messages show up there but not on your main Mac, you may need to rebuild your local mail database.
- Make sure that you have not created any rules on your mail server, on your mail client, or on another computer that delete messages or move them to the spam mailbox or trash. For example, a rule on one Mac that moves a message to a local mailbox will make it disappear from other computers that access the same mail account.
- Make sure that a junk filter on your mail server is not moving or deleting messages before you see them.
- Make sure that anti-virus software is not interfering. For example, if you are using Avast Mac Security, make sure that Settings ‣ Mail Shield Settings ‣ Scan secured connections is unchecked. This can cause hangs when Apple Mail is receiving messages.
- Try disabling other Mail plug-ins and see if that makes a difference.
7.12 SpamSieve Application Questions
7.12.1 Where is SpamSieve’s menu bar icon?
![]()
If you don’t see SpamSieve’s icon in the menu bar, first make sure that Show menu bar icon is checked in SpamSieve’s Settings ‣ Advanced window.
Make sure that SpamSieve is checked in System Settings ‣ Menu Bar ‣ Allow in the Menu Bar (macOS Tahoe 26 and later).
If you still don’t see it, the SpamSieve menu bar icon might not be visible if you have lots of other icons shown or if your Mac has a smaller screen. If there isn’t enough space to show the SpamSieve menu bar icon:
- You can remove other menu bar icons to make more space by Command-dragging them off the menu bar or by going to System Settings ‣ Control Center.
- The Control Center icon combines the functionality of many separate icons (Wi-Fi, Battery, Bluetooth, Sound, Battery, etc.), so some of the individual icons may not be necessary if you’re using Control Center.
- If your notebook Mac has a notch (camera housing) that covers the center of the menu bar, note that all of your icons need to fit on the right side of the notch. Even if there is empty menu bar space to the left of the notch, macOS will place any icons that overflow the right side directly in the notch (where they are invisible) rather than using the space to the left.
- If you can see the SpamSieve menu bar icon in some applications but not in others, you can give it priority by holding down the Command key and dragging it towards the right edge of the menu bar. That will ensure that it’s visible in Apple Mail or Outlook where you need to access it.
- You can still train SpamSieve from its Dock menu by clicking and holding on the Dock icon until the menu appears.
- You can still train SpamSieve using the keyboard shortcuts Command-Control-S (for Train as Spam) and Command-Control-G (for Train as Good).
It’s also possible that it’s been hidden by a third-party menu bar manager such as Bartender.
7.12.2 Why doesn’t my serial number work?
You need to enter the serial name and serial number exactly as they appear on your order confirmation e-mail. If you no longer have this e-mail, you can look up the name and number. Launch SpamSieve and choose Purchase from the SpamSieve menu. Then click the Look Up My Serial Number button.
7.12.3 Should I download SpamSieve from this free site?
No. We only recommend downloading SpamSieve from https://c-command.com and from reputable download sites such as Apple and MacUpdate. The SHA-256 hashes for all our current apps are available on the Downloads page. The C-Command Store lists all the vendors that are authorized to sell SpamSieve. Downloads from other sites may include adware or viruses.
The following sites:
DropDMG.downloads4mac.com
DropDMG.install4mac.com
DropDMG.macsoftware.com
DropDMG.onFreeDownload.com
EagleFiler.downloads4mac.com
EagleFiler.install4mac.com
EagleFiler.macsoftware.com
EagleFiler.onFreeDownload.com
SpamSieve.downloads4mac.com
SpamSieve.install4mac.com
SpamSieve.macsoftware.com
SpamSieve.onFreeDownload.com
are not authorized to distribute our software. They have been a source of confusion because they often appear in ads at the top of search results for Bing, DuckDuckGo, and Yahoo. We do not recommend downloading from these sites. In many cases, they will say that they are offering an “official” copy of SpamSieve that is anything but. In fact, the installer asks for your administrator password, installs adware, and makes other changes that may damage your Mac.
We do not offer apps for download on github.com.
CNET’s Download.com offers a Direct Download Link, which is valid; however it also offers a more prominent Download Now Installer Enabled link, which we do not recommend. The CNET installer installs toolbar adware and changes browser settings. This page explains how you can remove the toolbar.
7.12.4 How can I copy my training data to another machine?
SpamSieve’s Data Files
SpamSieve stores its training data in the folder:
/Users/<username>/Library/Application Support/SpamSieve/
and it stores its preferences in the file:
/Users/<username>/Library/Preferences/com.c-command.SpamSieve.plist
You should back up both of these. (See the How can I open the Library folder? section for how to access them.)
Moving or Copying SpamSieve to Another Mac (or User Account)
To transfer SpamSieve’s data to another machine, first quit both copies of SpamSieve. Then copy the folder and the preferences file to the corresponding locations on the other machine.
- You can do this using Migration Assistant.
- Or you could temporarily copy them from one Mac to iCloud Drive and then from iCloud Drive to the other Mac. (Do not keep the live copy of SpamSieve’s data in cloud storage; this will lead to database corruption.)
Your SpamSieve license will be transferred when you copy the preferences file. You can also transfer it manually, by looking up your order information.
When copying your SpamSieve setup to a Mac that didn’t previously have SpamSieve installed, you’ll need to put the SpamSieve application file in the Applications folder and do the setup in your mail program, but you can skip the initial training process because of the files that you copied above.
If you are copying the training data because you want to use SpamSieve on both Macs (rather than just moving it from one to the other), please see the SpamSieve and Multiple Macs section.
Restoring From a Backup
- Restore the SpamSieve folder and the com.c-command.SpamSieve.plist file that are mentioned above.
- Go to the SpamSieve Web site and click the Download button.
- Complete the installation steps in the Installing SpamSieve and Using SpamSieve sections, except that you can skip the initial training.
7.12.5 Does SpamSieve launch automatically?
Yes. Once it’s installed, you do not need to launch SpamSieve yourself:
- Apple Mail and Outlook will launch SpamSieve when they launch.
- The other mail clients will launch SpamSieve when they receive new e-mail messages that need to be processed or when you train a message as spam or as good.
In order to avoid SpamSieve showing the Settings window when it’s not wanted, we recommend that you do not add SpamSieve to System Settings ‣ General ‣ Login Items ‣ Open at Login. It should only be under Allow in the Background.
If SpamSieve is not auto-launching as it should, please:
- Make sure that it’s installed in the /Applications folder as described in the Installing SpamSieve section.
- Go to System Settings ‣ General ‣ Login Items and make sure that SpamSieve is enabled under Allow in the Background.
- Find the appropriate section to check the setup in your mail client.
- Try toggling filtering off and then on again in Settings ‣ Apple Mail ‣ Setup or Settings ‣ Outlook ‣ Setup.
- See the Sending in an Error Report section.
Although the SpamSieve application must be running in order to filter your mail, it ordinarily runs in the background with no user interface visible. The Dock icon can be hidden if desired, and you can also set it to quit when your mail client quits.
7.12.6 Can I use SpamSieve with more than one mail program at a time?
Yes; many people do this to separate their personal and business mail, and you can even use the two mail programs simultaneously. Whether you’re using multiple mail programs or just switching from one to another, you just need to follow the setup instructions once for each mail program. SpamSieve will automatically share its training data, rules, and statistics among all the mail programs.
7.12.7 How can I open the Library folder?
The user library folder is stored at the path /Users/<username>/Library/. The way to access it is different depending on which version of macOS you are using:
macOS 10.12.3 and Later
The Library folder is hidden by default. To open it, click on Finder in the Dock. Click on the Go menu at the top of the screen, hold down the Option and Shift keys, and then choose Library. (Only one of Option and Shift is needed, but due to an OS bug, which one you need to hold down can vary. Thus, it is easier to hold down both.)
Another way to access the Library folder is to choose Home from the Go menu, then type Command-Shift-Period to show invisible files, and then open the Library folder.
Mac OS X 10.7 Through 10.12.2
The Library folder is hidden by default. To open it, click on Finder in the Dock. Click on the Go menu at the top of the screen, hold down the Option key, and then choose Library.
Another option is to go to your home folder, choose View ‣ Show View Options and then make sure that Show Library Folder is checked.
Mac OS X 10.6
Click on Finder in the Dock, click on the Go menu, and choose Home. This will show your home folder, and you can open the Library folder directly.
7.13 Apple Mail–Specific Questions
7.13.1 If Apple Mail Is Running Slowly
If Apple Mail itself or SpamSieve operations related to Apple Mail are slow, please start out by checking these items, which apply to most situations:
Go to Mail ‣ Settings ‣ Accounts ‣ Account Information and set Download Attachments to All for each account.
(If there is a particular old message that you want to train, but which has not been fully downloaded, it may help to open it in its own window and/or to use File ‣ Save As… to save it in Raw Message Source format. That can trigger Mail to finish the download. Another option is to copy the message to a different mailbox and then train the copy.)
In Mail’s Settings window, click on the Accounts tab, then your account, then the Server Settings tab, and uncheck Automatically manage connection settings. (This option is not available for all account types. In previous versions of Mail, this option was called Automatically detect and maintain account settings and was in the Advanced tab.)
Make sure that you have granted SpamSieve Full Disk Access in System Settings ‣ Privacy & Security, as this massively speeds up the Check inboxes for new messages not sent to Mail extension, Filter spam messages in other mailboxes, and Add green flag to unread good messages features.
It sometimes helps to restart your Mac in safe mode, as this can clear out cache files that may be damaged and temporarily disable other software that may be conflicting.
If necessary, for troubleshooting purposes, you can temporarily turn off SpamSieve by selecting Disable spam filtering in Apple Mail in Settings ‣ Apple Mail ‣ Setup.
For more specific slowness issues, please see the Slow Apple Mail Filtering and Slow Apple Mail Training sections. If you need additional assistance, please see the Reporting Apple Mail Slowness section.
7.13.1.1 Slow Apple Mail Filtering
First, please try the suggestions in the If Apple Mail Is Running Slowly section.
The normal setup is to have SpamSieve checked in the Extensions tab of Apple Mail’s settings and to have Enable spam filtering using Mail extension selected and Check inboxes for new messages not sent to Mail extension checked in SpamSieve’s settings. However, several alternate configurations are possible and may work better in some cases:
You can uncheck SpamSieve in the Extensions tab of Apple Mail’s settings, while leaving Enable spam filtering using Mail extension enabled in SpamSieve’s settings. This can work around bugs in Mail that can cause Mail to redownload a message or hang if it’s talking to the SpamSieve Mail extension while SpamSieve is filtering a mailbox.
You can uncheck Check inboxes for new messages not sent to Mail extension and instead select all the inboxes that you want filtered in Filter spam messages in other mailboxes. (Keep SpamSieve checked and Enable spam filtering using Mail extension selected.)
You can uncheck Check inboxes for new messages not sent to Mail extension and rely on the Mail extension to filter inbox messages. To do this, make sure that you launch the SpamSieve app before you launch Mail. (Keep SpamSieve checked and Enable spam filtering using Mail extension selected.)
You can reduce the filtering overhead by setting SpamSieve to check for new messages less frequently. This can also help if a slow network connection is preventing Mail from fully downloading all the messages in a timely manner.
If you have a very large inbox (more than 200,000 messages) or other mailbox selected for filtering, SpamSieve is able to quickly check it for new messages that need to be filtered. However, prior to macOS Tahoe 26, there can be a slight delay when SpamSieve finds a new message and asks Mail to read it or move it to the Junk mailbox. If there are many such new messages, this delay can be noticeable in Mail’s responsiveness. You can see in Settings ‣ Apple Mail ‣ Filtering which mailbox is currently being filtered to see which one might be causing the slowness. The Select Mailboxes to Filter… sheet also shows the total number of messages in each mailbox. Once you’ve identified the slow mailbox, you can speed up its filtering by moving older messages to an unfiltered mailbox.
If you are using the Apple Mail - Remote Training, Apple Mail - SaneBox, or Apple Mail - Server Junk Mailbox script, try unchecking the Mail rule that runs the script and see if that helps. You can also run the script in Script Editor to see if it is taking a long time to complete.
If you need further assistance, please see the Reporting Apple Mail Slowness section.
7.13.1.2 Slow Apple Mail Training
First, please try the suggestions in the If Apple Mail Is Running Slowly section.
A small percentage of customers using macOS Tahoe 26 are seeing slow training in Apple Mail that is not resolved by the general fixes. The SpamSieve menu bar icon changes color for an extended period of time before the messages move to the Junk mailbox or the messages change color but don’t move at all. If this is happening for you, please update to SpamSieve 3.2.2 or later and click here to enable an experimental workaround. (You can click here if you need to disable it.)
Please let us know whether this helped. If you need further assistance, please see the Reporting Apple Mail Slowness section.
7.13.1.3 Reporting Apple Mail Slowness
If you’ve tried the suggestions in the If Apple Mail Is Running Slowly section and the problem is still occurring:
- Please see the Sending in a “Sample” Report section for how you can record what Mail is doing so that we can investigate the cause of the slowness. It’s important to record samples from both Mail and SpamSieve while the slowness is occurring.
- Please send in a diagnostic report as described in the Sending in an Error Report section. This will include information about errors that were reported how Mail is configured in order to help isolate the problem.
7.13.1.4 If Apple Mail Is Running Slowly (Mail Plug-In Setup)
The following sections only apply when using macOS 13 and earlier with the Mail plug-in setup. The If Apple Mail Is Running Slowly section has information about general Mail slowness problems, as well as slowness related to the Mail extension setup.
Slow Launching of Mail
If Mail is launching slowly (which can cause SpamSieve to deactivate its Mail rule) and you are using macOS 10.14 or later, the slowness is probably caused by a Mail bug. After a Mail plug-in (any plug-in, not just SpamSieve) has been installed for a long time, Mail sometimes pauses before loading it. There are two ways to work around this:
Automatic
On macOS 13 and with SpamSieve 2.9.52 or later, you can click this link to tell SpamSieve to enable its automatic workaround for this issue. You can also click here to disable the workaround. Please let us know if you encounter any problems.
Manual
Deactivate and then reactivate the plug-in:
Go to the Rules tab of Mail’s Settings and uncheck the SpamSieve rule.
Go to the General tab of Mail’s Settings and click on Manage Plug-ins…. Uncheck SpamSieve.mailbundle and restart Mail.
Note: It is important to temporarily disable the plug-in this way, from within Mail, rather than using the Uninstall Plug-In… command, as Mail has access to reset files that SpamSieve cannot access.
Go back to Manage Plug-ins… and check SpamSieve.mailbundle. Now restart Mail again.
Go to the Rules tab of Mail’s Settings and check the SpamSieve rule to make it active again.
This will usually speed up Mail’s launching for several months, if not longer, at which point you may need to repeat the procedure above. If you find that Mail slows down again sooner than that, please let us know.
Hang When Launching Mail
If Mail is not just slow (as above) but does not finishing launching at all (after waiting a few minutes), it may help to:
- Reboot your Mac in safe mode.
- Reboot your Mac in again (in regular mode).
- Click Install Plug-In.
7.13.2 If Apple Mail Doesn’t Check for New Messages Automatically
Some macOS 10.13 users have reported that when they are away from a Mac that is either on or in Power Nap, Mail stops downloading new messages from the server, and thus SpamSieve stops cleaning out the inbox. As soon as they sit down at the Mac and unlock the screen, Mail starts processing the messages again. This seems to be caused by a macOS bug that can be worked around by going to System Settings ‣ Security & Privacy ‣ General and toggling the Require password checkbox off and then on again.
7.13.3 If Apple Mail Shows an Error When Moving Messages
A small number of users have reported that, when SpamSieve’s background filtering asks Mail to move a message to the Junk mailbox, Mail shows an error alert that says something like:
The message “<subject>“ could not be moved to the mailbox “<account name>“
The specified object was not found in the store., The process failed to get the correct properties.
This seems to mostly, if not exclusively, happen with Exchange accounts. There are several separate problems that can manifest in this same way, including damage to Mail’s files and possibly bugs in Mail itself or the mail server. If you record sample log when the alert appears and contact us, we can investigate and try to determine specifically what is happening on your Mac. However, here are some potential solutions that you can try yourself and that will likely resolve the problem:
- Reset Mail’s junk database.
- Click here to tell SpamSieve not to tell Mail that the messages are junk. This can avoid hangs when the junk database is malfunctioning and resetting it doesn’t help. (You can click here to go back to the default setting.)
- Mail can show this error if a message is unexpectedly deleted from the server while it’s trying to access the message. Make sure that you don’t have any other rules, scripts, or devices that are deleting your spam messages.
- In Settings ‣ Accounts ‣ Mailbox Behaviors in Mail, make sure that Store junk messages on the server is unchecked for each account. (This is the opposite of what we normally recommend.)
- Click here to tell SpamSieve to move the spam messages to a local mailbox called Spam instead of to the Junk mailbox. (You can click here to go back to the default setting.)
7.13.4 Duplicate Apple Mail Accounts
In rare cases, two bugs in macOS can cause the training commands to fail. The SpamSieve - Train as Spam command doesn’t move the message to the Spam mailbox, and an error such as:
SpamSieve Apple Mail Plug-In [Train as Spam] Error Training: Mail got an error: Can’t get mailbox "INBOX" of account "<account>".
is reported in Console. The Train as Good command doesn’t move the message to the inbox, and an error such as:
SpamSieve Apple Mail Plug-In [Train as Good] Error Training: Mail got an error: An error of type 8 has occurred.
is reported in Console.
To make the training commands work and prevent these errors:
Choose Settings from the Mail menu.
Click on the Accounts tab.
Make sure that each account has a unique name. You can edit the Description field for an account to change its name so that it is different from the other accounts’ names.
For example, you may have both an active POP account and an inactive IMAP account for the same username and server. These might both be called “Account A”. In this case, you could rename the inactive one to “Account A Inactive” so that the names are different.
If you rename an inactive account, Mail will ask if you want to enable the account. Click Leave Disabled.
If you don’t see multiple accounts with the same name, check in System Settings ‣ Internet Accounts. Some accounts only show up there.
Having multiple mail accounts with the same name can also prevent incoming messages from being filtered.
If renaming the accounts doesn’t help, please follow the instructions in the Sending in an Error Report section.
7.13.5 Why are Apple Mail inbox messages not being processed?
Mail Extension
When using the Mail extension, please follow the Checking the Apple Mail Setup instructions to make sure that Apple Mail and SpamSieve are properly set up. Normally, SpamSieve will then immediately filter new messages that arrive unread in the inbox.
In rare cases, a macOS bug can prevent Apple Mail from sending new messages to the SpamSieve extension for analysis. You can check the Log window to see whether this is the case; if the log is not showing the messages as Predicted, that means SpamSieve is not seeing them. If this bug is affecting you, please let Apple know and reference bug number FB12819637.
You can probably avoid the bug by launching SpamSieve before Mail. SpamSieve also has a built-in feature to work around the bug. In most cases, all you need to do is make sure that Check inboxes for new messages not sent to Mail extension is enabled in the Settings ‣ Apple Mail ‣ Setup window. Then SpamSieve will periodically double-check the inboxes to make sure that any new messages have been filtered. This happens on a slight delay. If you want to see for sure whether a message in the inbox has been processed yet, you can enable the Add green flag to unread good messages option or check the Log window to see whether there is a Predicted log entry.
We strongly recommend granting SpamSieve Full Disk Access. Otherwise, the workaround will be be slower and may report an error, as described below. If you are using macOS 12 Monterey or earlier, it is recommended that you use the Mail plug-in setup, which avoids all of these issues.
Large Inboxes Without Full Disk Access
If you haven’t granted SpamSieve Full Disk Access, to avoid slowing down Apple Mail, SpamSieve will skip checking an inbox if it contains more than 5,000 messages, and it will tell you in the Log window and in Settings ‣ Apple Mail ‣ Setup that it did this. Such mailboxes are shown in orange in the Select Mailboxes to Filter… sheet. If you have an inbox with more messages:
- You can reduce the size of the inbox by moving some messages to the Archive mailbox or to another mailbox that you create, such as Inbox2. This is what we recommend because it will make checking the inbox faster and ensure that Mail doesn’t slow down or freeze.
- If there are fewer than 10,000 messages, you can select your inboxes in Filter spam messages in other mailboxes to tell SpamSieve that you want it to use this higher limit, understanding that depending on the speed of your Mac this may cause slowness or freezes in Mail.
- If you have a very fast Mac and really know what you’re doing, you can go to the esoteric preferences to raise the limits.
Mail Plug-In
When using the Mail plug-in, please follow the Checking the Apple Mail Setup (Plug-In) instructions to make sure that Apple Mail and SpamSieve are properly set up. Then SpamSieve should immediately filter new messages that arrive unread in the inbox.
Other Mailboxes
If the unprocessed spam messages are not in your inbox, see the Why are other Apple Mail mailboxes not being processed? section.
7.13.6 Why are other Apple Mail mailboxes not being processed?
First, please follow the Checking the Apple Mail Setup or Checking the Apple Mail Setup (Plug-In) instructions to make sure that Apple Mail and SpamSieve are properly set up.
When using the Mail extension, a limitation of macOS is that extensions only see new messages that remain in the inbox. Extensions do not have access to messages that were moved to another mailbox by a Mail rule.
You can use the Filter spam messages in other mailboxes option to have SpamSieve filter messages in other Apple Mail mailboxes after they have been moved by a Mail or a server rule. Just click Select Mailboxes to Filter… to choose which mailboxes SpamSieve should periodically check for new messages. This happens on a slight delay. If you want to see for sure whether a message outside the inbox has been processed yet, you can enable the Add green flag to unread good messages option or check the Log window to see whether there is a Predicted log entry.
We strongly recommend granting SpamSieve Full Disk Access. Otherwise, filtering will be be slower and report an error for mailboxes containing more than 10,000 messages.
Inbox
If the unprocessed spam messages are in your inbox, see the Why are Apple Mail inbox messages not being processed? section.
7.13.7 Why don’t I see the SpamSieve commands in Apple Mail’s Message menu?
When using the Mail extension, the SpamSieve menu commands are in the SpamSieve menu bar icon.
When using the Mail plug-in, the Message menu in Apple Mail should contain several SpamSieve commands, after completing Step 2 of the Setting Up Apple Mail (Plug-In) section.
Note that these commands should be in the Message menu at the top of the screen, not in the contextual (right-click) menu.
If you don’t see these commands, that means that SpamSieve’s Mail plug-in is not loaded. If the plug-in is not loaded, you will not be able to train SpamSieve, and Mail will move good messages to the spam mailbox without consulting SpamSieve.
To re-install the plug-in, go to Settings ‣ Apple Mail ‣ Setup and click Install Plug-In.
If you are using macOS 10.14 or later, you will need to click Manage Plug-ins… in Mail’s settings and enable SpamSieve.mailbundle. This is described in more detail in the Enabling and Updating the Apple Mail Plug-In section.
Troubleshooting
First, see the troubleshooting information in the Enabling and Updating the Apple Mail Plug-In section if you don’t see the plug-in in Manage Plug-ins… or if it doesn’t stay enabled there.
If you still don’t see the SpamSieve commands in the Message menu after relaunching Mail, try restarting your Mac. There may also be errors reported in the Console that point to the source of the problem.
In rare cases, Mail may be set not to load plug-ins and “stuck” so that this setting cannot be changed. To fix this, make sure that the Terminal application has Full Disk Access, open the Terminal application and enter these commands:
cd ~/Library/Containers/com.apple.mail/Data/Library/Preferences/
/usr/libexec/PlistBuddy com.apple.mail.plist -c 'Add EnableBundles bool YES'
killall -SIGTERM cfprefsd
7.13.8 Why do good messages move to the wrong inbox when trained in Apple Mail?
When you train a message in the Junk mailbox as good, SpamSieve normally moves it back to your inbox. If the messages are not going to the inbox, see the Why does a message disappear or go back to the Junk mailbox after I train it as good? section.
If the messages are going to the wrong inbox, follow the instructions in the Setting the Junk Mailbox in Apple Mail section to make sure that each account’s Junk mailbox is stored on the mail server. Also, make sure that you’ve told Apple Mail about your account aliases in Mail’s Settings ‣ Accounts ‣ Account Information window. The Email Address menu (for the proper account) should list the address that the message was sent to.
If you are using the Mail plug-in setup, make sure that your SpamSieve rule in Apple Mail is set to move the messages to the special All Junk mailbox.
7.13.9 Why do I see spam messages in my “Unread” smart mailbox in Apple Mail?
A smart mailbox in Apple Mail is not a mailbox in the sense of “a place where messages are stored.” Rather, a smart mailbox is a “saved search” across multiple actual mailboxes. When you’re viewing a smart mailbox, the message list shows the name of the mailbox that actually stores the message.
Thus, a smart mailbox that searches for unread messages will, by default, also find unread messages in the Junk mailbox. To avoid seeing spam messages in your Unread smart mailbox, make sure it’s set up as follows:
- Contains messages that match all of the following conditions:
- Message is Unread
- Message is not in Mailbox All Junk
7.13.10 Why does the Spam mailbox in Apple Mail appear empty even though there’s a number beside it?
Mail shows a number next to the Junk mailbox to indicate how many unread messages it contains. Sometimes you’ll see the number, but when you click on the mailbox to see its contents you’ll see either no messages or no unread messages. This may be because:
- The unread messages are actually in a second mailbox, inside the Junk mailbox. If there’s a triangle to the left of the mailbox icon, click to make it point down. This will reveal any mailboxes inside and allow you to access their contents.
- Mail’s database is damaged so that the numeric display is out of sync with the actual mail that’s stored on your Mac and/or your server. You can fix this by rebuilding Apple Mail’s database.
7.13.11 What can I do if my Spam or Junk mailbox in Apple Mail disappeared?
First, from Mail’s View menu, choose Show Sidebar (or Show Mailbox List on older versions of macOS) if necessary so that the mailboxes are visible.
Junk Mailbox
If you’re using the recommended setup described in Setting the Junk Mailbox in Apple Mail, the special Junk mailbox should always be visible within each account. To see the spam messages from all accounts consolidated into a single All Junk mailbox, you can click the + button next to Favorites at the top of Mail’s mailbox list and then add the All Junk mailbox to the favorites.
Spam Mailbox
If you are instead using a Spam mailbox under On My Mac, it is most likely it’s still there but Mail is currently hiding it. To show the Spam mailbox:
- Locate the On My Mac section of the mailbox list. It is typically below the Mailboxes and Smart Mailboxes sections of the mailbox list. You may need to scroll down in order to find this. (macOS may have made the scroll bars invisible, but you can scroll down by two-finger dragging on your Mac’s trackpad or by using the scroll ball on the mouse.)
- Move your mouse over On My Mac in the mailbox list. Then click the > or Show button that becomes visible at the right.
![]()
![]()
7.13.12 Why are messages marked as spam in Apple Mail but not moved?
All Apple Mail Setups
Sometimes SpamSieve may classify a message as spam (as shown in the log), and change its color in Apple Mail, but the message does not move to the Junk mailbox; it remains in the inbox.
Here are some ways to fix this:
- Follow the Setting the Junk Mailbox in Apple Mail instructions to make sure that each mail account has a Junk mailbox and that it’s stored on the mail server.
- You can test that Mail is able to move the messages by manually applying SpamSieve. Select one of the messages in the inbox that was marked as spam and choose Filter Messages from the SpamSieve menu bar icon. You can check in the Log section of the manual whether SpamSieve predicted the message to be spam. If it did, but the message did not move, Mail may be encountering an error when it tries to move the message. Please see Sending in an Error Report.
- Mail’s database may be damaged. Please see the How can I rebuild Apple Mail’s database? section of the manual.
Mail Plug-In Setups
- Make sure that your SpamSieve rule in Apple Mail looks like the one shown in the Setting Up Apple Mail (Plug-In) section of the manual. If Mail loses track of the Junk mailbox, there may be no mailbox specified in the rule’s actions, and so Mail will not move the spam messages.
- You can test that the rule works and that Mail is able to move the messages by manually applying the SpamSieve rule. Select one of the messages in the inbox that was marked as spam and choose Apply Rules from the Message menu. You can check in the Log section of the manual whether SpamSieve predicted the message to be spam. If it did, but the message did not move, Mail may be encountering an error when it tries to move the message. Please see Sending in an Error Report.
- Sometimes Mail rules will not move messages that were processed immediately after the Mac woke from sleep. You can work around this problem by quitting Mail before sleeping your Mac or by setting your Mac to not go to sleep, as described in the Filtering Spam During Power Nap instructions. You can also use the QuitMailWhenMacSleeps esoteric preference to make SpamSieve automatically quit Mail before the Mac sleeps and launch it when it wakes.
- A bug in macOS 10.15 through macOS 26, affecting a small number of customers, can prevent Mail rules from moving messages to certain mailboxes. Although the server may show them as moved, Mail on the Mac may also show them colored in the inbox. You can work around this by ensuring that the rule moves the messages to a mailbox that’s on the same server. The easiest way to do this is to use Mail’s special Junk mailbox, as described in Setting the Junk Mailbox in Apple Mail.
- See whether the problem still occurs if you disable other Mail plug-ins, as described in the Can other Apple Mail plug-ins cause problems with SpamSieve? section.
7.13.13 Why do Apple Mail messages bounce back to the inbox after I train them as spam?
Sometimes when you train an uncaught spam message in the inbox as spam, the message will move to the spam mailbox and then appear to “bounce back” to the inbox. That is, the same message (not a new one that looks similar) will appear again in the inbox and no longer be in the spam mailbox. Usually, the same thing will happen if you move the message via drag and drop rather than training it with SpamSieve, which indicates that it’s a general problem with moving messages rather than something specific to spam filtering.
Typically, this means that Apple Mail and the mail server did not successfully move the message in the first place. Mail moved the message locally, but it did not get moved on the server, and so the next time Mail synchronized with the server it reinstated the message in the inbox.
Sometimes this is caused by a problem with Mail’s database, and you can fix it by doing a complete rebuild of the database.
Other times, most commonly with Gmail, there can be a problem moving the message from the inbox (on the server) to a local mailbox (the Spam mailbox under On My Mac). We recommend Setting the Junk Mailbox in Apple Mail.
7.13.14 How can I rebuild Apple Mail’s database?
Many common problems with Mail can be fixed by rebuilding all or part of its index database. For example:
- You have a mailbox that shows a number of unread messages in the mailbox list, but when you click on the mailbox there do not seem to be any unread messages inside.
- Messages seem to have disappeared; they show up when you search your Mac using Spotlight but not when browsing or searching in Mail.
- A smart mailbox doesn’t seem to be finding the messages that you think it should.
- You click on a mailbox that you know contains some messages, but Mail doesn’t show any.
- Messages are colored as spam but remain in the inbox, even though your SpamSieve rule is set to move them to the Spam mailbox.
- You try to delete messages, but they come back or Mail reports an error.
- Mail is very slow at browsing or searching messages.
To do a complete rebuild of Mail’s database:
First toggle some settings to prevent SpamSieve from refiltering old messages if Mail redownloads them after the database rebuild:
- In SpamSieve’s Settings ‣ Apple Mail ‣ Setup window, turn off Check inboxes for new messages not sent to Mail extension and then turn it back on again.
- In SpamSieve’s Settings ‣ Apple Mail ‣ Filtering window, turn off Filter spam messages in other mailboxes and then turn it back on again.
(If these are already off, you can leave them off.)
Quit Mail.
Locate the Envelope Index file. On macOS 26, macOS 15, macOS 14, and macOS 13, the file is stored at:
/Users/<username>/Library/Mail/V10/MailData/Envelope Index
Open your user Library folder. (See the How can I open the Library folder? section if necessary.) Then open the Mail folder, then V10, then MailData to find the Envelope Index file.
- On macOS 12, the MailData folder is inside of the V9 folder rather than V10.
- On macOS 11, the MailData folder is inside of the V8 folder rather than V10.
- On macOS 10.15, the MailData folder is inside of the V7 folder rather than V10.
- On macOS 10.14, the MailData folder is inside of the V6 folder rather than V10.
- On macOS 10.13, the MailData folder is inside of the V5 folder rather than V10.
- On macOS 10.12, the MailData folder is inside of the V4 folder rather than V10.
- On macOS 10.11, the MailData folder is inside of the V3 folder rather than V10.
- On macOS 10.7 through 10.10, the MailData folder is inside of the V2 folder rather than V10.
Once you’ve found the Envelope Index file, drag it to the trash. Also delete Envelope Index-shm and Envelope Index-wal (if they exist).
Note: Rebuilding the index database is normally perfectly safe. Even though it seems that you are deleting a file, Mail stores its primary copy of your message data elsewhere. When you delete the damaged database, Mail uses this primary copy to create a new index database. However, please be careful if you are using macOS 10.15. We’ve heard some reports that rebuilding the Envelope Index can lose messages in On My Mac mailboxes on macOS 10.15.0–10.15.2 due to a bug in Mail. If you are using macOS 10.15 prior to macOS 10.15.3, be sure that you have a backup first, and proceed with caution.
Relaunch Mail. It will welcome you as if you haven’t used it before. This step may take a few minutes, as Mail searches through all of your stored messages to build your new database file. IMAP and Exchange messages will need to be re-downloaded from the server.
7.13.15 How can I reset Apple Mail’s junk database?
A corrupt database for Mail’s built-in junk mail filter can cause Mail to crash when processing incoming messages or when training messages with SpamSieve. To reset the database, find the LSMMap2 file and drag it to the trash.
On macOS 26, macOS 15, macOS 14, and macOS 13, the file is stored at:
/Users/<username>/Library/Mail/V10/MailData/LSMMap2
See the How can I open the Library folder? section. Open the Mail folder, then V10, then MailData to find the LSMMap2 file.
On macOS 12, the file is stored at:
/Users/<username>/Library/Mail/V9/MailData/LSMMap2
See the How can I open the Library folder? section. Open the Mail folder, then V9, then MailData to find the LSMMap2 file.
On macOS 11, the file is stored at:
/Users/<username>/Library/Mail/V8/MailData/LSMMap2
See the How can I open the Library folder? section. Open the Mail folder, then V8, then MailData to find the LSMMap2 file.
On macOS 10.15, the file is stored at:
/Users/<username>/Library/Mail/V7/MailData/LSMMap2
See the How can I open the Library folder? section. Open the Mail folder, then V7, then MailData to find the LSMMap2 file.
On macOS 10.14, the file is stored at:
/Users/<username>/Library/Mail/V6/MailData/LSMMap2
See the How can I open the Library folder? section. Open the Mail folder, then V6, then MailData to find the LSMMap2 file.
On macOS 10.13, the file is stored at:
/Users/<username>/Library/Mail/V5/MailData/LSMMap2
See the How can I open the Library folder? section. Open the Mail folder, then V5, then MailData to find the LSMMap2 file.
On macOS 10.12, the file is stored at:
/Users/<username>/Library/Mail/V4/MailData/LSMMap2
See the How can I open the Library folder? section. Open the Mail folder, then V4, then MailData to find the LSMMap2 file.
On macOS 10.11, the file is stored at:
/Users/<username>/Library/Mail/V3/MailData/LSMMap2
See the How can I open the Library folder? section. Open the Mail folder, then V3, then MailData to find the LSMMap2 file.
On macOS 10.7 through 10.10, the file is stored at:
/Users/<username>/Library/Mail/V2/MailData/LSMMap2
See the How can I open the Library folder? section. Open the Mail folder, then V2, then MailData to find the LSMMap2 file.
7.13.16 Can other Apple Mail plug-ins cause problems with SpamSieve?
We try to ensure that SpamSieve is compatible with other Apple Mail plug-ins. Nevertheless, it is possible for another plug-in—especially an old version—to prevent SpamSieve or Mail from working properly.
Known Issues
GPGMail
There is a known bug in the GPGMail plug-in that causes it to re-apply Mail’s rules (including SpamSieve) to non-new messages and even to sent messages.
MailTags
MailTags has generally been fully compatible with SpamSieve. Please make sure that you are using the latest version of MailTags. If you encounter any problems, see if disabling it helps.
Troubleshooting
If you are using multiple Mail plug-ins and seeing hangs, problems launching, or other unexpected behavior, it’s best to check whether the problem goes away when only the SpamSieve plug-in is installed.
On macOS 10.14 and later, you can disable Mail plug-ins by unchecking them from Settings ‣ General ‣ Manage Plug-ins….
On earlier versions of macOS, Mail plug-ins can be installed in the global Bundles folder (which not all users will have):
/Library/Mail/Bundles
and also in the user Bundles folder:
/Users/<username>/Library/Mail/Bundles
To access this folder, see the How can I open the Library folder? section.
Please check both Bundles folders for any .mailbundle files/folders. You can temporarily disable a plug-in by dragging its .mailbundle to your desktop and then re-launching Mail.
If disabling the other Mail plug-ins fixes the problem:
- You have a temporary fix for the problem: uninstalling the other plug-ins.
- You can report the problem to us and to the other plug-in developer so that we can find a way for the plug-ins to work better together.
7.13.17 What can I do if Apple Mail is crashing?
Under normal circumstances, Apple Mail does not crash, whether or not you are using SpamSieve. If you find that Mail is crashing, here are some things that you can do:
First, please send us a crash report so that we can look into the cause. Note that if you are seeing a spinning beachball cursor rather than a crash report window, Mail is probably hanging rather than crashing. In that case, you should instead see the If Apple Mail Is Running Slowly section of the manual.
Often, it helps just to restart your Mac.
Make sure that any other Mail plug-ins are updated to their latest versions. If that doesn’t help, see whether disabling the other plug-ins stops the crashes.
The most common Mail crash that we see is due to a bug in Mail’s own junk mail filter. SpamSieve normally tells Mail which messages it thinks are junk in order to protect you from Web bugs. Resetting Mail’s junk database may fix the problem.
You can also tell SpamSieve not to mark the messages as junk if analyzing the spam messages is causing Mail’s filter to crash. To do this, click the link for AppleMailPlugInSetIsJunk in the Esoteric Preferences.
Try renaming the SpamSieve rule in Mail to Move to Spam. This will cause Mail to treat it like a regular rule, bypassing SpamSieve. If Mail still crashes when applying the rule, this will show that the crash is due to Mail moving the message to the spam mailbox and not because of SpamSieve.
This test will cause Mail to move all incoming messages to the spam mailbox. After the test, you can disable the rule, move the messages back to the inbox, and use the Message ‣ Apply Rules command to re-filter them.
SpamSieve works with a variety of mail programs. You could temporarily use a different one, either for reading your mail or just for spam filtering. With an IMAP or Exchange mail account, you will see the same mailboxes and messages in each mail program.
8 Legacy Mail Programs
The following mail programs are discontinued, but they can still be used with SpamSieve.
8.1 Setting Up Airmail 1–3
These instructions apply to versions 1–3 of Airmail. For Airmail 4, please see the Setting Up Airmail section.
Make sure that you are using Airmail 1.3.1 (223) or later.
From the Airmail 3 (or Airmail 2) menu, choose Settings….
Click on the Accounts icon at the top of the window. For each IMAP account in the list:
- Click on the More tab and look in the Download section.
- Make sure Message Content is checked.
- Make sure Attachments is checked.
POP accounts do not have the Download section, so you can skip this step for them.
Click the Save button.
Click on the Advanced icon at the top of the window and make sure that Use SpamSieve is checked.
Now it is time to train SpamSieve:
- To train SpamSieve with spam messages, select the messages, Control-click, and choose SpamSieve - Train as Spam from the contextual menu. (Do not use the Mark as Spam command.)
- To train SpamSieve with good messages, select the messages, Control-click, and choose SpamSieve - Train as Good from the contextual menu. (Do not use the Mark as Not Spam command.)
The Do an Initial Training section explains which messages (and how many of them) you should train.
On macOS 10.14 or later, the first time you try to train a message macOS will ask whether Airmail can control SpamSieve, and you should click OK.
SpamSieve will process new mail automatically. Messages that it thinks are spam will be moved to the Junk or Spam folder. Airmail will automatically launch SpamSieve when there are new messages that need to be filtered or when you train messages as spam or as good.
If you need to troubleshoot SpamSieve and Airmail, see the Checking the Airmail Setup section.
Keyboard Shortcuts
If you prefer not to use the menu commands for training SpamSieve, you can set up keyboard shortcuts as follows:
- Open System Settings.
- Click on the Keyboard icon.
- Click on the Shortcuts (or Keyboard Shortcuts on older versions of macOS) tab.
- Select App Shortcuts (or Application Shortcuts on older versions of macOS).
- Click the + button.
- For Application, select Airmail 3 (or Airmail 2 or Airmail).
- For the Menu Title, enter SpamSieve - Train as Spam.
- Click in the box next to Keyboard Shortcut and enter your desired shortcut. We recommend Command-Control-S.
- Click the Add button.
- Click the + button.
- For Application, select Airmail 3 (or Airmail 2 or Airmail).
- For the Menu Title, enter SpamSieve - Train as Good.
- Click in the box next to Keyboard Shortcut and enter your desired shortcut. We recommend Command-Control-G.
- Click the Add button.
When the keyboard shortcuts are set up correctly, you will see them in Airmail’s Message ‣ Mark as Reminder menu.
8.2 Setting Up Entourage
This section applies to Entourage 2004 and 2008. Please see the Setting Up Entourage v.X section if you need to set up an older version of Entourage.
Go to Entourage’s Tools menu and select Junk E-mail Protection. Turn off Entourage’s junk filter by clicking None and then OK.
Switch to SpamSieve by clicking on its icon in the Dock. Go to the SpamSieve menu and choose Preferences…. Make sure that Use Outlook/Entourage contacts is checked and click the Load Contacts.
Choose Install Entourage Scripts from the SpamSieve menu. After you quit and re-launch Entourage, you should see four SpamSieve items in Entourage’s Scripts menu:
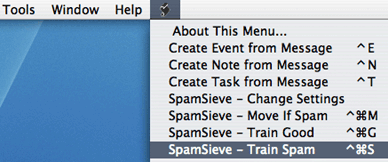
Choose Rules from Entourage’s Tools menu. Click on the tab corresponding to the type of account you have (e.g. POP, IMAP, or Exchange). If you have more than one kind of account, you will need to repeat steps 4–6 for each account type.
Click the New button. Change the name of the rule to SpamSieve - Move If Spam.
Click on the empty space between Change status and Not junk E-mail. Click Remove Action to delete the Change status action.

Click on the menu that says Set category and choose Run AppleScript. Then click the Script… button and Select the SpamSieve - Move If Spam\cmM file. This file is stored in the Entourage Script Menu Items folder (which is probably inside the Microsoft User Data folder inside your Documents folder):
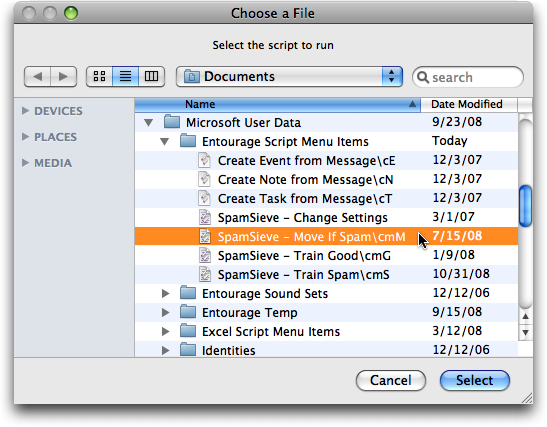
Make sure that Do not apply other rules… is unchecked. The rule should now look like:
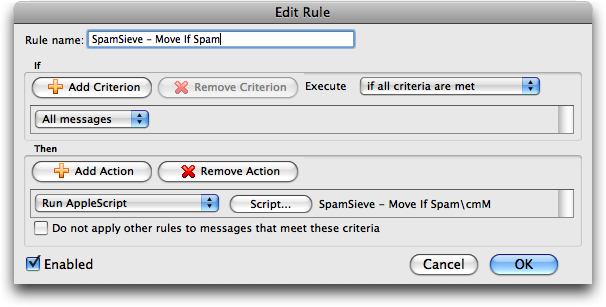
Click OK to close the Edit Rule dialog.
Note: It is important that you create the rule exactly as shown. Do not add additional actions below the action that runs the AppleScript. Such actions would apply to all messages (not just spam ones), which is probably not what you want.
Note: If you are using Gmail (via IMAP) or Exchange with Entourage, change the criterion from All messages to Folder Is Inbox (<Account Name>).
Click the New button to create a second rule. Change the name of the rule to SpamSieve - Move Messages.
Click on All messages and change it to say Category Is Junk.
Click Add Criterion. Click on From for the new criterion and change it to say Category Is Uncertain Junk.
Click on if all criteria are met and change it to if any criteria are met.
Click on the empty space between Change status and Not junk E-mail. Click Remove Action to delete the Change status action.
Click on the menu that says Set category and choose Move message. Change the menu at the right from Inbox to Junk E-mail. The rule should now look like:
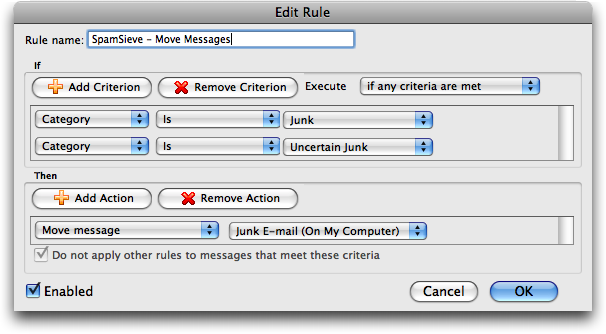
Click OK to close the Edit Rule dialog.
Make sure that the SpamSieve - Move If Spam rule appears at the top of the list in the Rules window. Directly below it should be the SpamSieve - Move Messages rule. You can change the order by dragging.
Now proceed to the Do an Initial Training section.
- To train SpamSieve with spam messages, select one or more of them and then choose SpamSieve - Train Spam from Entourage’s Scripts menu (as shown in the picture for Step 3, above).
- To train SpamSieve with good messages, select one or more of them and then choose SpamSieve - Train Good from Entourage’s Scripts menu.
The keyboard shortcuts for these commands are Command-Control-S and Command-Control-G.
Note: The training commands will move locally stored messages to the Junk E-mail folder or the inbox. Due to limitations of Entourage, they do not move IMAP or Exchange messages. (Incoming spam messages will be automatically moved to the Junk E-mail folder.)
SpamSieve will process new mail automatically. If you ever need to manually ask it to sift through a mix of spam and good messages, select the messages and choose Apply Rule ‣ All Rules from the Message menu.
The above is all you need to know about using SpamSieve with Entourage. The Entourage Customization section explains some more advanced setup options.
8.2.1 Entourage Customization
The following customizations are optional but recommended:
- Choose Entourage ‣ Preferences… and click on Notification. Turn off the sounds and new mail notifications, and let SpamSieve notify you only when you receive new non-spam messages.
- If you’re using an IMAP account, choose Tools ‣ Accounts. Edit the account and click on the Options tab. Make sure that Always download complete message bodies is checked and that Partially receive messages over is not checked.
Additional customizations are described below:
Change Settings
You can choose SpamSieve - Change Settings from Entourage’s Scripts menu to customize SpamSieve’s behavior in Entourage.
The settings are:
- Which folder should spam messages be moved to when you use “Train Spam”?
- Should “Train Spam” mark the messages as read?
- When you use “Train Good” on a message in the spam folder, should the message be moved back to the inbox?
- When you use “Train Good” on a message in the spam folder, should the message be marked as unread?
- Which folder should incoming spam messages be moved to? (This only affects POP messages. For IMAP and Exchange messages, you would need to modify the SpamSieve - Move Messages rule.)
- Should incoming spam messages be marked as read?
- Should incoming spam messages be removed from the mail server?
- Should incoming spam messages be marked with category “Uncertain Junk” rather than “Junk” if SpamSieve thinks they are not as spammy?
Spam Message Categories
SpamSieve colors spam messages in Entourage using one of two categories:
- Junk
- This is for messages that you mark as spam (using the SpamSieve - Train Spam command) and for most incoming messages that SpamSieve thinks are spam.
- Uncertain Junk
- This is for incoming messages that SpamSieve thinks are spam, but whose scores are below the uncertainty threshold. For more information about scores and uncertainty, see the Uncertain Spam Messages preference.
To change the colors associated with these categories, choose Edit ‣ Categories ‣ Edit Categories.
Normally, both Junk and Uncertain Junk messages are put into the same Junk E-mail folder. It is also possible to separate the messages by category. To do this:
- Create a new folder in Entourage called Uncertain Junk.
- Create a third rule called SpamSieve - Move Uncertain Messages. It should say “If Category Is Uncertain Junk, Then Move message Uncertain Junk.”
- Drag the new rule between the SpamSieve - Move If Spam and SpamSieve - Move Messages rules.
To turn off the uncertain spam feature, so that all spam messages are marked using the Junk category, use the SpamSieve - Change Settings command.
8.3 Setting Up Entourage v.X
Go to Entourage’s Tools menu and choose Junk Mail Filter. Turn off Entourage’s junk filter unchecking Enable Junk Mail Filter.
Double-click the SpamSieve application and choose Preferences from the SpamSieve menu. Make sure that Use Entourage/Outlook address book is checked, and click the Load button. Then click on the SpamSieve icon in the Dock and click Edit Addresses in SpamSieve’s Filters settings.
Choose Install Entourage Scripts from the SpamSieve menu. Quit and re-launch Entourage; then you should see four SpamSieve items in Entourage’s Scripts menu:
Now, set up a mail rule in Entourage that looks like this:
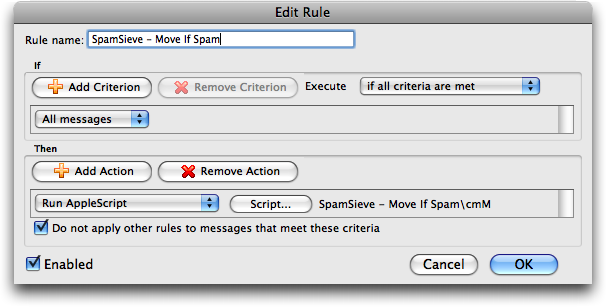
To do this, choose Rules from Entourage’s Tools menu. Click on the tab corresponding to the type of account you have (e.g. POP). If you have more than one kind of account, you will need to create an identical rule for each account type. Click the New button. Change the name of the rule to SpamSieve - Move If Spam. Then click just to the left of Change status to choose the first action. Click Remove Action to delete the Change status action. Click on the menu that says Set category and choose Run AppleScript. Then click the Script… button and Select the SpamSieve - Move If Spam\cmM file. This file is stored in the Entourage Script Menu Items folder (which is probably inside the Microsoft User Data folder inside your Documents folder):
Note: It is important that you create the rule exactly as shown. Do not add additional actions below the action that runs the AppleScript. Such actions would apply to all messages (not just spam ones), which is probably not what you want.
Click OK and drag the SpamSieve rule to the top of the list.
Now proceed to the Do an Initial Training section. To train SpamSieve with spam messages, select one or more of them and then choose SpamSieve - Train Spam from Entourage’s Scripts menu. To train SpamSieve with good messages, select one or more of them and then choose SpamSieve - Train Good from Entourage’s Scripts menu. The keyboard shortcuts for these commands are Command-Control-S and Command-Control-G.
SpamSieve will process new mail automatically. If you ever need to manually ask it to sift through a mix of spam and good messages, select the messages and choose Apply Rule ‣ All Rules from the Message menu.
The above is all you need to know about using SpamSieve with Entourage. The Entourage Customization section explains some more advanced setup options.
- IMAP Accounts
Entourage v.X does not support moving IMAP (or Hotmail or Exchange) messages via AppleScript. Thus, if you have one of these types of accounts, the spam messages will not be moved to your Junk E-mail folder. The best solution is to update to Entourage 2004 or 2008, which do not have this limitation. If you do not wish to do this, here are some possible workarounds:
- If you do not require IMAP, you can try creating a POP account in Entourage and re-entering your account information. Many IMAP accounts also work via POP, and this will allow SpamSieve to move the messages that it thinks are spam.
- Create an Entourage rule that moves messages that SpamSieve has marked as junk into another folder. After receiving mail, manually apply this rule to the messages in your IMAP account.
- Make a mail view of your IMAP account that looks for messages that are not junk. In this way, you can view your good messages without being distracted by the spam ones.
- Rule Tips
Once an Entourage v.X rule runs an AppleScript or moves a message, it cannot apply any more rules to that message. This limitation means that extra steps are necessary to integrate SpamSieve into a complex set of Entourage rules. The easiest solution is to update to Entourage 2004 or 2008, which are more flexible about how they handle AppleScript rules. If you do not wish to do this, here are some possible workarounds:
One option is to order your rules so that Entourage applies the SpamSieve rule after all your other rules. You can change the order of the rules by choosing Rules from Entourage’s Tools menu and dragging the rules in the list to change their order. With this approach, you can filter your good messages into folders however you want. Any mail that is not moved into another folder will remain in your inbox. Then, the SpamSieve rule will either mark the spams as junk or move them to a Junk E-mail folder. The disadvantage to this approach is that SpamSieve cannot catch any spams among the messages that were moved by your other rules.
Another option is to add the Run AppleScript action to each rule that moves messages. For instance, suppose you have a rule that moves all the messages from your Work Account account into a Work folder. You could set up the rule as shown below.
Now, messages sent to that account will be moved to the Work folder. Spam messages sent to that account will be moved to the Junk E-mail folder. You can add the SpamSieve AppleScript action to every rule that moves messages and also to a “catch-all” rule that applies to messages that aren’t moved. Then SpamSieve will be able to filter all the messages that you receive.
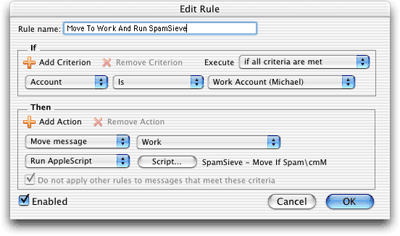
8.4 Setting Up MailForge
- Make sure that you are using MailForge 2.0.4 or later.
- In MailForge’s Junk Mail preferences, set the Junk Filtering Strictness to Use SpamSieve.
- In MailForge’s Accounts preferences, make sure that Full Email is checked for each IMAP account.
- Now proceed to the Do an Initial Training section.
- To train SpamSieve with spam messages, select the messages, go to MailForge’s Message menu, and choose Junk.
- To train SpamSieve with good messages, select the messages, go to MailForge’s Message menu, and choose Not Junk.
8.5 Setting Up Mailsmith
Open Mailsmith’s Preferences window and click on the Spam Handling pane. Make sure that Use SpamSieve is checked. Uncheck Honor SpamAssassin and BogoFilter headers.
Now it is time to train SpamSieve:
- To train SpamSieve with spam messages, select one or more of them and then choose Mark as Spam from Mailsmith’s Message menu.
- To train SpamSieve with good messages, select one or more of them and then choose Mark as Non-Spam from Mailsmith’s Message menu.
The Do an Initial Training section explains which messages (and how many of them) you should train.
If you ever need to manually ask it to sift through a mix of spam and good messages, choose Recalculate Spam Score from the Message menu.
The above is all you need to know about using SpamSieve with Mailsmith. For more information about using SpamSieve with Mailsmith, please see Chapter 8 of the Mailsmith User Manual.
If you need to troubleshoot SpamSieve and Mailsmith, see the Checking the Mailsmith Setup section.
8.6 Setting Up Outlook 2011
These instructions apply to Outlook 2011 (14.x), from Microsoft Office 2011. If you are using Outlook 365 (also known as Outlook 2016 and 2019, versions 15.x and 16.x), please see the Setting Up Outlook section. If you are using Microsoft Entourage, please see the Setting Up Entourage section.
Go to Outlook’s Tools menu and choose Junk E-mail Protection…. Turn off Outlook’s junk filter by clicking None and then OK.
Switch to SpamSieve by clicking on its icon in the Dock. Go to the SpamSieve menu and choose Preferences…. Make sure that Use Outlook/Entourage contacts is checked and click the Load Contacts button.
Click the Install Scripts button. After you quit and re-launch Outlook, you should see four SpamSieve items in Outlook’s Scripts menu:
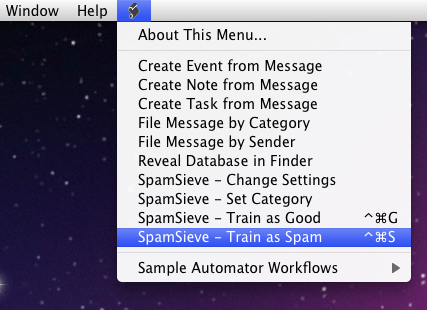
Choose Rules… from Outlook’s Tools menu. Click on the source list item under On My Computer corresponding to the type of account you that have (e.g. POP, IMAP, or Exchange). Ignore the Exchange Server section of the window, if any.
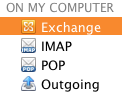
If you have more than one kind of account, you will need to repeat Steps 4–6 for each account type.
If you had previously used SpamSieve with Microsoft Entourage, delete any SpamSieve rules that Outlook brought over from your Entourage setup.
Click the + button. Change the name of the rule to SpamSieve - Set Category.
For a POP account:
- Under When a new message arrives it should say All Messages.
For an IMAP or Exchange account:
- Under When a new message arrives it should say Folder Is INBOX (<Account Name>).
- When you create a new IMAP rule, the pop-up menu at the left will automatically say Folder; when you create new Exchange rule, the pop-up menu will say From and you will have to change it to Folder.
- Next, you need to choose the inbox from the pop-up menu at the right. You may have to choose Choose Folder… and type “in” to be able to select the inbox.
- Click the + button to add an additional rule condition for each IMAP/Exchange account that you have. Change the pop-up menus to say Folder Is INBOX (<Account Name>) as before.
- Click on If all conditions are met and change it to If any conditions are met.
Under Do the following, click on the - button to the right of Change status and Not Junk E-mail to delete the Change status action.

Click on the pop-up menu that says Set Category and choose Run AppleScript.

Then click the Script… button and Select the SpamSieve - Set Category.scpt file. This file is stored in the Outlook Script Menu Items folder (which is probably inside the Microsoft User Data folder inside your Documents folder):
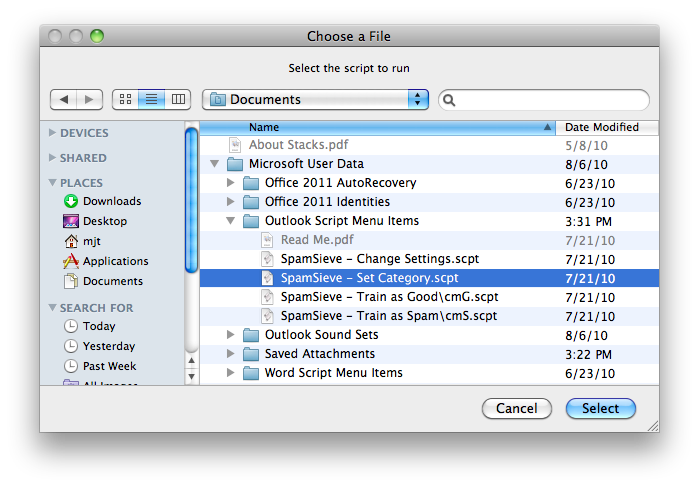
Make sure that Do not apply other rules… is unchecked. For a POP account, the rule should now look like this:
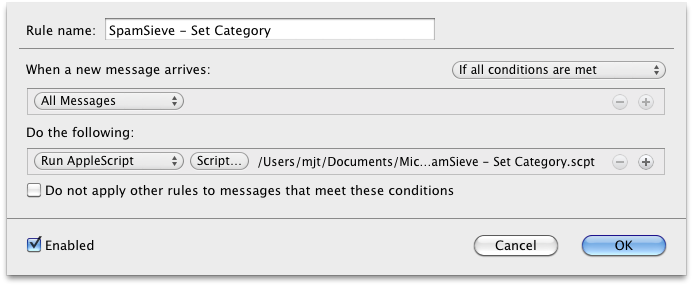
For an IMAP or Exchange account, the rule should now look like this:
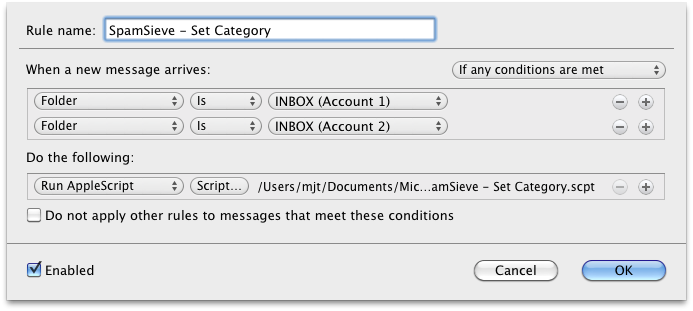
Click OK to close the sheet.
Drag the SpamSieve - Set Category rule to the top of the list.
In the Rules window, as before, repeat the following steps for each type of account that you have (e.g. POP, IMAP, or Exchange) under “On My Computer”.
Click the + button. Change the name of the rule to SpamSieve - Move Messages.
Under When a new message arrives, click on the pop-up menu and change it to say Category. Click on the pop-up menu for None and change it to Junk. The condition should now say Category Is Junk.
Click the + button to the right of Junk to make a new condition.

Click on From for the new condition and change it to say Category. Click on the pop-up menu for None and change it to Uncertain Junk. The condition should now say Category Is Uncertain Junk.
Click on If all conditions are met and change it to If any conditions are met.
Under Do the following, click on the - button to the right of Not Junk E-mail to delete the Change status action.
Click on the pop-up menu that says Set Category and choose Move Message.
Change the menu at the right from None to Junk E-mail. You may have to choose Choose Folder… and type “Junk” to be able to select the Junk E-mail folder. The rule should now look like:
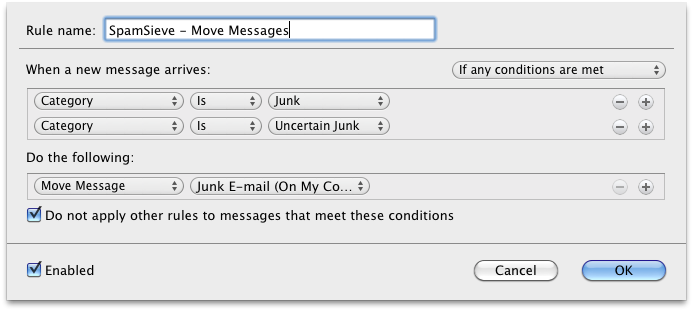
Click OK to close the sheet.
Drag the SpamSieve - Move Messages rule so that it is just below the SpamSieve - Set Category rule(s) (and above your other rules).
Now proceed to the Do an Initial Training section.
- To train SpamSieve with spam messages, select one or more of them and then choose SpamSieve - Train as Spam from Outlook’s Scripts menu.
- To train SpamSieve with good messages, select one or more of them and then choose SpamSieve - Train as Good from Outlook’s Scripts menu.
The keyboard shortcuts for these commands are Command-Control-S and Command-Control-G.
On macOS 10.14 or later, the first time you try to train a message macOS will ask for permission to control Outlook and SpamSieve, and you should click OK.
SpamSieve will process new mail automatically. If you ever need to manually ask it to sift through a mix of spam and good messages, select the messages and choose SpamSieve - Set Category from Outlook’s script menu. Then choose Rules ‣ Apply All from the Message menu.
The above is all you need to know about using SpamSieve with Outlook. The Outlook Customization section explains some more advanced setup options.
If you need to troubleshoot SpamSieve and Outlook, see the Checking the Outlook 2011 Setup section.
8.7 Setting Up Postbox
Note: These instructions apply to Postbox 2.x through 5.x. Postbox 6 and 7 do not currently have direct support for SpamSieve, but you can use it by following the Setting Up Other Mail Clients instructions.
Choose Install Postbox Plug-In from SpamSieve’s SpamSieve menu.
Launch Postbox. Choose Add-ons from the Tools menu.
If you have Postbox 2.5 or later, click on the action (gear) menu in the upper-right corner of the window and choose Install Add-on From File…. If you have Postbox 2.0, click the Install… button in the window that just opened.
In the file open panel, find your Downloads folder, select the SpamSieveForPostbox.xpi file, and click Open.
Click the Install Now button.
Quit Postbox and re-launch it. If you now go to the Tools menu and choose Add-ons you should see the SpamSieve Postbox Plug-In listed there. Next to it will be the version of the plug-in. The current plug-in version is always listed at the bottom of SpamSieve’s about box. You can now delete the SpamSieveForPostbox.xpi file from your desktop.
Choose Preferences… from the Postbox menu and click on Accounts. For each of your accounts in the list at the left (plus On My Mac), click on Junk Settings and make sure that:
- Enable adaptive junk mail controls for this account is checked.
- Move new junk messages to is checked.
- Trust junk mail headers set by is unchecked.
It is generally a good idea to uncheck the items under “Do not mark mail as junk if the sender is in” since these can prevent SpamSieve from filtering out certain spam messages.
Choose Preferences… from the Postbox menu and click on Privacy. Make sure that When I mark messages as junk is checked.
Now it is time to train SpamSieve:
- To train SpamSieve with spam messages, select one or more of them and then choose Message ‣ Mark ‣ As Junk, click the bullet in the junk status column of the message list, or press the J key.
- To train SpamSieve with good messages, select one or more of them and then choose Message ‣ Mark ‣ As Not Junk, click the junk icon in the junk status column of the message list, or press the J key.
The Do an Initial Training section explains which messages (and how many of them) you should train.
You can also customize the toolbar to add a Junk/Not Junk button.
Note: If Postbox already thinks that a message is junk, it may not let you mark it as junk—and likewise for not junk. That’s OK; it is enough to train SpamSieve by marking the messages that are misclassified in Postbox.
SpamSieve will process new mail automatically. If you ever need to manually ask it to sift through a mix of spam and good messages, select the messages and choose Message ‣ Mark ‣ Run Junk Mail Controls.
The above is all you need to know about using SpamSieve with Postbox. The Customization section explains some more advanced setup options.
If you need to troubleshoot SpamSieve and Postbox, see the Checking the Postbox Setup section.
8.8 Setting Up PowerMail
Make sure that you are using a POP (not IMAP) account.
Go to the Mark as Spam pane of PowerMail’s Preferences window. Click the Spam filter assistant… button and tell the assistant that you want to use SpamSieve.
Now it is time to train SpamSieve:
- To train SpamSieve with spam messages, select one or more of them and then choose Mark as Spam from the Mail menu.
- To train SpamSieve with good messages, select one or more of them and then choose Mark as Good from the Mail menu.
The Do an Initial Training section explains which messages (and how many of them) you should train.
SpamSieve will process new mail automatically. If you ever need to manually ask it to sift through a mix of spam and good messages, select the messages and choose Perform Filter ‣ Perform All Filters from the Mail menu.
The above is all you need to know about using SpamSieve with PowerMail. The Customization section explains some more advanced setup options. For more information about how to configure PowerMail’s handling of spam messages, please see the PowerMail documentation.
If you need to troubleshoot SpamSieve and PowerMail, see the Checking the PowerMail Setup section.
9 Legal Stuff
Copyright and Trademarks
SpamSieve and this manual are copyright © 2002–2026 by C-Command Software, LLC. All rights reserved.
SpamSieve is a trademark of C-Command Software, LLC. Mac is a registered trademark of Apple Computer. All other products mentioned are trademarks of their respective owners.
End User License Agreement
CAREFULLY READ THE FOLLOWING LICENSE AGREEMENT. YOU ACCEPT AND AGREE TO BE BOUND BY THIS LICENSE AGREEMENT BY DOWNLOADING AND INSTALLING THE PROGRAM. IF YOU DO NOT AGREE TO THIS LICENSE, THEN DO NOT DOWNLOAD AND INSTALL THE PROGRAM, AND REMOVE THE SOFTWARE FROM YOUR COMPUTER.
License Grant
“You” means the person or company who is being licensed to use the Software or Documentation. “We,” “us” and “our” means C-Command Software, LLC.
We hereby grant you a nonexclusive license to use one copy of the Software on any single computer, or on multiple computers only used by a single person. The Software is “in use” on a computer when it is loaded into temporary memory (RAM) or installed into the permanent memory of a computer—for example, a hard disk or other storage device.
Title
We remain the owner of all right, title and interest in the Software and related explanatory written materials (“Documentation”).
Archival or Backup Copies
You may copy the Software for backup and archival purposes, provided that the original and each copy is kept in your possession and that your installation and use of the Software does not exceed that allowed in the “License Grant” section above.
Things You May Not Do
The Software and Documentation are protected by United States copyright laws and international treaties. You must treat the Software and Documentation like any other copyrighted material—for example, a book. You may not:
- copy the Documentation,
- copy the Software except to make archival or backup copies as provided above,
- sublicense, rent, lease or lend any portion of the Software or Documentation.
Transfers
You may transfer all your rights to use the Software and Documentation to another person or legal entity provided you transfer this Agreement, the Software and Documentation, including all copies, updates and prior versions to such person or entity and that you retain no copies, including copies stored on computer.
Limited Warranty
The software is provided “as is,” without warranty of any kind, express or implied, including but not limited to the warranties of merchantability, fitness for a particular purpose and noninfringement. In no event shall the authors or copyright holders be liable for any claim, damages or other liability, whether in an action of contract, tort or otherwise, arising from, out of or in connection with the software or the use or other dealings in the software. No employee, agent, dealer or distributor of ours is authorized to modify this limited warranty, nor to make any additional warranties.
Term and Termination
This license agreement takes effect upon your use of the software and remains effective until terminated. You may terminate it at any time by destroying all copies of the Software and Documentation in your possession. It will also automatically terminate if you fail to comply with any term or condition of this license agreement. You agree on termination of this license to destroy all copies of the Software and Documentation in your possession.
General Provisions
- This written license agreement is the exclusive agreement between you and us concerning the Software and Documentation and supersedes any prior purchase order, communication, advertising or representation concerning the Software.
- This license agreement may be modified only by a writing signed by you and us.
- This license agreement is governed by the laws of the State of New Hampshire.
- You agree that the Software will not be shipped, transferred or exported into any country or used in any manner prohibited by the United States Export Administration Act or any other export laws, restrictions or regulations.
Components
The following open-source components are used in SpamSieve:
- Regular expression support is provided by the PCRE library package, which is open source software, written by Philip Hazel, and copyright by the University of Cambridge, England.
- CwlDemangle.swift is Copyright © 2017 Matt Gallagher and is available under the Apache License v2.0 with Runtime Library Exception.
- Thanks to Allan Odgaard for some code snippets that are used in the Software Update installer.
SQLite.swift is Copyright © 2014-2015 Stephen Celis (<stephen@stephencelis.com>).
Permission is hereby granted, free of charge, to any person obtaining a copy of this software and associated documentation files (the “Software”), to deal in the Software without restriction, including without limitation the rights to use, copy, modify, merge, publish, distribute, sublicense, and/or sell copies of the Software, and to permit persons to whom the Software is furnished to do so, subject to the following conditions:
The above copyright notice and this permission notice shall be included in all copies or substantial portions of the Software.
THE SOFTWARE IS PROVIDED “AS IS”, WITHOUT WARRANTY OF ANY KIND, EXPRESS OR IMPLIED, INCLUDING BUT NOT LIMITED TO THE WARRANTIES OF MERCHANTABILITY, FITNESS FOR A PARTICULAR PURPOSE AND NONINFRINGEMENT. IN NO EVENT SHALL THE AUTHORS OR COPYRIGHT HOLDERS BE LIABLE FOR ANY CLAIM, DAMAGES OR OTHER LIABILITY, WHETHER IN AN ACTION OF CONTRACT, TORT OR OTHERWISE, ARISING FROM, OUT OF OR IN CONNECTION WITH THE SOFTWARE OR THE USE OR OTHER DEALINGS IN THE SOFTWARE.
10 Version History
- 3.3—April 13, 2026
- Made various changes to improve SpamSieve’s filtering accuracy.
- When searching in the Corpus or Log window, you can now choose the search scope. This enables faster and more targeted searching. Additionally, you can now search by Raw Message Source and by Words, which were not possible before. These can be especially useful in finding messages that were not correctly trained—you can then fix them to improve SpamSieve’s filtering accuracy. The new Searching section of the manual explains the different ways of searching and when they might be useful. Each search field now has a Search Syntax Reference menu item to quickly open this section of the help.
- Optimized’s SpamSieve’s message processing speed.
- Improved SpamSieve’s recognition of headers from server spam filters.
- Added the Fixing Uncorrected Mistakes section of the manual.
- Improved the following sections of the manual:
- Searching by message identifier now works when there’s extraneous whitespace.
- Improved the error reporting for Apple Mail remote training.
- Added a workaround for App Nap pausing filtering.
- Fixed a crash that could occur during a software update.
- Fixed a bug that could cause SpamSieve to show its Settings window when it was being launched by Apple Mail or Outlook.
- Fixed some crashes that could be caused by regex processing with invalid UTF-8.
- Fixed a bug where recent searches were not shown in the menu until after the first search.
- We need help updating SpamSieve’s Japanese localization. If you’re interested, please contact spamsieve@c-command.com.
- 3.2.2—November 17, 2025
- Made various changes to improve SpamSieve’s filtering accuracy.
- Microsoft has extended support for Legacy Outlook for another year, so SpamSieve no longer warns about the transition to New Outlook in the Settings ‣ Outlook ‣ Setup window. The End of Support for Legacy Outlook and Turning Off New Outlook sections of the manual have been updated accordingly.
- When SpamSieve classifies a message using an allowlist or blocklist rule, the Log window now shows when that rule was created and whether it was created by the user or by SpamSieve’s auto training.
- A small percentage of customers using macOS Tahoe 26 with an IMAP account are seeing slow or non-functional training in Apple Mail. The Slow Apple Mail Training section of the manual discusses how you can enable an experimental workaround for this if it’s affecting you.
- Made further changes to work around an issue with macOS Tahoe 26 where it would keep trying to re-add the SpamSieve icon to the menu bar even if you’d turned the Show menu bar icon feature off.
- Rewrote the If Apple Mail Is Running Slowly section of the manual.
- Reduced the Swift bridging overhead when parsing message address lists.
- Fixed a bug where SpamSieve could hang when processing a message with a malformed address header.
- Added a guardrail so that any future such headers will cause a timeout error instead of a hang.
- Worked around a problem where macOS would not report to SpamSieve that Apple Mail or Microsoft Outlook was the frontmost app, so SpamSieve did not enable the training commands for those mail clients.
- Worked around an AppleScript bug in macOS 10.14 that could cause a crash.
- Removed some now-unused icon badging code so that SpamSieve will launch faster.
- Fixed some threading bugs with undoing changes to rules.
- Fixed a hang when processing a message with malformed HTML.
- If an error -1751 occurs when training a message in Apple Mail, SpamSieve will now recommend granting Full Disk Access to prevent that.
- Added some debug logging to investigate cases where the Settings window is being shown inappropriately.
- Added an experimental setting to opt into using Swift Regex instead of ICU for matching allowlist and blocklist rules. In some cases, macOS will do this automatically, but this setting can be useful to get better performance or in case a particular pattern triggers a problem with the ICU engine. It will also allow testing to detect further Swift Regex bugs before an eventual full switchover. You can switch SpamSieve to use Swift Regex by clicking here or go back to ICU by clicking here. Prior to macOS 14.4, SpamSieve will always use ICU due to bugs in Swift Regex that can cause hangs.
- Improved the performance of capturing stack trace information for errors.
- Improved the Mail extension’s error logging.
- 3.2.1—October 3, 2025
- Microsoft Outlook
- As previously mentioned, Microsoft will be temporarily removing Outlook’s support for AppleScript (and, thus, SpamSieve) on November 1. It is scheduled to return in December. In the interim, SpamSieve can continue to filter your mail if you set up your mail accounts and SpamSieve in Apple Mail. This will also keep the spam out of your inbox in Outlook, and if you enable the Train messages in TrainSpam and TrainGood setting, you can still train SpamSieve from within Outlook. There’s more information about all of this in the End of Support for Legacy Outlook section of the manual.
- Apple Mail
- Worked around a bug in macOS Tahoe 26, affecting some customers with POP accounts, that could cause hangs or prevent messages from moving to the Junk mailbox.
- Updated the Train messages in TrainSpam and TrainGood section of the manual.
- Fixed a bug where remote training would log (harmless) errors for POP accounts.
- The Mail extension will now retry if it gets a timeout error communicating with SpamSieve.
- Improved the Mail extension’s error reporting.
- Worked around a macOS bug that could cause a hang when logging Mail-related errors.
- SpamSieve is better at finding the inbox when running in Spanish.
- macOS Tahoe 26
- Worked around a change where macOS would keep trying to re-add the SpamSieve icon to the menu bar even if you’d turned the Show menu bar icon feature off.
- Fixed a bug where the Dock icon didn’t adapt to different themes.
- Worked around a macOS bug that could cause a crash at launch.
- Improved the layout of the Software Update… sheet.
- General
- The status colors for the menu bar icon when training and filtering now use the same colors as SpamSieve’s Dock icon and Apple Mail.
- Worked around a Help Viewer bug on macOS 14.
- Tried to work around a crash updating the Statistics window if the database is damaged.
- The diagnostic report shows additional information about fragmentation of SpamSieve’s database files and the Apple Mail Junk mailbox configuration.
- Fixed the icon margins in the legacy ICNS file and documentation.
- Updated the Swedish localization.
- 3.2—September 18, 2025
- Highlights
- SpamSieve 3.1.3 was already compatible with macOS Tahoe 26, but with version 3.2 we’ve made further updates and optimizations for it. Although the Tahoe beta went smoothly, and the Tahoe release worked as expected for most of the SpamSieve customers who have already updated, a very small percentage of users (all of them using POP mail accounts) have reported their spam filtering being interrupted due to errors from Apple Mail. (On these Macs, when SpamSieve asks Mail to move a message to the Junk mailbox, it doesn’t do so.) These seem to be isolated cases, but we wanted to make you aware of this situation as you decide when to update to Tahoe. As we investigate further, we’ll make a bug report to Apple, try to develop a workaround, and post updated information on the support page.
- Made various changes to improve SpamSieve’s filtering accuracy.
- There is now built-in support for training SpamSieve while away from your Mac or when using a Mac e-mail client that SpamSieve doesn’t integrate with directly. If you go to the Settings ‣ Apple Mail ‣ Training window and select Train messages in TrainSpam and TrainGood, you can train SpamSieve from an iPhone (or other device) by moving messages into the special TrainSpam or TrainGood mailbox. Simply deleting spam messages to get them out of your inbox would lead SpamSieve to think they were good, reducing its filtering accuracy. We used to recommend training spam messages in the inbox when you got back to your Mac. Now you can train SpamSieve remotely, which immediately gets the spams out of view and improves SpamSieve’s filtering of future messages. There’s more information about how this works in the Drone Setup and Remote Training section of the manual. If you were using the old remote training AppleScript and rule, you can uninstall them as described in the Legacy AppleScript section.
- On November 1, 2025, Microsoft will remove AppleScript support from Outlook. Until this is restored (currently scheduled for December 2025), SpamSieve will not be able to directly work with Outlook. However, you will still be able to use SpamSieve to filter your mail (via Apple Mail) and you’ll still be able to train it from Outlook (via the remote training mentioned above). There’s a lot more information about this in the End of Support for Legacy Outlook section of the manual. The Settings ‣ Outlook ‣ Setup window now shows a link to this help page if Outlook filtering is enabled.
- macOS Tahoe 26
- Updated SpamSieve’s application icon for macOS Tahoe 26 and the new Liquid Glass design language. It no longer appears in “squircle jail” and now adapts as you change the macOS appearance to use the Dark, Clear, and Tinted icon styles.
- The top-left corner of SpamSieve’s Dock icon used to change to show the current training or filtering status. Badging the icon in this way doesn’t work properly with the new Liquid Glass appearance themes, so SpamSieve now shows these status changes as glyphs using the system standard red badge in the top-right corner of the Dock icon. (These will only be shown if System Settings ‣ Notification ‣ SpamSieve ‣ Badge application icon is checked.)
- Added images for each menu item.
- Updated the window toolbar appearance.
- The Uncertain spam messages and Spam-catching strategy sliders now show their neutral values and have adjusted tint prominence.
- Text fields now disallow Security Code AutoFill since it’s not relevant.
- Corpus, Blocklist, Allowlist, and Log
- Selecting or deleting large numbers of rules or log entries is faster and uses much less memory.
- The Corpus and Log windows now show the message’s From address in addition to the sender’s name. This should make it easier to tell at a glance which messages are spam.
- Dates shown in the Corpus, Blocklist, Allowlist, and Log windows now have tooltips to show the full day of the week and time. The From and Subject columns also have tooltips in case there isn’t enough space to fit the whole text.
- Auto-training entries in the Log now show why the message was originally predicted the way it was.
- Improved the sizing and toolbar overflow behavior of search fields throughout the app.
- Improved the description of rule changes when copying from the Log window to the clipboard.
- Fixed a bug where a rule matching the sender’s name might not match a message if the name used an Asian character that had a different Unicode width.
- SpamSieve reports more error information when there’s a problem opening a database file.
- Settings
- Added the Where is SpamSieve’s menu bar icon? section to the manual and a link from the Settings ‣ Advanced window.
- The Quit when mail client quits feature now works with MailMaven.
- Made a change to try to prevent the Settings window from opening as a result of two processes launching SpamSieve at the same time.
- Apple Mail
- When you uninstall SpamSieve’s Mail plug-in, it no longer auto-quits as a result of Mail quitting.
- Added a workaround to prevent reprocessing messages if Mail incorrectly reported their metadata.
- Improved the error reporting when Mail is bogged down and SpamSieve is trying to read the list of inboxes.
- The Apple Mail - Rescue Good Messages script tries to work around a Mail bug that could lead to messages being moved to the trash but still marked as unread.
- Documentation
- Updated the documentation and screenshots for macOS Tahoe 26.
- Improved the following sections of the manual:
- General
- Updated the Dutch, French, German, Japanese, Korean, and Spanish localizations.
- Worked around some Swift Concurrency changes in Xcode 26.
- Work around a bug in Xcode 26 that could cause a crash at launch on macOS 12 when running on an Intel Mac.
- Work around a bug in Xcode 26 that could cause a crash at launch on macOS 10.13.
- AppleScript
- The AppleScript file property of the corpus now returns the URL of the whole corpus package (as has been documented) rather than of the main words database file.
- 3.1.3—May 29, 2025
- Made various changes to improve SpamSieve’s filtering accuracy.
- The new MailMaven e-mail client from SmallCubed is now in public beta, and it includes built-in support for SpamSieve. The SpamSieve manual now includes sections for Setting Up MailMaven and Checking the MailMaven Setup, and these are linked from the Settings ‣ Other Clients window.
- SpamSieve is better at detecting whether a server junk filter classified a message as spam (for display in the Log and Corpus windows).
- Clicking a notification to open the message in SpamSieve’s Log window now works when SpamSieve isn’t already running.
- When using the Show number of new good messages in Dock option with the Apple Mail extension and the Check inboxes for new messages not sent to Mail extension option, the number shown in the Dock icon is now accurate even if the same message had been processed twice.
- Improved the efficiency of updating the rule hits statistics, reading settings, and various database operations.
- Improved the following sections of the manual:
- Improved the handling of AppleScript errors if you train a message when Apple Mail is overloaded.
- Worked around a bug where Apple Mail would ask the extension to filter messages that were drafts.
- Made further changes to prevent SpamSieve from triggering local network privacy prompts.
- SpamSieve will now report an error if it looks like filtering is being impacted by the Mac’s clock being wrong.
- Fixed a bug where SpamSieve could crash if there were errors reading Apple Mail’s database or if it contained invalid data.
- Fixed a bug where search fields weren’t appropriately cleared when stopping a search.
- Fixed a bug where the training toolbar buttons were enabled in the Words tab of the Corpus window.
- Changes to the esoteric preferences from Terminal now take effect right away.
- 3.1.2—March 31, 2025
- Made various changes to improve SpamSieve’s filtering accuracy.
- It’s now possible to select more than 1,000 log entries at once in the Log window.
- Improved the scrolling and copying performance in the Log window.
- Improved the following sections of the manual:
- SpamSieve now automatically relaunches if it crashes or is accidentally quit while Outlook is running. (This was already the case for Apple Mail.)
- Improved the diagnostic report.
- Added the Apple Mail - Block Reply-To sample script.
- Fixed a bug where sometimes SpamSieve launched after a delay or not at all when Apple Mail or Outlook was set as a login item.
- Fixed a bug where, in rare cases, SpamSieve did not find the correct sender or recipient names/addresses for a message.
- Fixed a bug where the Train SpamSieve allowlist, Train SpamSieve blocklist, and Train Bayesian classifier settings were hooked up to the wrong checkboxes in the Settings window.
- Fixed a bug where the esoteric preferences for custom training keyboard shortcuts didn’t work for numbers and some other keys.
- 3.1.1—February 7, 2025
- Highlights
- Made various changes to improve SpamSieve’s filtering accuracy.
- When a supported mail client is the frontmost app, the first item of the SpamSieve icon menu, instead of being a static label, now opens the setup instructions for that mail client.
- The training commands in the Message menu in the SpamSieve icon menu now work when SpamSieve is not the frontmost app. The original thinking was to disable these, because people would use the hotkeys or the more convenient top-level menu commands for this purpose, but it turns out that many people prefer to use the Message submenu.
- Working with large selections in the Corpus, Allowlist, Blocklist, and Log windows is much faster and uses less memory. Now SpamSieve waits to load the selected items until you actually do something with them, and then it does so in batches to that they don’t all need to be stored in memory at the same time.
- Apple Mail
- The Filter Messages hotkey (Command-Control-L) was originally intended for use with the Mail extension, but it is now also available when using the Mail plug-in setup.
- Fixed a bug where, if you went on vacation and didn’t launch Mail for a week, when you got back to lots of new messages SpamSieve might not filter some of them because it would see them as old.
- Worked around a Mail bug where a message might disappear when trained as good instead of moving to the inbox. (If messages ever disappear, you can recover them from the Log window.)
- When training a message as good and moving it to the inbox, if multiple mail accounts have the same e-mail address that matches the message, SpamSieve now prefers the inbox of the account that the message is already in.
- SpamSieve now reports an error if multiple Mail accounts have the same name, as that can prevent filtering from working.
- If SpamSieve can’t find an account’s Junk mailbox when training a message as spam, it now reports an error that shows the name of the problematic account.
- General
- You can now close the Settings window by pressing the Esc key.
- When you click an esoteric preferences link to enable or disable debug logging, the change now takes effect immediately, without having to restart SpamSieve.
- Worked around several macOS bugs that could cause crashes when trying to access the Contacts database.
- Diagnostic report files are much smaller, as they no longer include excerpts from the verbose system console log, only from SpamSieve’s own log files.
- Fixed a rare crash that could occur when updating the log after training a message.
- Fixed a rare crash that could occur when reporting an error about a database that couldn’t be saved.
- Fixed a rare crash that could occur because the Bayesian classifier’s internal state was invalid.
- Documentation
- SpamSieve 3.1
introduced a workaround of opening help pages in the user’s Web
browser because the system help viewer doesn’t work properly on
macOS 15.
- Fixed a bug where help pages could open in a text editor instead of in your browser if you’d changed the default opener for .html files.
- You can now hold down the Option key when clicking a help link to switch between using a Web browser and using the help viewer, e.g. if you prefer the non-default behavior for your version of macOS or to test whether the help viewer is working properly.
- Fixed the PowerMail help links in the Settings ‣ Other Clients window.
- Improved the following sections of the manual:
- Correct All Mistakes
- Filter spam messages in other mailboxes
- Log
- Prune full message data in log
- Setting Up Airmail
- Turning Off the Yahoo Mail Spam Filter
- Why do good messages keep going to the Junk or Spam mailbox?
- Why do good messages move to the wrong inbox when trained in Apple Mail?
- Why is SpamSieve not catching my spam?
- SpamSieve 3.1
introduced a workaround of opening help pages in the user’s Web
browser because the system help viewer doesn’t work properly on
macOS 15.
- 3.1—November 20, 2024
- Highlights
- Made various changes to improve SpamSieve’s filtering accuracy.
- Previously, the Train as Good and Train as Spam commands in SpamSieve’s Message menu were disabled while you were in the app when there was nothing for them to apply to, i.e. if no messages were selected in the Corpus or Log. To reduce confusion, since some people thought these commands were meant to be used from within Apple Mail or Outlook, they are now always enabled but will open the Train as Good/Spam section of the help when not applicable, as that will direct you to the various ways that you can train SpamSieve from within your mail client.
- If macOS incorrectly reports that SpamSieve is damaged when installing or updating the app, we now have a Download Fixer tool to help.
- SpamSieve no longer triggers the “find devices on local networks” prompt on macOS 15. It never needed that access, anyway. If, for some reason, you still get the local network access prompt, it’s fine to click Don’t Allow.
- SpamSieve is once again localized in Korean.
- Blocklist and Allowlist
- If SpamSieve hangs due to a bug in Swift Regex, it is now able to report the problematic pattern and string, so that you can temporarily disable the offending rule and so that we can make a bug report to Apple.
- Added some protections to help prevent rules from malfunctioning if the rules database is damaged.
- Log
- When you copy a log entry as text, it now shows more information about the corpus and rule changes.
- If there’s an error reading an inessential part of the log database, SpamSieve will now just log the error instead of preventing you from using the app.
- Apple Mail
- If you’re using Proton Mail, we recommend using the Move it to the Trash if the spam score is at least setting to have SpamSieve move all spam messages to the Trash instead of to the Junk mailbox. This will ensure that Proton Mail removes the spam messages from the special All Mail mailbox.
- Fixed a problem where, if you flagged a good message at the same time SpamSieve was filtering it, the flag could be overwritten.
- Worked around a Mail bug where it could lose a message if you were manually refiltering messages that were already in the Junk mailbox.
- Fixed an issue where, if a mail account was reset or Mail’s database was rebuilt, SpamSieve might reprocess old messages if they were still marked as unread.
- Worked around a Mail bug that could cause a modal error to be reported (and block filtering and use of the app) when moving a message on an Exchange server.
- The Select Mailboxes to Filter… sheet now prevents the selection of additional sent and notes mailboxes, as these do not receive new messages that should be filtered.
- Added some diagnostics to help track down a Mail bug that can cause messages to be inappropriately flagged orange when using the Mail extension.
- The diagnostic report now includes additional information for troubleshooting problems with Mail’s database and Mail extensions.
- Microsoft Outlook
- When there’s an error processing an Outlook message, SpamSieve now reports the account name and folder, not just the subject of the message.
- General
- Updated the Dutch, French, and German localizations.
- Fixed an issue where SpamSieve could get confused if you corrected a mistake but the mail server had changed the message data in between the prediction and the training.
- Tried to work around a macOS bug that could cause it to incorrectly report the SpamSieve application file as damaged.
- The × button in progress views now has an accessibility label.
- When trying to open a database file that’s damaged, SpamSieve will now move it aside (saving it for diagnostic and recovery purposes) and start a fresh database automatically, rather than blocking the app from launching.
- Fixed a problem where database errors caused by the disk being full were not handled properly because macOS was incorrectly reporting the error.
- Removed various code that is no longer used.
- The diagnostic report now includes information about the app’s logs, the crash logs folder, and components that could cause AppleScript errors.
- SpamSieve is now built with Xcode 16 and the macOS 15 SDK.
- Documentation
- Worked around a bug in macOS 15 where sometimes the system help viewer wouldn’t open to the right help page. SpamSieve will instead open help files in the user’s Web browser.
- Improved the following sections of the manual:
- Checking the MailMate Setup
- Checking the Outlook Setup
- Correct All Mistakes
- Hiding Special Gmail Mailboxes From IMAP
- How can I copy my training data to another machine?
- How can I rebuild Apple Mail’s database?
- If Apple Mail Is Running Slowly
- Move it to the Trash if the spam score is at least
- Rescuing Good Messages Caught By a Server Filter
- Setting Up a MailMate Drone
- Train as Good/Spam
- AppleScript
- Optimized the scripting support so that it is now possible to access the entire contents of a large corpus without overwhelming AppleScript, as demonstrated here.
- The training script commands now report an error if you forget to supply the message data.
- 3.0.5—July 1, 2024
SpamSieve 3.0.5 is a free update for those who have already purchased the SpamSieve 3.0 upgrade. If you’re using SpamSieve 2 and haven’t upgraded yet, the easiest way is to first let SpamSieve install the new version. At launch, it will show the Purchase window, and you can click the Check Upgrade Options button to get the upgrade discount without having to enter your old serial number.
- Apple Mail
- Preliminary testing shows that SpamSieve is compatible with macOS 15 Sequoia Developer Beta 2. Further updates may be required when Apple updates Mail in a subsequent Sequoia beta.
- Worked around some problems where Mail could temporarily hang during spam filtering if the network connection was very slow or when encountering a macOS bug where Mail redownloads messages that have already been downloaded. If SpamSieve detects that Mail is slow reading a message, it will postpone filtering for a while to give it time to finish downloading everything. It can also help to go to Mail ‣ Settings ‣ Accounts ‣ Account Information and set Download Attachments to All for each account. This will encourage Mail to fully download messages right away.
- The Filter Now button in Settings ‣ Apple Mail ‣ Filtering can now be used to manually filter the Mail inboxes, even when automatic filtering is disabled or postponed.
- Worked around an issue where sometimes filtering in Mail didn’t work because Mail was so bogged down that it couldn’t read the inboxes for SpamSieve in a timely manner.
- The mailbox outline for Filter spam messages in other mailboxes now recognizes the lowercase spam and junk names as being for mailboxes that should not be filtered.
- Fixed a bug where SpamSieve would try to repair files related to Mail plug-ins when running on macOS 14, which doesn’t support plug-ins.
- Fixed a bug where updating certain settings could cause a spurious error to be logged if you were not using the Mail plug-in.
- Improved the error reporting to track down a Mail AppleScript issue when finding new messages to filter.
- Microsoft Outlook
- The Settings ‣ Outlook ‣ Setup window clarifies that, when using Enable spam filtering for Inbox, the non-spam messages left in the inbox are marked with the Good category after SpamSieve has processed them.
- Settings
- Fixed a bug where the notification score slider was too narrow on macOS 10.13.
- Modernized the editable text fields to use shaded bezels instead of solid lines.
- Secondary label text throughout the user interface now uses the modern gray coloring.
- Icons
- Due to a macOS bug, clicking the SpamSieve menu bar icon does not show the menu when the Mac has multiple displays, a window on the secondary display is full screen, and you are clicking the menu bar icon on that display. You can work around this by accessing the SpamSieve commands in another way (e.g. via the keyboard shortcuts or the menu bar icon on the main display) or by unchecking Show Dock icon in the settings.
- Fixed a bug where the application icon in the Dock or Command-Tab switcher could appear pixellated when it was badged to show that SpamSieve was in the process of filtering or training a message.
- General
- SpamSieve now disables automatic filtering for Apple Mail and Outlook when the Mac is not connected to the Internet, to avoid hangs that could occur when trying to read messages that can’t be downloaded from the server.
- The Open in External Viewer command now works in the Corpus and Log windows when the table view has a selected message but doesn’t have keyboard focus.
- Improved the error reporting when a database can’t be accessed because the disk is full.
- Worked around a problem where SpamSieve could crash if Core Data’s conflict resolution failed because the database file was damaged.
- Made various updates for macOS 15, Xcode 16, and Swift 6.
- Documentation
- Improved the following sections of the manual:
- 3.0.4—May 17, 2024
SpamSieve 3.0.4 is a free update for those who have already purchased the SpamSieve 3.0 upgrade. If you’re using SpamSieve 2 and haven’t upgraded yet, the easiest way is to first let SpamSieve install the new version. At launch, it will show the Purchase window, and you can click the Check Upgrade Options button to get the upgrade discount without having to enter your old serial number.
- General
- You can now use the Message submenu commands within the SpamSieve menu bar icon to train SpamSieve from Apple Mail or Outlook, for users who didn’t see the top-level commands inside the menu bar icon.
- Made some changes to improve performance on Macs with spinning hard drives.
- Improved the way the Text to Match column in rules windows truncates text that doesn’t fit.
- You can now press Command-C in the Statistics window as a shortcut for clicking the Copy Statistics button.
- Toolbar buttons no longer shift position when the Flag label changes to Unflag.
- Updated the German localization and Settings window layout.
- SpamSieve now reports an error if the Edit Addresses button can’t access your card in Contacts.
- Fixed a bug that could cause a crash when quitting SpamSieve while a window was in the process of reloading.
- Fixed an issue where SpamSieve could be double-launched after restarting your Mac, possibly causing the Settings window to be opened when it should have been hidden. Also, to avoid this problem, we recommend that you not add SpamSieve to System Settings ‣ General ‣ Login Items ‣ Open at Login. It should only be under Allow in the Background.
- If a database file is damaged, SpamSieve now marks it as such and moves it aside. At the next launch, SpamSieve will create a fresh database so that you don’t continually run into the same error that prevents you from launching the app.
- If a database can’t be saved, SpamSieve now logs the changes to a series of text files so that there’s a chance at recovering the data or figuring out what caused the problem.
- Apple Mail
- Fixed a bug where filtering could be delayed for a long time after the Mac woke from sleep, if it had gone to sleep while SpamSieve was waiting for a response from Mail.
- Fixed a problem where filtering or training a large batch of messages in Mail could be slow or cause SpamSieve to hang or crash.
- SpamSieve is more responsive and better at reporting errors when Mail is not responding.
- Worked around a macOS bug that could cause a hang while waiting for Mail to respond to a command.
- When using the Mail plug-in, SpamSieve no longer wastes time checking for messages in the inbox that need to be unflagged.
- SpamSieve is better at handling AppleScript errors when training from Mail.
- SpamSieve reports a better error message if Mail filtering is slow and the problem can be fixed by switching from the Mail extension to the Mail plug-in.
- Improved the error reporting when SpamSieve is unable to read the accounts from Mail.
- Improved the error reporting when setting up the Mail plug-in.
- Worked around a Mail bug that could cause a spam message on an Exchange server to lose its body when moving it to the Junk mailbox.
- Fixed a bug where some of SpamSieve’s script error codes could possibly conflict with Apple ones.
- Added AppleMailMarkGoodRead to the esoteric preferences, for those who want SpamSieve to mark incoming good messages as read.
- The AppleMailMailboxListerExtraMailboxes option in the esoteric preferences can now be used with local mailboxes, to work around a Mail bug that hides certain mailboxes from SpamSieve.
- Microsoft Outlook
- When training an Outlook message as spam, SpamSieve now removes the Uncertain Junk category.
- When refiltering an Outlook message that turns out to be spam, SpamSieve now removes the Good category.
- Filtering
- When using macOS 14.4 or later, SpamSieve uses Swift Regex instead of ICU for matching blocklist and allowlist rules.
- Worked around a macOS bug that could cause a crash when using a regular expression to process message text.
- Worked around a macOS bug that could cause a hang when detecting the language of some message text.
- Improved the handling of non-breaking space characters within words.
- Log
- Fixed a problem where SpamSieve could hang when reporting an error if the log database couldn’t be saved.
- Log text that’s copied to the clipboard (or included in diagnostic reports) now uses consistent number formatting for message and word probabilities and has better descriptions for migrated rule predictions.
- Diagnostic reports now include summary information about the objects in each database.
- Diagnostic reports now include information to track down problems with the preferences not being saved.
- Documentation
- Improved the following sections of the manual:
- Checking the Apple Mail Setup
- Checking the Outlook Setup
- Move it to the Trash if the spam score is at least
- Security & Privacy Access
- Use Outlook/Entourage contacts
- What can I do if the corpus is damaged?
- Why are Apple Mail inbox messages not being processed?
- Why are messages marked as spam in Apple Mail but not moved?
- Why does a message disappear or go back to the Junk mailbox after I train it as good?
- Why is SpamSieve not catching my spam?
- Improved the layout of 4th-level section headers in the PDF version of the manual.
- Improved the following sections of the manual:
- 3.0.3—December 27, 2023
SpamSieve 3.0.3 is a free update for those who have already purchased the SpamSieve 3.0 upgrade. If you’re using SpamSieve 2 and haven’t upgraded yet, the easiest way is to first let SpamSieve install the new version. At launch, it will show the Purchase window, and you can click the Check Upgrade Options button to get the upgrade discount without having to enter your old serial number.
- Apple Mail
- Fixed a problem where, with certain unusual account configurations, SpamSieve would not see the new messages that needed to be filtered, so they would stay in the inbox.
- SpamSieve is better able to continue filtering messages when Mail is temporarily unable to look up account information.
- Worked around a macOS bug that could cause Mail to hang if it was preparing to send a message to the SpamSieve Mail extension while SpamSieve was filtering another mailbox.
- Improved the Filter spam messages in other mailboxes
feature:
- Added a safety feature where SpamSieve will no longer filter messages that were received before SpamSieve was installed or before this feature was activated, to avoid reprocessing lots of old messages that happen to still be marked as unread.
- The checkboxes in the mailbox list for TrainGood and TrainSpam are now disabled, as these mailboxes should not be selected for filtering.
- SpamSieve is now able to continue finding mailboxes to list even if Mail returns invalid information for some of them.
- Fixed a bug where the Settings ‣ Apple Mail ‣ Training window could be out-of-sync with the stored settings that SpamSieve was using, leading to trained messages not moving where you expected.
- Removed the Including in the inbox setting. The Add green flag to unread good messages setting now controls the green flags for all mailboxes.
- Improved the error handling when reading the selected messages.
- Improved the error handling when reading the inboxes.
- General
- Worked around a macOS bug that could cause a crash when updating the Dock icon.
- Worked around a macOS bug that could cause SpamSieve to hang at launch or when opening the Settings window.
- The Print… command is now disabled for large table views, as it would overload the macOS printing system and cause a hang.
- Improved the following sections of the manual (amongst others):
- Fixed a bug where a damaged corpus database could cause a crash.
- Fixed a bug where the hotkeys didn’t work with certain keyboard layouts.
- Fixed a bug reporting errors during Outlook filtering.
- Worked around a Core Data bug that could cause a crash.
- Updated the German localization.
- 3.0.2—November 17, 2023
SpamSieve 3.0.2 is a free update for those who have already purchased the SpamSieve 3.0 upgrade. If you’re using SpamSieve 2 and haven’t upgraded yet, the easiest way is to first let SpamSieve install the new version. At launch, it will show the Purchase window, and you can click the Check Upgrade Options button to get the upgrade discount without having to enter your old serial number.
- Apple Mail
- Apple Mail filtering when using the Mail extension is much
faster and is no longer limited by the number of messages in a
mailbox.
- This applies to the Check inboxes for new messages not sent to Mail extension, Filter spam messages in other mailboxes, and Add green flag to unread good messages features.
- To enable fast filtering, make sure that you’ve granted SpamSieve Full Disk Access. SpamSieve will still work without it, but in some cases it will be slower or report an error if a mailbox contains too many messages. If you were previously using SpamSieve 2 with Apple Mail, it most likely still has Full Disk Access. Otherwise, or if it seems like filtering is slow, check System Settings ‣ Privacy & Security ‣ Full Disk Access to make sure SpamSieve is enabled there.
- If you haven’t granted Full Disk Access, but SpamSieve thinks you would benefit from doing so, it will show a warning help link in the Settings ‣ Apple Mail ‣ Setup window.
- Fast filtering currently requires macOS 13 Ventura or later. (On macOS 13 and earlier, it’s not really needed because the Mail plug-in is available.)
- When fast filtering is available, SpamSieve now defaults to checking for new messages every 30 seconds instead of every minute. If you want, you can go to the Settings ‣ Apple Mail ‣ Filtering window and set it to check even more frequently, e.g. every 5 seconds, to minimize the time that spam messages spend in the inbox. In most cases, this doesn’t add much CPU overhead, however it might make Mail less responsive if you have a slow network connection or if Mail on your Mac takes a long time to fully download new messages for some other reason.
- The Select Mailboxes to Filter… sheet will no longer show large mailboxes in orange or red when fast filtering is available, because it’s now fine to select them.
- The Mail extension no longer sets the background color at all on spam messages if coloring is off. This lets you set colors yourself for other purposes.
- Improved the reporting of duplicate accounts when training from Apple Mail.
- Clicking the Filter Now button will now filter the inboxes, too, not just the selected mailboxes.
- SpamSieve will now log if Apple Mail is stuck reading a certain message.
- Improved the error logging when listing Apple Mail mailboxes.
- Added AppleMailMailboxListerExtraMailboxes to the esoteric preferences, which makes it possible to select mailboxes for filtering that Apple Mail failed to include in its mailbox listing.
- Apple Mail filtering when using the Mail extension is much
faster and is no longer limited by the number of messages in a
mailbox.
- Microsoft Outlook
- Training an Outlook message as spam now removes the Good category.
- Fixed a bug where SpamSieve would auto-launch when Outlook launched if Apple Mail filtering was enabled but Outlook filtering was disabled (and vice-versa).
- Log
- You can now click on the Date column header to reverse the sort order in the Log window so that the most recent log entries are at the top. (For memory and performance reasons, Date is the only sortable column in the log.)
- When opening the Log window, if no log entries are selected, it now auto-scrolls to show the most recent ones.
- SpamSieve is better at reporting whether a server junk filter thought that a message was spam.
- Improved the error log entry when SpamSieve lacks privacy access for the Use macOS Contacts feature.
- General
- Improved the auto-creation of From (name) blocklist and allowlist rules so that SpamSieve learns more quickly when you train a message.
- The Uncertain spam messages notification is now disabled by default, as most people only want to be notified about good messages.
- Fixed a bug where the training keyboard shortcuts didn’t work in Apple Mail or Outlook when using a Greek keyboard layout.
- Work around a Core Data bug that could cause a crash when saving the corpus.
- Updated the Danish, Dutch, French, Japanese, and Spanish localizations.
- Fixed a crash that could occur when processing an e-mail message with an improperly encoded ZIP file attachment.
- Fixed a crash that could occur when updating the Dock icon during a software update.
- 3.0.1—October 19, 2023
SpamSieve 3.0.1 is a free update for those who have already purchased the SpamSieve 3.0 upgrade. If you’re using SpamSieve 2 and haven’t upgraded yet, the easiest way is to first let SpamSieve install the new version. At launch, it will show the Purchase window, and you can click the Check Upgrade Options button to get the upgrade discount without having to enter your old serial number.
- Highlights
SpamSieve 3.0 brought a new way of integrating with Apple Mail—using a Mail extension—that’s compatible with macOS 14 Sonoma. Most customers have had success with this simpler system, where there’s no plug-in to install or rule to set up. Unfortunately, some customers encountered a macOS bug where Apple Mail stops sending new messages to SpamSieve’s Mail extension. This would cause spam messages to be left in the inbox, not because SpamSieve thought they were good, but because it hadn’t actually seen them.
We were aware of this problem affecting a small percentage of customers, and SpamSieve 3.0 included a built-in workaround: you could enable the Filter spam messages in other mailboxes feature and select your inboxes, and then SpamSieve would periodically check them for any new messages that Mail hadn’t sent to the extension. This worked, but there were a few downsides. You had to know—or see in the Log window or FAQ—that you needed to configure this. Also, there could be a slight delay before SpamSieve would detect the new messages; you could optionally enable a green flag to indicate to you when a message in the inbox had, in fact, been processed.
The main focus of SpamSieve 3.0.1 is improving this workaround so that everyone can get their mail filtered, even when Apple Mail is misbehaving. SpamSieve 3.0.1 adds a Check inboxes for new messages not sent to Mail extension feature that will automatically filter all of your inboxes, without your having to configure anything. Currently, this feature only kicks in if your inbox has fewer than 5,000 messages. We found that trying to read a larger inbox could cause Mail to freeze. If there are too many messages in the inbox, SpamSieve will skip it and tell you this in the Settings ‣ Apple Mail ‣ Setup window and in the Log window. Filtering will automatically resume if you move some messages to the Archive mailbox (or to another mailbox that you create, such as Inbox2) to get below the limit.
We understand that needing to move messages is not ideal, but most customers are below the limit and we wanted to get the fix to them as soon as possible. If you have a fast Mac, it may be able to handle a higher limit, and you can adjust this in the esoteric preferences. For SpamSieve 3.0.2, we’re working on another way of accessing the messages, which will work for larger inboxes and with a much shorter delay.
To be clear, all of this only applies for customers impacted by the macOS bug that prevents new messages from being sent to SpamSieve’s Mail extension. For most people, Mail does send messages to the extension for filtering. If your inbox has a large number of messages but is being filtered properly by the extension, you can ignore any error messages that SpamSieve reports about there being too many messages. The error just means that SpamSieve couldn’t double-check that all the new messages were processed.
- Apple Mail
- Added the Check inboxes for new messages not sent to Mail
extension feature:
- In the event that a macOS bug prevents Apple Mail from sending new messages to SpamSieve’s Mail extension for filtering, this will automatically find and filter new messages in the inbox.
- This is enabled by default and will check the inboxes periodically using the same schedule that you’ve set for Filter spam messages in other mailboxes.
- Inboxes with more than 5,000 total messages (shown as orange in the Select Mailboxes to Filter… sheet) will be skipped, to avoid slowing down or freezing Apple Mail.
- We recommend reducing the size of the inbox by archiving older messages or moving them to another mailbox. This will ensure that your inbox is eligible for automatic filtering and also make inbox checks faster.
- If you really want SpamSieve to try filtering a large inbox (shown in orange), you can manually select it in the Select Mailboxes to Filter… sheet or adjust the esoteric preferences.
- Otherwise, you can remove any inboxes that you had added to the Select Mailboxes to Filter… sheet (to avoid duplicate checks).
- To avoid disturbing old, unread messages that you may be purposely leaving in the inbox, Check inboxes for new messages not sent to Mail extension only processes messages received after the first time you launch SpamSieve 3.0.1. If you need to filter older messages in the inbox, you can select them and use the Filter Messages menu command.
- Improved the new filtering system:
- The Mail extension no longer overwrites the background color of good messages, so you can once again have Mail rules that set background colors for other reasons.
- Worked around an Apple Mail bug that could prevent trained or filtered messages from moving to the trash.
- Restored the prior behavior of leaving spam messages totally uncolored (rather than gray) when Color the background according to how spammy it is is unchecked.
- If there’s an error moving a message to the Junk mailbox, SpamSieve now tries various fallback methods of moving it.
- If the Mail extension encounters an error communicating with SpamSieve, it now flags the message orange instead of gray, since gray is now used for another purpose (see above).
- If Apple Mail erroneously provides empty data for a message, SpamSieve will now always classify it as good, just to be safe, and it will also log some information about the location of the problematic message and then try again later.
- Added an esoteric preference (click to enable/disable), which makes the Mail extension flag spam messages gray. Message background colors don’t sync between devices, but flags do, so this makes it possible to see on another device which messages in the Junk mailbox were put there by SpamSieve (rather than by a server filter). Also, the flag can be useful for separating spam messages from good ones in Apple Mail if Mail is for some reason unable to move the spam messages to the Junk mailbox.
- Worked around an AppleScript error checking whether an account was enabled.
- Fixed a bug where the details for some AppleScript error messages were lost.
- Improved the Filter spam messages in other mailboxes feature:
- This is now enabled by default, to avoid the problem of selecting mailboxes to filter but forgetting to enable the feature.
- Previous versions of SpamSieve would warn you not to select a mailbox that was orange in the Select Mailboxes to Filter… sheet (having 5,000 or more messages) or red (10,000 or more messages). If you disregarded its advice, SpamSieve would respect your choice, but sometimes this could lead to Mail freezing and confusion as to what caused this. Now, SpamSieve will strictly enforce the red limit and skip filtering such mailboxes to avoid slowing down Apple Mail or causing it to freeze. If you think your Mac is super speedy and can handle more messages, you can raise the limit using the esoteric preferences.
- If reading a particular mailbox causes a timeout error, SpamSieve now reports this in the log and recommends archiving some of the old messages to another mailbox that’s not selected for filtering.
- SpamSieve will no longer try to filter mailboxes in accounts that are marked as disabled.
- If a mailbox can’t be found because there are multiple mail accounts with the same name, SpamSieve will now try to figure out which account you meant and, failing that, show an error message saying that you should rename one of the accounts.
- Fixed a bug where the wrong mailbox could be filtered if a top-level mailbox had the same name as a nested one.
- Worked around an Apple Mail bug that could prevent moving POP messages to the Junk or Trash mailbox.
- SpamSieve is better at handling errors from Mail when setting a message’s flag or read status.
- Made some optimizations to speed up filtering.
- Improved the Select Mailboxes to Filter… sheet:
- SpamSieve is better at handling and reporting errors that Mail reports when reading the mailbox list.
- The special mailboxes are now sorted to the top, like in Apple Mail.
- Improved the recognition of special Junk and Archive mailboxes.
- The special Archive mailbox is no longer selectable as filterable, since it doesn’t receive new messages.
- Mailboxes that are not eligible for filtering are never shown in red or orange, even if they contain a large number of messages.
- Improved the Add green flag to unread good messages feature:
- Including in the inbox no longer tries to remove green flags from inboxes in accounts that are disabled.
- In order to prevent Including in the inbox from causing slowness in Mail, SpamSieve will skip unflagging for large inboxes that show up as orange in the Select Mailboxes to Filter… sheet. It will also log an error if it looks like unflagging failed because there were too many messages in the mailbox.
- Fixed a bug that could cause spurious errors to be logged when unflagging messages.
- Improved the responsiveness of Mail during filtering and unflagging.
- Improved the Mail plug-in:
- Updated some error messages to account for SpamSieve’s new Settings window.
- Fixed an error moving a trained spam message to the Trash mailbox.
- In rare cases, SpamSieve asking Mail to deactivate its rules on macOS 14 can cause a crash, so you can now click here to tell SpamSieve not to do that. In that case, you should be sure to deactivate or delete the rules yourself.
- Added the Check inboxes for new messages not sent to Mail
extension feature:
- General
- Fixed a bug where the training hotkeys sometimes didn’t work in Apple Mail or Outlook.
- When you train a message as good in Apple Mail or Outlook, SpamSieve no longer marks it as unread if it’s not in a Junk mailbox. Also, clarified the labels in the Settings window to say that the message is only moved if it’s in the Junk mailbox. In other words, you can train messages in other mailboxes (e.g. as part of the initial training) without messing up how they are filed.
- Worked around a Swift bug that could cause a crash when parsing an e-mail message’s address list.
- Improved the filtering accuracy through more precise message parsing.
- Added Danish and Swedish localizations.
- Updated the Dutch, French, German, and Spanish localizations.
- You can now access the the release notes from the Help menu.
- Improved SpamSieve’s launch time by preloading scripts in the background.
- Many sections of the manual have been revised or updated.
- SpamSieve will now log at launch if it thinks the menu bar icon is set to be visible but doesn’t actually fit on screen due to other menu bar icons or the Mac’s camera housing. There is now an esoteric preference (click to enable/disable) to see in the log how it determined this.
- Added an esoteric preference to suppress badging of the Dock icon, as in rare cases that can trigger a Core Image bug that causes a crash (click to disable/enable badging).
- Fixed a bug where SpamSieve wouldn’t let you enter your license information into the Purchase window.
- Importing From SpamSieve 2
- Worked around a Core Data bug that could cause an error saving the corpus when importing from SpamSieve 2.
- Fixed a bug where SpamSieve could hang when importing certain malformed messages from SpamSieve 2.
- Fixed a crash that could occur when importing from SpamSieve 2 if the corpus was damaged. SpamSieve will now just skip the damaged message.
- Fixed a bug where certain settings migrated from SpamSieve 2 would make it show in the Settings window that trained messages would be moved to Junk, but actually they would not be moved.
- Settings
- In the pop-up menu for the Move it to the Trash if the spam score is at least checkbox, the score of 50 is now labeled with all spam.
- The menu item for opening the window is now called Settings, even on older versions of macOS, as having it called Preferences was confusing for people following the instructions in the manual.
- SpamSieve will show a warning if Check inboxes for new messages not sent to Mail extension is disabled or if an inbox was skipped for filtering because it contained too many messages.
- SpamSieve will now show a warning if you have Apple Mail mailboxes selected for filtering but Filter spam messages in other mailboxes is disabled.
- SpamSieve will now show a warning if it skips filtering a mailbox because it’s too large.
- Fixed the labels for the Uncertain spam messages slider, which were backwards.
- Improved the display of Entourage and Postbox installation errors.
- Blocklist and Allowlist
- Fixed a bug where changing whether a rule was enabled or locked from a rule list window didn’t work if the search field had focus.
- Fixed a bug where the text to match in the rule editor sheet was unreadable in Dark Mode.
- Worked around a Swift Regex bug that could cause a hang when matching a message against the blocklist or allowlist.
- Fixed a crash that could occur when using the Import Addresses… command on macOS 10.15 or earlier.
- Log
- SpamSieve is better at reporting whether a server filter thought that a message was spam.
- When you copy a log entry to the clipboard, it now includes the sender’s name.
- If the same error occurs multiple times when communicating with Apple Mail or Outlook, SpamSieve now only logs it once per hour.
- Fixed a bug where viewing a partially deleted log entry could cause a crash.
- Fixed a bug where some emoji were not available on macOS 10.14.
- 3.0—September 21, 2023
SpamSieve 3.0 is a major upgrade. It costs $39.99 for new users (no subscription), $19.99 for previous SpamSieve owners, and is free for people who purchased SpamSieve 2.x on or after January 1, 2023. There’s a 30-day fully-featured trial for new users and upgraders. If you’re updating from SpamSieve 2, SpamSieve 3 will start out with no license information shown, but it still knows your serial number for the previous version. You can just click the Check Upgrade Options button in the Purchase window to take you to the store and automatically apply the upgrade discount.
- Highlights
- SpamSieve 3 is compatible with macOS 10.13 (High Sierra) through macOS 14 (Sonoma) and is recommended for all customers using those versions of macOS. SpamSieve 3 is required for customers using Apple Mail with Sonoma. We recommend updating SpamSieve before updating to Sonoma.
- When you launch SpamSieve 3, it will offer to automatically migrate all your old training data and accuracy statistics (so that you don’t need to retrain it), or you can choose to start fresh. Your SpamSieve 2 data is left untouched, so it’s possible to revert to the old version if necessary. The new version of the Apple Mail plug-in also works with SpamSieve 2. Training done with version 2 after updating to version 3 will stay with version 2 (and vice-versa).
- The Apple Mail integration has been completely rewritten for compatibility with macOS 14 Sonoma. On Sonoma, SpamSieve now uses a Mail extension rather than a Mail plug-in (as Sonoma no longer supports plug-ins). The extension needs to be enabled in Mail’s Settings ‣ Extensions window. It is no longer necessary to install any files or to give SpamSieve Full Disk Access. You will now train SpamSieve from the SpamSieve menu bar icon at the top of the screen or from SpamSieve’s Dock icon, rather than from the Message menu in Mail.
- If you had previously used SpamSieve with Apple Mail, the first time SpamSieve launches on Sonoma it will explain how to make the transition to using the Mail extension. The new setup is also described in the Setting Up Apple Mail section of the manual. With earlier versions of macOS, you can continue using the Mail plug-in, as before. With macOS 13 Ventura and macOS 12 Monterey, you can choose whether to use the Mail extension (which is simpler to set up) or the Mail plug-in (which is more customizable). You can click Uninstall Plug-In… (which will also offer to delete the old Mail rule) in Settings ‣ Apple Mail ‣ Setup if you plan to switch all your Macs to using the extension.
- The Microsoft Outlook support has been rewritten to be simpler and easier to set up. It is no longer necessary to install any script files. The Outlook Filter Mailboxes helper app is no longer needed. If you don’t store large amounts of mail in your inbox, it’s no longer necessary to create any rules in Outlook.
- If you had previously used SpamSieve with Outlook, you can continue to use the existing scripts and Outlook Filter Mailboxes, or you can remove the Outlook Filter Mailboxes app and switch to the new setup by following either the Setting Up Outlook or Setting Up Outlook (Large Inboxes) instructions.
- SpamSieve’s e-mail parser has been rewritten in Swift for better accuracy, stability, and speed. SpamSieve is better able to understand messages that use newer e-mail formats, as well as malformed messages that don’t follow the specification. Where previous versions might get confused and give up (ignoring parts of the message) or even crash, the new parser engine is more resilient. Being able to read and understand more of the e-mail message increases the filtering accuracy, since it’s able to see spammy content that was invisible to SpamSieve 2, either because of bugs in the e-mail sending software or because spammers were deliberately trying to evade filters.
- The corpus, blocklist, and allowlist have been rewritten to use a new database format. This greatly reduces SpamSieve’s launch time and memory use, while enabling lots of new features.
- The text-based log file and history database have been replaced by a new log database and Log window, which is easier to browse and search. The log includes lots more information about each message to help you understand what SpamSieve did and why, and what you might want to do in response. It should be your first stop when troubleshooting.
- The Settings window has been redesigned, consolidating options and commands that were previously in other menus, scripts, or esoteric preferences. Many of the labels have been reworded for clarity, and there are now links to open relevant sections of the help for more detailed explanations.
- There is now a Show Dock icon setting to more easily hide SpamSieve’s Dock icon. With the Dock icon hidden, you can access all of SpamSieve’s windows and commands from the new SpamSieve menu bar icon. If both the Dock icon and menu bar icon are hidden, you can still access the settings by opening SpamSieve from your Applications folder when it’s already running.
- Apple Mail
- Filtering is now controlled from within SpamSieve’s Settings window rather than from Mail’s settings. You can now choose to Enable spam filtering using Mail extension (for the newer, simpler setup) or Enable spam filtering using Mail plug-in (which works the same way as in SpamSieve 2). You can also select Disable spam filtering in Apple Mail to temporarily turn off filtering (without having to uninstall anything).
- The Settings window has new buttons to Install Plug-In or Uninstall Plug-In…. The latter will also uninstall any SpamSieve rules. To stop using the Mail extension, you can just select Disable spam filtering in Apple Mail, which removes SpamSieve’s launch agent. There’s nothing further to uninstall, aside from the app itself.
- There’s a new Filter Messages menu command to manually apply SpamSieve to the selected messages. This has a keyboard shortcut of Command-Control-L. Mail’s Apply Rules command has a keyboard shortcut of Command-Option-L, and it still works to apply the Mail rules, but it no longer applies SpamSieve when using the Mail extension (because there is no more SpamSieve rule).
- We have long recommended setting Mail to move the messages SpamSieve catches to the All Junk mailbox rather than to the Spam mailbox. This is still the case when using the Mail plug-in, and with the Mail extension the Spam mailbox is no longer an option. There remains a SpamSieve setting to control where spam messages move when you train them. If you had been using Spam, you may want to change this to Junk so that all your spam messages end up in the same place.
- SpamSieve normally moves spam messages to the Junk mailbox. When using the Mail extension, there’s a new Move it to the Trash if the spam score is at least option. This separates the more spammy messages (in Trash), which are less likely to be mistakes, from the less spammy ones (in Junk), so that you can concentrate your efforts on reviewing those. For example, if you set the score to 99, when you train a message as spam, its sender will go on SpamSieve’s blocklist, and future messages from the same name or address will go directly to the Trash.
- There’s a new Mark it as read setting to mark new messages as read if SpamSieve thinks they’re spam, e.g. so that you aren’t distracted by the unread count in Mail’s sidebar.
- The Color the background according to how spammy it is setting is now available in the Settings window (instead of via the Change Settings command). There’s now a legend so that you can see which spam levels the different colors correspond to.
- There’s a new Filter spam messages in other mailboxes option. This makes it possible for SpamSieve to filter messages that other rules (either in Mail or on your mail server) moved out of the inbox. This is especially important when using the Mail extension, because Mail only sends new messages to the extension if they remain in the inbox after processing your Mail rules. With the Mail plug-in, this was not a concern because the SpamSieve rule was at the top of the list, so it was applied first. However, even with the plug-in, Mail does not apply rules to messages that were moved out of the inbox by a server rule or by another device before they got to your Mac. With this option, it is now possible for SpamSieve to filter all new messages, no matter where they are.
- Filtering messages in other mailboxes is not immediate: SpamSieve needs to periodically check whether any new messages have arrived. If you receive lots of new messages and spend a lot of time in Mail, you may see a new message before SpamSieve does. It may not be clear whether a spam message is visible because SpamSieve made a mistake and thought it was good or simply because SpamSieve hadn’t had a chance to examine it yet. The new Add green flag to unread good messages option lets you choose to have SpamSieve mark messages that it has checked with a green flag. Messages with no flag are pending processing; they are not mistakes that need to be trained as spam.
- In rare cases, a Mail bug may prevent new messages from being sent to the SpamSieve extension for analysis. You can enable green flags for the inbox using the Including in the inbox option, and if this and the Log window show that SpamSieve is not seeing the inbox messages, you can add the inboxes to the Select Mailboxes to Filter… sheet to have SpamSieve filter them without relying on the Mail extension.
- You can now control from the Settings window whether messages that you train as spam are moved to the Junk, to the Trash mailbox, or to a custom mailbox; and whether they should be marked as read. You can also control whether messages trained as good are moved back to the inbox or marked as unread.
- SpamSieve now shows an error message and help link in the settings if it’s missing Automation access to control Apple Mail or Full Disk Access to use the Apple Mail plug-in.
- The new Setting the Junk Mailbox in Apple Mail section to the manual consolidates and updates several previous sections.
- The Apple Mail - Rescue Good Messages and Apple Mail - Remote Training scripts are still supported. They do not need to be updated to continue working with SpamSieve 3. They work best when SpamSieve is set to move trained messages to the Junk mailbox.
- Outlook
- Filtering is now controlled by SpamSieve itself rather than using the Outlook Filter Mailboxes helper app. In SpamSieve’s Settings window, you can choose to Enable spam filtering for Inbox. This is a simpler setup that’s available for users who don’t keep lots of old messages in the inbox. You can also choose to Enable spam filtering for InboxSpamSieve, which uses Outlook rules to temporarily store messages in the InboxSpamSieve folder until they have been processed, as with previous versions of SpamSieve. You can also select Disable spam filtering in Outlook to temporarily turn off filtering or if you want to uninstall—there are no more extra files that need to be manually deleted.
- You can now train SpamSieve from the SpamSieve menu bar icon at the top of the screen or from SpamSieve’s Dock icon, rather than from the system script menu. The training commands now have keyboard shortcuts.
- There’s a new Filter Messages menu command to manually apply SpamSieve to the selected messages.
- You can now set in the Settings window how often SpamSieve checks for new messages to filter. There’s also a Filter Now button that shows whether filtering is currently in progress and lets you tell SpamSieve to filter right away.
- The Settings window now has a Mark less spammy messages as “Uncertain Junk” checkbox. There are also checkboxes to control whether messages trained as spam (or good) are moved to the Junk E-mail folder (or to the inbox) or marked as read (or as unread).
- SpamSieve still supports Outlook 2011. This works the same way as in SpamSieve 2, except that the scripts can now be installed directly from the Settings window, and there are links to the setup instructions right there.
- SpamSieve now shows an error message and help link in the settings if it’s missing Automation access to control Apple Mail or Outlook.
- Other Settings
- The Filters and Training settings have been consolidated. There are now buttons to open the various SpamSieve windows directly from the Settings window, along with links to open the relevant help sections. The old Use Habeas Safelist, “ADV” messages are spam, and Encoded HTML mail is spam filters have been retired. The old Allow good/spam duplicates in corpus checkboxes were not very useful and have been removed.
- The Update Address Book “Me” Card command has been replaced with an Edit Addresses button, as it no longer worked due to privacy restrictions in macOS. This is useful in conjunction with the Catch spam sent from my own addresses setting (which used to be called Exclude my addresses).
- Notification sounds are now shown without filename extensions and are remembered even if extension hidden flag is changed.
- SpamSieve now supports Notification Center, with options for notifying for Good messages sent from Contacts, Other good messages, The number of new good messages, and Uncertain spam messages. There’s now a slider for controlling which messages are considered uncertain. The old support for Growl notifications has been retired.
- There’s a new Other Clients tab of the Settings, which offers installation buttons and links to the setup instructions for the other mail apps that SpamSieve supports.
- Bayesian Filtering
- SpamSieve is better able to understand Emoji and Asian languages, so that runs of these characters are properly tokenized into words even when they are not separated by whitespace. This greatly improves the filtering accuracy for messages containing such characters.
- SpamSieve also has a better understanding of Unicode normalization and of certain special characters, which improves recognition of words that had been seen before, but in a slightly different form.
- Made various other changes to improve SpamSieve’s filtering accuracy.
- Rules Filtering
- Normally, when you train a message as spam, SpamSieve will disable any matching allowlist rules; and when you train a message as good, SpamSieve will disable any matching blocklist rules. This prevents such “incorrect” rules from causing filtering mistakes for future messages. SpamSieve now lets you lock certain rules, which prevents them from being automatically disabled in this manner. This is useful when you are really sure that a rule does what you intend, for example if you want messages matching a certain rule to always be classified as good, even if some spam messages also match that rule.
- SpamSieve is much faster at matching messages against mailing list rules.
- Regex rules work better with Unicode text.
- Added logging to help detect slow regexes that are slowing down rule filtering.
- If you have a rule that has matched a lot of messages, SpamSieve no longer stops counting at 65,535 hits.
- Corpus Window
- The Words tab of the Corpus window works much the same as before, but it’s much faster to open and to change the sorted column. A large corpus can take a while to reload after an update, and this now happens in the background, rather than blocking the user interface and filtering. The text is larger and easier to read.
- There are new tabs in the Corpus window where you can view the list of Good Messages and Spam Messages that SpamSieve has been trained with. In most cases, the full message data is not available for messages trained with SpamSieve 2, so in that case only placeholders will be shown. For messages trained with SpamSieve 3, you can view metadata about the message, as well as when and how it was trained. You can also view the message’s rendered content and its raw source and MIME structure.
- Messages can now be trained from the Corpus window. Normally, it’s better to train from within your mail client, but sometimes you can’t find a message in the mail client or it’s already been deleted, due to a client or server bug or another device moving the message to a local mailbox. Having the message available in the Corpus window lets you properly update SpamSieve’s training in such cases. Previously, the only way to fix an incorrect training if you no longer had the message was to reset the corpus. Also, you can view the lists of spam and good messages to make sure that SpamSieve has been trained properly, i.e. that there were no mistakes that you forgot to correct.
- You can flag messages of note to come back to them later.
- You can open SpamSieve’s copy of a message into your e-mail client to reply to it there or to copy it back to the mail server.
- You can drag and drop messages out of the corpus window to export them for backup or for reporting to customer support.
- Searches now support wildcards (* and ?), and you can also search for messages by their subject, address, or SpamSieve identifier.
- The Corpus window now supports secondary sorting.
- Rules Windows
- The Blocklist and Allowlist windows work much the same as before, but they’re much faster to open, loading now happens in the background, and the text is larger and easier to read.
- The “whitelist” has been renamed to “allowlist,” as recommended by the IETF and Apple.
- There are new columns to show when a rule was last Modified and when it last Matched a message. The Hits column has been replaced with separate columns to show the number of Correct and Incorrect times it was used to classify a message. This can help you identify rules that are not working as expected.
- Secondary sorting is now supported. For example, to find allowlist rules that you might no longer need, you could sort by Date Created and then by Correct, to see all the rules with 0 hits ordered by how old they are.
- Editing a rule now takes place in a separate sheet, where there’s more room to see the different options and to edit the text. You can now see live whether the regex that you entered is valid. The sheet also shows information about when and how the rule was created and how it has been used.
- There’s a space to enter comments for each rule, e.g. to help you remember why you created a rule or how a regex was intended to work. You can search for rules by comment.
- You can also flag a rule that you’re observing or tweaking or that you’ve put on probation to easily find it again later.
- Rules with invalid regular expressions are shown in red. Some rules created with SpamSieve 2 may need to be updated, as the regex engine has changed from PCRE to ICU.
- Changes that you make to rules are now undoable.
- Searches now support wildcards (* and ?).
- Log
- The new Log window shows all the message trainings and predictions, as before. They are now color-coded so that you can see SpamSieve’s accuracy: green means that it was correct, orange indicates a false negative, and red indicates a false positive.
- You can now view a message’s rendered content and its raw source and MIME structure, rather than just its metadata. There’s a new setting to control how long SpamSieve should store the full message data for old log entries, to prevent it from using too much storage.
- Log entries show more information about each message. You can see which mail client (and in some cases which account and mailbox) a message came from. You can see whether a server junk filter agreed with SpamSieve about whether or not a message is spam. It also shows more information about what SpamSieve did with the message and why. If a log message is for a training, and you’ve correcting SpamSieve, the training log entry will show you information right there about why SpamSieve made that mistake. You can also search the log for the message’s identifier to see all the log entries related to that message. The log will also try to alert you to unusual situations, e.g. if you trained a message that was not actually a SpamSieve mistake, or if the exact same message had been repeatedly classified or trained.
- The log also shows new types of entries. You can see changes that you or SpamSieve have made to rules. You can see errors reported by the mail client when SpamSieve asks it to do something—information that was previously only available in the system log.
- SpamSieve 2 recorded less extensive log and history information, but SpamSieve 3 imports it and updates it to the new format where possible. If you had enabled the experimental message backup feature in SpamSieve 2, to protect against the Mail data loss bug, any backed up messages will now be available in the Log window. Messages from the old Save false negatives to disk feature are also imported.
- As with the corpus, you can open messages from the log in Apple Mail and other mail clients or export them via drag and drop.
- If SpamSieve thinks that processing a particular message caused a crash, it will be shown in red in the log. You can drag the log entry into an e-mail to report the problematic data to us so that we can try to prevent the crash in the future.
- You can also see whether a particular message took an abnormally long time to process and report such problematic messages.
- The contents of the log are now localized.
- Log entries can now display context-specific links to help pages. For example, there is a particular link that’s only relevant when you are using Apple Mail and the Mail extension and you’ve trained a message in the inbox that SpamSieve had not seen before as spam.
- If you’ve enabled notifications for new messages, e.g. to see which messages SpamSieve is uncertain about, clicking the notification will find that message in the log.
- The log database is now stored as shards, so it works much better with backups (old shards rarely change and so won’t need to be recopied) and is more resilient (if one file becomes damaged, you don’t have to throw away the entire log).
- Message data is no longer stored in plaintext, to avoid problems with anti-virus software deleting data out from under SpamSieve, even though it was inert.
- Diagnostic reports now include a fixed number of recent log entries, whereas previously there could be too much or too little data depending on when the log file had last rolled over.
- Statistics Window
- The accuracy statistics now ignore duplicate classifications of the same message.
- Calculating the corpus and rules statistics no longer blocks the user interface.
- Show Statistics Since now uses a date picker rather than a free-form text field in a separate sheet.
- General
- SpamSieve has a new Dock icon. The top-left of the icon shows an envelope when SpamSieve is idle, a downward pointing arrow when SpamSieve is classifying a message, a check mark when it’s training a message as good, and an x mark when it’s training a message as spam.
- You can now open the Settings window from the Dock menu.
- The SpamSieve menu bar icon changes color while an operation initiated by the menu or a hotkey is in progress (blue when filtering messages, green when training as good, and brown when training as spam).
- AppleScript support for the corpus and rules has been rewritten to be faster and use less memory. You can now use considering case and ignoring case blocks when looking up words and rules.
- The Setting Up Airmail instructions now have screenshots.
- Each help page now has a link to a Google translation so you can view it in a different language.
- Removed support for PowerMail 4.x; versions 5.x and 6.x are still supported.
- Updated the Dutch, French, German, Japanese, and Spanish localizations.
- Removed the Danish, Italian, Korean, Russian, Swedish, and Vietnamese localizations, which are out-of-date. If you’d like to help update the localizations (or add a new one), please contact spamsieve@c-command.com.
- 2.9.52—March 10, 2023
- Added support for Apple Mail on the forthcoming macOS 13.3. We recommend updating SpamSieve before updating macOS. SpamSieve 2.9.52 should automatically update the installed version of its Apple Mail plug-in, and the plug-in should stay enabled. However, if you don’t see the SpamSieve commands in Apple Mail’s Message menu, be sure to choose Install Apple Mail Plug-In from the SpamSieve menu and to enable the plug-in.
- Made various changes to improve SpamSieve’s filtering accuracy.
- If you are using Apple Mail on macOS 13, we recommend going to Mail ‣ Settings ‣ Accounts ‣ Account Information and setting Download Attachments to All for each account. This can work around a Mail bug that causes a hang when training a message.
- Added an experimental workaround for an issue on macOS 13 that could cause Apple Mail to take a long time to launch. For information on how to enable the workaround, please see the If Apple Mail Is Running Slowly section of the manual.
- Improved the speed of filtering the first message after SpamSieve launches.
- Added the following sections of the manual:
- Improved the following sections of the manual:
- Improved the error reporting for the Apple Mail plug-in installer.
- 2.9.51—January 11, 2023
- Made various changes to improve SpamSieve’s filtering accuracy.
- When using Apple Mail, SpamSieve installs a launch agent, and this now shows up as SpamSieve rather than as C-Command Software in System Settings ‣ General ‣ Login Items ‣ Allow in the Background on macOS 13.
- Renamed Preferences to Settings for macOS 13.
- Improved the diagnostic report on macOS 13.
- If training a message doesn’t work due to an AppleScript failure, the error message now explains how you may be able to fix this by removing problematic legacy component files from your Mac.
- Improved the error reporting when the Apple Mail plug-in cannot be installed due to a file permissions problem.
- Improved the following sections of the manual:
- Apple Mail Customization
- Checking the Airmail Setup
- Filtering Spam During Power Nap
- How should I configure the junk filter on my mail server?
- If Apple Mail Is Running Slowly
- Only Filtering Certain Accounts
- Setting Up a Spam Filtering Drone
- Setting Up Airmail
- Setting Up Apple Mail
- What can I do if my Spam or Junk mailbox in Apple Mail disappeared?
- Why are messages marked as spam in Apple Mail but not moved?
- Why do good messages move to the wrong inbox when trained in Apple Mail?
- The Apple Mail - Rescue Good Messages script now has an option to remove colored flags that were added by the server junk filter, as these can make spam messages show up in Mail’s special mailboxes even after they’ve been deleted.
- The Apple Mail - Remote Training script now skips accounts that are disabled in Mail to avoid spurious errors.
- Added a workaround to the Apple Mail - Remote Training script for some users whose messages were not being moved out of the TrainGood mailbox.
- Made various code modernizations.
- SpamSieve now requires macOS 10.13 (High Sierra) or later.
- 2.9.50—August 4, 2022
- Made various changes to improve SpamSieve’s filtering accuracy.
- Fixed an issue where, on macOS 12.5, sometimes Mail would move e-mails received immediately after launch to the Junk mailbox without asking SpamSieve whether they were spam.
- Fixed an issue where, on macOS 12.5, sometimes SpamSieve would disable its Apple Mail rules because it looked like Mail hadn’t loaded the plug-in, but actually Mail was just slow to launch.
- Made a change to prevent potential problems setting up the Message menu in Apple Mail on future versions of macOS 13 Ventura.
- Fixed a bug where SpamSieve could incorrectly report that another copy of the Apple Mail plug-in was installed in the wrong place, when that copy might be necessary for another macOS user account on a different volume.
- Fixed a bug that in rare cases could prevent SpamSieve from detecting that two copies of the Apple Mail plug-in were loaded at the same time.
- SpamSieve is better at handling damaged rules files.
- Reduced the size of the app by removing a helper tool that was only necessary for Apple Mail on macOS 10.7, which is no longer supported.
- 2.9.49—June 22, 2022
- Added support for Apple Mail on the forthcoming macOS 12.5 and macOS 13 Ventura. We recommend updating SpamSieve before updating macOS. SpamSieve 2.9.49 should automatically update the installed version of its Apple Mail plug-in, and the plug-in should stay enabled. However, if you don’t see the SpamSieve commands in Apple Mail’s Message menu, be sure to choose Install Apple Mail Plug-In from the SpamSieve menu and to enable the plug-in.
- Made various changes to improve SpamSieve’s filtering accuracy.
- Updated the Outlook Filter Mailboxes helper app to work around a problem where macOS 12.3 would report an error at launch. It also now helps you figure out if Outlook Filter Mailboxes doesn’t have Automation access to control SpamSieve.
- Improved the following sections of the manual:
- Does SpamSieve stop Web bugs?
- Separate Spam Mailboxes for Each Account
- Setting Up Apple Mail
- Setting Up Outlook
- Using a Spam Mailbox on the Server
- Why do good messages keep going to the Junk or Spam mailbox?
- Worked around a macOS bug that could prevent a rules file written on macOS 12 on an M1 Mac from being properly read on macOS 10.15.
- Fixed a bug where certain Unicode character sequences in a message’s address list could cause SpamSieve to hang when matching against a rule list.
- Updated the Read Me.
- 2.9.48—February 10, 2022
- Added support for Apple Mail on the forthcoming macOS 12.3. We recommend updating SpamSieve before updating macOS. SpamSieve 2.9.48 should automatically update the installed version of its Apple Mail plug-in, and the plug-in should stay enabled. However, if you don’t see the SpamSieve commands in Apple Mail’s Message menu, be sure to choose Install Apple Mail Plug-In from the SpamSieve menu and to enable the plug-in.
- Made various changes to improve SpamSieve’s filtering accuracy.
- Improved the following sections of the manual:
- Improved error reporting for the software updater.
- 2.9.47—December 6, 2021
- Added support for Apple Mail on the forthcoming macOS 12.1. We recommend updating SpamSieve before updating macOS. SpamSieve 2.9.47 should automatically update the installed version of its Apple Mail plug-in, and the plug-in should stay enabled. However, if you don’t see the SpamSieve commands in Apple Mail’s Message menu, be sure to choose Install Apple Mail Plug-In from the SpamSieve menu and to enable the plug-in.
- Made various changes to improve SpamSieve’s filtering accuracy.
- Worked around a bug in Apple Mail that could prevent messages trained as good from moving back to the inbox or messages (particularly POP ones) trained as spam from moving to the Junk mailbox. If you continue to see either of these problems, choose Install Apple Mail Plug-In from the SpamSieve menu.
- Updated the Open Window script to work around an issue on macOS 12 where some windows didn’t open due to an AppleScript error.
- Improved the following sections of the manual:
- Improved the error handling when Apple Mail reports an error determining whether a message trained as spam is already in the Junk mailbox.
- Improved the diagnostic report on macOS 12.
- SpamSieve now declares notch compatibility for the new MacBook Pros.
- 2.9.46—October 14, 2021
- Added support for Apple Mail on the forthcoming macOS 12.0. (An additional update was required due to late changes in Monterey Developer Beta 9.) We recommend updating SpamSieve before updating to Monterey. SpamSieve 2.9.46 should automatically update the installed version of its Apple Mail plug-in, however if you don’t see the SpamSieve commands in Apple Mail’s Message menu, be sure to choose Install Apple Mail Plug-In from the SpamSieve menu and to enable the plug-in.
- When you train a message as good, and SpamSieve is moving the message back to the inbox, it’s better at handling localized inbox names.
- The Train as Good command in Apple Mail now moves messages out of spam/junk mailboxes that have a leading space in the name for sorting.
- Updated the crash reporter for macOS 12 Monterey.
- Improved the following sections of the manual:
- Sending in a “Sample” Report
- Switching From the Spam Mailbox to the Junk Mailbox
- The Apple Mail - Remote Training script is now able to find training mailboxes that are nested in other folders.
- The Apple Mail - Server Junk Mailbox script is better at handling errors.
- Added AppleMailTrainGoodMoveAlways to the esoteric preferences, which can work around a problem with Gmail where Mail does not report the trained message as being in the right mailbox, so SpamSieve decides not to move it when training as good.
- Worked around a problem where an internal Apple Mail error could prevent messages from moving to the inbox when you trained them as good.
- Fixed a bug where the Apple Mail - Remote Training script could fail after “Switching From the Spam Mailbox to the Junk Mailbox.”
- 2.9.45—September 8, 2021
Added support for Apple Mail on the forthcoming macOS 12.0. (An additional update was required due to late changes in Monterey Developer Beta 6.) We recommend updating SpamSieve before updating to Monterey. SpamSieve 2.9.45 should automatically update the installed version of its Apple Mail plug-in, however if you don’t see the SpamSieve commands in Apple Mail’s Message menu, be sure to choose Install Apple Mail Plug-In from the SpamSieve menu and to enable the plug-in.
Made various changes to improve SpamSieve’s filtering accuracy.
On macOS 10.15 and later, we now recommend configuring Apple Mail and SpamSieve to move spam messages to the special All Junk mailbox rather than to the Spam mailbox. This simplifies many setup procedures and works around some Mail bugs that, in rare cases, can cause spam messages that SpamSieve has caught to appear in the inbox as well in as the Spam mailbox or to be deleted instead of moved to the Spam mailbox.
New installations of SpamSieve will use the Junk mailbox by default, and the manual has been rewritten with this new setup in mind.
If you are already using SpamSieve with a Spam mailbox and are not encountering the bugs mentioned above, you can continue with your current setup. It will keep working the same way as before, without your having to change anything.
The “Switching From the Spam Mailbox to the Junk Mailbox” section of the manual explains all of this in more detail and describes how you can update an existing SpamSieve setup if desired.
When you enter Deleted Messages as the spam mailbox name for training in Change Settings (Apple Mail), SpamSieve now moves the messages to the account-specific trash mailbox instead of to the local one, working around a macOS bug in that could cause the message to be deleted instead of moved.
Added the “Separating Spam Caught by SpamSieve and Server Filters” section of the manual.
Improved the following sections of the manual:
Added the Apple Mail - Rescue Good Messages script, which moves good messages that were incorrectly caught by a server junk filter from the Junk mailbox to the inbox. This is similar to the old Apple Mail - Server Junk Mailbox script but is easier to set up because you can just install the script file without having to edit it first.
The Apple Mail - Remote Training script now works when SpamSieve is configured to use the special Junk mailbox. In such cases, you can now download the script and use it directly. There is no need to edit it, as with previous versions.
The Apple Mail - SaneBox script now works when SpamSieve is configured to use the special Junk mailbox.
The Apple Mail - Move If Spam script now works when SpamSieve is configured to use the special Junk mailbox.
Improved the error reporting when you’ve launched an incomplete copy of SpamSieve from a Carbon Copy Cloner SafetyNet folder.
- 2.9.44—July 5, 2021
- Added support for Apple Mail on the forthcoming macOS 11.5 and macOS 12.0. We recommend updating SpamSieve before updating to these versions of macOS. SpamSieve 2.9.44 should automatically update the installed version of its Apple Mail plug-in, however if you don’t see the SpamSieve commands in Apple Mail’s Message menu, be sure to choose Install Apple Mail Plug-In from the SpamSieve menu and to enable the plug-in.
- Made various changes to improve SpamSieve’s filtering accuracy.
- In most cases, updating SpamSieve’s Mail plug-in on macOS 11 no longer requires the plug-in to be re-enabled. It will just keep working after the update.
- Improved the following sections of the manual:
- On macOS 12, SpamSieve changes the keyboard shortcut for Mail’s Show/Hide Sidebar menu command to Command-Option-S. This avoids a conflict with the SpamSieve - Train as Spam command and makes Mail consistent with other apps such as Finder.
- Updated the Outlook Filter Mailboxes helper app to to work around a macOS bug that could cause messages to be left in the InboxSpamSieve folder on Apple Silicon Macs. If you are seeing this problem, you should quit Outlook Filter Mailboxes and replace it with a freshly downloaded copy.
- Optimized the text coloring in Mail’s message list on macOS 11.
- Improved the Apple Mail diagnostic report.
- 2.9.43—February 22, 2021
- Worked around a bug in the forthcoming macOS 11.3 that could cause SpamSieve to crash at launch.
- Improved the following sections of the manual:
- The Use Growl global notification system checkbox is now shown as disabled when Growl is not available, e.g. on Apple Silicon Macs.
- Improved SpamSieve’s debug logging of messages received and processed.
- 2.9.42—January 20, 2021
- SpamSieve now runs natively on Apple Silicon Macs.
- Worked around a macOS bug that could block communication between Apple Mail or Outlook and SpamSieve on Apple Silicon Macs. This could cause training not to work and/or messages to accumulate in the InboxSpamSieve folder.
- SpamSieve now tries to detect if Apple Mail will incorrectly report an “Incompatible Plug-ins Disabled” error on macOS 11 (e.g. when the installed version of the plug-in actually is compatible) and explains how to fix this.
- Improved the following sections of the manual:
- SpamSieve now maintains its own error log files, so you can still access information for troubleshooting when the macOS system log isn’t working properly.
- Improved the installer and diagnostic report to better work around problems with Apple Mail’s plug-ins folder on macOS 11.
- The software updater reports a more useful error message if you try to update SpamSieve while running it from the disk image. This should prevent confusion where you continue running an old version despite telling it to update.
- The Apple Mail - Move If Spam script now lets you set a server spam mailbox name via the user defaults without having to edit the script.
- 2.9.41—December 11, 2020
- Added support for Apple Mail on the forthcoming macOS 11.1. We recommend updating SpamSieve before updating to macOS 11.1. In any case, if you don’t see the SpamSieve commands in Apple Mail’s Message menu, be sure to choose Install Apple Mail Plug-In from the SpamSieve menu and enable the plug-in.
- The Apple Mail installer is better able to detect when a new version of macOS requires a new version of SpamSieve.
- Apple Mail is faster at launching SpamSieve and more likely to find the right installed copy of it.
- Worked around a macOS 11 bug that prevented the diagnostic report from working properly on Apple Silicon Macs.
- Worked around a macOS 11 bug that could cause an Apple Mail hang when SpamSieve and Small Cubed MailSuite were both in use.
- Made various changes to try to work around a problem where Apple Mail training commands were intermittently not received on Macs with Apple Silicon.
- Improved the diagnostic report on macOS 11.
- Update the Korean localization.
- 2.9.40—October 19, 2020
- Added support for Apple Mail on the forthcoming macOS 11.0 Big Sur. We recommend updating SpamSieve before updating to Big Sur. In any case, if you don’t see the SpamSieve commands in Apple Mail’s Message menu, be sure to choose Install Apple Mail Plug-In from the SpamSieve menu and enable the plug-in.
- Made various changes to improve SpamSieve’s filtering accuracy.
- SpamSieve now works with Apple Mail when running on an Apple Silicon Mac.
- On macOS 11, you can now hold down the Option key when installing SpamSieve’s Apple Mail plug-in to clear out any active plug-in files that may be preventing Mail from loading the plug-in. (Other third-party Mail plug-ins will be disabled but not deleted; they can be re-enabled using the Manage Plug-in… button in Mail’s preferences.) This is much easier than the former method on macOS 10.14 and 10.15 that required temporarily disabling SIP.
- Restored Web bug protection in Apple Mail on macOS 11 since it seems to fix the issue in macOS 10.15 that necessitated disabling it.
- The Apple Mail plug-in now has a stapled notarization ticket so that it can be loaded even if the Mac can’t contact Apple’s notarization servers.
- The Apple Mail plug-in installer is better at working around macOS quarantine bugs.
- It is now possible to save a diagnostic report when SpamSieve’s Dock icon is hidden (and thus the Help menu is inaccessible) by clicking a special link.
- Improved the following sections of the manual:
- Checking the Airmail Setup
- Enabling and Updating the Apple Mail Plug-In
- If Apple Mail Is Running Slowly
- If the Apple Mail Plug-In Doesn’t Appear in the List or Doesn’t Stay Enabled
- Outlook IMAP/Exchange Account Rules
- Setting Up Apple Mail
- Setting Up Gmail, iCloud, Yahoo, AOL, or Other Web Mail
- Using a Spam Mailbox on the Server
- Why does a message disappear or go back to the Junk mailbox after I train it as good?
- The Setting Up Outlook section of the manual now explains that you should turn off the New Outlook switch because it does not support AppleScript.
- SpamSieve now requires macOS 10.9 or later.
- Improved the diagnostic report.
- If a duplicate Apple Mail plug-in is installed, SpamSieve now reveals it to you in Finder.
- The Apple Mail installer is better at reporting when the loaded version of the plug-in is different from the installed version, to help track down data vaults problems.
- Added a workaround for a macOS privacy performance bug.
- Fixed a regression where SpamSieve would unnecessarily update its Mail plug-in at each launch.
- If an icon file is damaged, the error message now suggests installing a fresh copy of SpamSieve.
- Fixed a bug where the text of an Apple Mail installer alert wasn’t accurate if you had relocated your Mac’s home folder.
- Fixed a bug where the tags field was inappropriately shown.
- 2.9.39—March 4, 2020
- Made various changes to improve SpamSieve’s filtering accuracy.
- When you select spam messages in Apple Mail, the message list text is more readable through a variety of highlight colors.
- Improved the following sections of the manual:
- Added the Processing Messages Before SpamSieve and Setting Up Airmail 1–3 sections of the manual.
- Worked around a change in the forthcoming macOS 10.15.4 that could prevent Mail from loading SpamSieve’s plug-in if you had relocated your home folder to another volume. If Mail reports an error loading the plug-in, choose Install Apple Mail Plug-In from the SpamSieve menu to update it.
- Worked around an Apple Mail bug that could, in rare cases on macOS 10.15, cause spam messages to be marked as spam but not moved to the Spam mailbox. If this is happening for you, choose Install Apple Mail Plug-In from the SpamSieve menu to enable the workaround.
- A small percentage of Apple Mail users are seeing a macOS 10.15 bug where a rule that is supposed to move messages to an IMAP or Exchange mailbox instead deletes them. If this is happening for you, make sure that your SpamSieve rule is set to move the messages to a local mailbox under On My Mac (as recommended in the Setting up Apple Mail section of the manual) rather than to a mailbox on the mail server.
- A small percentage of Apple Mail users are seeing a macOS 10.15 bug where moving a message to an IMAP or Exchange mailbox (either via drag-and-drop or via AppleScript, as SpamSieve does) instead deletes it. If this is happening for you, you can use the Change Settings command to set SpamSieve to (a) move messages trained as spam to a local Spam mailbox (this is the default); and (b) not move messages trained as good back to the inbox (you can instead copy them by Option-dragging or using the menu command).
- SpamSieve now includes an experimental feature to save backup copies of the messages that it has processed. This can help prevent data loss if you are one of the unlucky users affected by a bug in the macOS 10.15 version of Apple Mail that can delete messages when moving them from one mailbox to another. The bug is not actually related to SpamSieve and also manifests when it’s not installed. However, training messages with SpamSieve is a common reason that Mail would be asked to move messages, possibly triggering the bug. And since SpamSieve sees the messages, anyway, it’s in a good position to help mitigate the bug. For more information about backups and how to enable them, please see the Backing Up Messages section of the manual.
- If you are running into a bug in macOS 10.15 where Mail hangs for 10+ seconds during launch, the If Apple Mail Is Running Slowly section of the manual now describes how you can work around this by disabling and re-enabling SpamSieve’s plug-in.
- Worked around an Apple Mail bug that could cause the Preferences window to be blank on macOS 10.15, making it impossible to enable SpamSieve’s plug-in or to access other Mail settings.
- When installing the Apple Mail plug-in, SpamSieve will now warn you if Mail’s files are stored on a different volume than your home folder, which would prevent Mail from loading the plug-in on macOS 10.14 or later.
- If SpamSieve detects that macOS’s AppleScript system files are damaged, which can prevent training from working, it will now recommend that you reinstall macOS.
- After installing the Apple Mail plug-in, we recommend clicking the Quit and Show Instructions button. If you opt not to do this, the other button is now titled Continue rather than Cancel, to better reflect that the plug-in has still been installed and still needs to be enabled.
- There’s now an esoteric preference to mark Outlook messages as unread after filtering, to work around a mysterious issue where moving a message to another folder caused it to be marked as read.
- SpamSieve now logs to Console to help you detect inefficient regexes that slow down rule matching.
- Revised the Apple Mail and Postbox plug-ins for new macOS notarization requirements.
- Fixed a bug where training a message as good in Apple Mail could switch to displaying the inbox instead of moving the message to the inbox.
- Fixed a bug where SpamSieve could warn you that the Apple Mail plug-in was not enabled if Mail relaunched while SpamSieve was in the process of uninstalling.
- Fixed a bug where relaunching Apple Mail while SpamSieve was reminding you to enable the plug-in could result in a duplicate alert being shown.
- 2.9.38—November 19, 2019
- SpamSieve 2.9.38 (and also 2.9.37) are compatible with macOS 10.15, however a small number of customers are seeing issues with the Catalina version of Apple Mail. The latest information about Catalina is available here.
- Worked around an AppleScript bug in Apple Mail on macOS 10.15 that could result in messages trained as good being moved to the inbox of an account that’s disabled, making it look like the messages disappeared. This fix is available for all new installations and for older ones if you choose Install Apple Mail Plug-In from the SpamSieve menu. (If you weren’t seeing this problem or have no disabled accounts, it’s not necessary to update the plug-in.)
- Worked around an issue that could prevent some Apple Mail messages from being filtered through SpamSieve if SpamSieve had not yet launched and the Mac was overloaded, e.g. because it was relaunching all apps after logging in.
- Worked around a problem where SpamSieve could be slow to launch if the system privacy database was overloaded.
- Added the If the Apple Mail Plug-In Doesn’t Appear in the List or Doesn’t Stay Enabled section of the manual.
- Improved the following sections of the manual:
- A macOS 10.15 bug can prevent Apple Mail messages from being moved to the Spam mailbox, leaving them colored as spam in the inbox. SpamSieve now offers an alternate “Apple Mail Script Rule” setup for the small number of customers affected by this bug.
- Added an experimental esoteric preference (click to enable/disable) to flag incoming spam messages as gray. A few customers are running into a Mail bug in macOS 10.15 that prevents rules from moving messages (even when using an “Apple Mail Script Rule”). This workaround makes it possible to set up a smart mailbox for gray flagged messages, so that they can easily be viewed and bulk-deleted even if the messages remain in the inbox.
- Worked around some bugs in macOS 10.15 that could cause Mail to hang when SpamSieve launched.
- If the Rules file is damaged, SpamSieve will now report some more information about the problem.
- The Apple Mail - Server Junk Mailbox script now has an option to only mark confirmed spam messages as read, leaving them in the server spam mailbox rather than moving them to a shared spam mailbox.
- Fixed a bug that could cause a crash when a Software Update… error occurred.
- Fixed a bug with the crash reporter window and Dark Mode.
- Modernized the localizations.
- 2.9.37—August 19, 2019
- SpamSieve is now compatible with Apple Mail under macOS 10.15 (which is now in beta).
- It’s best to update to SpamSieve 2.9.37 now, before updating to macOS 10.15. If you are already using macOS 10.15, the SpamSieve 2.9.36 auto-updater won’t work, so you should instead use the Download button in the Software Update… window and install the update manually, according to the instructions in the Read Me file. Once you have SpamSieve 2.9.37, auto-updates on macOS 10.15 will work normally.
- Updated the documentation for macOS 10.15.
- The Outlook - Filter Mailboxes app is now notarized for compatibility with macOS 10.15. If you’ve already installed the helper app, it should not be necessary to update it, but this change is needed for future updates as well as new installations.
- Various Apple Mail error messages and documentation are better at reminding you to grant SpamSieve Full Disk Access when not having that might be the cause of the error, e.g. SpamSieve thinking its plug-in is not loaded.
- Apple Mail on macOS 10.15 has a bug where it will not load plug-ins that are installed in the normal location if you’ve redirected your home folder to another volume. If SpamSieve detects this situation, it will apply a workaround (moving the plug-in to an alternate location) and show an alert that explains what it’s doing.
- Renamed the “Setting Up Outlook 365” section of the manual to Setting Up Outlook, as it covers all current versions of Outlook, not just 365. This section has also been substantially rewritten to make it clearer what to do for each type of account.
- The Can other Apple Mail plug-ins cause problems with SpamSieve? section of the manual now recommends using Mail’s own plug-in manager instead of manipulating the Bundles folder directly.
- Fixed a bug where SpamSieve would sometimes ask you to enable an old Apple Mail plug-in (which wasn’t possible, because it was old) and quit, where instead it should have offered to update it first.
- Worked around an Apple Mail bug where training a message as good sometimes didn’t move it to the inbox because Mail reported a script error when checking whether the account was enabled.
- Improved the diagnostic report.
- Software Update… reports a better error message if it was unable to install the new version of the app.
- 2.9.36—May 24, 2019
- Made various changes to improve SpamSieve’s filtering accuracy.
- When using Outlook 365, you can now use Outlook rules to organize messages into folders, and SpamSieve will filter them (rather than just the messages in the inbox). The details for how to set this up are in Filtering Other Folders in the “Setting Up Outlook 365” section of the manual. (This has always worked automatically, with no special setup, in previous versions of Outlook and in Apple Mail.)
- After you manually refilter messages in Outlook, SpamSieve now clears the selection to prevent accidental bulk training when correcting a spam message that remains.
- Fixed a problem where some Apple Mail messages that were colored as spam still displayed with white text in Dark Mode, which was difficult to read.
- Improved the following sections of the manual:
- Does SpamSieve stop Web bugs?
- How can I hide SpamSieve’s Dock icon?
- Security & Privacy Access
- Setting Up Airmail
- Why do Apple Mail messages bounce back to the inbox after I train them as spam?
- If SpamSieve encounters an error because your Mac’s storage is full, it now displays information about the free space available and recommends Apple’s guide to freeing up storage space.
- SpamSieve reports a more useful error message if it determines that the reason its application package is damaged is because it’s running from a Carbon Copy Cloner safety net.
- Improved the error message when uninstalling the Apple Mail plug-in if SpamSieve hasn’t been granted Full Disk Access.
- Improved the error message when SpamSieve doesn’t have access to your Contacts.
- Worked around a problem where asking Apple Mail for the list of mailboxes could cause it to hang at launch.
- When training a good message in Apple Mail, if SpamSieve can’t find the proper inbox it logs more information to help figure out what happened.
- Fixed a bug displaying the number of licenses in the Purchase window.
- Fixed a bug where debug logging of messages that caused parser crashes wasn’t working with Apple Mail.
- The diagnostic report now includes information about when the privacy database was last reset.
- Diagnostic reports now work better when SpamSieve lacks Full Disk Access.
- Updated to Xcode 10.2.
- 2.9.35—December 20, 2018
- Worked around an issue where macOS 10.14 would tell SpamSieve that Mail had finished launching when it hadn’t. If Mail took a long time to launch, this could make SpamSieve erroneously think that its plug-in wasn’t enabled, so it would show some unnecessary and annoying alert windows asking you to fix this.
- SpamSieve no longer updates its Apple Mail plug-in with each new release because this causes extra work to re-enable it for customers using macOS 10.14. Instead, the plug-in only auto-updates when there is a major change that we recommend for all users. You can still update it manually (by choosing Install Apple Mail Plug-In from the menu) if you want to ensure that you have the latest version.
- Improved the following sections of the manual:
- Enabling and Updating the Apple Mail Plug-In
- Security & Privacy Access
- “Setting Up Outlook 365”
- Turning Off the AOL Spam Filter
- Improved SpamSieve’s error handling when trying to uninstall its Apple Mail plug-in while lacking Full Disk Access.
- Fixed a bug where AppleScript permissions errors could report the wrong app name.
- Fixed a bug where some Retina images in the manual were shown at double size.
- Fixed a bug where the help index file was marked as executable.
- 2.9.34—October 30, 2018
- Made a variety of changes to work better with Apple Mail on macOS 10.14:
- SpamSieve now uses a variety of heuristics to better detect when Mail has finished launching before checking that its plug-in is enabled. This helps avoid annoying dialogs and prevents unnecessary rule deactivations if Mail takes a really long time to launch, e.g. on a slower Mac that has rebooted and is restoring all the previously open applications at once or if a utility such as iLock has halted Mail during the launch process.
- SpamSieve can now protect you from a disabled plug-in when Mail launches after SpamSieve launches, e.g. if you are using SpamSieve with multiple mail clients and so SpamSieve is not always launched as a result of Mail launching.
- SpamSieve now detects and repairs problems with Mail’s preferences folder that could prevent Mail from showing the Manage Plug-ins… button.
- If macOS has forgotten that you gave SpamSieve Full Disk Access, SpamSieve will now detect this and remind you to grant it again.
- If SpamSieve can’t install its Mail plug-in because it doesn’t have Full Disk Access, it no longer suggests that you install the plug-in manually. (It is better for you to grant access and then try the automatic installer again.)
- If you’ve previously declined to give SpamSieve Automation access to control Mail, SpamSieve will now remind you to do this (and open System Preferences for you) when you try to train a message, instead of failing silently.
- The Apple Mail - Remote Training and Apple Mail - Server Junk Mailbox scripts, when running as standalone applications, now explain to you that they need Automation access in order to function.
- Adjusted the launch agent so that SpamSieve more reliably launches when Mail launches, and sandbox errors aren’t logged to Console.
- Since version 2.9.21, SpamSieve has overridden the text color in Mail’s message list in order to improve the contrast and readability for spam messages that are marked with a colored background. This now works on macOS 10.14, including with Dark Mode.
- The AppleMailAllJunkMessagesUseBlackText esoteric preference now switches the color for Dark Mode on macOS 10.14.
- SpamSieve now logs more information to Console and diagnostic reports to help diagnose problems with the Mail plug-in.
- The alert and manual now clarify that, if you no longer want to use SpamSieve with Mail, you can prevent SpamSieve from reminding you to enable the plug-in by uninstalling it.
- SpamSieve no longer wastes time waiting for Mail to launch when there are no rules for it to reactivate, anyway.
- Fixed an error reporting bug when activating the Mail rules.
- Fixed a bug where a fresh install on macOS 10.14 wouldn’t remember that the Mail plug-in had been installed.
- Outlook Filter Mailboxes now shows a more helpful error message if it lacks Automation access on macOS 10.14.
- Due to changes in Airmail and macOS 10.14, Airmail versions 3.6.3 through 3.6.41 are not compatible with SpamSieve when using macOS 10.14. You should use Airmail 3.6.42 or later.
- When checking the setup for your e-mail client, the instructions now recommend verifying that Automation access has been granted.
- The Apple Mail - Discard Spam script reports a better error if Mail times out because there were too many messages in the trash.
- Updated the Security & Privacy Access section of the manual.
- The About window now includes a link to the privacy policy and has an updated layout.
- Updated SpamSieve’s code signing for the latest Apple notarization requirements.
- Fixed a bug where training a message as spam in Apple Mail would display the Spam mailbox instead of moving the message if you were using the old GUI scripting workaround on macOS 10.12 or later with a non-US localization.
- Fixed a bug where SpamSieve could get confused by the presence of Fluid App instances.
- Made a variety of changes to work better with Apple Mail on macOS 10.14:
- 2.9.33—September 21, 2018
Streamlined the flow of using SpamSieve with Apple Mail on macOS 10.14. SpamSieve does a better of job of guiding you through the Mojave security changes to make setup as easy as possible. For the smoothest experience, we recommend updating to SpamSieve 2.9.33 before you update your Mac to macOS 10.14.
On macOS 10.14, it is possible for an Apple Mail plug-in to be installed but not yet enabled. When SpamSieve’s plug-in is not enabled, the SpamSieve rule(s) in Mail cannot function properly and may move new good messages to the spam mailbox without consulting SpamSieve. SpamSieve now protects you from this by automatically deactivating the rules if it notices that the plug-in is disabled. Once you’ve enabled the plug-in, it reactivates the rule(s) for you.
For completeness, we mention that there is a chance that Mail will move some messages before SpamSieve can deactivate the rule(s), e.g. because Mail downloaded them while SpamSieve was launching or because you declined when SpamSieve requested access to control Mail. If you end up with some good messages in the spam mailbox that are uncolored (because Mail moved them without consulting SpamSieve), you can just drag them back to your inbox.
If you want to fully prevent messages from being moved to the spam mailbox, you can manually deactivate (uncheck) the SpamSieve rule(s) in Mail’s preferences until you know that the plug-in is loaded (i.e. you see the SpamSieve menu commands in Mail’s Message menu). However, most users will find it easier to let SpamSieve manage the rule(s) for them.
If you have previously used SpamSieve with Apple Mail but are now using a different mail client, you can choose Uninstall Apple Mail Plug-In… from the SpamSieve menu in order to prevent SpamSieve from reminding you to enable the Mail plug-in.
If the Uninstall Apple Mail Plug-In… command can’t remove the Mail rules because it lacks Automation access on macOS 10.14, it will now proceed with uninstalling the other items and ask you to remove the rules manually rather than stopping with an error.
SpamSieve now supports the Hardened Runtime on macOS 10.14.
SpamSieve is now notarized by Apple.
The former “Advanced Outlook Setup for Large Inboxes” (which uses the InboxSpamSieve folder) is now the standard setup described in the “Setting Up Outlook 365” section of the manual. This setup makes Outlook more responsive and provides for more accurate filtering when setting up SpamSieve for the first time. If you are already successfully using Outlook 365 with SpamSieve, the old setup is still supported, so you don’t have to change anything.
Improved the following sections of the manual:
Reduced the sizes of some large screenshots in the HTML manual so that the text is more easily readable.
Fixed a bug where some screenshots in the PDF manual were displayed at double size instead of at Retina resolution.
Removed support for legacy mail clients that no longer work on SpamSieve’s supported macOS versions: Claris Emailer, Eudora, Outlook Express, and Thunderbird 2.x.
- 2.9.32—August 30, 2018
- SpamSieve now supports macOS 10.14 Mojave and Dark Mode.
- Made various changes to improve SpamSieve’s filtering accuracy.
- Apple Mail
- SpamSieve is now compatible with Apple Mail under macOS 10.14. It’s easiest if you update to SpamSieve 2.9.32 before updating to 10.14. In any case, if you don’t see the SpamSieve commands in Apple Mail’s Message menu, be sure to choose Install Apple Mail Plug-In from the SpamSieve menu. Otherwise, with the SpamSieve plug-in not installed, Mail will move good messages to the spam mailbox without consulting SpamSieve.
- macOS 10.14 adds some security protections for Apple Mail, and so
you will need confirm to the system that you want SpamSieve to be
able to access Mail and that you want Mail to load SpamSieve’s
plug-in. SpamSieve will automatically advise you of what you need
to do and when, but the steps are included here for reference:
- In order to install the Mail plug-in, you’ll need to give SpamSieve Full Disk Access using System Preferences. This is described in the Security & Privacy Access section of the manual.
- In order for Mail to load SpamSieve’s plug-in, you’ll need to enable it in Mail’s preferences. This is described in the Enabling and Updating the Apple Mail Plug-In section of the manual.
- Each new version of SpamSieve will auto-update the installed plug-in, but you will need to re-enable it in Mail’s preferences. If the plug-in is installed but not enabled, Mail will move new messages to the Spam mailbox without consulting SpamSieve. You can prevent this by temporarily disabling (unchecking) the SpamSieve rule in Mail’s preferences before updating SpamSieve. Or you can just drag the messages back to the inbox if you happen to receive any before you’ve had a chance to re-enable the plug-in.
- In order to train messages in Mail, SpamSieve needs Automation access to control Mail. When macOS asks if SpamSieve should be able to control Mail, you should click OK. This is described in the Security & Privacy Access section of the manual.
- The Software Update… command now advises you about re-enabling SpamSieve’s Mail plug-in after the update if you are using macOS 10.14.
- Added the Keeping Spam Messages Out of Gmail’s Archive section of the manual.
- If Mail can’t find the SpamSieve application file, e.g. because you manually deleted it in attempting to uninstall manually, it now offers the option of uninstalling the SpamSieve plug-in for you, so that you don’t have to reinstall the app to use the automatic installer.
- If SpamSieve doesn’t have Full Disk Access, it will now log a single error to that affect, rather than a flood of file permissions errors.
- SpamSieve now detects if the installed plug-in is up-to-date but not enabled (macOS 10.14–only) in Mail and will explain how to fix this.
- Fixed a problem where color-specific rules didn’t apply their actions on macOS 10.14.
- The Apple Mail - SaneBox script is better at handling and reporting errors.
- The Mail plug-in is no longer code-signed, to work around an issue with macOS 10.14, and thus SpamSieve no longer checks whether it’s damaged.
- Fixed a bug where the Mail plug-in could show the same error message repeatedly if the SpamSieve application was deleted, thus interfering with access to Mail itself.
- Fixed a typo in Mail debug logging.
- Microsoft Outlook 365
- Added support for Outlook 365’s new kind of Gmail accounts that show up as “Google” accounts rather than as “IMAP” accounts.
- Filtering is faster and will now process any messages in the InboxSpamSieve folder, even read ones.
- SpamSieve is better able to recover when Outlook reports an error getting a message’s account.
- To get these improvements, please go to the “Setting Up Outlook 365” section of the manual and follow the instructions in Step 6 to update your copy of Outlook - Filter Mailboxes.app.
- The Advanced Outlook Setup for Large Inboxes section of the manual now describes a different way to do the setup if you are using Outlook 16.17 (currently available on the Office Insider track) with a Gmail account.
- Fixed a bug where SpamSieve would incorrectly log that the Outlook scripts were damaged if you were using Outlook 365 but had previously used Outlook 2011 and still had its old scripts installed at the old location.
- Added the Setting Up Other Mail Clients section of the manual.
- Improved the following sections of the manual:
- “Checking the Outlook 365 Setup”
- Install Apple Mail Plug-In
- Setting Up Apple Mail
- “Setting Up Outlook 365”
- Turning Off Microsoft Spam Filters
- Turning Off the AOL Spam Filter
- Turning Off the Gmail Spam Filter
- Turning Off the Yahoo Mail Spam Filter
- Uninstalling SpamSieve
- Why does SpamSieve always need an update when macOS is updated?
- When you click the link to show SpamSieve’s Dock icon, the change now takes effect immediately, as quitting and relaunching to see the effect was difficult to do when the Dock icon was hidden.
- Added a statistics report AppleScript property, which is a string with the current contents of the Statistics window.
- The Copy Stats button no longer copies zeroes to the clipboard when the statistics haven’t been calculated yet.
- Worked around a bug in macOS 10.13 that could prevent the log file from being written.
- Worked around a macOS 10.13 bug that could prevent keyboard input after closing the Help menu.
- Worked around a bug in macOS 10.13.4 that could cause an internal error when locating SpamSieve’s data files.
- An error saving the system log for the diagnostic report is no longer fatal, so other files can still be saved to the report.
- Fixed a bug where holding down the Command and Option keys to reset one of SpamSieve’s damaged files didn’t work if the file was seriously damaged.
- Fixed a spurious error message when trying to launch SpamSieve if it was already running.
- 2.9.31—April 30, 2018
- Made various changes to improve SpamSieve’s filtering accuracy.
- Fixed a database bug that could cause SpamSieve to crash when processing a particular type of spam message containing garbage Unicode characters in the subject.
- Outlook - Filter Mailboxes now checks for new inbox messages every 1 minute by default (instead of 5), is more efficient, and is able to filter inboxes with localized names that were previously ignored.
- Updated the Requirements and Setting Up Postbox sections of the manual. Postbox 6 no longer supports plug-ins, so we recommend continuing to use Postbox 5 for the time being or using the Apple Mail drone setup in the background.
- The Outlook sections of the manual have been renamed to “Setting Up Outlook 365” and Setting Up Outlook 2011 for clarity.
- Improved the following sections of the manual:
- Automatically Deleting Old Spam Messages
- Checking the Apple Mail Setup
- Setting Up MailMate
- Using a Spam Mailbox on the Server
- Worked around a bug in macOS 10.13 that could cause an internal error at launch when resolving an alias.
- The Apple Mail - Discard Spam script is better able to work around Mail slowness that could leave spam messages stranded in the trash.
- Diagnostic reports now include more information about localizations and SpamSieve helper processes.
- Made various minor code updates.
- Fixed a crash reporter bug that could prevent some information from being logged.
- 2.9.30—January 30, 2018
- SpamSieve is now 64-bit only and requires macOS 10.7 or later.
- Made various changes to improve SpamSieve’s filtering accuracy.
- You can now click the Outlook - Filter Mailboxes icon in the Dock to make it filter the new inbox messages immediately instead of waiting until the next scheduled check.
- The Apple Mail - Remote Training script now auto-creates the TrainGood and TrainSpam mailboxes for you.
- Added the Apple Mail - Block Sender script.
- Improved the following sections of the manual:
- “Checking the Outlook 365 Setup”
- Only Filtering Certain Accounts
- Setting Up Apple Mail
- SpamSieve can now recover from certain types of damage to a Rules file by logging information about the damaged rules and modifying them so that they don’t cause crashes.
- Manually installing the Apple Mail plug-in now forces creation of a new launch agent .plist file, even if nothing has changed, to work around a problem with it not loading.
- The Apple Mail - Remote Training, Apple Mail - SaneBox, and Apple Mail - Server Junk Mailbox scripts work around a macOS bug that reports that System Events is not running.
- Outlook - Filter Mailboxes now works around an Outlook bug with getting folders by name.
- Improved the error reporting when a file cannot be written.
- Fixed a bug where SpamSieve could be fooled into parsing the wrong e-mail address out of a message header (Mailsploit).
- Fixed a bug where a misleading error message would be presented if a secure connection could not be made to the software update server.
- Fixed a spurious error in diagnostic reports on macOS 10.12 and later.
- Made various code modernizations.
- Updated the German localization.
- 2.9.29—August 24, 2017
- Works with Apple Mail under macOS 10.13 High Sierra (currently in beta). It’s easiest if you update to SpamSieve 2.9.29 before updating to 10.13. In any case, if you don’t see the SpamSieve commands in Apple Mail’s Message menu, be sure to choose Install Apple Mail Plug-In from the SpamSieve menu. Otherwise, with the SpamSieve plug-in not installed, Mail will move good messages to the spam mailbox without consulting SpamSieve.
- To get the improvements (described below) to SpamSieve’s integration
with Microsoft Outlook 2016, please follow these instructions after
updating SpamSieve:
- Quit Microsoft Outlook and Outlook - Filter Mailboxes.
- From the SpamSieve menu in SpamSieve, choose Install Outlook Scripts.
- Go to the “Setting Up Outlook 365” section of the manual and follow the instructions in Step 6 to update your copy of Outlook - Filter Mailboxes.app.
- Made various changes to improve SpamSieve’s filtering accuracy.
- Made various improvements to the Outlook - Filter Mailboxes
app for Microsoft Outlook 2016:
- The “Setting Up Outlook 365” section of the manual has been updated to be more complete and clear.
- Worked around a hang in Outlook when there are lots of messages in the inbox.
- There is an optional “Large Inboxes” setup that can greatly speed up the processing of new messages if you have lots of old messages in your inbox.
- Filtering now works when the Mac is running in Dutch or Swedish.
- It is now possible to configure the options using esoteric preferences links, so that you don’t have to edit the script itself.
- Improved the debug logging and error reporting.
- Worked around a bug in Microsoft Outlook 15.36 were it could incorrectly report that no messages were selected, thus preventing training from working.
- The Apple Mail - Remote Training script now sets and clears message background colors and (optionally) flags. This way if a server filter and SpamSieve share the same Spam mailbox, you can easily see which messages are confirmed as spam by SpamSieve because they will be marked in its normal way.
- Improved the following sections of the manual:
- “Checking the Outlook 365 Setup”
- Converting Your Apple Mail Setup to IMAP
- Requirements
- Setting Up GyazMail
- “Setting Up Outlook 365”
- Turning Off the AOL Spam Filter
- Turning Off the Fastmail Spam Filter
- Turning Off the Gmail Spam Filter
- Uninstalling SpamSieve
- Improved the scrolling speed in the Blocklist, Corpus, and Whitelist windows.
- The diagnostic reporter can now check whether the application package is damaged
- SpamSieve is better at detecting and reporting problems with the launch agent.
- Logged errors now use indentation to improve readability.
- SpamSieve now fixes the permissions of the log file if it can’t append to it (and worked around an OS bug reporting such errors).
- Improved the Apple Mail debug logging.
- Improved the reporting of corpus reset errors.
- Improved the error reporting for damaged files.
- Documentation and Help menu links to c-command.com now use https instead of http.
- Made various code modernizations.
- Fixed a bug that could cause a -10004 error when filtering messages for Microsoft Outlook 2016.
- Fixed a bug that could cause a crash when processing incoming Apple Mail messages on macOS 10.13.
- Fixed a bug where some Preferences window labels were truncated on Mac OS X 10.10 due to OS font changes.
- 2.9.28—February 27, 2017
- Works with Apple Mail under macOS 10.12.4. It’s easiest if you update to SpamSieve 2.9.28 before updating to 10.12.4. In any case, if you don’t see the SpamSieve commands in Apple Mail’s Message menu, be sure to choose Install Apple Mail Plug-In from the SpamSieve menu. Otherwise, with the SpamSieve plug-in not installed, Mail will move good messages to the spam mailbox without consulting SpamSieve.
- Made various changes to improve SpamSieve’s filtering accuracy.
- The Save Diagnostic Report… command in the Help menu now works with all versions of macOS that SpamSieve supports.
- Improved the following sections of the manual:
- How can I open the Library folder?
- Requirements
- Sending in an Error Report
- Sending in Apple Mail Rules
- Sending in the SpamSieve Log File
- Setting Up MailMate
- Setting Up Outlook 365
- Uninstalling SpamSieve
- Made various internal code modernizations.
- Made the task code more robust.
- Worked around an OS bug that could cause a crash when creating a diagnostic report.
- Fixed a bug where Apple Mail messages trained as good didn’t move to the inbox when the Mac was running in Russian.
- Fixed a bug that could cause a crash when logging errors.
- Updated the Danish and German localizations.
- 2.9.27—December 9, 2016
- Works with Apple Mail under macOS 10.12.2. It’s easiest if you update to SpamSieve 2.9.27 before updating to 10.12.2. In any case, if you don’t see the SpamSieve commands in Apple Mail’s Message menu, be sure to choose Install Apple Mail Plug-In from the SpamSieve menu. Otherwise, with the SpamSieve plug-in not installed, Mail will move good messages to the spam mailbox without consulting SpamSieve.
- Made various changes to improve SpamSieve’s filtering accuracy.
- The new Save Diagnostic Report… command in the Help menu provides an easier way of recording error logs and other information to send to technical support (requires macOS 10.12).
- The Apple Mail - Remote Training script now lets you specify a different spam mailbox name for each account.
- The Quit when mail client quits feature now works with Airmail 3.
- The Outlook - Filter Mailboxes script now filters messages in inboxes with localized names.
- Improved the following sections of the manual:
- Requirements
- Does SpamSieve launch automatically?
- Recommended Mail Hosts
- Sending in an Error Report
- Sending in Apple Mail Rules
- Sending in the SpamSieve Log File
- Made various changes to SpamSieve’s logging to work better with macOS 10.12.
- Improved SpamSieve’s checking of the launch agent’s owner and group.
- Improved the debug logging when training as spam in Apple Mail.
- Fixed a regression where the Change Settings command in Apple Mail did not show the current settings using the default button.
- SpamSieve now removes the Show Tab Bar menu item and associated functionality on macOS 10.12, since they don’t make sense for its user interface.
- Updated to Xcode 8.1.
- 2.9.26—October 18, 2016
- Works with Apple Mail under macOS 10.12.1. It’s easiest if you update to SpamSieve 2.9.26 before updating to 10.12.1. In any case, if you don’t see the SpamSieve commands in Apple Mail’s Message menu, be sure to choose Install Apple Mail Plug-In from the SpamSieve menu. Otherwise, with the SpamSieve plug-in not installed, Mail will move good messages to the spam mailbox without consulting SpamSieve.
- Made various changes to improve SpamSieve’s filtering accuracy.
- SpamSieve now tells Apple Mail’s junk filter when incoming messages are not junk (instead of only when they are junk). This should help prevent the confusing behavior of Mail displaying good messages in gold/brown text if its filter (or a server filter) disagreed with SpamSieve. Reminder: You can also have SpamSieve override the message text color by enabling AppleMailAllJunkMessagesUseBlackText in the esoteric preferences.
- SpamSieve now uses the new os_log subsystem on macOS 10.12.
- Adjusted the sizes of the Dock icon status indicators to work around a font change in macOS 10.12.
- The version number of the Apple Mail plug-in is now synchronized with the version number of SpamSieve itself to reduce confusion for those using Mail Plugin Manager.
- Added the Apple Mail - Mark Server Spam Messages as Read script.
- Improved the following section of the manual:
- Worked around a badly worded OS certificate error when checking for a software update.
- Adjusted SpamSieve’s package resources to work around several code signing issues with macOS 10.12.
- Fixed a bug where Apple Mail could repeatedly report the same error message.
- Fixed a bug where the Portuguese localizer was not given credit in the About SpamSieve window.
- 2.9.25—September 19, 2016
- Works with Apple Mail under macOS 10.12. It’s easiest if you update to SpamSieve 2.9.25 before updating to 10.12. In any case, if you don’t see the SpamSieve commands in Apple Mail’s Message menu, be sure to choose Install Apple Mail Plug-In from the SpamSieve menu. Otherwise, with the SpamSieve plug-in not installed, Mail will move good messages to the spam mailbox without consulting SpamSieve.
- Made various changes to improve SpamSieve’s filtering accuracy.
- Apple Mail
- Improved the positioning of the SpamSieve items in Apple Mail’s Message menu.
- If SpamSieve’s plug-in is incompatible with the current version of Apple Mail, the error message now includes a button to join the SpamSieve public beta.
- The Apple Mail - Server Junk Mailbox script now has an option to mark good messages as read.
- The Apple Mail - Move if Spam, Apple Mail - SaneBox, and Apple Mail - Server Junk Mailbox scripts now have an option to not change the junk status in Apple Mail, as that can be very slow with some mail servers.
- Removed a workaround that sometimes prevented messages trained in Apple Mail on Mac OS X 10.10 from updating the junk status in Mail.
- SpamSieve is more careful about only modifying its launch agent file when it’s actually changed, so as not to arouse the suspicions of anti-virus software.
- Improved the reporting of Apple Mail training errors.
- Improved the error reporting when Apple Mail is having trouble launching SpamSieve.
- Improved the error message if SpamSieve finds that its launch agent has been unexpectedly deleted.
- Fixed a bug where the Apple Mail plug-in could report an error about not being able to create a file.
- Fixed a bug where the Apple Mail plug-in was missing its Spanish localization.
- Fixed a bug where SpamSieve could get stuck in an auto-launch, auto-quit cycle when logging into a slower Mac.
- Fixed a bug where Apple Mail could hang when processing incoming messages if SpamSieve was showing a modal window, such as the trial expiration alert.
- Microsoft Outlook
- Worked around an Outlook error getting a message’s subject. To get this fix, choose Install Outlook Scripts from the SpamSieve menu.
- Updated the Outlook - Move If Spam, Outlook - Filter Mailboxes, and Outlook - Remote Training scripts scripts to work around a bug in Outlook 2016 that could make a spam message disappear if Outlook could not find the Junk E-mail folder.
- The Outlook - Filter Mailboxes script is better at handling errors from Outlook in getting the message’s subject.
- The Outlook - Filter Mailboxes script no longer tries to apply an empty category name to good messages.
- Fixed a bug where the Outlook - Filter Mailboxes script only filtered one mailbox per account.
- Worked around an OS issue where the Outlook - Filter Mailboxes script would report a System Events error.
- Improved the following section of the manual:
- Consolidating Spam From Multiple Filters
- Correct All Mistakes
- Does SpamSieve prevent me from receiving messages?
- Exclude my addresses
- Filtering Spam During Power Nap
- Outlook Customization
- Requirements
- Sending in an Error Report
- Setting Up Airmail
- Setting Up an Apple Mail Drone
- Setting Up Apple Mail
- Setting Up Gmail, iCloud, Yahoo, AOL, or Other Web Mail
- Setting Up MailMate
- Turning Off the Fastmail Spam Filter
- Turning Off the Gmail Spam Filter
- Turning Off the Yahoo Mail Spam Filter
- Using a Spam Mailbox on the Server
- What can I do if my Spam or Junk mailbox in Apple Mail disappeared?
- What can I do if the corpus file is damaged?
- What can I do if the statistics database is damaged?
- Why do good messages keep going to the Junk or Spam mailbox?
- Why does the “Junk” mailbox appear in Apple Mail?
- Renamed “Mac OS X” to “macOS” throughout the app and documentation.
- Made various code modernizations.
- Updated to Xcode 8.
- The distribution disk image is now signed.
- Updated the Spanish localization.
- Infinisys customers can now participate in SpamSieve public betas.
- If you try to activate SpamSieve when its Dock icon is hidden, it now reports how you can show the Dock icon.
- Worked around a Postbox issue that could make SpamSieve not realize that it had seen certain messages before.
- If logging a mail client error to Console fails, SpamSieve will now try to report the error via an alert window so it’s not lost.
- Improved the handling and reporting of file handle errors.
- Improved SpamSieve’s reporting of permissions errors when reading files.
- Improved the error reporting and debug logging.
- Fixed a bug identifying the current mail client.
- Fixed a bug that could cause an autorelease pool error when reporting a crash.
- Fixed a bug where SpamSieve would log errors to Console at launch on Mac OS X 10.6.
- 2.9.24—March 1, 2016
- Works with Apple Mail under Mac OS X 10.11.4. It’s easiest if you update to SpamSieve 2.9.24 before updating to 10.11.4. In any case, if you don’t see the SpamSieve commands in Apple Mail’s Message menu, be sure to choose Install Apple Mail Plug-In from the SpamSieve menu. Otherwise, with the SpamSieve plug-in not installed, Mail will move good messages to the spam mailbox without consulting SpamSieve.
- Made some optimizations so that SpamSieve launches faster and sorting and deleting in the Blocklist, Whitelist, and Corpus windows is faster.
- The Train as Good command in Apple Mail is better at finding which inbox to move the message back to.
- The Outlook - Filter Mailboxes.app file is now codesigned for Gatekeeper, so it will work without your having to change System Preferences to allow applications downloaded from Anywhere.
- The Apple Mail - Move If Spam script can now color or flag messages based on how spammy they are.
- Improved the following sections of the manual:
- Automatically Deleting Old Spam Messages
- Checking the Airmail Setup
- Exclude my addresses
- How can I open the Library folder?
- Setting Up Airmail
- Setting Up Apple Mail
- Setting Up MailMate
- Setting Up Outlook 365
- Use Growl global notification system
- SpamSieve now uses a different and more reliable strategy to prevent the OS from keeping it stuck in a partially launched state.
- Added an experimental option for Apple Mail to use black text for messages marked as junk but not processed by SpamSieve, overriding the low-contrast color that Mail added in Mac OS X 10.11. For SpamSieve’s black text, click here; for the default brown text click here.
- The Uninstall Apple Mail Plug-In… command now removes the Launch SpamSieve.scpt file.
- When running as background applications, the Apple Mail - Remote Training, Apple Mail - SaneBox, and Apple Mail - Server Junk Mailbox scripts no longer launch Mail if it is not already running.
- Improved the error handling in the Apple Mail - Discard Spam script so that it can now delete most of the messages even if a few result in errors.
- Reduced SpamSieve’s memory use when type-selecting in the Corpus, Blocklist, and Whitelist windows.
- SpamSieve is better able to function when the system is unable to tell it where the user’s home folder is.
- Improved the error reporting for the Software Update… command.
- Modernized the Software Update code that checks whether your OS version is new enough to run the new version of SpamSieve.
- The SpamSieveHelper application will now quit in the rare event that another copy is already running.
- Made some changes to try to work around a rare bug where SpamSieve’s Apple Mail plug-in didn’t load until after the first few messages had been downloaded from the server, leading to them being filtered directly to the Spam mailbox rather than through SpamSieve.
- Worked around an issue where an internal path conversion error from NSFileManager could cause SpamSieve to interrupt spam filtering with an error dialog. Now SpamSieve will simply log an “Error looking up image for address” message to the Console and continue filtering.
- Made various code modernizations.
- Made various changes to the build system.
- 2.9.23—December 8, 2015
- Works with Apple Mail under Mac OS X 10.11.2. It’s easiest if you update to SpamSieve 2.9.23 before updating to 10.11.2. In any case, if you don’t see the SpamSieve commands in Apple Mail’s Message menu, be sure to choose Install Apple Mail Plug-In from the SpamSieve menu. Otherwise, with the SpamSieve plug-in not installed, Mail will move good messages to the spam mailbox without consulting SpamSieve.
- Made a variety of changes to work around a bug in Mac OS X 10.11 in which (in rares cases) the system would start to launch SpamSieve but not load any of its code, leaving it stuck in a partially launched state. This would particularly happen if Mail itself was auto-launched by the system after your Mac booted. This could lead to Apple Mail hanging (while waiting for SpamSieve), spam messages left in the inbox (because the Mail plug-in was forced to assume they were good), and high Mail memory use. SpamSieve’s launch agent now tries to detect this situation and quit the stuck SpamSieve process, allowing it to relaunch normally. If this is unsuccessful, the Mail plug-in will report an error explaining what is going on and how you can manually fix it.
- The Apple Mail - Server Junk Mailbox script can now move the spams to per-account spam mailboxes, has better error reporting, and has an option to enable debug logging.
- The Apple Mail - SaneBox script now has an option to enable debug logging.
- Made some improvements to the statistics database to be more resilient to errors and also report them better.
- SpamSieve is better at handling errors if it gets disconnected from Apple Mail in the middle of processing a message.
- SpamSieve will no longer try to use Apple Mail’s background activity count scripting property on Mac OS X 10.11 because it’s known to be broken. This will reduce unnecessary error logging to Console.
- SpamSieve no longer creates an App Store Receipts folder, since it would always be empty.
- Updated code for Xcode 7.1.
- Fixed the size of the distribution disk image window.
- Worked around a Finder bug that could cause the disk image’s icons to be misaligned if the AppleShowAllFiles option was enabled.
- 2.9.22—October 21, 2015
- Works with Apple Mail under Mac OS X 10.11.1. It’s easiest if you update to SpamSieve 2.9.22 before updating to 10.11.1. In any case, if you don’t see the SpamSieve commands in Apple Mail’s Message menu, be sure to choose Install Apple Mail Plug-In from the SpamSieve menu. Otherwise, with the SpamSieve plug-in not installed, Mail will move good messages to the spam mailbox without consulting SpamSieve.
- If SpamSieve detects that training a message didn’t work because of an AppleScript bug in Mac OS X 10.11, it will now direct you to the new Duplicate Apple Mail Accounts section of the manual for a workaround.
- When filtering incoming messages, Apple Mail will now wait longer for SpamSieve to launch in case the system delayed respawning the launch agent. Thus, spam messages are more likely to be filtered rather than left in the inbox.
- If the launch agent is set to be continuously running, it no longer quits itself when Mail quits or SpamSieve quits/crashes. This should help ensure that Mail is able to relaunch SpamSieve right away, without Mac OS X 10.11 throttling the launch agent.
- The Apple Mail - Discard Spam script now has an option to set the retry delay to work around a problem with spam messages being left in the trash if Mail failed to delete them.
- Improved the following sections of the manual:
- 2.9.21—September 28, 2015
- Works with Apple Mail under Mac OS X 10.11 El Capitan. It’s easiest if you update to SpamSieve 2.9.21 before updating to El Capitan. In any case, if you don’t see the SpamSieve commands in Apple Mail’s Message menu, be sure to choose Install Apple Mail Plug-In from the SpamSieve menu. Otherwise, with the SpamSieve plug-in not installed, Mail will move good messages to the spam mailbox without consulting SpamSieve.
- Made various changes to improve SpamSieve’s filtering accuracy.
- In Apple Mail on Mac OS X 10.11, SpamSieve now overrides the text color in the message list to prevent unreadable brown text on a colored background.
- Microsoft Outlook 2016 removes the Run AppleScript rule action feature. This makes it impossible to create a rule that automatically processes incoming messages with SpamSieve. We recommend using the “send-a-smile” button in Outlook’s main window (below the search field) to send Microsoft feedback, asking them to prioritize this feature. Please see this forum post for more information and workarounds for using SpamSieve with Outlook 2016.
- Added the Outlook - Filter Mailboxes script as a workaround for automatically filtering messages with Outlook 2016.
- Added support for App Transport Security on Mac OS X 10.11.
- Modernized code for the Xcode 7 compiler and the Mac OS X 10.11 SDK.
- The About, Software Update, and help windows now use the San Francisco font on Mac OS X 10.11.
- Added the following sections to the manual:
- Improved the following sections of the manual:
- Automatically Deleting Old Spam Messages
- Checking the Apple Mail Setup
- Correct All Mistakes
- Installing SpamSieve
- iPhone Spam Filtering
- Play sound
- Save false negatives to disk
- Sending in an Error Report
- Setting Up Airmail
- Setting Up an Apple Mail Drone
- Setting Up Gmail, iCloud, Yahoo, AOL, or Other Web Mail
- Setting Up Outlook 365
- Spam Message Colors in Apple Mail
- SpamSieve and Multiple Macs
- Turning Off the Gmail Spam Filter
- What can I do if Apple Mail is crashing?
- Why does a message disappear or go back to the Junk mailbox after I train it as good?
- When SpamSieve encounters a permissions error, it now reports on any applicable ACLs (Access Control Lists).
- Improved the error message when your version of SpamSieve is too old for the current version of Mac OS X.
- Added “(?)” to error text to help people know what “Help button” refers to.
- If a PDF file attached to an e-mail triggers an OS bug that leads to an infinite loop, SpamSieve now aborts the spamsieve-reader process after 30 seconds. Previously, the process (and your fan) would keep running forever and possibly freeze the mail client.
- Worked around a bug in Mac OS X 10.11 that could cause a crash during Software Update….
- Worked around a bug in Mac OS X 10.6 and 10.7 that could cause a crash.
- Added defensive coding to try to prevent a crash when saving the corpus to disk.
- Fixed a regression that could cause an error when switching applications.
- Fixed a regression where SpamSieve wasn’t able to reset the corpus.
- Fixed a regression where the Entourage scripts could not be installed.
- Fixed a bug where Software Update… would continue offering updates in the same session in which you had held down the Option key.
- Fixed a bug where SpamSieve could crash when sending data to a helper tool that exited unexpectedly.
- Fixed a bug where a text field in the crash reporter was truncated.
- Fixed a few small memory leaks.
- Updated the German localization.
- 2.9.20—June 3, 2015
- General
- Made various changes to improve SpamSieve’s filtering accuracy.
- Apple’s server-side iCloud spam filter has recently become more aggressive. As a result, many people have been confused by the sudden increase in messages in the Junk mailbox (rather than SpamSieve’s Spam mailbox). iCloud’s spam filter cannot be turned off, but the “Why does the “Junk” mailbox appear in Apple Mail?” section of the manual and the new “Consolidating Spam From Multiple Filters” section explain some of the options for dealing with this.
- SpamSieve’s launch agent process no longer runs when Apple Mail is not running, which should reduce overall memory use.
- Dates in the log are now shown in the local time zone.
- Trained entries in the log now include the sender’s address.
- The Apple Mail plug-in installer now checks that file ownership is enabled on the volume containing your home folder. This is necessary for proper operation of SpamSieve’s launch agent and, thus, launching and training from Apple Mail.
- When the trial period is over, the alert now has a Help button that opens the instructions for uninstalling.
- The Uninstall Apple Mail Plug-In… command is now available even after the trial period has ended.
- Improved the fonts in the About and Software Update windows.
- Added accessibility labels in the Software Update new News windows.
- Added the following sections to the manual:
- Checking the Airmail Setup
- Consolidating Spam From Multiple Filters
- Turning Off the Fastmail Spam Filter
- Improved the following sections of the manual:
- Can I delete spam messages that are in the junk mailbox?
- Changing the Name of the Spam Mailbox
- Checking the Airmail Setup
- Checking the Apple Mail Setup
- Checking the Outlook 365 Setup
- Checking the Postbox Setup
- Consolidating Spam From Multiple Filters
- Correct All Mistakes
- Does SpamSieve launch automatically?
- Does SpamSieve stop Web bugs?
- Faster Apple Mail Training
- How can I copy my training data to another machine?
- How should I configure the junk filter on my mail server?
- Setting Up Outlook 365
- Spam Message Colors in Apple Mail
- Train SpamSieve whitelist
- Turning Off the Gmail Spam Filter
- Use Bayesian classifier
- Use macOS Contacts
- What can I do if Apple Mail is crashing?
- What can I do if my Spam or Junk mailbox in Apple Mail disappeared?
- What can I do if the corpus file is damaged?
- Why does SpamSieve always need an update when macOS is updated?
- Why does the “Junk” mailbox appear in Apple Mail?
- Why is SpamSieve not catching my spam?
- Reinstalling a Fresh Copy is now its own section of the manual, and SpamSieve will direct you there if it finds that one of its files is missing.
- AppleScript
- The Apple Mail - SaneBox and
Apple Mail - Server Junk Mailbox
scripts:
- Can now be configured to move any color of spammy messages directly to the trash and to apply flag colors so that you can sort by spamminess.
- Have an option to move the most spammy messages to trash.
- Can now be saved as standalone applications to run on a more regular schedule than when run via a Mail rule.
- The Apple Mail - Remote Training script now has an option to mark the trained spam messages as read.
- The Apple Mail - SaneBox script now has a configurable mailbox name.
- The Apple Mail - Discard Spam script is better at handling errors from Mail.
- Added the Apple Mail - List Mailboxes script.
- The Copy Whitelist Addresses script can now copy blocklist addresses and now restricts itself to “Is Equal to” rules.
- Fixed an error reporting bug in the Apple Mail - Discard Spam script.
- Fixed a regression in the Apple Mail - Remote Training script.
- Fixed an error reporting bug in the Apple Mail - SaneBox script.
- The Apple Mail - SaneBox and
Apple Mail - Server Junk Mailbox
scripts:
- Error Handling
- SpamSieve will now recreate the log file’s folder if it unexpectedly disappears after the application has launched, perhaps due to CleanApp. If this affects you, SpamSieve will make a note in the Console log.
- Improved SpamSieve’s error handling and recovery when there is an error creating or updating the log file.
- The Uninstall Apple Mail Plug-In… command will now retry if there’s an error communicating with Mail and report a better error if it still doesn’t succeed.
- When training from Apple Mail, SpamSieve will now report a better error if it detects that the necessary SpamSieveHelper application is not running.
- If SpamSieve detects that one of its files is missing, i.e. that the application is damaged, it now presents a better error message.
- When there is an error reading the corpus or history database, the error alert now has a clickable Help button instead of inline URL text.
- The Entourage scripts can now log errors to Console.
- SpamSieve will now log an error if it’s not installed in the Applications folder, as this can prevent proper functioning with Airmail (due to sandbox restrictions).
- Improved the error message if Apple Mail can’t launch SpamSieve.
- Errors for corrupt files now link to the relevant Web pages that explain how to fix them.
- Improved the error message when you’re using a version of SpamSieve that’s too old for your version of Apple Mail.
- Improved error reporting when a temporary folder cannot be created.
- Improved the error message for incorrect serial numbers.
- SpamSieve now reports permissions information if there’s an error opening the statistics database.
- Bug Fixes
- Worked around a bug where Microsoft Outlook does not always correctly return a message’s source. This could lead to spam messages being classified as good because SpamSieve had no information to work from. To get this fix, choose Install Outlook Scripts from the SpamSieve menu.
- Worked around a text conversion bug in Mac OS X 10.10.3.
- SpamSieve will no longer repeatedly try to fix a file’s owner if ownership is ignored on the volume.
- Fixed a bug where SpamSieve could report an internal error if it received an Apple event while in the process of quitting.
- Fixed a bug that could cause an internal error writing to SpamSieve’s log file when the application was quitting.
- Fixed a regression where the Outlook 14 installer didn’t properly migrate installed script files.
- Fixed a bug abbreviating long rules in the log.
- Date formatters now use the POSIX local where appropriate.
- 2.9.19—January 27, 2015
- Works with Apple Mail under Mac OS X 10.10.2. It’s easiest if you update to SpamSieve 2.9.19 before updating to Mac OS X 10.10.2. In any case, if you don’t see the SpamSieve commands in Apple Mail’s Message menu, be sure to choose Install Apple Mail Plug-In from the SpamSieve menu. Otherwise, with the SpamSieve plug-in not installed, Mail will move good messages to the spam mailbox without consulting SpamSieve.
- To make future OS updates smoother:
- You can wait to update Mac OS X until a new version of SpamSieve has been released. The latest compatibility information is always available at the top of the SpamSieve Support page. To prevent Mac OS X from updating itself without asking you, go to the App Store section of System Preferences and make sure that Install OS X updates is unchecked.
- You can sign up to receive the public beta versions of SpamSieve. Then you will likely already have a compatible version of SpamSieve installed when the OS update first becomes available.
- Added the Uninstall Apple Mail Plug-In… command in the SpamSieve menu.
- SpamSieve is now more aggressive about auto-training whitelist rules to prevent false positives.
- SpamSieve is now 33% faster at reading the corpus and 48% faster at writing it. This improves the launch time and overall application responsiveness.
- The Apple Mail Train as Good command is better at determining when a message is inside of a junk mailbox with a localized name.
- The Apple Mail - Remote Training script no longer times out when there are lots of messages in the training mailbox. It also has new options for changing the name of the spam mailbox and for enabling debug logging.
- The Apple Mail - SaneBox and Apple Mail - Server Junk Mailbox scripts now set the junk status and color for spam messages.
- Added the following sections to the manual:
- Checking the GyazMail Setup
- Separate Spam Folders for Each Account (Outlook 2011)
- What can I do if the corpus file is damaged?
- What can I do if the statistics database is damaged?
- Improved the following sections of the manual:
- iPhone Spam Filtering
- Installing SpamSieve
- Setting Up Outlook 365
- Updating From a Previous Version
- Added improved instructions for installing and running supplemental AppleScripts.
- If Outlook reports an error when creating the Uncertain Junk category, SpamSieve now explains how you can create it manually.
- SpamSieve can now log the contents of the LaunchAgents folder if there is a problem.
- When the SpamSieve application is damaged and needs to be reinstalled, it now links to some more extensive online instructions for doing so.
- Improved the error reporting when SpamSieve’s log file can’t be written to.
- If there’s an error removing the old copy of the Apple Mail plug-in and fixing the file permissions/ownership doesn’t help, SpamSieve now instructs you how to remove the file manually.
- Improved the text in the Welcome window. Also, the window is now shown later in the launch process so that the referenced Help menu is available.
- The About SpamSieve window now uses the new system font on Mac OS X 10.10.
- The About SpamSieve window now uses the system language names when crediting localizers, to reduce the number of strings that localizers need to keep up-to-date.
- Increased the font size in the Software Update… window on Mac OS X 10.10.
- Added the ShowResetAlert user default to show the corpus/history reset window if the user can’t hold down the proper modifier keys.
- Added QuitMailWhenMacSleeps to the esoteric preferences. This quits Mail when the Mac sleeps and relaunches it when the Mac wakes. This works around an OS bug that can cause messages not to be moved to the Spam mailbox if Mail received them right after the Mac woke from sleep.
- Worked around a string encoding bug in Mac OS X 10.10.
- Fixed a bug where the Apple Mail plug-in would cause unnecessary messages about LSUIElement and the sandbox to be logged to Console.
- Fixed a bug where a change in system font metrics caused some text in the Preferences and Statistics windows to be truncated.
- Fixed spurious log messages from SpamSieveHelper when running on Mac OS X 10.10.
- Added defensive check to prevent trying to fix the ownership of certain folders.
- Fixed a bug where toolbar buttons in the rules and corpus windows were always enabled when running on Mac OS X 10.10.
- Worked around an OS bug that prevented bookmark files from being resolved.
- Worked around an OS bug that could cause SpamSieve’s log file to be created in the wrong location.
- Updated the German and Spanish localizations.
- 2.9.18—November 17, 2014
- Works with Apple Mail under Mac OS X 10.10.1. It’s easiest if you update to SpamSieve 2.9.18 before updating to Mac OS X 10.10.1. (To prevent Mac OS X from updating itself without asking you, go to the App Store section of System Preferences and make sure that Install OS X updates is unchecked.) In any case, if you don’t see the SpamSieve commands in Apple Mail’s Message menu, be sure to choose Install Apple Mail Plug-In from the SpamSieve menu. Otherwise, with the SpamSieve plug-in not installed, Mail will move good messages to the spam mailbox without consulting SpamSieve.
- Added preliminary support for Microsoft Outlook 15.3 (part of Office 365). This is described in the “Setting Up Outlook 365” section of the manual.
- Added the following sections to the manual:
- Setting Up Outlook 365
- Checking the Outlook 365 Setup
- What can I do if Apple Mail is crashing?
- Improved the following sections of the manual (among others):
- Setting Up Airmail
- Setting Up GyazMail
- Setting Up MailMate
- Why does SpamSieve always need an update when macOS is updated?
- The Apple Mail - Discard Spam script is faster and more reliable for large mailboxes.
- Improved the error reporting when writing to the log file and the disk is full.
- SpamSieve is better able to recover from incorrect launch agent file ownership.
- The Quit when mail client quits feature now works with Airmail 2.
- The Blocklist and Whitelist windows now display the number of rules using commas if there are more than 1,000.
- The Purchase… window now accepts serial numbers copied and pasted from a PDF of an order confirmation, after the browser has transliterated the dashes.
- Updated the toolbar icons for Mac OS X 10.10.
- Updated the disk image icon for Mac OS X 10.10.
- Worked around a bug in Mac OS X 10.10 that could cause SpamSieve to freeze at launch.
- Worked around a string encoding conversion bug in Mac OS X 10.10.
- The crash reporter now reports more information if it couldn’t find any matching crash log files.
- 2.9.17—October 16, 2014
- Works with Apple Mail under Mac OS X 10.10 Yosemite. It’s easiest if you update to SpamSieve 2.9.17 before updating to Mac OS X 10.10. In any case, if you don’t see the SpamSieve commands in Apple Mail’s Message menu, be sure to choose Install Apple Mail Plug-In from the SpamSieve menu. Otherwise, with the SpamSieve plug-in not installed, Mail will move good messages to the spam mailbox without consulting SpamSieve.
- Added the following sections to the manual:
- Does SpamSieve stop Web bugs?
- Why do good messages move to the wrong inbox when trained in Apple Mail?
- Why does a message disappear or go back to the Junk mailbox after I train it as good?
- Does SpamSieve prevent me from receiving messages?
- Can other Apple Mail plug-ins cause problems with SpamSieve?
- Improved the following sections of the manual (among others):
- Updating OS versions is smoother since SpamSieve is better at finding disabled copies of its Apple Mail plug-in.
- Worked around a change in Mac OS X that could cause the Quit when mail client quits feature to not work when running in Japanese.
- Improved the crash reporter’s error reporting.
- Improved debug logging for the Apple Mail training scripts.
- Fixed a bug where SpamSieve could crash if there was an error writing to its log file.
- Fixed a bug where SpamSieve would, in rare cases, try to change the ownership of a temporary folder unnecessarily.
- We need help keeping SpamSieve’s Japanese localization up-to-date. Please contact spamsieve@c-command.com if you’re interested.
- 2.9.16—September 17, 2014
- Works with Apple Mail under Mac OS X 10.9.5. It’s easiest if you update to SpamSieve 2.9.16 before updating to Mac OS X 10.9.5. In any case, if you don’t see the SpamSieve commands in Apple Mail’s Message menu, be sure to choose Install Apple Mail Plug-In from the SpamSieve menu. Otherwise, with the SpamSieve plug-in not installed, Mail will move good messages to the spam mailbox without consulting SpamSieve.
- Improved compatibility with pre-release versions of Mac OS X 10.10 Yosemite.
- Made various changes to improve SpamSieve’s filtering accuracy.
- Updated the Outlook and Entourage scripts for compatibility with the upcoming Mac OS X 10.0. If you’re using one of those mail clients, you should update the scripts by choosing Install Outlook Scripts or Install Entourage Scripts from the SpamSieve menu.
- Updated the Apple Mail - Discard Spam, Apple Mail - Move If Spam, Apple Mail - Remote Training, Apple Mail - Save Spam, and PowerMail - Uncertain Spam Condition scripts to work around a bug in the upcoming Mac OS X 10.10. If you are using these scripts, you will need to download and install fresh copies of them.
- Updated the Apple Mail - Remote Training, Apple Mail - SaneBox, and Apple Mail - Server Junk Mailbox scripts to work around a problem with duplicate messages created from deleted messages that Mail had not expunged. If you are using these scripts, you will need to download and install fresh copies of them.
- Added a new method of hiding SpamSieve’s Dock icon that doesn’t require editing the Info.plist file. For more information, see the “How can I hide SpamSieve’s Dock icon?” section of the manual.
- Added the “Faster Apple Mail Training,” Why don’t I see the SpamSieve commands in Apple Mail’s Message menu?, and Recommended Apple Mail Customizations (macOS 10.8 and Earlier) sections of the manual.
- Improved the Automatically Deleting Old Spam Messages, “Changing the Name of the Spam Mailbox” sections, “Show Blocklist”, “Show Whitelist”, Requirements, Correct All Mistakes, “Separate Spam Mailboxes for Each Account,” Use macOS Contacts, “Redirecting Good Messages to Another Account,” Apple Mail Customization, How should I configure the junk filter on my mail server?, Updating From a Previous Version, and Uninstalling SpamSieve sections of the manual.
- SpamSieve is better at repairing folder ownership and permissions.
- SpamSieve is better able to recover from errors when creating temporary folders.
- Made lots of code modernizations.
- By default, training a message as good in Apple Mail no longer clears its colored flags. This can be adjusted using the AppleMailTrainGoodClearFlags option in the esoteric preferences.
- Esoteric preferences links are now directly clickable in the Apple Help and PDF manual.
- Worked around a problem where Apple Mail could hang at launch if MailTags was installed.
- Removed spurious warnings about extra Apple Mail preferences files.
- Improved error reporting when SpamSieve can’t connect to the update server.
- Removed the Option-key workaround to have SpamSieve try to update the Apple Mail plug-in’s Info.plist file (based on installed version of Mail) because it’s no longer effective.
- Fixed a bug reporting an error from running a compiled AppleScript.
- Improved the crash reporter.
- Fixed a crash when reporting file errors.
- We need help keeping SpamSieve’s Japanese localization up-to-date. Please contact spamsieve@c-command.com if you’re interested.
- 2.9.15—June 30, 2014
- Works with Apple Mail under Mac OS X 10.9.4. It’s easiest if you update to SpamSieve 2.9.15 before updating to Mac OS X 10.9.4. In any case, if you don’t see the SpamSieve commands in Apple Mail’s Message menu, be sure to choose Install Apple Mail Plug-In from the SpamSieve menu. Otherwise, with the SpamSieve plug-in not installed, Mail will move good messages to the spam mailbox without consulting SpamSieve.
- Improved compatibility with pre-release versions of Mac OS X 10.10 Yosemite.
- Made various changes to improve SpamSieve’s filtering accuracy.
- SpamSieve now requires Mac OS X 10.6.8 or later. Versions of SpamSieve for Mac OS X 10.5 and earlier are available.
- Modernized lots of code and removed old code that’s no longer needed for compatibility with legacy OS versions.
- Made changes so that SpamSieve launches faster, especially when cfprefsd is slow to respond.
- Added the Why are messages marked as spam in Apple Mail but not moved? section to the manual.
- Fixed a bug that could cause the Install Outlook Scripts command to fail if Parallels Desktop was installed and its stub application for the Windows version of Outlook was enabled.
- The Apple Mail - SaneBox script now reports errors to Console (since Mail was suppressing them) and no longer times out for very large mailboxes.
- The Software Update… feature is better at explaining what you can do if installation fails.
- Adjusted the way the Purchase… window displays the remaining demo time to try to make it clearer.
- Improved the reporting of file permissions errors and damaged sound files.
- Improved the handling of localized strings when the application is damaged.
- Fixed a bug where the release notes in the Software Update… window were shown in the wrong font.
- Fixed a bug where SpamSieve would auto-train even if you had unchecked all of the filters.
- Updated the Dutch, Japanese, and Spanish localizations.
- We need help keeping SpamSieve’s Japanese localization up-to-date. Please contact spamsieve@c-command.com if you’re interested.
- 2.9.14—May 15, 2014
- Works with Apple Mail under Mac OS X 10.9.3. It’s easiest if you update to SpamSieve 2.9.14 before updating to Mac OS X 10.9.3. In any case, if you don’t see the SpamSieve commands in Apple Mail’s Message menu, be sure to choose Install Apple Mail Plug-In from the SpamSieve menu. Otherwise, with the SpamSieve plug-in not installed, Mail will move good messages to the spam mailbox without consulting SpamSieve.
- Made various changes to improve SpamSieve’s filtering accuracy.
- Added the Does SpamSieve protect me from viruses? and “Why does SpamSieve always need an update when macOS is updated?” sections to the manual.
- Improved the Spam Message Colors in Apple Mail, Correct All Mistakes, “Sending in the SpamSieve Log File”, “Using a Spam Mailbox on the Server,” “Why does the “Junk” mailbox appear in Apple Mail?,” and Checking the Mailsmith Setup sections of the manual, as well as various instructional alerts and error messages.
- The Import Addresses… command no longer has a file size limit.
- SpamSieve no longer prompts to access the system contacts database if you have Use macOS Contacts unchecked.
- Made some changes to make SpamSieve launch faster, especially when cfprefsd is slow to respond.
- Rewrote the Apple Mail - Discard Spam script to not rely on GUI scripting and to avoid deleting messages that were already in the trash.
- The Setting Up Postbox command works better with pre-release versions of Postbox.
- SpamSieve now checks the permissions on more of Apple Mail’s folders.
- If an error occurs during Install Outlook Scripts, SpamSieve will now try to determine whether this was because Microsoft Outlook was not installed properly.
- If your copy of Apple Mail is damaged, SpamSieve will now report this, but it will still let you install the plug-in.
- The training commands in Apple Mail work better with localized mailbox names.
- Added more logging for the Outlook Train as Good command.
- The images in the PDF manual and Apple Help are now Retina-resolution.
- Adjusted the font sizes in the PDF manual.
- 2.9.13—February 25, 2014
- Works with Apple Mail under Mac OS X 10.9.2. It’s easiest if you update to SpamSieve 2.9.13 before updating to Mac OS X 10.9.2. In any case, if you don’t see the SpamSieve commands in Apple Mail’s Message menu, be sure to choose Install Apple Mail Plug-In from the SpamSieve menu. Otherwise, with the SpamSieve plug-in not installed, Mail will move good messages to the spam mailbox without consulting SpamSieve.
- Made various changes to improve SpamSieve’s filtering accuracy.
- On Mac OS X 10.9 Mavericks, Apple Mail is slower at moving messages to the Spam mailbox when you choose SpamSieve - Train as Spam and the inbox when you choose SpamSieve - Train as Good. This version of SpamSieve includes some changes to speed this up. It also includes workarounds to move messages faster by using GUI scripting instead of regular AppleScript. To enable the workarounds, please see the AppleMailTrainSpamGUIScripting and AppleMailTrainGoodGUIScripting options in the Esoteric Preferences section of the manual.
- Documented the AppleMailPlugInSetIsJunk esoteric preference, as it can be used to speed up filtering on Mac OS X 10.9.
- Improved the Setting Up Airmail section of the manual to recommend not deleting messages from the Spam mailbox when using Airmail 1.3.1 (223).
- Added the “Why does the “Junk” mailbox appear in Apple Mail?” section to the manual.
- Improved the Setting Up a MailMate Drone and iPhone Spam Filtering sections of the manual.
- The AppleMailTrainSpamGUIScripting esoteric preference now works if you’ve selected the trash as your mailbox for trained spam messages.
- Optimized and fixed a possible Apple Mail crash when using the “Setting Up an Apple Mail Drone” configuration.
- SpamSieve is now able to log more diagnostic information to help track down problems with Apple Mail.
- When a Mac OS X update disables SpamSieve’s Apple Mail plug-in, and your Mac is running in a language other than English, SpamSieve is better able to detect this and auto-reinstall the plug-in.
- SpamSieve now cleans up empty folders of disabled Apple Mail bundles.
- When training messages from Microsoft Outlook, SpamSieve now logs errors to the Console. You can also enable extended error logging via the OutlookScriptDebug default.
- 2.9.12—December 16, 2013
- Works with Apple Mail under Mac OS X 10.9.1. It’s easiest if you update to SpamSieve 2.9.12 before updating to Mac OS X 10.9.1. In any case, if you don’t see the SpamSieve commands in Apple Mail’s Message menu, be sure to choose Install Apple Mail Plug-In from the SpamSieve menu. Otherwise, with the SpamSieve plug-in not installed, Mail will move good messages to the spam mailbox
- On Mac OS X 10.9 Mavericks, Apple Mail is slower at moving messages to the Spam mailbox when you choose SpamSieve - Train as Spam. SpamSieve includes a workaround to move messages faster by using GUI scripting instead of regular AppleScript. To enable the workaround, please see the AppleMailTrainSpamGUIScripting option in the Esoteric Preferences section of the manual.
- Versions 1.2.1 and later of the Airmail e-mail client include support for SpamSieve. The Setting Up Airmail section of the manual describes how to use SpamSieve with Airmail.
- It is now possible to set up a spam filtering drone using the MailMate e-mail client. This is described in the Setting Up a MailMate Drone section of the manual.
- The Flash PowerMate feature is now compatible with (and requires) version 3.0 of the Griffin PowerMate software.
- You can now hold down the Option key when you click Check Now in the Software Update… window to always download the latest version, even if your version is already up-to-date. This is an easy way to download and re-install a fresh copy of SpamSieve if yours is damaged.
- Added the AppleMailTrainGoodClearFlags esoteric preference, for people who use colored flags on their spam messages for purposes other than indicating the spam level.
- If Microsoft Outlook is not able to retrieve a message’s source, SpamSieve will now log the message’s subject to Console.
- Worked around an OS bug that could cause a crash when SpamSieve was processing certain types of multi-part e-mail messages.
- Improved various error messages.
- Tried to work around a crash by disabling JavaScript in the release notes view.
- 2.9.11—November 7, 2013
- Works with the Mail Update for Mavericks 1.0.
- Added a workaround for some rare cases where SpamSieve’s commands were not showing in Apple Mail’s Message menu.
- Updated the Apple Mail - Discard Spam script.
- Added some defensive coding to protect against a bug in _NSDispatchData that could cause a crash on Mavericks.
- Made various updates and improvements to the manual.
- 2.9.10—October 22, 2013
- SpamSieve is now compatible with the updated GM build of Mac OS X 10.9 Mavericks. It is recommended that you update to SpamSieve 2.9.10 before installing Mavericks. If you’ve updated to Mavericks first, and you don’t see the SpamSieve commands in Apple Mail’s Message menu, be sure to choose Install Apple Mail Plug-In from the SpamSieve menu.
- The “How can I hide SpamSieve’s Dock icon?” section of the manual has been updated for Mac OS X 10.9 Mavericks.
- Improved various other parts of the manual and Read Me.
- Tried to work around a problem where the Outlook installer received an error from the system when the Mac was running in French.
- 2.9.9—October 7, 2013
- SpamSieve is now compatible with the GM build of Mac OS X 10.9 Mavericks. It is recommended that you update to SpamSieve 2.9.9 before installing Mavericks. If you’ve updated to Mavericks first, and you don’t see the SpamSieve commands in Apple Mail’s Message menu, be sure to choose Install Apple Mail Plug-In from the SpamSieve menu.
- Made various changes to improve SpamSieve’s filtering accuracy.
- Microsoft Outlook 2011’s notification sounds are now available in SpamSieve’s Notification preferences.
- Added the Apple Mail - Server Junk Mailbox script. When it’s not possible to turn off a server-side junk filter (e.g. iCloud’s), this lets SpamSieve save you from mistakes that the server junk filter made by moving any messages that SpamSieve thinks are good back to the inbox. It will also consolidate the spam messages from all the accounts into a single spam mailbox (the same one where SpamSieve is already putting your spam).
- Can now repair the ownership and permissions of the SpamSieve and Apple Mail preferences files if needed. This fixes problems where SpamSieve would lose its registration information or Apple Mail wouldn’t show the SpamSieve menu commands.
- Fixed some problems where the Open Window command in Apple Mail was not available or did not always open the specified window.
- 2.9.8—September 12, 2013
- SpamSieve is now compatible with Mac OS X 10.8.5.
- Made various changes to improve SpamSieve’s filtering accuracy.
- The Train as Good command in Apple Mail now considers the message’s CC recipients when determining the proper account inbox.
- The installer is better at working around incorrect Apple Mail folder permissions.
- Improved the Why is SpamSieve not catching my spam?, “Open Log”, Setting Up Outlook 2011, SpamSieve and Multiple Macs, and various other sections of the manual.
- The AppleScript for “Setting Up a Spam Filtering Drone” runs faster now.
- Automatic software updates no longer fail if Hazel is set to move files in the Downloads folder.
- The Help menu now includes direct links to important sections of the manual.
- Removed unused code from the Apple Mail plug-in.
- 2.9.7—May 1, 2013
- Improved compatibility with pre-release versions of Mac OS X.
- Made various changes to improve SpamSieve’s filtering accuracy.
- SpamSieve no longer links against AppleScriptKit. This removes some GUI scripting functionality (which is now largely available by other means) but works around an OS bug that could prevent SpamSieve from launching.
- Worked around a bug in Apple Mail’s iCloud rule syncing.
- SpamSieve is better at moving trained messages when Outlook has lost track of the special Junk E-mail folder.
- Fixed a problem where Apple Mail couldn’t communicate with SpamSieve when the file permissions were incorrect.
- Fixed a bug where SpamSieve couldn’t load any addresses from Outlook if it reported an error while getting the e-mail address of a contact.
- Fixed a bug editing counts in the Corpus window (due to suspected 64-bit OS bug).
- Added more checks that the folders SpamSieve relies upon have the proper permissions.
- Improved error reporting for Apple Mail, Growl, and more.
- Improved handling of file permissions errors.
- The Apple Mail drone script now sets the junk status.
- Wrote a script that allows SpamSieve to filter messages (in Apple Mail) that have been organized by SaneBox.
- Improved the Japanese localization.
- SpamSieve now requires Mac OS X 10.5 or later.
- 2.9.6—December 19, 2012
- Worked around a bug in Mac OS X 10.8.2 that could cause spam operations in Postbox to be very slow. If you’re using Postbox, you can update your SpamSieve plug-in by following steps 1 through 6 in the Setting Up Postbox section of the manual.
- Made various changes to improve SpamSieve’s filtering accuracy.
- SpamSieve now understands that @icloud.com, @me.com, and @mac.com are equivalent, so it’s better at finding the proper inbox in Apple Mail when you train a message as good. (For non-Apple IMAP and POP mail accounts, you can define aliases manually, as before. Go to the Accounts tab of Mail’s preferences and enter all the addresses—separated by commas—in the Email Address field.)
- Customers have reported that Sync Services does not work reliably on Mac OS X 10.8 Mountain Lion. Thus, rather than having Outlook use Sync Services to sync its contacts with the system address book, SpamSieve now offers a feature to load the Outlook address book directly. (This ensures that SpamSieve doesn’t mark messages from people in your address book as spam.) Outlook users are encouraged to make sure that Use Entourage/Outlook address book is checked in SpamSieve’s preferences and to click the Load button. For more information, see the Use Entourage/Outlook address book section of the manual.
- SpamSieve is now better able to handle invalid data received from a mail program.
- When “Using a Spam Mailbox on the Server,” SpamSieve is better at handling errors from Mail that could cause a trained spam message to go to the local spam mailbox instead.
- Training a message as good in Apple Mail now removes any flags, in case you were using Spam Message Colors in Apple Mail.
- Added How should I configure the junk filter on my mail server? to the FAQ.
- The Automatically Deleting Old Spam Messages section of the manual now includes instructions for Outlook.
- Worked around various file permissions problems that could prevent training in Apple Mail from working.
- Worked around a bug in Migration Assistant that could prevent SpamSieve from working properly with Apple Mail.
- The plug-in and scripts installers are better able to handle non-standard folder structures.
- Fixed a bug where SpamSieve was unable to see the contents of certain malformed messages, leading to poor filtering accuracy.
- Fixed a bug where sometimes setting the date in the Statistics window didn’t work when SpamSieve was running in 64-bit mode.
- Fixed a regression where where messages trained as good in Apple Mail didn’t move back to the inbox if you were using a local spam mailbox and no inbox matched the message’s recipients.
- Made various improvements to the manual.
- 2.9.5—September 21, 2012
- Updated the Apple Mail plug-in to work with Security Update 2012-004 (Snow Leopard) for Mac OS X 10.6.8. If, after installing this update, you don’t see the SpamSieve commands in Mail’s Message menu, it may be necessary to go to the SpamSieve menu and choose Install Apple Mail Plug-In.
- The AppleScripts for controlling the Griffin PowerMate seem to trigger a crashing bug in OS X 10.8 Mountain Lion. Thus, SpamSieve’s Flash PowerMate option has been turned off. You can try re-enabling it in the preferences if desired.
- When training a message as good from Apple Mail, SpamSieve is better at figuring out which account it came from.
- Worked around problems on some Macs that could prevent SpamSieve from receiving training commands from Apple Mail on OS X 10.8 Mountain Lion.
- Import Blocklist Regex Rules is a sample AppleScript that shows how to create blocklist rules using the contents of a text file.
- Made various improvements to the manual.
- 2.9.4—September 4, 2012
- Made various changes to improve SpamSieve’s filtering accuracy.
- Revised and expanded the Frequently Asked Questions (FAQ) to make it easier for people to find, fix, and report problems.
- Fixed a problem where SpamSieve could crash when processing messages from Apple Mail on OS X 10.8, particularly after the Mac had awakened from sleep.
- Worked around an issue on OS X 10.8 that could cause training SpamSieve from Apple Mail to be very slow.
- The Train as Good command in Outlook will now move messages from the trash back to the inbox.
- Made various updates to the manual for OS X 10.8 Mountain Lion, for example clarifying that SpamSieve works (via Apple Mail) during a Power Nap.
- Worked around a problem where Apple Mail couldn’t communicate with SpamSieve if the /etc/hosts file was damaged.
- Improved the error reporting when SpamSieve detects that one of its files is damaged.
- Added defensive coding to try to track down a notification icon problem when running in French.
- You can now set the MJTSoundLoadFromApps default to false if you want to prevent SpamSieve from looking for notification sounds installed by other applications, e.g. to prevent mounting an encrypted Microsoft User Data folder.
- Fixed a bug handling errors if a software update failed; if it succeeded, the .dmg file is now deleted to reduce clutter.
- After purchasing, SpamSieve used to show your user image to indicate that it had been successfully personalized. It now shows a generic checkmark to avoid prompting you for Contacts access on OS X 10.8.
- Added an icon for the crash reporter, since it’s now displayed under OS X 10.8.
- Fixed a bug where Apple Mail on Mac OS X 10.5 would log (harmless) errors about _NSAutoreleaseNoPool.
- Fixed a bug where the Apple Mail plug-in sometimes logged confusing error messages about not being able to launch SpamSieve even though it was already launched.
- Fixed a bug where the Apple Mail plug-in reported the wrong installation path in an error message when running on OS X 10.8.
- 2.9.3—July 19, 2012
- Added support for the forthcoming Mac OS X 10.7.5.
- Fixed a bug that could prevent SpamSieve from auto-launching on the forthcoming OS X 10.8.
- SpamSieve is now able to recover from certain unexpected system errors on OS X 10.8.
- Fixed a layout bug in the German-localized Statistics window.
- Improved the Automatically Deleting Old Spam Messages instructions.
- SpamSieve now tells the system that it can use the integrated GPU, which should reduce battery use on newer MacBook Pros.
- SpamSieve’s disk image background is now displayed at Retina quality on eligible Macs running Mac OS X 10.7 or 10.8. (On Mac OS X 10.6, due to an OS bug, it will incorrectly display at double size.)
- Fixed a regression where SpamSieve’s disk image icon didn’t display properly.
- 2.9.2—July 5, 2012
- Improved compatibility with the forthcoming OS X 10.8 Mountain Lion.
- The recommended condition for the Apple Mail rule is now Every Message rather than Message Type Is Mail. SpamSieve will auto-update your rules at launch on Mac OS X 10.7 if Mail is running.
- SpamSieve is better at detecting a certain type of tricky spam message.
- Worked around an OS bug that prevented SpamSieve from properly analyzing some message attachments.
- False negative files now have the .eml extension so that they work with Quick Look, etc.
- The “Setting Up a Spam Filtering Drone” section of the manual has been updated with simpler instructions for Apple Mail and new instructions for setting up a drone using Microsoft Outlook 2011.
- Added the “Using a Spam Mailbox on the Server” section of the manual (for Apple Mail).
- Updated various graphics for retina displays.
- If the Apple Mail plug-in cannot be installed due to a folder ownership problem, SpamSieve will now ask for an administrator password to try to fix the folder for you.
- Reverted to version 1.2.3 of the Growl SDK to avoid problems with high CPU usage, internal errors, and crashes.
- Improved SpamSieve’s reporting of unexpected errors as well as script errors from Apple Mail.
- SpamSieve no longer responds at all to certain invalid commands. This should work around an OS bug that could lead to crashes.
- The crash reporter can now make recommendations for you based on the contents of the crash log.
- Added a link to the forum in the Help menu.
- 2.9.1—April 26, 2012
- Added support for Microsoft Outlook 2011 SP2 (a.k.a. 14.2.x). If SpamSieve can detect that you were using Outlook 2011 before, and that SP2 has been installed, SpamSieve will auto-update its scripts automatically. Otherwise, you can choose Install Outlook Scripts from the SpamSieve menu. Either way, the SpamSieve rules in Outlook will continue to work without modification.
- SpamSieve now tries to detect whether its Apple Mail plug-in is damaged and auto-heal the installed copy if necessary.
- If there’s an error updating SpamSieve’s Apple Mail plug-in, it now reports more information to try to diagnose the problem.
- If the Apple Mail plug-in detects that it’s damaged, it will alert the user to download and install a fresh copy.
- SpamSieve now checksums the Outlook script files (both the installed and built-in copies) to detect whether they are damaged.
- Made a change to eliminate a particular cause of false positives for some users.
- SpamSieve no longer triggers Mac OS X’s “accept incoming network connections” firewall dialog.
- Added some exception guards to work around bugs in the Growl SDK.
- When an unexpected error occurs and no stack trace is available, SpamSieve will now try to report the approximate location.
- Improved the What information should I include when I report a problem? section of the manual.
- 2.9—April 3, 2012
- Added support for upcoming versions of Mac OS X.
- Made various changes to improve SpamSieve’s filtering accuracy.
- SpamSieve is now code-signed using a Developer ID certificate for Gatekeeper.
- When training an Exchange message as good in Apple Mail, SpamSieve is better at moving it to the proper inbox.
- Processing incoming messages with Outlook is more efficient. To take advantage of this change, choose Install Outlook Scripts from the SpamSieve menu.
- If you’ve used the SpamSieve - Change Settings command in Apple Mail to tell SpamSieve not to use a local spam mailbox, training a message as spam will now try to move the message to a spam mailbox on the same server account, rather than always using the first account.
- Added support for training messages as spam via Herald (version 2.1.2 and later), a notification plug-in for Apple Mail.
- When sorting spam messages by color in Apple Mail, you can now use Grey as a synonym for Gray.
- The score script command has a new auto training parameter that can be used to override the setting in the preferences on a case-by-case basis. This might be useful, for example, if you’re writing an AppleScript to triage messages that have already been classified, and you just want to get SpamSieve’s opinion without having to make any corrections.
- Adjusted the drone AppleScripts so that they’re easier to troubleshoot.
- If Apple Mail gives SpamSieve empty data for a message, the plug-in now assumes the message is good and does not pass it on to SpamSieve for analysis.
- Added support for Growl notifications via GNTP (requires Mac OS X 10.7 or later).
- SpamSieve is better at handling file permission errors.
- SpamSieve is better at handling errors when running helper tools.
- Improved SpamSieve’s ability to still function when the application package is damaged.
- Added the AddStandardRules esoteric preference, which lets you prevent SpamSieve from creating its built-in blocklist and whitelist rules if you prefer to manage the rules yourself.
- Fixed a bug that could reduce SpamSieve’s filtering accuracy for some messages with attached files.
- Made various improvements to the documentation.
- Updated the German localization.
- 2.8.8—November 17, 2011
- Improved compatibility with pre-release versions of Mac OS X.
- Added support for Postbox 3.0.
- Added support for Growl 1.3.
- Made various changes to improve SpamSieve’s filtering accuracy.
- The Exclude my addresses feature now lets you specify additional addresses via Terminal, if you don’t want to clutter your “Me” card in Address Book.
- The Apple Mail plug-in installer is more resilient to permissions errors.
- Added example of using colored flags to sort spam messages in Apple Mail by spamminess.
- Added some logging to detect obscure errors when loading SpamSieve’s Apple Mail plug-in.
- Improved the French localization.
- 2.8.7—August 31, 2011
- Improved compatibility with pre-release versions of Mac OS X.
- Made various changes to improve SpamSieve’s filtering accuracy.
- SpamSieve now runs as a 64-bit application on Mac OS X 10.7 Lion. This allows for faster launch times and reduced overall system memory use if you are running exclusively 64-bit applications. It also prevents problems caused by buggy input manager haxies. You can use the Finder’s Get Info window to set SpamSieve to run in 32-bit mode if you want to play classic Mac OS notification sounds or to reduce the memory use of SpamSieve itself.
- When training an Apple Mail message in the Spam mailbox as good, SpamSieve is now better able to match it up with the proper inbox.
- Offloaded more PDF processing to the helper tool so that SpamSieve itself doesn’t crash if you receive a message with a corrupt PDF attachment.
- Made the Apple Mail plug-in installer more robust and better at reporting errors.
- An error finding the built-in copy of SpamSieve’s Eudora plug-in will no longer prevent SpamSieve from launching, unless it actually needs to install the plug-in.
- Entourage is supposed to create the Entourage Script Menu Items folder, but for extra robustness SpamSieve will now create it if it’s missing.
- If SpamSieve’s PDF reader detects that the CTLoader input manager is loaded, it now logs a warning that this may cause SpamSieve to hang.
- Tried to work around an unconfirmed issue that could prevent SpamSieve from processing the first few Apple Mail messages on Mac OS X 10.7 Lion.
- Fixed a bug with re-personalizing the application via URL.
- Clarified the Do an Initial Training section of the manual.
- Updated the Import Addresses… instructions for Microsoft Outlook.
- The “Setting Up a Spam Filtering Drone” section of the manual now includes instructions for setting up a drone for multiple mail accounts.
- The manual now explains how to open the Library folder on Mac OS X 10.7 Lion.
- 2.8.6—July 6, 2011
- Made various changes to improve SpamSieve’s filtering accuracy.
- Improved compatibility with Mac OS X 10.7 (Lion).
- Added support for Postbox 2.5.
- Updated the Setting Up MailMate instructions for the new preferences in MailMate 1.1.2.
- Updated the Setting Up Outlook 2011 instructions for Microsoft Office 2011 Service Pack 1.
- Updated the Setting Up Postbox instructions to ensure that messages that you train as spam are moved to the junk mailbox or trash.
- Worked around a rare OS/hardware condition that could prevent SpamSieve from launching.
- The Apple Mail plug-in is better at reporting errors when it’s unable to fully load itself.
- Made various other clarifications to the manual.
- Adjusted the help page titles to fit better in the menu and search results.
- 2.8.5—March 1, 2011
- Improved SpamSieve’s filtering accuracy.
- Improved compatibility with the Thunderbolt MacBook Pros and pre-release versions of Mac OS X.
- Freron Software’s MailMate now works with SpamSieve, as described in the Setting Up MailMate section of the manual.
- Whitelisting Previous Recipients now works with Microsoft Outlook 2011.
- The Train as Good command can now move spam messages out of the spam folder when running a localized version of Microsoft Outlook 2011.
- SpamSieve’s Apple Mail plug-in helper now runs as 64-bit on Mac OS X 10.6, where possible, to prevent input manager haxies from interfering with the training commands.
- Added a workaround to prevent SpamSieve from hanging if the address book database is damaged.
- Clarified the text in the Welcome and Purchase windows.
- Improved the instructions for using Microsoft Outlook and Entourage with Exchange accounts.
- Updated the Setting Up Postbox section of the manual.
- Made various improvements to the documentation.
- Updated the Danish and Spanish localizations.
- 2.8.4—October 13, 2010
- SpamSieve now integrates with Microsoft Outlook 2011. For more information, see the Setting Up Outlook 2011 section of the manual.
- SpamSieve now integrates with Postbox, an enhanced version of Thunderbird. For more information, see the Setting Up Postbox section of the manual.
- Adjusted SpamSieve’s tokenizer to improve the filtering accuracy.
- The Train as Good command in Apple Mail is better at moving messages in the spam folder or trash back to the inbox.
- Fixed a regression where the whitelist and blocklist windows wouldn’t open when running SpamSieve under certain localizations.
- Improved the localizations.
- 2.8.3—August 31, 2010
- Adjusted SpamSieve’s tokenizer to improve the filtering accuracy.
- Improved compatibility with pre-release versions of Apple Mail.
- MailForge now works with SpamSieve, as described in the Setting Up MailForge section of the manual.
- Made some changes to better support the upcoming Microsoft Outlook 2011. (Full support will come when Office ships.)
- Added various updates and clarifications to the manual.
- Fixed a regression where SpamSieve wouldn’t be able to install its Apple Mail plug-in if Mail’s folder had been redirected using an alias.
- Fixed a bug where SpamSieve would sometimes quit when coming out of trial mode.
- Fixed a bug where sometimes the Hits column in a rules window couldn’t be resized.
- Worked around an OS bug that could cause an internal error when reporting a corpus error.
- Made various modernizations to SpamSieve’s code and interface files.
- The Apple Mail plug-in now shows up with the proper name in Mail Plugin Manager.
- Updated the disk image layout.
- 2.8.2—May 25, 2010
- Improved compatibility with pre-release versions of Mac OS X.
- Added Dutch, Italian, and Swedish localizations.
- Made various code improvements and modernizations.
- SpamSieve is better able to recover from certain types of damaged corpus files.
- Updated the “Setting Up Eudora” section of the manual.
- Improved the layout of the Software Update… window.
- Adjusted the packaging of the disk image and the installation instructions.
- Fixed a bug that could cause a crash when parsing messages with an invalid Date header.
- Fixed a regression where SpamSieve would sometimes bring up an alert sheet to report that you already had the latest version.
- Fixed a crash in the software updater.
- 2.8.1—March 24, 2010
- Fixed a regression in the SQLite build that could cause SpamSieve to crash when running on a PowerPC-based Mac.
- 2.8—March 24, 2010
- Made various changes to improve SpamSieve’s filtering accuracy.
- Adjusted the SpamSieve - Train as Good command in Apple Mail to reduce confusion. Training a message as good now will only move the message into the inbox of an enabled account. If no account matches the message or if the proper account is disabled, it will move the message into the inbox of the first enabled account (even if it doesn’t match). Thus, the message will always move out of the Spam mailbox, and it will no longer seem to disappear because it was moved into an inbox that was hidden.
- Made various code modernizations.
- Apple Mail now auto-launches SpamSieve sooner, to speed up the filtering of the first messages.
- Improved the support for server-side Spam mailboxes in Apple Mail.
- Clarified the instructions in the Do an Initial Training section of the manual.
- Added the “How do I make SpamSieve catch spams sent from my own address?” section to the manual.
- Expanded the Correct All Mistakes section of the manual.
- Improved the Apple Mail troubleshooting instructions.
- Improved the styling of the Apple Help.
- Improved SpamSieve’s launching speed.
- Fixed a bug where, in rare circumstances, SpamSieve didn’t filter all of the first batch of messages when using Apple Mail on Mac OS X 10.6.
- SpamSieve will now warn you if it looks like its Apple Mail plug-in has been damaged by an application slimming utility. This could lead to Mail continually reporting that the plug-in was incompatible.
- SpamSieve will now complain if it looks like you’ve manually installed the Apple Mail plug-in in the wrong folder instead of using SpamSieve’s installer.
- Made a change to try to work around a bug in Apple Mail that could make training a message as good create a duplicate copy of the message.
- Improved the Purchase window to reduce confusion about the demo period, serial numbers, and the number of seats that you’ve purchased.
- Modernized the Software Update window and code.
- Changed the way the Software Update feature finds the downloads folder on Mac OS X 10.5 and later because sometimes the one that Internet Config returned would be invalid or unwanted.
- Fixed a bug where SpamSieve would crash when processing certain invalid URLs.
- Fixed an error where a newly added whitelist/blocklist rule might not be auto-selected.
- Removed the Dutch, Italian, and Portuguese localizations because they were out of date. If you would like to update the translation for one of these languages, please contact spamsieve@c-command.com.
- 2.7.7—October 20, 2009
- Improved compatibility with pre-release versions of Mac OS X.
- Made some changes to improve SpamSieve’s filtering accuracy.
- Fixed a bug where the “Train as Good” command in Apple Mail didn’t move Exchange messages back to the inbox.
- Encoded HTML mail is spam is now off by default, to reduce the number of false positives.
- Modernized the code.
- Updated the Vietnamese localization.
- Updated the Apple Mail script for discarding spam.
- 2.7.6—September 9, 2009
- Improved compatibility with pre-release versions of Mac OS X.
- Expanded the Can I delete spam messages that are in the junk mailbox? section of the manual.
- Fixed a bug in the “Setting Up a Spam Filtering Drone” instructions.
- Improved number entry in the corpus window.
- Improved the reporting of unexpected errors.
- Updated links to indicate that Mailsmith is now available from Stickshift Software.
- Added a Console warning if the Apple Mail plug-in detects that CTLoader is installed.
- The crash reporter works better with Mac OS X 10.6.
- Fixed a mistake in the French localization.
- 2.7.5—July 29, 2009
- Made various accuracy improvements.
- Fixed a problem where Apple Mail (running on pre-release versions of Mac OS X 10.6) could freeze at launch if you had a rule involving address book groups.
- Rewrote the “Setting Up a Spam Filtering Drone” instructions.
- Added Why does the Spam mailbox in Apple Mail appear empty even though there’s a number beside it? to the frequently asked questions.
- Updated the Automatically Deleting Old Spam Messages instructions to include Entourage.
- The search fields are now scrollable.
- The Apple Mail plug-in is better at detecting when SpamSieve’s Dock icon is hidden.
- Worked around a problem where Mail could crash if you had installed two copies of the SpamSieve plug-in at the same time.
- Fixed a bug that could cause SpamSieve to freeze when applying a whitelist/blocklist rule involving certain regular expressions.
- The crash reporter works better with pre-release versions of Mac OS X 10.6 (Snow Leopard).
- Fixed a bug that could prevent SpamSieve from launching.
- Updated the Dutch, Japanese, and Korean localizations.
- 2.7.4—April 13, 2009
- Improved compatibility with pre-release versions of Mac OS X 10.6 (Snow Leopard).
- SpamSieve is better able to recover from corpus files that were damaged due to disk errors.
- Improved the Entourage installer’s error handling.
- Improved the error reporting when saving the corpus.
- Improved the troubleshooting instructions.
- Fixed a problem where messages trained as good in Apple Mail could be moved into the inbox of a disabled account.
- Fixed a bug that could cause harmless error messages to be logged to the Console when playing System 7 sound files.
- The crash reporter now warns before sending a report without an e-mail address.
- You can now press Enter to click the Send Report button in the crash reporter.
- 2.7.3—January 26, 2009
- Rewrote and restructured the manual to make the setup and troubleshooting instructions clearer.
- Replaced the Training Tip window with an alert that’s displayed when SpamSieve’s corpus is empty. This goes along with the more explicit guidance that ongoing training is only necessary to correct mistakes.
- The Entourage installer no longer asks before replacing existing script files. If you want to customize the scripts (rare these days, since there are so many built-in configuration options), you should use copies with different names to avoid having SpamSieve overwrite them.
- Changed the recommended Entourage rule setup to better handle uncertain messages. The installer now creates the Uncertain Junk category if necessary.
- Made the Apple Mail plug-in installer more robust.
- Worked around a problem parsing certain multipart messages.
- Adjusted the built-in blocklist rules for better accuracy.
- Reduced memory usage when processing message attachments.
- Fixed a bug sorting in rules windows.
- Fixed a bug marking incoming Entourage messages as Uncertain Junk.
- Updated the localizations.
- 2.7.2—October 29, 2008
- Made various accuracy improvements.
- Improved compatibility with pre-release versions of Mac OS X 10.6 (Snow Leopard). There are now two separate versions of SpamSieve’s Apple Mail plug-in. Version 1.3 is for Mac OS X 10.4; version 1.4 is for Mac OS X 10.5 and later. SpamSieve will auto-choose which one to install (or update) based on the version of Mac OS X that you’re running.
- Added new sections to the manual about Whitelisting Previous Recipients and iPhone Spam Filtering. Expanded the Auto-train with incoming mail section.
- Worked around a problem where the Edit Log command would try to open SpamSieve’s log using Script Editor if Launch Services was confused.
- Rewrote filesystem code to improve performance and error reporting.
- If there’s an error getting the downloads folder for a software update, SpamSieve now defaults to Downloads rather than Desktop.
- Worked around a problem where training (using Apple Mail on Mac OS X 10.5) could be interrupted.
- Added Korean localization.
- Moved .nib files that don’t need localization out of the English.lproj folder. This should make it easier to run SpamSieve in a language other than English without changing the default language on your Mac.
- Fixed some small memory leaks.
- Improved reporting of unexpected errors.
- Added placeholder text to the Purchase… window.
- Added Help button to the Software Update window.
- 2.7.1—June 4, 2008
- Fixed a regression in version 2.7 where SpamSieve was slow loading certain large corpus files when running on Mac OS X 10.5.
- Worked around a bug in Mac OS X 10.4 that could cause a crash when training a message with Apple Mail.
- Made some minor accuracy improvements.
- 2.7—May 21, 2008
- Now requires Mac OS X 10.4 or later.
- Made a variety of accuracy improvements, focused on dealing with obfuscations, image attachments, URLs, and HTML.
- Improved corpus speed and memory use.
- Made various improvements to the column widths and alignments in the rules and corpus windows, and added alternating row colors.
- Fixed a rare problem where Apple Mail on Mac OS X 10.5 might hang if you trained a message as spam while Mail was downloading messages.
- If the OS reports an error when playing a sound as an alert sound, SpamSieve now plays it using the normal sound channel.
- Increased the range of possible values for the uncertain spam threshold.
- Improved sorting of sound names in the pop-up menu.
- Fixed bug where SpamSieve wouldn’t launch if the Microsoft User Data folder had been replaced by an alias file that was invalid.
- No longer shows the Reset Corpus/History alert at launch if you hold down other modifier keys in addition to Command-Option.
- Updated the Dutch localization.
- 2.6.6—January 23, 2008
- Made various accuracy improvements.
- Rewrote internal corpus storage to work around a performance bug in Mac OS X 10.5 that could, in some circumstances, make SpamSieve very slow to launch.
- Worked around a problem on Mac OS X 10.5 where the Apple Mail plug-in would sometimes try to launch multiple copies of SpamSieve (and then they’d all self-quit, leading to -609 errors).
- Made some internal changes so that Use Growl global notification system works more reliably on Mac OS X 10.5.
- The Flash PowerMate notification feature now works with version 2.1 of the PowerMate software.
- If SpamSieve’s corpus file or history database is damaged, you can now hold down the Command and Option keys at launch to reset them.
- Growl notifications are now posted from a background thread, to speed up message filtering.
- Fixed bug where the open panel for the Import Addresses… command was slow.
- Worked around a problem that could cause corruption of SpamSieve’s Entourage scripts.
- Fixed rare crash when processing HTML messages.
- If SpamSieve is unable to install its Apple Mail plug-in, it now does a better job of helping you complete the installation manually.
- Integration with Apple Mail and Entourage no longer relies on the mydefaults command-line tool, since it had some limitations and there were occasional problems installing it.
- The software updater is better at handling invalid downloads folders.
- Added Dutch localization and updated the other localizations.
- 2.6.5—November 14, 2007
- Now requires Mac OS X 10.3 or later.
- Made various accuracy improvements.
- Added high-resolution version of the application icon.
- Adjusted the appearance of the status indicators (•, G, S) for better visibility in the Leopard Dock.
- Updated the default whitelist rules.
- Updated documentation for Mac OS X 10.5.
- Updated to PCRE 7.4.
- Improved compatibility with pre-release versions of Entourage 2008.
- The Train as Good command in Apple Mail now recognizes spam mailboxes whose names end with “Spam”, and it works with the Trash mailbox on Mac OS X 10.5.
- Worked around change in Apple Mail on Mac OS X10.5 that could cause the Train as Spam command not to move the messages.
- Fixed bug where the Apple Help didn’t work on Mac OS X 10.5.
- Fixed hang processing some pathological HTML spams.
- Fixed bug where Growl notification preferences got reset if you ran SpamSieve under different localizations.
- Fixed unnecessary Console logging when loading Entourage addresses.
- Updated Italian localization.
- 2.6.4—August 20, 2007
- Made more accuracy improvements for messages with attachments.
- Fixed a bug that could cause crashes when processing messages containing PDF attachments.
- Updated localizations.
- 2.6.3—August 3, 2007
- Made various accuracy improvements, particularly for messages with attachments.
- Improved compatibility with pre-release versions of Mac OS X 10.5 Leopard.
- Fixed bug where the Software Update… checker didn’t always re-check for new updates.
- Restored progress bar when loading Entourage addresses.
- Updated the localizations.
- Improved the documentation.
- Fixed help book icon.
- 2.6.2—May 4, 2007
- Made changes to prevent a crash on Mac OS X 10.4.9 when quitting in response to a mail program quitting.
- Slight changes for better accuracy.
- Fixed regression where the Import Addresses… command didn’t always work for text files in the default encoding.
- Blocklist and whitelist rules that use Body (any text part) can now match text from the headers of bounced messages (which e-mail clients often display as part of the message body).
- The Software Update… feature now checks whether the updated version can run on your installed version of Mac OS X.
- Better logging of messages that don’t have a sender.
- Fixed a threading bug.
- Made an optimization to the Apple Mail plug-in.
- Adjusted the setup instructions for Apple Mail to avoid problem with the Previous Recipients list.
- Modernized the crash reporter code.
- Updated the French and German localizations.
- 2.6.1—April 9, 2007
- Fixed regression where SpamSieve wouldn’t launch if you had a large number of Mac OS 9 sound files.
- Fixed bug where Thunderbird messages that were manually marked as junk weren’t moved to the junk folder. If you are using Thunderbird, first update to SpamSieve 2.6.1, then choose Install Thunderbird Plug-In from the SpamSieve menu to update the plug-in.
- Made change prevent crash on Mac OS X 10.4.9 when quitting in response to a mail program quitting.
- 2.6—March 19, 2007
- SpamSieve now works with Mozilla Thunderbird.
- Improved detection of image spams and phishing messages.
- Made various message analysis improvements to increase the accuracy of the Bayesian filter.
- AppleScripting the whitelist and blocklist is much more efficient for scripts that access a lot of rules.
- Improved compatibility with pre-release versions of Mac OS X 10.5 Leopard.
- When installing a plug-in for a mail program, SpamSieve now opens the relevant page of the Apple Help to help you complete the installation.
- The alert when SpamSieve has auto-updated its Apple Mail plug-in is now non-modal, so it doesn’t interfere with spam filtering.
- The Software Update… checker now works behind an HTTP proxy, and the auto-updater is now compatible with FileVault.
- Can now import addresses from the incorrectly encoded .vcf files that are generated by recent versions of Address Book.
- Growl notifications are now enabled by default.
- The Apple Mail plug-in is more robust.
- Fixed some small memory leaks.
- Made some performance optimizations to the message tokenizer.
- SpamSieve is more robust when processing incomplete messages.
- The Entourage “Train Good” command now moves messages out of the Uncertain Spam folder.
- The Apple Mail “Train as Good” command now moves messages out of zSpam mailboxes.
- Updated to PCRE 7.0.
- 2.5—October 30, 2006
- Made lots of changes to the parser and classifiers to improve accuracy, especially for HTML and image messages.
- The in-memory corpus representation is much more efficient, which should lead to lower memory use and greater speed.
- Rewrote the Software Update… feature. When a new version is available, it can now show you the release notes. SpamSieve now downloads the new version itself, rather than relying on your browser. On 10.3 and later, the Download & Install button will cause SpamSieve to auto-update itself to the latest version.
- Improved accuracy on messages containing misspelled words.
- Now requires Mac OS X 10.2.8 or later.
- Auto-training now places a higher priority on corpus balance compared to learning from novel messages.
- Improved the Apple Mail plug-in’s Train as Good script to work around a bug in Mail.
- Improved the reliability of the Apple Mail training commands.
- Made further changes to improve the success rate of the Apple Mail plug-in installer.
- Updated to PCRE 6.7.
- Entourage training progress messages no longer block if Entourage is in the background.
- Worked around OS bug that prevented the Statistics sheet from properly parsing dates when the user’s date format started with a two-digit year.
- No longer quits with an internal error if the mydefaults tool can’t be installed.
- Added keyboard shortcut for Hide Others.
- Fixed bug with Purchase window sheet.
- Removed some old, unused code.
- Updated the toolbar icons.
- Various localization and documentation improvements.
- Fixed bug with display of remaining demo time.
- The Entourage script installer is more robust when contacting Entourage via AppleScript fails.
- Improved compatibility with Leopard.
- The date in the Statistics window more closely matches the user’s preferences (10.4 and later).
- Better at detecting damaged corpus files (instead of crashing).
- Fixed bug where Uncertain Spam growls were always sent, even if disabled in SpamSieve’s preferences.
- Adjusted workaround for Help Viewer bug.
- Increased the maximum width of the Hits column in rule list windows.
- Added thousands separators throughout the Statistics, Corpus, and rules windows.
- Fixed bug where adding a rule didn’t create a new rule if there was already a rule with a blank “Text to Match.”
- Fixed rare crashing bug when performing operations during idle time.
- Removed the Import Messages command (which let you train SpamSieve directly from a file in mbox format), because there are now very few situations where it is useful, and it was confusing people.
- Added screenshot showing where to find Entourage scripts.
- 2.4.4—July 13, 2006
- Made various changes to improve SpamSieve’s accuracy, particularly when processing blank messages, HTML messages, and messages containing images.
- The following strings may now be used in rules to match headers that are missing: <SpamSieve-Unknown-Subject>, <SpamSieve-Unknown-From>, <SpamSieve-Unknown-FromName>, <SpamSieve-Unknown-To>. It is somewhat common for messages to have a blank subject (which can be matched using the empty string), but legitimate messages that omit the Subject for From header are rare, and now these can easily be matched by creating the appropriate rules on the blocklist.
- Quit when mail client quits is now enabled by default.
- Log entries are now abbreviated when the string that matched the rule is long.
- The Apple Mail Train as Good command can now move messages out of submailboxes of the Junk mailbox.
- The Apple Mail plug-in installer works better when the folder permissions are messed up.
- Can now auto-recover from damaged message store files, rather than complaining to the user about them.
- If SpamSieve is hidden when launched, it will refrain from opening the Training Tip window.
- Improved the documentation, training tips, and localizations.
- Various code modernization and bullet-proofing throughout.
- Fixed localization bugs that could cause crashes.
- Fixed crash when hiding the progress panel.
- Fixed crash when saving false negatives to disk.
- Made changes to the Entourage scripts to try to work around an OS bug that causes them to grow and eventually become corrupted.
- Worked around OS bug to prevent freezes when attempting to play damaged sound files.
- 2.4.3—March 30, 2006
- Improved SpamSieve’s accuracy by counteracting various spammer tricks.
- Removed the delay, when using Apple Mail on Tiger, between choosing “Train as Good” or “Train as Spam” and when training actually started.
- The Entourage scripts now report progress part way through bulk trainings and allow you to cancel. They also warn if it looks like you’re training SpamSieve with too many messages, and they’re better at preventing duplicate categories from being created in Entourage. The “Train Spam” script now removes the spam messages from the server.
- Growl notifications from people in the address book now include the “To” address for mailing list messages. This makes it easier to decide whether to ignore the notification.
- Fixed bug that caused part of SpamSieve’s corpus to be written to disk incorrectly when running on Intel. In most cases, no ill effects would have been observed, and SpamSieve will repair the corpus file the first time you launch 2.4.3.
- Improved the error messages.
- Improved the display of the demo time remaining.
- Updated the localizations.
- 2.4.2—February 23, 2006
- SpamSieve is now much better at catching a new type of spam message that previous versions had been inconsistent at catching.
- Worked around some more spammer tricks to improve accuracy.
- Improved the way message attachments are analyzed.
- Fixed bug that could cause improper analysis of messages from Apple Mail or Eudora, leading to reduced accuracy.
- Improved phish detection.
- Improved the performance of the Apple Mail training commands on Tiger and Jaguar.
- Made some changes to the way spam messages are colored in Apple Mail. Now, the most spammy color (blue) is reserved for messages with scores 99 or higher, i.e. messages that matched a blocklist rule, had encoded HTML parts, or were known to definitely be spam.
- The Show Window command in Apple Mail can now open the SpamSieve help.
- Under certain circumstances, SpamSieve can now detect at launch whether the application package is damaged, rather than too-quietly reporting errors in the log during message processing.
- Improved the troubleshooting documentation.
- Updated the Japanese localization.
- 2.4.1—January 25, 2006
- SpamSieve is now a universal binary.
- Made various changes to SpamSieve’s tokenizer and HTML parser to improve accuracy.
- Improved filtering of messages containing attachments.
- Added Apple Mail settings to control whether messages trained as spam are marked as read and/or left on the server.
- Better at finding notification sounds that are built into mail clients.
- Now shows uncertain growls when notification is suppressed.
- SpamSieve now delegates more file reveal operations to Path Finder 4, since it fixes a bug in Path Finder 3 that prevented certain reveals from working.
- Rather than typing (or copying and pasting) your name and serial number to personalize SpamSieve, you can now click the x-spamsieve:// URL that’s sent to you when you purchase SpamSieve or get a serial number reminder.
- Fixed bug where the rules list would scroll one rule up if it was scrolled to the bottom and you edited a rule.
- Added Spanish localization and updated the Danish, Italian, Swedish, and Vietnamese localizations.
- Improved the installation and troubleshooting documentation.
- Removed spurious Section 4.4.1 of the manual.
- 2.4—November 16, 2005
- Made various changes to the Bayesian engine to improve accuracy.
- Added some heuristics for detecting phishes.
- Apple Mail messages can now be filed into different mailboxes based on how spammy they are (requires 10.3 or 10.4).
- The Apple Mail plug-in is now a Universal Binary, so SpamSieve can be used on Intel-based Macs without running Mail in Rosetta.
- Added support for the new (non-haiku) Habeas headers.
- SpamSieve now plays notification sounds using the alert volume rather than the master volume, and they’ll be played on the same output device as alerts and sound effects. (The old behavior is still in effect when playing classic sound files and when running on Jaguar.)
- Added suppressing notification AppleScript parameter. You can use this to prevent SpamSieve from bouncing its Dock icon or showing Growls when recalculating the spam scores of old messages.
- The Software Update alert is now a sheet, so it won’t interfere with spam filtering.
- If Path Finder is running, it will be used instead of the Finder to reveal files/folders.
- Made various tweaks to keep PowerMates from flashing when they shouldn’t.
- Adjusted the standard set of rules.
- You can now tab back and forth between the search field and table in the corpus and rules windows (requires 10.4).
- Predicted entries in the log now show the message’s sender.
- Added preference to control whether Apple Mail false positives are marked as unread.
- Added Technical Support & Feedback item to the Help menu.
- The Entourage scripts try even harder to avoid creating duplicate categories.
- SpamSieve now avoids loading the address book except when absolutely necessary. Thus, if your address book is corrupted such that loading it would cause a crash, you’ll still be able to receive mail if you turn off SpamSieve’s address book–related features.
- Messages with empty senders are no longer considered to be from people in the address book, even if the address book contains a contact with such an address.
- Fixed longstanding bug in which sorting the blocklist or whitelist by Header or Match Style would group the rules appropriately, but wouldn’t order the groups alphabetically by the localized text in the column.
- Improved the error messages in the application and in the Apple Mail plug-in.
- Made a change to prevent Apple Mail from deadlocking (in rare circumstances) when training SpamSieve on Mac OS X 10.4.3.
- Fixed regression where Trained: (Auto) log entries occurred before the corresponding Predicted ones.
- The Apple Mail training commands now respect the preference for whether to color messages.
- Added hidden preference LogSpam that you can turn on with defaults write com.c-command.SpamSieve LogSpam YES to make SpamSieve keep a maildir-style folder of the spam messages it’s seen. Right now, this is not recommended for general use on slower machines.
- Updated link to Habeas Safelist.
- Updated eSellerate, PCRE, and SQLite libraries.
- Added Danish localization and improved the other localizations.
- Various documentation improvements, including:
- Described how to place Entourage messages in different mailboxes based on how spammy they are.
- Added section describing how to redirect non-spam Apple Mail messages to another account, e.g. to filter the mail that you receive on your Blackberry.
- 2.3.2—August 8, 2005
- Made various improvements to increase SpamSieve’s accuracy.
- Added Quit when mail client quits option.
- Sped up filtering when Growl notifications are enabled. Improved the text/layout of the Growl notifications.
- Re-installing or updating Eudora could have the effect of re-enabling Eudora’s built-in junk plug-ins. This could reduce the filtering accuracy and cause unexpected behavior as multiple plug-ins acted on the same messages. Now, if SpamSieve detects that its Eudora plug-in is installed, it will automatically disable any other Eudora junk plug-ins.
- When you reset the corpus, SpamSieve automatically creates a dated backup so that it’s possible to revert, if need be.
- The pop-up menu for selecting the uncertainty threshold now supports scores as high as 98. This makes it possible to designate all non-blocklisted spam messages as uncertain.
- The S and G indicators are now only shown in the Dock icon after manual training, not auto-training.
- The log is now UTF-8 rather than ASCII, so it should be much more readable for people using localized versions of SpamSieve.
- More errors are now logged.
- Better at finding sound files that are built into Mailsmith.
- Worked around Tiger bug that would cause archived log files to not decompress automatically when opened.
- Fixed regression where SpamSieve could crash if you tried to install the Entourage scripts when Entourage was not installed.
- Fixed bug in Apple Mail’s Train as Good, where it didn’t always move messages out of the Spam mailbox if there were lots of recipients.
- Fixed Entourage Train Good script to not make a new Uncertain Junk category when one already exists (but Entourage says that it doesn’t).
- Worked around AppleScript error that could occur when running Entourage scripts.
- The regex code is more bulletproof in the face of rare OS errors.
- Added better heuristic for determining which files SpamSieve can import addresses from. This should prevent some rare crashes.
- Updated the Habeas link in the Preferences window.
- The history database is more robust on Tiger.
- The Purchase window now makes it more clear when the serial number has been successfully entered. Merged the Web Purchase… and Instant Purchase… buttons.
- Adjusted the way the remaining demo time is displayed, as it led many people to believe that they had less than a month of total trial time.
- Improved training tips and the manual.
- Added French translation of manual. Updated Vietnamese manual. Fixed regression where the Italian and Vietnamese manuals were inaccessible.
- 2.3.1—May 16, 2005
- Works with Apple Mail on Mac OS X 10.4.1. SpamSieve should automatically install a new copy of its Apple Mail plug-in the first time it’s launched, but if it doesn’t you can do so by choosing Install Apple Mail Plug-In from the SpamSieve menu.
- Various accuracy improvements.
- Renamed the Apple Mail training commands to Train as Good and Train as Spam.
- Train as Spam is much faster in Apple Mail on 10.4 when there are multiple messages selected.
- If SpamSieve’s Dock icon is hidden, a new SpamSieve - Open Window command will appear in Apple Mail’s Message menu. This lets you quit SpamSieve or access its windows and settings while its menu bar is hidden.
- Worked around Apple Mail bug so that Train as Good now moves spam messages out of Mail’s Spam folder on 10.4, provided that SpamSieve had put them there.
- Reduced the maximum size of the Growl notification bubbles.
- Better at parsing malformed messages.
- The HTML parser is much faster with certain pathological spam messages that could previously drag parsing out for a minute or more.
- Worked around Entourage bug that could lead to the creation of multiple Uncertain Junk categories.
- SpamSieve no longer complains about the permissions on Apple Mail’s Bundles folder if you’re using a different mail program.
- Removed the Prune Corpus command. With auto-training being much smarter than in earlier versions, it’s almost never advisable to prune, and improper pruning severely reduces accuracy.
- The demo reminder window updates the number of days remaining if you leave SpamSieve running for days or weeks at a time.
- Fixed bug that could cause a crash when using Instant Purchase.
- Worked around crash caused by bug in 10.2.
- Updated localizations.
- 2.3—April 25, 2005
- General
- Works with Mac OS X 10.4 (Tiger).
- Made lots of improvements to SpamSieve’s parsers and tokenizer for better accuracy. To fully take advantage of this, you will need to reset SpamSieve’s corpus and re-train it (e.g. with 300 recent good messages and 600 recent spams). However, this is certainly not required, and I expect that most people will opt for the simpler upgrade of just installing the new SpamSieve application.
- Auto-training works better. SpamSieve is smarter about selecting which incoming messages to train itself with, so that it reaches a high level of accuracy sooner, and it is better at adapting to new types of mail that you receive.
- Improved the training tips and the training section of the manual so that it’s clearer what the best practices are.
- When training the whitelist, SpamSieve will now create rules that match the addresses of the other recipients. This should reduce false positives from people who haven’t previously sent you mail, but who correspond with the same people you do.
- Added Update Address Book “Me” Card command.
- Scriptability
- Added selection AppleScript property, which can be used to get the selected token infos in the corpus or the selected rules in the whitelist or blocklist window. One use of this is demonstrated in a script that adds the addresses of the selected whitelist rules to the Address Book.
- Added AppleScript properties and commands to access SpamSieve’s windows and log. One use of this is demonstrated in a script that lets you open SpamSieve’s windows if its Dock icon is hidden (and thus the menu bar is inaccessible).
- Notification
- Added option to control whether Growl notifications contain excerpts of the message body.
- The new message count in SpamSieve’s Dock icon is now auto-positioned.
- Fixed regression where dragging the slider to adjust the size of the number in the Dock icon didn’t temporarily show the number so that you could preview the results.
- Apple Mail Integration
- Improved accuracy due to better decoding of Apple Mail messages.
- The commands for training SpamSieve from Apple Mail are now in Mail’s Message menu, rather than in the Scripts menu. This lets you access those commands in the same way on 10.2 through 10.4, and you don’t have to worry about changing the scripts around if you boot into a different version of the OS.
- The Apple Mail plug-in is faster at processing messages.
- If the Apple Mail plug-in is installed but disabled for some reason (e.g. a location switch or OS re-install), SpamSieve will automatically re-enable it (takes effect when you relaunch Mail).
- Worked around bug in Mail that could prevent Train Good or Train Spam from working properly when training multiple messages at once that were already in their final destination.
- Eudora Integration
- The installer no longer asks you to find Eudora except when absolutely necessary.
- The Eudora plug-in is now installed in the Application Support folder rather than inside the Eudora application package. Thus, it’s no longer necessary to re-install the plug-in when updating Eudora, although you still may need to disable the SpamWatch and SpamHeaders plug-ins if updating Eudora re-enables them.
- Added a Cancel button to the alert that you get if Eudora is already running when you ask SpamSieve to install the Eudora plug-in, in case you don’t want to quit Eudora at that time.
- Fixes and Tweaks
- The Apple Help is now multiple linked pages, rather than a single page, so you can now use Help Viewer’s search box.
- Simplified the setup instructions in the manual, and added new sections on customization.
- Improved duplicate message detection.
- Fixed bug where e-mail addresses were not always correctly parsed out of mail headers.
- Tweaked the format of Trained entries in the log.
- Worked around OS bug that could cause SpamSieve to freeze when installing AppleScripts.
- SpamSieve is better at following aliases and more tolerant of incorrect permissions when looking for its support files.
- Updated to eSellerate Engine 3.6.1.
- Improved serial number name entry.
- Various localization fixes.
- The ? buttons in the Preferences window now open the specific help sections on Jaguar.
- Fixed longstanding unreported bug where you could launch multiple instances of SpamSieve if you were using Jaguar.
- General
- 2.2.4—February 10, 2005
- Increased the speed of SpamSieve’s message processing.
- Processing messages with Entourage is much faster. To realize the speed increase, re-install SpamSieve’s Entourage scripts and let it replace the existing ones.
- Improved accuracy through better HTML and header processing. (It is not necessary to reset the corpus.)
- Colors to indicate spamminess in Apple Mail are now enabled by default.
- Can now play sounds (and bounce the Dock icon) when mail arrives, even if SpamSieve or a mail program is frontmost.
- Added option to Entourage’s Change Settings to make all spam messages marked with category Junk instead of marking some of them with Uncertain Junk.
- Added more standard blocklist rules for non-Latin character sets.
- AppleScript errors complaining about not being able to find the SpamSieve application should be much less common now. If you do see such an error, asking SpamSieve to re-install the scripts for Apple Mail or Entourage (and letting it replace the existing scripts) should cure things.
- Improved name and serial number entry.
- The Edit Log command is no longer an alternate menu item.
- Can now load Entourage addresses when Launch Services can’t find Entourage.
- The default classifier reports better scores.
- The behavior of the default classifier (if no rules or other classifiers match, and the Bayesian classifier is disabled) may now be changed by setting the DefaultIsGood default. Normally this is YES, but you can set it to NO to make SpamSieve treat all non-whitelisted messages as spam.
- Pruning now is recorded in the log.
- Updated the Russian localization.
- Added Swedish and Vietnamese localizations.
- Expanded and improved the manual.
- The Entourage scripts no longer mark messages with multiple copies of the same category.
- Fixed bug where SpamSieve would sometimes incorrectly think that it had made a mistake (if auto-training was on and the user had asked it to reclassify a message).
- Fixed bug in the Change Settings scripts.
- No longer reports an error when trying to reset an empty initial corpus.
- Fixed crash when quitting after resetting an empty corpus.
- Fixed bug where SpamSieve would crash when reading a damaged corpus file.
- Worked around OS bug that could cause crashes when creating the Uncertain Junk category in Entourage.
- Notification dismissal now works on Tiger.
- Apple Mail’s scripts are now installed in the correct location when running on Tiger.
- 2.2.3—November 15, 2004
- Fixed bug where SpamSieve would complain of a permissions error at startup.
- 2.2.2—November 14, 2004
- Can notify with Growl when good messages arrive, and to help spot false positives without looking through the entire contents of the spam folder.
- Added Change Settings commands for Apple Mail and Entourage, which let you configure script options (spam folder name, behavior when using Train Good and Train Spam, etc.) without having to edit the scripts. The settings are stored in SpamSieve’s preferences file, so they will persist if you update or re-install the scripts.
- Fixed bug where SpamSieve would report a syntax error when processing certain messages (typically in non-ASCII character sets).
- Better accuracy due to improved header and body analysis.
- Better accuracy due to smarter auto-creation of From (name) rules.
- Auto-training now takes scores into account; the corpus is updated using messages that were harder to classify, to forestall errors.
- Better handling of spam messages that lie about their encoding.
- Entourage now uses two separate categories for spam messages, so that you can see which ones are more (or less) spammy.
- Improved accuracy when processing messages in German.
- Any Address rules now match SendTo addresses.
- Better handling of messages with “From ” lines.
- Worked around Mail performance problem where Add Good would hang if there were a lot of recipients.
- The Dock (and DragThing) good message counter no longer increases for messages received while the mail program is active.
- Added Russian localization.
- Improved the French localization.
- Better recovery from damaged Rules and History.db files.
- Added Italian-localized installation instructions.
- Improved launch time.
- Better parsing of PGP messages.
- Worked around 10.2 bug that could cause crashes when the Training Tip window was updated.
- Fixed bad interaction between auto-training and duplicates when the corpus was small.
- More tolerant of incorrect file and folder permissions.
- If Launch Services cannot find the Eudora application, the installer will now try some heuristics and prompt the user to locate Eudora, rather than giving up.
- The Apple Mail and Eudora plug-ins are better at finding and launching the SpamSieve application, and they will notify the user if they are unable to do this.
- Updated to eSellerate 3.5.9, which provides support for registration names using non-ASCII characters.
- When you type in your serial number, SpamSieve normalizes its spacing and case.
- The Add Good and Add Spam AppleScripts have been renamed Train Good and Train Spam. When installing the new scripts, SpamSieve will automatically move the old ones to the trash.
- The Entourage spam folder is now called Junk E-mail instead of Spam, since Entourage 2004 already has a so-named folder.
- 2.2.1—September 20, 2004
- Shows count of new good messages in DragThing 5.3 and later, if you install an integration script. (This script will be built into future versions of DragThing.)
- Fixed accuracy regressions from 2.1.4 and made some accuracy improvements.
- Added Italian localization.
- Auto-training will no longer add duplicate messages to the corpus, because they interfere with undo.
- You can now start a new paragraph in the crash reporter by pressing Return rather than Command-Return.
- Tries to add itself to the Launch Services database at launch, to make it easier for the scripts and plug-ins to find the SpamSieve application.
- Fixed bug where the help buttons in the Preferences window didn’t work unless the main help had previously been opened.
- Improved the French and Japanese localizations.
- The Edit Log command will now open the log using an editor, rather than Console, if BBEdit is unavailable.
- Improved accuracy statistics when using Apple Mail IMAP accounts.
- The mailbox parser is faster and more tolerant of malformed mbox files.
- No longer tries to roll over the log more than once per day.
- Fixed regression where adding to the whitelist or blocklist didn’t work if a disabled rule matched the message.
- Fixed crash that could happen when showing progress bar at launch.
- Fixed crash when scanning System 7–format sounds.
- Fixed bug where slightly spammy Apple Mail messages would be colored and recorded as spam, but not moved to the Spam mailbox.
- 2.2—August 24, 2004
- Accuracy Improvements
- SpamSieve is smarter about what text to tokenize, it extracts more information from messages, it’s better at detecting invisible text, and it can undo more spammer obfuscations.
- The Bayesian classifier can leverage the results of SpamAssassin’s heuristic tests. It also assigns better word probabilities and is better at deciding which parts of the message are important.
- Messages containing Habeas headers are now checked against the Habeas Whitelist. This protects against spam messages that include Habeas headers in order to get through filters.
- Removed the Import Seed Spam command, as it would reduce accuracy with recent versions of SpamSieve.
- General Improvements
- Auto-training is more automatic. There is now a single checkbox to enable auto-training and, if it’s on, SpamSieve will try to do the right thing when it processes new messages. That is, it will train itself using messages of the types that it needs to see more of, and it will prevent the corpus from growing unbalanced or overly large. Also, it will update the whitelist using every incoming good message, so that you can have a complete whitelist without bloating the corpus.
- The rules and corpus windows now have toolbars, and they support iTunes-style filter-searching.
- The corpus and rules are now scriptable, and SpamSieve now supports AppleScript Kit terminology.
- Assorted performance enhancements make SpamSieve faster and improve the responsiveness of its user interface.
- Added Portuguese localization.
- Blocklist and Whitelist
- Rules support more match fields: From (name), Any Recipient, Any Address, Any Character Set, and Any Attachment Name.
- The new Import Addresses… command lets you import blocklist and whitelist rules from text files (e.g. address book exports or mbox files).
- Added default blocklist rules for .pif and .scr attachments and a default whitelist rule for lists.c-command.com.
- Rules can now match the empty string, e.g. when there is a subject header, but the subject is blank. They can also match absent headers by matching against, e.g. <SpamSieve-Unknown-Subject>.
- The Text to Match field now abbreviates using an ellipsis if the text won’t all fit.
- Notification
- Can make a Griffin PowerMate flash when new good messages arrive.
- Now supports System 7–format notification sounds as well as Entourage sound sets. In addition to the Library/Sounds folders, SpamSieve will now look for sounds installed with Apple Mail, Entourage, Mailsmith, and PowerMail.
- Doesn’t play the notification sound if you are using fast user switching and SpamSieve is running in one of the background sessions.
- Notifications that require dismissal (continuous bouncing, PowerMate flashing) are no longer triggered when SpamSieve or the mail program is already frontmost. Thus, you don’t have to deactivate the mail program and then activate it again to dismiss the notification.
- Apple Mail Integration
- Sets the colors of spam messages to reflect how spammy they are, making it easier to skim the Spam mailbox for false positives.
- Protects against Web bugs by telling Mail not to load the images from messages that are classified as spam.
- The Add Good script is better at moving messages from the Spam folder back to the correct inbox, and it will mark them as unread when it does so.
- The Add Good and Add Spam now work with Mac OS X 10.3.5.
- The plug-in will look for SpamSieve in the Applications folder, even if Launch Services is confused and says it can’t find it.
- Entourage Integration
- The Exclude my addresses switch now also applies to the Entourage address book, to reduce the chances of a forged spam getting through.
- Added new scripting verb add entourage addresses. This will allow you to keep the Entourage addresses in sync by using an Entourage shutdown schedule.
- Can automatically add the recipients of the messages you send to the whitelist.
- Sanity-checks addresses that are loaded from Entourage. For instance, if both the name and the address were entered in Entourage’s address field, SpamSieve will now extract just the address, rather than taking Entourage’s word for it.
- The Add Good script now works with the Possible Spam folder and marks false positives as unread.
- Messages can have more than one category, so SpamSieve now adds and removes the Junk category from the message, rather than replacing the category. This means that marking a message as junk doesn’t wipe out other categories on the message.
- Shows a progress bar while importing Entourage addresses.
- Eudora Integration
- Removed the option to use the full Eudora junk score range; this setting is now always in effect.
- Mailsmith Integration
- Can automatically add the recipients of the messages you send to the whitelist.
- PowerMail Integration
- Can automatically add the recipients of the messages you send to the whitelist.
- Statistics and Log
- The Statistics window shows the number of blocklist and whitelist rules and the number of spam messages received per day. The date sheet has a Now button that enters the current date and time.
- The log is now stored in ~/Library/Logs/SpamSieve. The Open Log command now opens the log in Console, so that it’s easier to monitor as it changes. To get the old behavior of opening the log in a text editor, hold down Option and choose Edit Log.
- If the log file grows larger than 5 MB, SpamSieve compresses it, archives it by date, and starts a new log.
- When SpamSieve makes a mistake, the log records which classifier made the error and what the message’s score was. The log also now records parse errors and the number of messages in the corpus.
- Fixes and Tweaks
- SpamSieve can optionally show an alternate, more photo-realistic, icon in the Dock.
- There is a new mailing list for discussion of SpamSieve.
- Each tab of the Preferences window now contains a help button that will open the corresponding section of the Apple help.
- Updated to PCRE 4.5 and SQLite 2.8.15.
- Fixed bug where SpamSieve could crash when generating a message’s identifier if a system routine failed.
- Fixed bug in EDMessage that could cause crashes when decoding certain quoted-printable messages.
- Better handling of 8-bit subjects with no specified encoding.
- Worked around Panther bug that could cause crashes or drawing artifacts on the desktop by no longer trying to draw on the Dock icon when it’s hidden.
- Worked around OS bug that prevented certain notification sounds from playing.
- Fixed bug where the selection was not always preserved when editing blocklist and whitelist rules.
- The Show Corpus, Show Statistics, and Preferences… commands in the Dock menu now bring SpamSieve to the front.
- The progress window when exporting the corpus sometimes lagged a bit before closing automatically.
- Fixed bug where SpamSieve would get confused if you entered the empty string as a date.
- Accuracy Improvements
- 2.1.4—April 15, 2004
- Fixed bug where SpamSieve could crash when installing the Eudora plug-in if you were using Eudora 6.0.x.
- Fixed regression where SpamSieve couldn’t process certain messages, resulting in a script error and reduced accuracy.
- Added French localization.
- Updated AOL instructions, since AOL now supports IMAP.
- 2.1.3—April 13, 2004
- Added menu commands for installing the Apple Mail plug-in and scripts, the Eudora plug-in, and the Entourage scripts. These items are now stored inside the SpamSieve application package.
- Scripts for the other applications are now stored inside the application bundle, not at the root of the disk image. The Show Other Scripts menu command will reveal them in the Finder.
- Apple Mail and Eudora users should update their plug-ins, using the commands in the SpamSieve menu.
- Added the score script command, which returns an integer between 0 and 100 indicating how spammy the message is. 50 and higher mean spam.
- The Predicted lines in SpamSieve’s log now show the scores of the messages.
- Can now use Eudora’s full 0-to-100 junk score range if you check the appropriate box in the Advanced preferences.
- Improved parsing of messages with 8-bit transfer data.
- Faster at processing messages.
- Added support for Outlook Express 5.
- Worked around OS bug that could cause SpamSieve to come to the front each time a message was processed in Apple Mail or Eudora (usually if an X11 application was frontmost).
- Fixed bug where errors encountered while processing messages were not reported in the log.
- Worked around Cocoa problem where certain notification sounds wouldn’t play.
- Made the Purchase window easier to understand, and added a button for looking up lost serial numbers.
- Trims the text in the serial number field so people don’t accidentally paste the number in twice.
- Software updater is better at checking whether the computer can connect to the Internet.
- SpamSieve now tries to parse Eudora messages according to RFC822, even though this will sometimes fail, as many Eudora messages are not RFC822-compliant.
- Adjusted the list of headers that SpamSieve ignores.
- Added keyboard shortcuts for Apple Mail scripts.
- Improved the training tips.
- Updated to SQLite 2.8.13.
- Updated to eSellerate SDK 3.5.5.
- The Send Report button in the crash reporter is no longer a default button, so there’s no longer confusion about entering returns in the comment field.
- No longer prints fragments of spam messages to the console when it gets confused.
- Replaced the copy of the manual outside the app with a read-me.
- 2.1.2—January 26, 2004
- SpamSieve can now move Apple Mail POP messages to the Spam folder. Thus, it now fully supports Apple Mail on Jaguar and Panther.
- Honor Habeas headers is now off by default.
- Fixed regression where blocklist and whitelist rules got deselected after editing their text.
- When loading addresses from Entourage, SpamSieve now picks up addresses that are not associated with any contact (that is, they appear only in a group).
- The default date shown in the Statistics window is now the date that SpamSieve was first launched, rather than September 2002.
- The Apple Mail Add Good script is better at finding the proper inbox when moving false positives out of the Spam folder.
- The Apple Mail Mark If Spam script can mark the spam messages as read.
- The Purchase window now makes it more clear when a serial number has been accepted.
- In the Statistics window, Set… is now Set Date… and Copy is now Copy Stats.
- Fixed crash that could happen when processing messages in Japanese encodings.
- Added Japanese localization.
- 2.1.1—January 8, 2004
- Much faster at processing messages when there are many blocklist and whitelist rules. Also improved the speed of loading, deleting, and sorting rules.
- Improved accuracy tracking with the Panther version of Apple Mail; previously, SpamSieve couldn’t always tell when it was being corrected.
- Catches more spam because it knows about more spammer obfuscation tricks and also which headers it should ignore.
- Fixed bug (introduced in 2.0) where the Bayesian engine didn’t work if Mac OS X’s default language was set to Japanese.
- The SpamSieve Eudora Plug-In is better at launching the SpamSieve application if it is not already running.
- Loading Entourage addresses now adds to the addresses that were previously loaded, rather than replacing them. This makes it possible for Entourage users who have more than one Entourage identity to give SpamSieve the addresses from all their address books (by loading once for each identity). Hold down Option when clicking Load to get the old behavior of replacing the previously loaded addresses.
- The sound pop-up menu in the Preferences window now immediately notices when new sounds are installed; previously, it would only check when updating the rest of the preferences window.
- You can now add a rule without a the Blocklist or Whitelist window being frontmost. SpamSieve will ask which type of rule to add.
- Regex rules can now start with an options modifier such as (?-i).
- Copying rules to the clipboard now just copies the text to match (typically an e-mail address), not all the columns. To get all the columns, you can print to PDF.
- The Entourage Add Good script now finds localized inboxes, rather than creating a folder called Inbox.
- The Entourage Add Spam script can now remove spam messages from the server.
- The Statistics window now shows percentages instead of ratios.
- SpamSieve will now quit at launch if another copy of the application is already running.
- Re-targeted broken Habeas URL.
- Added the following menu commands: Close All Windows, Minimize All Windows, and Zoom.
- 2.1—December 9, 2003
- Added support for Apple Mail POP accounts. POP messages can be marked as junk and colored, but (due to limitations in the present version of Apple Mail) they cannot be moved to another mailbox.
- Added a Training Tip window that gives advice on how to improve SpamSieve’s accuracy, based on the current state of the corpus and preferences.
- Rules in the whitelist and blocklist are no longer limited to just matching sender addresses. They can now match a variety of message fields (To, CC, Subject, etc.), as well as the message body. In addition to exact matches, rules now support the following match styles: contains, starts with, ends with (useful for matching domains), and Perl-compatible regular expressions. You can now edit rules and add new rules manually (as opposed to automatically, as a result of training SpamSieve with a message).
- When trained with a good message from a mailing list, SpamSieve will automatically create a whitelist rule based on a mailing list header, if present.
- SpamSieve can now read in the Entourage address book and use it as a whitelist. Thus, the Entourage rule can now give SpamSieve all the messages, not just the ones that were from unknown senders. This means that SpamSieve can now accurately notify the user when non-spam messages are received. Also, the statistics it keeps will be more complete.
- Improved the accuracy of the Bayesian classifier when the corpus is unbalanced.
- Made a variety of low-level changes to improve SpamSieve’s accuracy, for instance: adjusted the list of headers that are analyzed and how words are tokenized.
- The Apple Mail Add Spam script now has an option to control whether the messages are moved to the Spam folder.
- The Entourage Add Good script now moves messages to the inbox if they’re located in the Spam folder.
- Mailsmith users can now auto-train using only spam or good messages by turning off training in Mailsmith and turning on one of the auto-train checkboxes in SpamSieve.
- Improved the importing of mbox files that do not have blank lines between the messages, such as some Eudora mailboxes. Fixed a bug where the mbox parser could crash if a message had length zero. Also, SpamSieve now shows a progress bar while counting the number of messages that will be imported.
- Improved the corpus and rule list displays. You can now enter and leave editing mode by typing Return. Type-ahead works better; for instance, if you type “g” and there are no rows that start with “g,” it will look for one that starts with “f.” When you delete a word or rule, you can cancel out of the confirmation sheet by typing Escape. To avoid the confirmation sheet entirely, you can delete using Command-Delete instead of Delete. When a word or rule is deleted, SpamSieve selects a nearby rule so that you don’t lose your place. When deleting many words at once, SpamSieve no longer shows a progress window for deletions that will not take very long.
- Entering the name and serial number to personalize SpamSieve is now more foolproof: SpamSieve strips leading and trailing whitespace, and it detects when you enter a coupon code in the serial number field. Fixed regression where SpamSieve rejected names containing non-ASCII characters. In addition, there’s a new button for quickly redeeming coupons.
- Updated to the latest eSellerate SDK so that purchasing SpamSieve from within the application is faster.
- SpamSieve now requires Mac OS X 10.2.6 or later.
- Fixed bug where dates entered in the Statistics window were sometimes parsed in GMT instead of the local time zone, thus causing the date to be off by a few hours.
- Improved the reliability and user interface of the crash reporter.
- No longer crashes when parsing certain non-RFC822-compliant Eudora messages.
- 2.0.2—October 1, 2003
- Now works with Apple Mail (IMAP and .Mac only, not POP).
- The message count in the Dock icon now resets when an e-mail client becomes active (rather than just when SpamSieve became active). You can also control the size and position of the number in the Dock icon.
- Much faster at deleting lots of rules at once.
- Replaced the message store database with custom code that’s faster and more reliable.
- Improved accuracy for HTML messages containing links.
- Importing mbox files is faster.
- Fixed bug where you couldn’t use Web registration after the demo period had expired.
- The log records which addresses matched the whitelist or blocklist.
- The log records corpus imports.
- Auto-training is faster.
- The Entourage Add Spam script can close the frontmost window if it’s spam.
- Fixed bug where the date in the Statistics window could get cut off if you changed it to use a more verbose format.
- Worked around OS bug that caused dates like “01.09.2003” to be interpreted as January 9 in German-style locales.
- Added Copy button to the Statistics window.
- Fixed problem updating certain history databases from 1.3.1.
- More resilient to minor corpus file corruption.
- Fixed crash that could happen with improperly formed multi-part messages.
- Shows the number of blocklist or whitelist rules in the title bar.
- The whitelist now contains some c-command.com addresses by default.
- Fixed crash when opening the Statistics window while adding messages.
- The Statistics window shows ratios, where applicable.
- Assorted minor performance improvements.
- The modification dates of the AppleScripts are now the actual modification dates, not the date the distribution was built.
- 2.0.1—September 17, 2003
- Replaced the database engine that was being used to store the corpus with some custom code. This should be much faster and more reliable.
- Loading and saving the rules is faster, due to a better file format.
- The rules and corpus message counts are now saved to disk during idle time rather than when quitting. This should prevent data loss in the event that SpamSieve doesn’t quit normally.
- The whitelist and blocklist are more memory-efficient.
- Plugged memory leak in EDMessage.
- Fixed crash involving certain really long header lines.
- Fixed bug where the Whitelist and Blocklist windows weren’t always up to date.
- Table views are smarter about not scrolling unnecessarily to maintain their selections.
- The Whitelist and Blocklist windows now secondary sort by sender.
- Changes to the preferences are saved to disk immediately.
- Fixed bug where tables saved their sorted columns but didn’t restore them.
- When SpamSieve gets a fatal error, it now quits like it says it will.
- 2.0—September 10, 2003
- SpamSieve now extracts a lot more information from each message. This makes it much more accurate and also makes it learn faster.
- Now integrates with Eudora 6 (Sponsored or Paid) via a plug-in. It can now process every incoming Eudora message and can be trained using the Junk and Not Junk commands in Eudora’s Message menu.
- SpamSieve now has a blocklist and a whitelist. These are automatically maintained based on the senders of messages that SpamSieve is trained with. The blocklist makes sure that all messages from known spammers are caught and speeds processing for these messages. The whitelist lets you be sure that certain messages will never be marked as spam; this was possible before, but now you don’t have to clutter your address book with addresses from online retailers, etc.
- You can now control how conservative or aggressive SpamSieve is at catching spam.
- SpamSieve can now play a sound or bounce its Dock icon after a batch of non-spam messages has arrived. This is meant to replace your e-mail client’s new mail notification, which you don’t want going off if all the new messages are spam.
- Shows the number of new good messages in the Dock icon.
- Now parses HTML so that it can better extract relevant information from HTML messages, and also handle various HTML-based tricks that spammers use to fool filters.
- New method of calculating word probabilities makes SpamSieve better at discerning which words in the message are important.
- Includes a corpus of seed spam, to jump-start spam recognition for users who do not have many saved spam messages.
- The corpus is now stored in databases rather than in a property list. This makes it launch faster and use much less memory, as the corpus doesn’t have to be all in RAM at the same time.
- The statistics file format (for History.db) has changed in order to enable performance improvements and more statistical displays in future versions.
- Handles more types of plain text obfuscations, and is much faster at undoing them.
- Added option for the address book whitelist to only use other people’s addresses, so that spam messages from your own address don’t match the whitelist.
- Can mark all messages with Habeas headers as good.
- Can mark all messages with some variant of “ADV” at the start of the subject as spam.
- Can mark all base64-encoded HTML messages as spam.
- New probability combiner increases accuracy.
- Uses stop words to speed processing and reduce false negatives.
- When filtering a message, considers the number of occurrences of the words, not just which words are present.
- Can import messages from mbox files.
- Can import the corpus from and export it to an XML property list (the same format used by 1.x).
- SpamSieve can now check for updated versions of itself.
- Added crash reporter.
- Added Dock menu containing frequently used commands.
- The entries in the log are more detailed.
- The corpus now stores the date at which each word was last accessed.
- Fixed bug where storing statistics would fail on systems that didn’t know about GMT.
- Fixed bug where SpamSieve could throw away long runs of HTML thinking they were attachments.
- Added button for opening the Mac OS X Address Book from inside SpamSieve.
- The Statistics window now has a contextual menu item for copying the displayed information.
- SpamSieve no longer wastes cycles updating the Statistics window after it’s been closed.
- The Statistics window is smarter about updating only the portions that could have changed.
- No longer shows Good Words and Spam Words stats.
- Logging has less overhead.
- Updates the history asynchronously, resulting in faster message processing.
- Checks for mistakes in a background thread.
- False negatives are now written to disk in a background thread.
- Re-arranged the Corpus window.
- Pruning the corpus now works by access date rather than by word counts. Of course, you can manually prune the old way by sorting the Corpus window by Total.
- Updated to SQLite 2.8.6 and tuned it for speed.
- Updated to PCRE 4.3.
- Updated to eSellerate 3.5, which should fix crashes some people saw after registering on 10.2.6.
- Now looks at headers of subparts of messages from Mailsmith.
- Time-consuming operations now either have a progress bar or a progress spinner.
- Better at extracting malformed e-mail addresses from headers.
- Copying rows from the Corpus window to the clipboard now uses the order of the columns in the window rather than the default column order.
- Fixed regression where the Entourage scripts no longer created the Spam folder if it didn’t exist.
- Fixed potential crash with regex replacements at the end of a string.
- The history and the corpus files can now be aliases.
- Automatically trims carriage returns and other illegal characters when you paste in your name and serial number.
- Now saves the name and serial number to disk as soon as they’re entered.
- The Spam folder in Entourage no longer has to be top-level.
- Entourage can mark good messages as unread.
- Type-selecting in table views is quicker.
- No longer nags constantly when unregistered.
- Fixed bug where it could look as though SpamSieve had hung if it started up in the background with an empty corpus.
- 1.3.1—June 18, 2003
- Added direct integration with Mailsmith 2.0 and later. Enabling SpamSieve is as easy as clicking a checkbox. You can train SpamSieve directly from Mailsmith’s Message menu. Bare Bones Software has seamlessly integrated it with Mailsmith’s powerful filtering system, and Mailsmith knows not to bounce its Dock icon after receiving a batch of messages that are all spam.
- Fixed crashing bug triggered by incorrectly encoded headers.
- Regex substitutions are faster and much more memory efficient.
- When adding spam messages to the corpus, the default is now for SpamSieve to move them to the Spam folder.
- The PowerMail Move If Spam script now changes the color of spam messages.
- The Emailer scripts now pass text and HTML attachments on to SpamSieve for analysis.
- Added instructions for using the Entourage and PowerMail address books as whitelists.
- Compacted the ED frameworks to reduce application size and memory use.
- Disabled SQLite’s file locking so that SpamSieve’s data folder can now be located on an AppleShare volume.
- Caches the Address Book to speed whitelist lookups 100 fold.
- The statistics database is faster due to an updated version of SQLite.
- Fixed bad pointer in header extractor that caused unnecessary fallbacks to the secondary parser (reducing accuracy).
- Added experimental support for moving Entourage messages on IMAP accounts to the (local) Spam folder. This can be enabled by editing the scripts with Script Editor.
- For clarity, the names of AppleScripts that ask SpamSieve to predict the category of a message now contain the word “if.”
- Added lots of minor clarifications to the documentation.
- 1.3—February 11, 2003
- More resilient to spammers’ tricks for obfuscating words.
- Can use e-mail addresses in the system Address Book as a whitelist. Messages sent from those addresses will never be marked as spam.
- Greatly reduced overall memory usage as well as launch and quit times.
- Can save false negatives to disk for later reporting to SpamSieve’s developer.
- You can edit the spam and good counts associated with a word, remove selected words from the corpus, and reset the corpus entirely.
- Type-ahead navigation in the Corpus window. Type the first few letters of a word or number to select it (and scroll to it).
- You can hide statistics from before a set date, to better see the current accuracy and spam reception rate.
- Improvements to the Corpus window: Shows all words rather than only those considered statistically significant. Re-sorting by numeric columns is twice as fast. You can copy the selected rows to the clipboard or drag them to another application. The selection is preserved when you change the sort column, you can sort in descending order, and the sorted column is remembered between launches. The Home and End keys work.
- The Prune Corpus command now tells you how many words it would remove and asks for confirmation.
- The statistics tracking is smarter about handling duplicate messages.
- The statistics have tooltips explaining what they mean, and you can copy all of the statistics to the clipboard at once.
- Improved accuracy tracking of PowerMail and Emailer messages.
- Eudora Integration: Can mark spam messages as read and/or mark them for removal from the server.
- Expanded the AppleScript dictionary, to enable better integration with mail and news clients.
- Entourage Integration: Creates Junk category if there isn’t one, and can mark spam messages as read.
- Mailsmith Integration: The adding scripts now set the appropriate message properties.
- Better parsing of messages with illegal characters in the headers.
- SpamSieve’s Info.plist file contains an LSUIElement entry. Change the 0 to a 1 to hide the application’s Dock icon. (You’ll need to change it back to access the preferences.)
- The message count display has moved from the Corpus window to the Statistics window.
- Better error message when the corpus couldn’t be saved.
- Added tooltips to preferences.
- The registration window gives better feedback when you personalize.
- Better recovery from errors in the corpus file.
- The secondary parser is better at handling DOS linebreaks.
- 1.2.2—November 20, 2002
- Fixed bug in the PowerMail Add Good script.
- Added uninstaller for Eudora users.
- Better handling of errors while adding messages to the corpus.
- Removed bloat from the Entourage Mark Spam script.
- The application icon now has an alpha channel, so it doesn’t appear with a white halo when viewed on a colored background.
- Minor changes to the manual.
- 1.2.1—November 18, 2002
- Modified Info.plist to work around a bug in Mac OS X 10.1 that could cause the Finder to crash when launching SpamSieve.
- 1.2—November 18, 2002
- Added support for Emailer 2.0v3 and Eudora (5.2 and later).
- Decodes base64 and quoted-printable text parts, thus finding words that spammers try to hide from anti-spam software.
- Decodes subjects that use different character sets (e.g. big5).
- Adds special tokens for MIME entities such as part boundaries and uninterpretable message parts.
- Keeps track of the messages added to the corpus, and can optionally prevent you from adding the same message more than once (biasing the counts). Thus, you no longer have to remember which messages you’ve already added.
- You can now “undo” adds to the corpus, e.g. if you added a message as good when you meant to add it as spam.
- Can now add messages to the corpus as they are filtered, so after the initial training you only have to add messages when SpamSieve makes a mistake.
- When filtering a message, SpamSieve can optionally check whether the message is in the corpus. If it is, SpamSieve looks up the answer rather than trying to predict. One use of this feature is that if SpamSieve makes a mistake, you can Add Spam and then Label/Move If Spam and be sure that the message will be labeled/moved.
- Keeps a log of additions to the corpus, filtering results, and errors.
- Mailsmith: If SpamSieve thinks a message is spam, it sets the deleted property of the message to true; otherwise it sets the flagged property of the message to true. Therefore, if SpamSieve has classified the message then exactly one of the properties will be true, and if it hasn’t they’ll both be false. (Normally, neither of these message properties is used by Mailsmith itself.)
- Entourage and PowerMail: If you tell SpamSieve to move spam messages to a spam folder and the spam folder doesn’t exist, the script will create the spam folder for you.
- When you add spam messages to the corpus, can optionally move them to a Spam folder.
- Added status indicators in the Dock icon (like Norton DiskLight).
- The spam probability of unknown words is now 0.4 instead of 0.2.
- The Corpus window uses less memory and sorts much faster.
- Accuracy tracking is faster and uses less memory and disk space.
- Fixed bug where accuracy tracking didn’t work for some Mailsmith messages with multiple parts.
- Improved the manual’s instructions for e-mail client integration.
- Compiled with GCC 3 for greater speed.
- Uses the latest version of the eSellerate SDK, which eliminates a crash at startup under certain circumstances.
- No longer shows the “Upgrading From 1.0” message when starting with a blank corpus.
- 1.1—September 19, 2002
- E-Mail Client Integration
- Added support for PowerMail.
- Added instructions and an AppleScript for making Mailsmith download and filter mail faster.
- Added an AppleScript for Entourage that moves spam into a Junk folder.
- Performance
- Launches about 60% faster than 1.0.
- You can now prune the corpus to remove words that are taking up memory without contributing to spam recognition. This can also dramatically decrease SpamSieve’s launch time.
- Recalculating spam probabilities is about 10% faster and uses less memory.
- Quitting is faster because SpamSieve now writes corpus changes to disk during idle time.
- Saving the corpus is slightly faster.
- Displays statistics about the number of messages filtered, SpamSieve’s accuracy, and the types of words in the corpus.
- SpamAssassin’s X-Spam-Status headers are now treated as single words. This means that if SpamAssassin is running on your mail server, SpamSieve will learn to respect (or ignore) its judgment.
- Does a better job of ignoring e-mail attachments, thus reducing corpus bloat.
- Installs the eSellerate Engine if it’s not present, thus enabling “Instant Registration” for more users.
- Asking SpamSieve to categorize a message now forces an update of all the word probabilities. Previously, the update only happened during idle time.
- Highlights the sorted column in the Corpus window. The columns themselves have shorter names. There’s a new “Total” column. Auto-resizing of the columns works better. You can now manually resize any column, and manual resizings and reorderings are saved between launches.
- Shows fatal errors as alert panels rather than just printing them on the console.
- The Corpus.plist data file is now sorted by word. This makes it easier to examine the corpus manually, and to compare it to other users’ corpora.
- E-Mail Client Integration
- 1.0—September 10, 2002
- First public release.