3.3 Setting Up Airmail
These instructions apply to versions 4 and 5 of Airmail. For older versions of Airmail, please see the Setting Up Airmail 1–3 section.
From the Airmail menu, choose Settings….
Click on the Accounts icon at the top of the window. For each IMAP, Exchange, or Gmail account in the list:
- Click on the (…) or gear icon, then the More tab.
- Make sure Message Content is checked.
- Make sure that Attachment is set to either All Attachments or New Attachments. (With earlier versions of Airmail, you should instead make sure that the Attachments box is checked.)
POP accounts do not have the Download section, so you can skip this step for them.

Click the Save button.
Click on the Advanced icon at the left of the window and make sure that Use SpamSieve is checked. (In older versions of Airmail, Advanced is at the top of the window.)

Make sure that you do not have any rules in Airmail’s Settings ‣ Rules window that process spam messages. Since Airmail applies these after SpamSieve, having other rules that catch spam messages can prevent proper training. If you want to customize SpamSieve’s filtering, it’s better to use the SpamSieve Blocklist window. (It’s OK to have Airmail rules that target the Spam mailbox rather than the inbox because then they would only apply to messages that SpamSieve either already saw or wasn’t going to see.)
Now it is time to train SpamSieve:
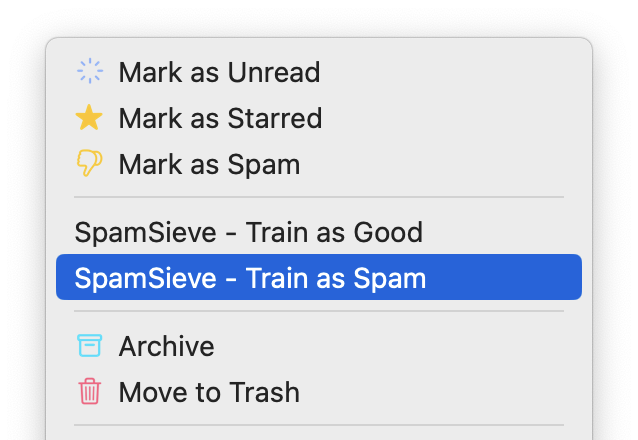
To train SpamSieve with spam messages, select the messages, Control-click, and choose SpamSieve - Train as Spam from the contextual menu. (Do not use the Mark as Spam command.)
You can also choose Messages ‣ Mark as Reminder ‣ Spam Sieve - Train as Bad or press the Option-Shift-Command-B keyboard shortcut. (The keyboard shortcut can be customized in System Settings.)
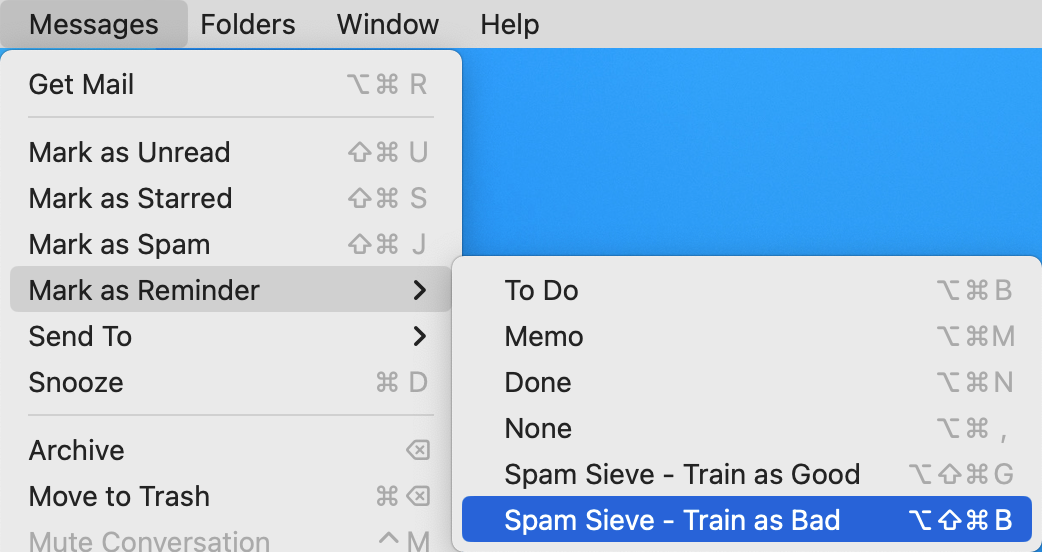
To train SpamSieve with good messages, select the messages, Control-click, and choose SpamSieve - Train as Good from the contextual menu. (Do not use the Mark as Not Spam command.) You can also choose Messages ‣ Mark as Reminder ‣ Spam Sieve - Train as Good or press the Option-Shift-Command-G keyboard shortcut.
The Do an Initial Training section explains which messages (and how many of them) you should train.
On macOS 10.14 or later, the first time you try to train a message macOS will ask whether Airmail can control SpamSieve, and you should click OK.
SpamSieve will process new mail automatically. Messages that it thinks are spam will be moved to the Junk or Spam folder. Airmail will automatically launch SpamSieve when there are new messages that need to be filtered or when you train messages as spam or as good.
If you need to troubleshoot SpamSieve and Airmail, see the Checking the Airmail Setup section.