8.6 Setting Up Outlook 2011
These instructions apply to Outlook 2011 (14.x), from Microsoft Office 2011. If you are using Outlook 365 (also known as Outlook 2016 and 2019, versions 15.x and 16.x), please see the Setting Up Outlook section. If you are using Microsoft Entourage, please see the Setting Up Entourage section.
Go to Outlook’s Tools menu and choose Junk E-mail Protection…. Turn off Outlook’s junk filter by clicking None and then OK.
Switch to SpamSieve by clicking on its icon in the Dock. Go to the SpamSieve menu and choose Preferences…. Make sure that Use Outlook/Entourage contacts is checked and click the Load Contacts button.
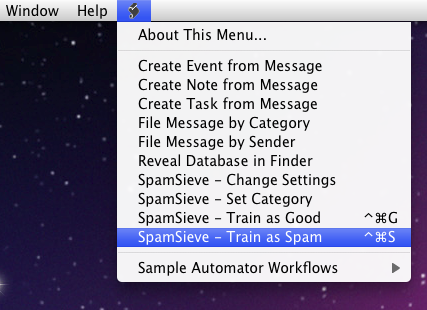
Click the Install Scripts button. After you quit and re-launch Outlook, you should see four SpamSieve items in Outlook’s Scripts menu:
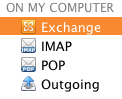
Choose Rules… from Outlook’s Tools menu. Click on the source list item under On My Computer corresponding to the type of account you that have (e.g. POP, IMAP, or Exchange). Ignore the Exchange Server section of the window, if any.
If you have more than one kind of account, you will need to repeat Steps 4–6 for each account type.
If you had previously used SpamSieve with Microsoft Entourage, delete any SpamSieve rules that Outlook brought over from your Entourage setup.
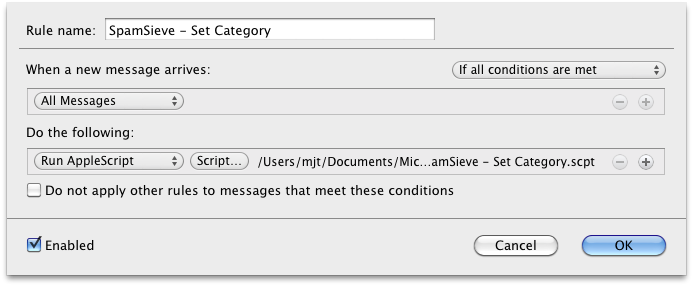
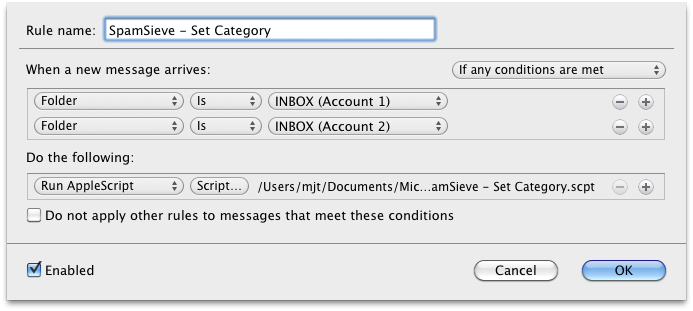
Click the + button. Change the name of the rule to SpamSieve - Set Category.
For a POP account:
- Under When a new message arrives it should say All Messages.
For an IMAP or Exchange account:
- Under When a new message arrives it should say Folder Is INBOX (<Account Name>).
- When you create a new IMAP rule, the pop-up menu at the left will automatically say Folder; when you create new Exchange rule, the pop-up menu will say From and you will have to change it to Folder.
- Next, you need to choose the inbox from the pop-up menu at the right. You may have to choose Choose Folder… and type “in” to be able to select the inbox.
- Click the + button to add an additional rule condition for each IMAP/Exchange account that you have. Change the pop-up menus to say Folder Is INBOX (<Account Name>) as before.
- Click on If all conditions are met and change it to If any conditions are met.
Under Do the following, click on the - button to the right of Change status and Not Junk E-mail to delete the Change status action.

Click on the pop-up menu that says Set Category and choose Run AppleScript.

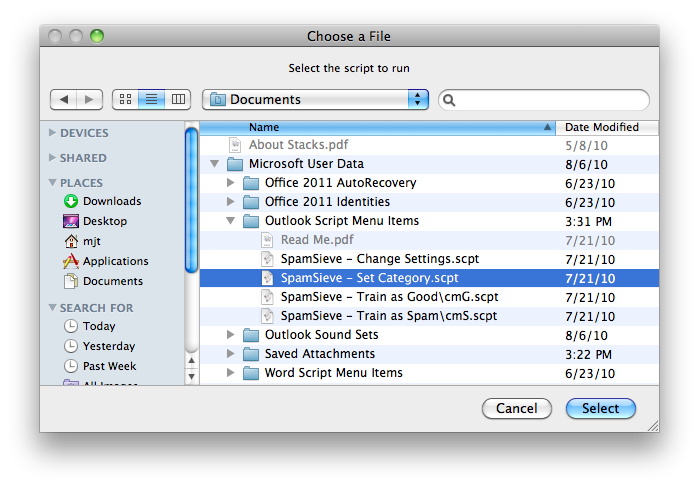
Then click the Script… button and Select the SpamSieve - Set Category.scpt file. This file is stored in the Outlook Script Menu Items folder (which is probably inside the Microsoft User Data folder inside your Documents folder):
Make sure that Do not apply other rules… is unchecked. For a POP account, the rule should now look like this:
For an IMAP or Exchange account, the rule should now look like this:
Click OK to close the sheet.
Drag the SpamSieve - Set Category rule to the top of the list.
In the Rules window, as before, repeat the following steps for each type of account that you have (e.g. POP, IMAP, or Exchange) under “On My Computer”.
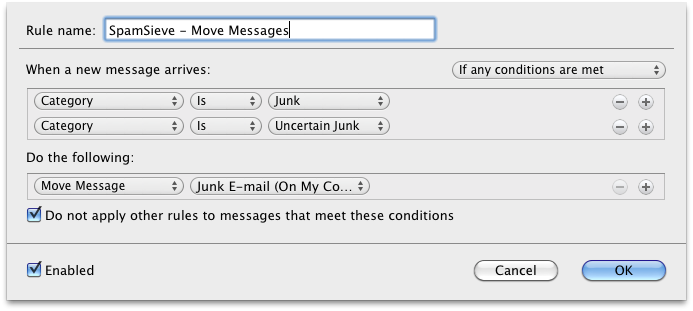
Click the + button. Change the name of the rule to SpamSieve - Move Messages.
Under When a new message arrives, click on the pop-up menu and change it to say Category. Click on the pop-up menu for None and change it to Junk. The condition should now say Category Is Junk.
Click the + button to the right of Junk to make a new condition.

Click on From for the new condition and change it to say Category. Click on the pop-up menu for None and change it to Uncertain Junk. The condition should now say Category Is Uncertain Junk.
Click on If all conditions are met and change it to If any conditions are met.
Under Do the following, click on the - button to the right of Not Junk E-mail to delete the Change status action.
Click on the pop-up menu that says Set Category and choose Move Message.
Change the menu at the right from None to Junk E-mail. You may have to choose Choose Folder… and type “Junk” to be able to select the Junk E-mail folder. The rule should now look like:
Click OK to close the sheet.
Drag the SpamSieve - Move Messages rule so that it is just below the SpamSieve - Set Category rule(s) (and above your other rules).
Now proceed to the Do an Initial Training section.
- To train SpamSieve with spam messages, select one or more of them and then choose SpamSieve - Train as Spam from Outlook’s Scripts menu.
- To train SpamSieve with good messages, select one or more of them and then choose SpamSieve - Train as Good from Outlook’s Scripts menu.
The keyboard shortcuts for these commands are Command-Control-S and Command-Control-G.
On macOS 10.14 or later, the first time you try to train a message macOS will ask for permission to control Outlook and SpamSieve, and you should click OK.
SpamSieve will process new mail automatically. If you ever need to manually ask it to sift through a mix of spam and good messages, select the messages and choose SpamSieve - Set Category from Outlook’s script menu. Then choose Rules ‣ Apply All from the Message menu.
The above is all you need to know about using SpamSieve with Outlook. The Outlook Customization section explains some more advanced setup options.
If you need to troubleshoot SpamSieve and Outlook, see the Checking the Outlook 2011 Setup section.